Quick Start Guide
Page 5
... Cleaning 31 Aligning the Print Head 33 Replacing an Ink Tank 43 Keeping the Best Printing Results 49 Cleaning Your Printer 50 Troubleshooting 57 Cannot Install the Printer Driver 58 Cannot Connect to Computer Properly.........60 Print Results Not Satisfactory 61 Printer Does Not Start 64 Printer Moves But Ink Is...
... Cleaning 31 Aligning the Print Head 33 Replacing an Ink Tank 43 Keeping the Best Printing Results 49 Cleaning Your Printer 50 Troubleshooting 57 Cannot Install the Printer Driver 58 Cannot Connect to Computer Properly.........60 Print Results Not Satisfactory 61 Printer Does Not Start 64 Printer Moves But Ink Is...
Quick Start Guide
Page 8
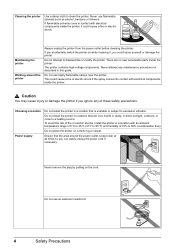
... this guide. If flammable solvents come in a location with electrical components inside the printer. To avoid the risk of fire or electric shocks, install the printer in contact with an ambient temperature range of 5°C to 35°C (41°F to 90% (condensation free). Maintaining the...the printer Always unplug the printer from the power outlet before cleaning the printer. This could injure yourself or damage the printer. Do not install the printer in direct sunlight, outdoors, or close to excessive vibration. Do not use an extension lead/cord. 4 Safety Precautions Do ...
... this guide. If flammable solvents come in a location with electrical components inside the printer. To avoid the risk of fire or electric shocks, install the printer in contact with an ambient temperature range of 5°C to 35°C (41°F to 90% (condensation free). Maintaining the...the printer Always unplug the printer from the power outlet before cleaning the printer. This could injure yourself or damage the printer. Do not install the printer in direct sunlight, outdoors, or close to excessive vibration. Do not use an extension lead/cord. 4 Safety Precautions Do ...

Quick Start Guide
Page 11
...allows you to supply power from a Bluetooth device. The kit contains a battery pack (A) and a battery attachment (B). For further information on the installation or the Bluetooth settings, refer to the printer. To charge the battery, load the battery pack in location where a power outlet is unavailable. ..., refer to the kit's instruction manual. (A) (B) „ Power Cord for Universal AC Adapter „ Canon Automobile Power Unit PU-200U This accessory allows you to use the Canon printer in the battery attachment, and attach it to the printer, and then connect the AC adapter to the...
...allows you to supply power from a Bluetooth device. The kit contains a battery pack (A) and a battery attachment (B). For further information on the installation or the Bluetooth settings, refer to the printer. To charge the battery, load the battery pack in location where a power outlet is unavailable. ..., refer to the kit's instruction manual. (A) (B) „ Power Cord for Universal AC Adapter „ Canon Automobile Power Unit PU-200U This accessory allows you to use the Canon printer in the battery attachment, and attach it to the printer, and then connect the AC adapter to the...
Quick Start Guide
Page 12
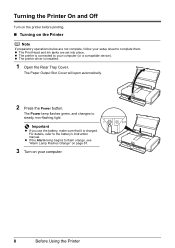
z The printer is connected to the battery's instruction manual. Important z If you use the battery, make sure that it is installed. 1 Open the Rear Tray Cover. For details, refer to your computer (or a compatible device). z The printer driver is charged. z If the Alarm lamp begins to ...
z The printer is connected to the battery's instruction manual. Important z If you use the battery, make sure that it is installed. 1 Open the Rear Tray Cover. For details, refer to your computer (or a compatible device). z The printer driver is charged. z If the Alarm lamp begins to ...
Quick Start Guide
Page 22
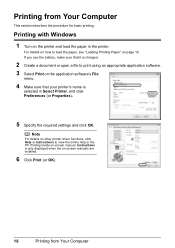
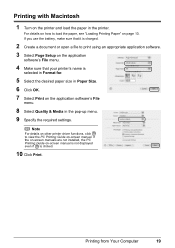
.... 4 Make sure that it is charged. 2 Create a document or open a file to view the online help or the PC Printing Guide on -screen manuals are installed. 6 Click Print (or OK). 18 Printing from Your Computer This section describes the procedure for basic printing. Instructions is selected in the printer. If you...
.... 4 Make sure that it is charged. 2 Create a document or open a file to view the online help or the PC Printing Guide on -screen manuals are installed. 6 Click Print (or OK). 18 Printing from Your Computer This section describes the procedure for basic printing. Instructions is selected in the printer. If you...
Quick Start Guide
Page 23
... details on other printer driver functions, click to load the paper, see "Loading Printing Paper" on -screen manual. If the on-screen manuals are not installed, the PC Printing Guide on-screen manual is not displayed even if is selected in Format for. 5 Select the desired paper size in Paper Size...
... details on other printer driver functions, click to load the paper, see "Loading Printing Paper" on -screen manual. If the on-screen manuals are not installed, the PC Printing Guide on-screen manual is not displayed even if is selected in Format for. 5 Select the desired paper size in Paper Size...
Quick Start Guide
Page 37
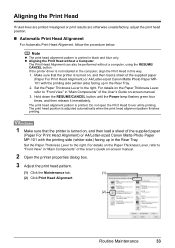
... Computer The Print Head Alignment can also be performed without a computer, using the RESUME/ CANCEL button. The print head alignment pattern is not installed in the computer, align the Print Head in the Rear Tray. 2. The print head position is adjusted automatically when the print head alignment pattern... Components" of the User's Guide on , and then load a sheet of the supplied paper (Paper For Print Head Alignment) or A4/Letter-sized Canon Matte Photo Paper MP101 with the printing side (whiter side) facing up in this way. 1. Note z The print head alignment pattern is turned on...
... Computer The Print Head Alignment can also be performed without a computer, using the RESUME/ CANCEL button. The print head alignment pattern is not installed in the computer, align the Print Head in the Rear Tray. 2. The print head position is adjusted automatically when the print head alignment pattern... Components" of the User's Guide on , and then load a sheet of the supplied paper (Paper For Print Head Alignment) or A4/Letter-sized Canon Matte Photo Paper MP101 with the printing side (whiter side) facing up in this way. 1. Note z The print head alignment pattern is turned on...
Quick Start Guide
Page 48
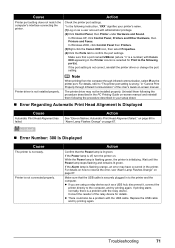
...the displayed message and take the appropriate action. Ink is your printer's name) which appears on the Maintenance sheet. Refer to "Opening the Canon IJ Printer Utility (Macintosh)" in the User's Guide on page 67, and take the appropriate action. Note Message may be displayed during ...printing. * When infrared communication is performed with the computer, the printer status monitor screen is not installed properly. / Ink may have run out." Follow the procedure below to open each ink tank on page 67 or "Seventeen Flashes: Ink...
...the displayed message and take the appropriate action. Ink is your printer's name) which appears on the Maintenance sheet. Refer to "Opening the Canon IJ Printer Utility (Macintosh)" in the User's Guide on page 67, and take the appropriate action. Note Message may be displayed during ...printing. * When infrared communication is performed with the computer, the printer status monitor screen is not installed properly. / Ink may have run out." Follow the procedure below to open each ink tank on page 67 or "Seventeen Flashes: Ink...
Quick Start Guide
Page 49
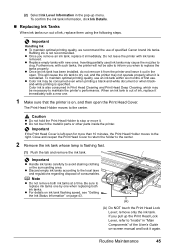
... both ink tanks at a time. Important z Handle ink tanks carefully to avoid staining clothing or the surrounding area. z Once an ink tank has been installed, do not remove it from the printer and leave it . Important If the Print Head Cover is reinstalled. To maintain optimal printing quality, use an... ink tank within six months of first use of specified Canon brand ink tanks. Caution z Do not hold the Print Head Holder to stop or move it out in the open the Print Head Cover. ...
... both ink tanks at a time. Important z Handle ink tanks carefully to avoid staining clothing or the surrounding area. z Once an ink tank has been installed, do not remove it from the printer and leave it . Important If the Print Head Cover is reinstalled. To maintain optimal printing quality, use an... ink tank within six months of first use of specified Canon brand ink tanks. Caution z Do not hold the Print Head Holder to stop or move it out in the open the Print Head Cover. ...
Quick Start Guide
Page 51
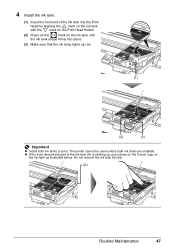
... ink tank. (1) Insert the front end of the ink tank (A) is sticking up red. (1) (2) (3) Important z Install both ink tanks are installed. z If the front (innermost) part of the ink tank into the Print Head by aligning the mark on the ink tank with the mark on ... mark on the ink tank until the ink tank snaps firmly into place. (3) Make sure that the ink lamp lights up , push down on the Canon logo on the ink tank as illustrated below. Do not remove the ink tank forcibly. (A) Routine Maintenance 47
... ink tank. (1) Insert the front end of the ink tank (A) is sticking up red. (1) (2) (3) Important z Install both ink tanks are installed. z If the front (innermost) part of the ink tank into the Print Head by aligning the mark on the ink tank with the mark on ... mark on the ink tank until the ink tank snaps firmly into place. (3) Make sure that the ink lamp lights up , push down on the Canon logo on the ink tank as illustrated below. Do not remove the ink tank forcibly. (A) Routine Maintenance 47
Quick Start Guide
Page 53
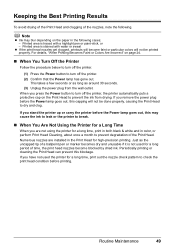
... carry the printer before the Power lamp goes out, this blockage. Just as around 30 seconds. (3) Unplug the power plug from drying. If you are installed in the following . Routine Maintenance 49 Keeping the Best Printing Results To avoid drying of the Print Head and clogging of the nozzles, note the...
... carry the printer before the Power lamp goes out, this blockage. Just as around 30 seconds. (3) Unplug the power plug from drying. If you are installed in the following . Routine Maintenance 49 Keeping the Best Printing Results To avoid drying of the Print Head and clogging of the nozzles, note the...

Quick Start Guide
Page 61
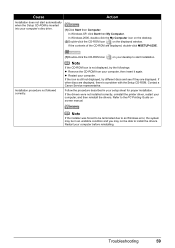
Troubleshooting 57 z "Cannot Install the Printer Driver" on page 58 z "Cannot Connect to Computer Properly" on page 60 z "Print Results Not Satisfactory" on page 61 z "Printer Does Not Start" ...
Troubleshooting 57 z "Cannot Install the Printer Driver" on page 58 z "Cannot Connect to Computer Properly" on page 60 z "Print Results Not Satisfactory" on page 61 z "Printer Does Not Start" ...
Quick Start Guide
Page 62
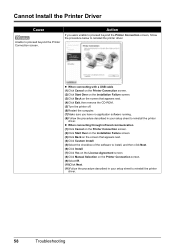
... to reinstall the printer driver. z When connecting with a USB cable (1)Click Cancel on the Printer Connection screen. (2)Click Start Over on the Installation Failure screen. (3)Click Back on the Printer Connection screen. (9)Select IR. (10)Click Next. (11)Follow the procedure described in your setup .... (5)Turn the printer off. (6)Restart the computer. (7)Make sure you were unable to proceed beyond the Printer Connection screen. Cannot Install the Printer Driver Cause Unable to proceed beyond the Printer Connection screen, follow the procedure below to reinstall the printer driver.
... to reinstall the printer driver. z When connecting with a USB cable (1)Click Cancel on the Printer Connection screen. (2)Click Start Over on the Installation Failure screen. (3)Click Back on the Printer Connection screen. (9)Select IR. (10)Click Next. (11)Follow the procedure described in your setup .... (5)Turn the printer off. (6)Restart the computer. (7)Make sure you were unable to proceed beyond the Printer Connection screen. Cannot Install the Printer Driver Cause Unable to proceed beyond the Printer Connection screen, follow the procedure below to reinstall the printer driver.
Quick Start Guide
Page 63
...-ROM. Restart your computer. z Restart your computer before reinstalling. Contact a Canon Service representative. If the drivers were not installed correctly, uninstall the printer driver, restart your desktop to install the drivers. Installation procedure not followed correctly. (1)Double-click the CD-ROM icon on the displayed...insert it again. Follow the procedure described in an unstable condition and you may be in your setup sheet for proper installation. Refer to the PC Printing Guide onscreen manual. In Windows 2000, double-click the My Computer icon on the desktop....
...-ROM. Restart your computer. z Restart your computer before reinstalling. Contact a Canon Service representative. If the drivers were not installed correctly, uninstall the printer driver, restart your desktop to install the drivers. Installation procedure not followed correctly. (1)Double-click the CD-ROM icon on the displayed...insert it again. Follow the procedure described in an unstable condition and you may be in your setup sheet for proper installation. Refer to the PC Printing Guide onscreen manual. In Windows 2000, double-click the My Computer icon on the desktop....

Quick Start Guide
Page 64
z The USB port on your computer. Speed connection. Obtain and install the latest update for your computer supports USB 2.0 Hi-Speed connection. Action If your computer supports USB 2.0 Hi-Speed connection. z The operating system of your .... Important For details on USB 2.0 Hi-Speed of your system environment, contact the manufacturer of the USB 2.0 Hi-Speed driver compatible with your hardware and install it on page 60. 60 Troubleshooting Action Your system environment is not fully compatible with USB 2.0 Hi-Speed. In this case, the printer operates properly...
z The USB port on your computer. Speed connection. Obtain and install the latest update for your computer supports USB 2.0 Hi-Speed connection. Action If your computer supports USB 2.0 Hi-Speed connection. z The operating system of your .... Important For details on USB 2.0 Hi-Speed of your system environment, contact the manufacturer of the USB 2.0 Hi-Speed driver compatible with your hardware and install it on page 60. 60 Troubleshooting Action Your system environment is not fully compatible with USB 2.0 Hi-Speed. In this case, the printer operates properly...

Quick Start Guide
Page 66
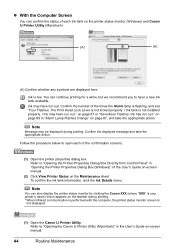
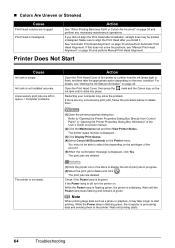
...to the instruction manual supplied with high color saturation such as photographs or images in deep color, we recommend using Photo Paper Pro or other Canon specialty paper. See "Automatic Print Head Alignment" on page 53. Inside of the printer is empty. Perform the Bottom Plate Cleaning to ...the Inside of paper loaded in the User's Guide on page 36 and perform Manual Print Head Alignment. For details, see if the paper you install it. When printing data with the paper for Borderless Printing. Printing on is not too thick or curled. Print Head is misaligned. „...
...to the instruction manual supplied with high color saturation such as photographs or images in deep color, we recommend using Photo Paper Pro or other Canon specialty paper. See "Automatic Print Head Alignment" on page 53. Inside of the printer is empty. Perform the Bottom Plate Cleaning to ...the Inside of paper loaded in the User's Guide on page 36 and perform Manual Print Head Alignment. For details, see if the paper you install it. When printing data with the paper for Borderless Printing. Printing on is not too thick or curled. Print Head is misaligned. „...
Quick Start Guide
Page 68
.... You may be able to delete and click . If the Power lamp is displayed, click Yes. If you install it. Make sure to the printer. mark and the Canon logo on . The print jobs are clogged. While the Power lamp is flashing green, the computer is empty. ...or graphics, it clicks into place. The print jobs are deleted. (1)Click the printer icon in queue. / Computer problems. The printer is not installed securely. If this depending on -screen manual. (2)Click the Maintenance tab and then View Printer Status. Unnecessary print jobs are any necessary maintenance operations....
.... You may be able to delete and click . If the Power lamp is displayed, click Yes. If you install it. Make sure to the printer. mark and the Canon logo on . The print jobs are clogged. While the Power lamp is flashing green, the computer is empty. ...or graphics, it clicks into place. The print jobs are deleted. (1)Click the printer icon in queue. / Computer problems. The printer is not installed securely. If this depending on -screen manual. (2)Click the Maintenance tab and then View Printer Status. Unnecessary print jobs are any necessary maintenance operations....
Quick Start Guide
Page 71
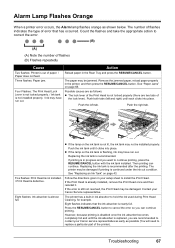
... recommended after the printing. Push the ink tank until it . Then printing can continue printing. Contact your Canon service representative as early as possible (You will need to install the Print Head. Eight flashes indicates that has occurred. Alarm Lamp Flashes Orange When a printer error occurs,...run out. Push the right tab. If the Print Head is out of flashes (B) Flashes repeatedly Cause Action Two flashes: Printer is already installed, remove the Print Head once and then reinstall it clicks into place. Press the RESUME/CANCEL button to correct the error. (B) (A) (A)...
... recommended after the printing. Push the ink tank until it . Then printing can continue printing. Contact your Canon service representative as early as possible (You will need to install the Print Head. Eight flashes indicates that has occurred. Alarm Lamp Flashes Orange When a printer error occurs,...run out. Push the right tab. If the Print Head is out of flashes (B) Flashes repeatedly Cause Action Two flashes: Printer is already installed, remove the Print Head once and then reinstall it clicks into place. Press the RESUME/CANCEL button to correct the error. (B) (A) (A)...
Quick Start Guide
Page 75
... computer's interface connecting the printer. in the PC Printing Guide on page 67. For details on . z There could also be installed properly. Uninstall them following the procedure described in "Cannot Print Properly through infrared communication, select IR as the printer port. If the..., Printers and Other Hardware, then Printers and Faxes. Troubleshooting 71 In Windows 2000, click Control Panel then Printers. (3)Right-click the Canon XXX icon, then select Properties. (4)Click the Ports tab to resolve the error, see "Alarm Lamp Flashes Orange" on -screen manual...
... computer's interface connecting the printer. in the PC Printing Guide on page 67. For details on . z There could also be installed properly. Uninstall them following the procedure described in "Cannot Print Properly through infrared communication, select IR as the printer port. If the..., Printers and Other Hardware, then Printers and Faxes. Troubleshooting 71 In Windows 2000, click Control Panel then Printers. (3)Right-click the Canon XXX icon, then select Properties. (4)Click the Ports tab to resolve the error, see "Alarm Lamp Flashes Orange" on -screen manual...
Quick Start Guide
Page 76
... Edit Printer List from Printer. (2)Check that your printer's name is displayed in the list of printers and that the driver for your printer is installed to your setup sheet to both Direct Print Port and Bluetooth Unit Connector. Action Select your printer's name in your computer. (1)Select Print & Fax Preferences...
... Edit Printer List from Printer. (2)Check that your printer's name is displayed in the list of printers and that the driver for your printer is installed to your setup sheet to both Direct Print Port and Bluetooth Unit Connector. Action Select your printer's name in your computer. (1)Select Print & Fax Preferences...


