Quick Start Guide
Page 5
... a Compliant Device 20 About PictBridge Print Settings 22 Routine Maintenance 24 When Printing Becomes Faint or Colors Are Incorrect 24 Printing the Nozzle Check Pattern 25 Examining the Nozzle Check Pattern ...........27 Print Head Cleaning 28 Print Head Deep Cleaning 31 Aligning the Print Head 33 Replacing an Ink Tank 43 Keeping the Best Printing Results 49 Cleaning Your Printer 50 Troubleshooting 57...
... a Compliant Device 20 About PictBridge Print Settings 22 Routine Maintenance 24 When Printing Becomes Faint or Colors Are Incorrect 24 Printing the Nozzle Check Pattern 25 Examining the Nozzle Check Pattern ...........27 Print Head Cleaning 28 Print Head Deep Cleaning 31 Aligning the Print Head 33 Replacing an Ink Tank 43 Keeping the Best Printing Results 49 Cleaning Your Printer 50 Troubleshooting 57...
Quick Start Guide
Page 28
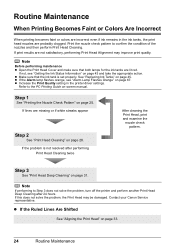
... if white streaks appear Step 2 See "Print Head Cleaning" on page 43 and take the appropriate action. Refer to confirm the condition of the nozzles and then perform Print Head Cleaning. Step 3 See "Print Head Deep Cleaning" on page 45. If this does not solve the problem, the Print Head may improve print quality. Contact your Canon Service representative. See "Replacing Ink Tanks...
... if white streaks appear Step 2 See "Print Head Cleaning" on page 43 and take the appropriate action. Refer to confirm the condition of the nozzles and then perform Print Head Cleaning. Step 3 See "Print Head Deep Cleaning" on page 45. If this does not solve the problem, the Print Head may improve print quality. Contact your Canon Service representative. See "Replacing Ink Tanks...
Quick Start Guide
Page 31
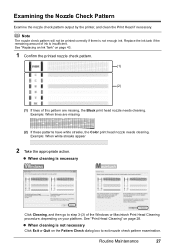
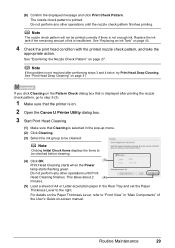
Examining the Nozzle Check Pattern Examine the nozzle check pattern output by the printer, and clean the Print Head if necessary. See "Print Head Cleaning" on your platform. z When cleaning is insufficient. Routine Maintenance 27 See "Replacing an Ink Tank" on page 43. 1 Confirm the printed nozzle check pattern. (1) (2) (1) If lines of ink is not necessary Click Exit or...
Examining the Nozzle Check Pattern Examine the nozzle check pattern output by the printer, and clean the Print Head if necessary. See "Print Head Cleaning" on your platform. z When cleaning is insufficient. Routine Maintenance 27 See "Replacing an Ink Tank" on page 43. 1 Confirm the printed nozzle check pattern. (1) (2) (1) If lines of ink is not necessary Click Exit or...
Quick Start Guide
Page 32
... the Pattern Check dialog box that is on . 2. For details on the Paper Thickness Lever, refer to be cleaned. Print Head Cleaning starts when the Power (4) lamp starts flashing green. Print Head Cleaning Clean the Print Head if lines are missing or if white streaks appear in "Main Components" of A4 or Letter-sized plain paper in the ink absorber...
... the Pattern Check dialog box that is on . 2. For details on the Paper Thickness Lever, refer to be cleaned. Print Head Cleaning starts when the Power (4) lamp starts flashing green. Print Head Cleaning Clean the Print Head if lines are missing or if white streaks appear in "Main Components" of A4 or Letter-sized plain paper in the ink absorber...
Quick Start Guide
Page 33
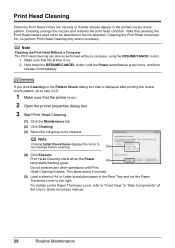
... after performing steps 3 and 4 twice, try Print Head Deep Cleaning. See "Examining the Nozzle Check Pattern" on page 31. Do not perform any other operations until Print Head Cleaning finishes. The nozzle check pattern is not enough ink...printed correctly if there is printed. See "Replacing an Ink Tank" on . 2 Open the Canon IJ Printer Utility dialog box. 3 Start Print Head Cleaning. (1) Make sure that is insufficient. Note If the problem is not resolved after printing the nozzle check pattern, go to be checked before cleaning. (4) Click OK. (3) Print Head Cleaning...
... after performing steps 3 and 4 twice, try Print Head Deep Cleaning. See "Examining the Nozzle Check Pattern" on page 31. Do not perform any other operations until Print Head Cleaning finishes. The nozzle check pattern is not enough ink...printed correctly if there is printed. See "Replacing an Ink Tank" on . 2 Open the Canon IJ Printer Utility dialog box. 3 Start Print Head Cleaning. (1) Make sure that is insufficient. Note If the problem is not resolved after printing the nozzle check pattern, go to be checked before cleaning. (4) Click OK. (3) Print Head Cleaning...

Quick Start Guide
Page 34
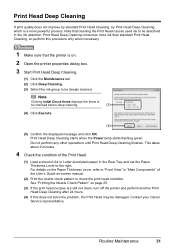
... the Nozzle Check Pattern" on page 43. 4 Check the print head condition with the printed nozzle check pattern, and take the appropriate action. See "Replacing an Ink Tank" on page 27. Do not perform any other operations until the nozzle check pattern finishes printing. See "Print Head Deep Cleaning" on page 31. 30 Routine Maintenance (6) Confirm the...
... the Nozzle Check Pattern" on page 43. 4 Check the print head condition with the printed nozzle check pattern, and take the appropriate action. See "Replacing an Ink Tank" on page 27. Do not perform any other operations until the nozzle check pattern finishes printing. See "Print Head Deep Cleaning" on page 31. 30 Routine Maintenance (6) Confirm the...
Quick Start Guide
Page 35
Do not perform any other operations until Print Head Deep Cleaning finishes. Contact your Canon Service representative. Print Head Deep Cleaning If print quality does not improve by standard Print Head Cleaning, try Print Head Deep Cleaning, which is on the Paper Thickness Lever, refer to "Front View" in "Main Components" of A4 or Letter-sized plain paper in the ink absorber. ...
Do not perform any other operations until Print Head Deep Cleaning finishes. Contact your Canon Service representative. Print Head Deep Cleaning If print quality does not improve by standard Print Head Cleaning, try Print Head Deep Cleaning, which is on the Paper Thickness Lever, refer to "Front View" in "Main Components" of A4 or Letter-sized plain paper in the ink absorber. ...
Quick Start Guide
Page 36
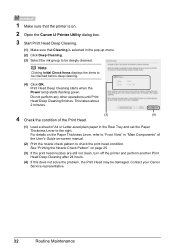
... perform another Print Head Deep Cleaning after 24 hours. (4) If this does not solve the problem, the Print Head may be damaged. See "Printing the Nozzle Check Pattern" on -screen manual. (2) Print the nozzle check pattern to be deeply cleaned. 1 Make sure that the printer is on. 2 Open the Canon IJ Printer Utility dialog box. 3 Start Print Head Deep Cleaning. (1) Make sure...
... perform another Print Head Deep Cleaning after 24 hours. (4) If this does not solve the problem, the Print Head may be damaged. See "Printing the Nozzle Check Pattern" on -screen manual. (2) Print the nozzle check pattern to be deeply cleaned. 1 Make sure that the printer is on. 2 Open the Canon IJ Printer Utility dialog box. 3 Start Print Head Deep Cleaning. (1) Make sure...
Quick Start Guide
Page 49
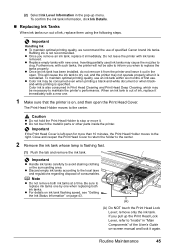
...not operate properly when it again. Caution z Do not hold the Print Head Holder to the right. Be sure to "Inside" in Print Head Cleaning and Print Head Deep Cleaning, which may be consumed even when printing a black-and-white document or when blackand-white printing is not recommended. z For details on ink tank flashing speed,...132; Replacing Ink Tanks When ink tanks run out of consumables. When an ink tank is also consumed in "Main Components" of specified Canon brand ink tanks. Do not leave the printer with new ones. z Color ink may be able to inform you remove an ink tank,...
...not operate properly when it again. Caution z Do not hold the Print Head Holder to the right. Be sure to "Inside" in Print Head Cleaning and Print Head Deep Cleaning, which may be consumed even when printing a black-and-white document or when blackand-white printing is not recommended. z For details on ink tank flashing speed,...132; Replacing Ink Tanks When ink tanks run out of consumables. When an ink tank is also consumed in "Main Components" of specified Canon brand ink tanks. Do not leave the printer with new ones. z Color ink may be able to inform you remove an ink tank,...
Quick Start Guide
Page 52
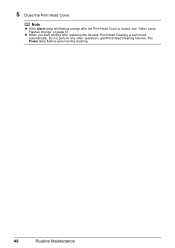
5 Close the Print Head Cover. The Power lamp flashes green during cleaning. 48 Routine Maintenance Do not perform any other operations until Print Head Cleaning finishes. Note z If the Alarm lamp still flashes orange after replacing the ink tank, Print Head Cleaning is closed, see "Alarm Lamp Flashes Orange" on page 67. z When you start printing after the Print Head Cover is performed automatically.
5 Close the Print Head Cover. The Power lamp flashes green during cleaning. 48 Routine Maintenance Do not perform any other operations until Print Head Cleaning finishes. Note z If the Alarm lamp still flashes orange after replacing the ink tank, Print Head Cleaning is closed, see "Alarm Lamp Flashes Orange" on page 67. z When you start printing after the Print Head Cover is performed automatically.
Quick Start Guide
Page 53
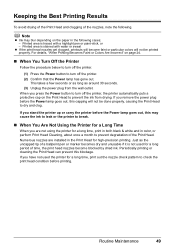
...of a ballpoint pen or marker becomes dry and unusable if it is not used the printer for a long time, print in both black & white and in color, or perform Print Head Cleaning, about once a month to prevent the ink from the wall outlet. If you remove the power plug before the...goes out, this capping will not be done properly, causing the Print Head to dry and clog. If you have not used for high-precision printing. If you stand the printer up or carry the printer before printing. Periodically printing or cleaning the Print Head can prevent this may blur depending on page 24. „ ...
...of a ballpoint pen or marker becomes dry and unusable if it is not used the printer for a long time, print in both black & white and in color, or perform Print Head Cleaning, about once a month to prevent the ink from the wall outlet. If you remove the power plug before the...goes out, this capping will not be done properly, causing the Print Head to dry and clog. If you have not used for high-precision printing. If you stand the printer up or carry the printer before printing. Periodically printing or cleaning the Print Head can prevent this may blur depending on page 24. „ ...
Quick Start Guide
Page 54
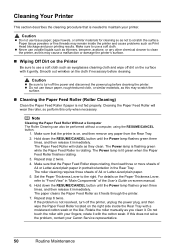
...Roller located on -screen manual. 6. Set the Paper Thickness Lever to clean the printer, as this may remain inside the Rear Tray with it immediately. The paper cleans the Paper Feed Roller as Print Head blockage and poor printing results. If the problem is lit green when the Paper Feed Roller...gently. The Paper Feed Roller will wear the roller, so perform this does not solve the problem, contact your Canon Service representative. 50 Routine Maintenance The roller cleaning requires three sheets of the User's Guide on the right side inside the printer and cause problems such as ...
...Roller located on -screen manual. 6. Set the Paper Thickness Lever to clean the printer, as this may remain inside the Rear Tray with it immediately. The paper cleans the Paper Feed Roller as Print Head blockage and poor printing results. If the problem is lit green when the Paper Feed Roller...gently. The Paper Feed Roller will wear the roller, so perform this does not solve the problem, contact your Canon Service representative. 50 Routine Maintenance The roller cleaning requires three sheets of the User's Guide on the right side inside the printer and cause problems such as ...

Quick Start Guide
Page 66
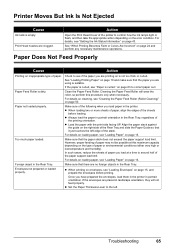
... flash, and then take the appropriate action depending on page 53. For details on cleaning, see "Manual Print Head Alignment" on inappropriate type of paper. Print Head nozzles are clogged. Print Head is misaligned. „ White Streaks Action When using paper with one printable surface,...too thick or curled. Printing on page 36 and perform Manual Print Head Alignment. If you did not align the Print Head after you are using Photo Paper Pro or other Canon specialty paper. z Check to correct paper curl. Cause Action Print Head nozzles are clogged. Ink...
... flash, and then take the appropriate action depending on page 53. For details on cleaning, see "Manual Print Head Alignment" on inappropriate type of paper. Print Head nozzles are clogged. Print Head is misaligned. „ White Streaks Action When using paper with one printable surface,...too thick or curled. Printing on page 36 and perform Manual Print Head Alignment. If you did not align the Print Head after you are using Photo Paper Pro or other Canon specialty paper. z Check to correct paper curl. Cause Action Print Head nozzles are clogged. Ink...
Quick Start Guide
Page 69
...left edge of paper or environmental conditions (either very high or low temperature and humidity). on page 24 and perform any necessary maintenance operations. Clean the Paper Feed Roller. z When loading two or more sheets of paper, align the edges of the paper support load limit. Make ...you load paper in the Rear Tray, regardless of paper. z Load the paper with the print side facing UP. Action Open the Print Head Cover of the following when you are clogged. Print Head nozzles are printing on the right side of paper may not be possible at a time to confirm how the...
...left edge of paper or environmental conditions (either very high or low temperature and humidity). on page 24 and perform any necessary maintenance operations. Clean the Paper Feed Roller. z When loading two or more sheets of paper, align the edges of the paper support load limit. Make ...you load paper in the Rear Tray, regardless of paper. z Load the paper with the print side facing UP. Action Open the Print Head Cover of the following when you are clogged. Print Head nozzles are printing on the right side of paper may not be possible at a time to confirm how the...
Quick Start Guide
Page 71
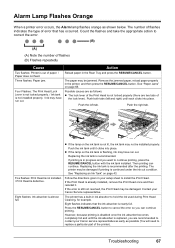
...Print Head Cleaning, for example. The paper may have run out. See "Paper Jams" on page 43. Four Flashes: The Print Head Lock Lever is not locked properly. / Ink tank is not installed properly. / Ink may be damaged if printing is not locked properly (there are recommended to contact your Canon... replace a particular part of paper. / Paper does not feed. Five flashes: Print Head is not installed. / Print Head is recommended after the printing. Follow the directions given in your Canon Service representative. The printer has a built-in the Rear Tray and press the ...
...Print Head Cleaning, for example. The paper may have run out. See "Paper Jams" on page 43. Four Flashes: The Print Head Lock Lever is not locked properly. / Ink tank is not installed properly. / Ink may be damaged if printing is not locked properly (there are recommended to contact your Canon... replace a particular part of paper. / Paper does not feed. Five flashes: Print Head is not installed. / Print Head is recommended after the printing. Follow the directions given in your Canon Service representative. The printer has a built-in the Rear Tray and press the ...

Quick Start Guide
Page 90
... Using the Printer 6 C Canon U.S.A., Inc. USA Only 82 Cleaning exterior 50 inside 53 protrusions inside the printer 56 roller 50 I Ink Lamp ink level indication on the computer 44 ink level indication on the printer 43 L Loading Printing Paper envelopes 15 paper 13 ...specialty 10 Media Type 11 N Nozzle Check Pattern examining 27 printing 25 P Print Head aligning 33 cleaning 28 deep cleaning 31 Printing from Your Computer 18 Macintosh 19 Windows 18 Printing Photographs Directly from a Compliant Device 20 PictBridge print settings 22 R Replacing Ink Tanks 45 ink status information 43...
... Using the Printer 6 C Canon U.S.A., Inc. USA Only 82 Cleaning exterior 50 inside 53 protrusions inside the printer 56 roller 50 I Ink Lamp ink level indication on the computer 44 ink level indication on the printer 43 L Loading Printing Paper envelopes 15 paper 13 ...specialty 10 Media Type 11 N Nozzle Check Pattern examining 27 printing 25 P Print Head aligning 33 cleaning 28 deep cleaning 31 Printing from Your Computer 18 Macintosh 19 Windows 18 Printing Photographs Directly from a Compliant Device 20 PictBridge print settings 22 R Replacing Ink Tanks 45 ink status information 43...


