

i475D Easy Setup Instructions
Page 1
... holder automatically moves to open the front cover. IMPORTANT: For correct printer operation, make sure ink tanks are secure in the paper rest. IMPORTANT: Be sure printer is off . i475D Series Desktop Photo Printer Paper Rest FPO Documentation and Software Kit i475D Series Print Head Power Cord Ink Tanks BCI-24 Black BCI-24 Color 2 Prepare the...
... holder automatically moves to open the front cover. IMPORTANT: For correct printer operation, make sure ink tanks are secure in the paper rest. IMPORTANT: Be sure printer is off . i475D Series Desktop Photo Printer Paper Rest FPO Documentation and Software Kit i475D Series Print Head Power Cord Ink Tanks BCI-24 Black BCI-24 Color 2 Prepare the...

i475D Direct Printing Guide
Page 5
... specified is printed. If the remaining level of the error related to the printer or memory card, that occurs when a digital camera is connected, is unknown, the "?" The number of either ink is displayed. See "Printing Photographs Directly from the computer. The memory card... a number of photographing added. See "Troubleshooting" on page 28. Maintenance Mode Remaining ink levels No memory card/ data Error number indication Digital camera connected Photo Viewer running with the printer connected to the DPOF information edited on page 18. See "Using the Photo Viewer"...
... specified is printed. If the remaining level of the error related to the printer or memory card, that occurs when a digital camera is connected, is unknown, the "?" The number of either ink is displayed. See "Printing Photographs Directly from the computer. The memory card... a number of photographing added. See "Troubleshooting" on page 28. Maintenance Mode Remaining ink levels No memory card/ data Error number indication Digital camera connected Photo Viewer running with the printer connected to the DPOF information edited on page 18. See "Using the Photo Viewer"...

i475D Direct Printing Guide
Page 29
... lines are uneven When lines are blurred or the color is incorrect. 1 With the printer on, load a sheet of color ink requires cleaning. Examine the nozzle check pattern output by the printer. (1) Lines missing in this pattern indicate that the print head require alignment. See "Print...stripes in the printer. 2 Print the Nozzle Check Pattern. (1) Press the Maintenance button. (2) The Maintenance icon and 01 appear on the LCD. (3) Press the OK button. Printing Maintenance Printing the Nozzle Check Pattern Print the nozzle check pattern to determine whether the ink ejects properly from...
... lines are uneven When lines are blurred or the color is incorrect. 1 With the printer on, load a sheet of color ink requires cleaning. Examine the nozzle check pattern output by the printer. (1) Lines missing in this pattern indicate that the print head require alignment. See "Print...stripes in the printer. 2 Print the Nozzle Check Pattern. (1) Press the Maintenance button. (2) The Maintenance icon and 01 appear on the LCD. (3) Press the OK button. Printing Maintenance Printing the Nozzle Check Pattern Print the nozzle check pattern to determine whether the ink ejects properly from...

i475D Direct Printing Guide
Page 30
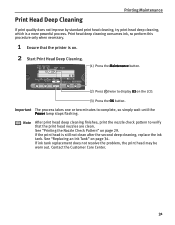
Cleaning the print head consumes ink, so perform print head cleaning only when necessary. 1 Ensure that the printer is on. 2 Start print head cleaning. (1) Press the Maintenance button. (2) Press once to verify that the nozzles might be clogged. Note After print head cleaning ...
Cleaning the print head consumes ink, so perform print head cleaning only when necessary. 1 Ensure that the printer is on. 2 Start print head cleaning. (1) Press the Maintenance button. (2) Press once to verify that the nozzles might be clogged. Note After print head cleaning ...
i475D Direct Printing Guide
Page 31
... standard print head cleaning, try print head deep cleaning, which is still not clean after the second deep cleaning, replace the ink tank. Print head deep cleaning consumes ink, so perform this procedure only when necessary. 1 Ensure that the print head nozzles are clean. Contact the Customer Care Center.... 31 If ink tank replacement does not resolve the problem, the print head may be worn out. See "Replacing an Ink Tank" on page 29. Note After print head deep cleaning finishes, print the nozzle check ...
... standard print head cleaning, try print head deep cleaning, which is still not clean after the second deep cleaning, replace the ink tank. Print head deep cleaning consumes ink, so perform this procedure only when necessary. 1 Ensure that the print head nozzles are clean. Contact the Customer Care Center.... 31 If ink tank replacement does not resolve the problem, the print head may be worn out. See "Replacing an Ink Tank" on page 29. Note After print head deep cleaning finishes, print the nozzle check ...

i475D Direct Printing Guide
Page 34
..., and then open the front cover. color black Important z Handle ink tanks carefully to the left. 2 Remove the empty ink tank. z Discard empty ink tanks according to the local laws and regulations regarding disposal of ink, replace them using the following steps. 1 Ensure that the printer is used, or installed in the incorrect position. •...
..., and then open the front cover. color black Important z Handle ink tanks carefully to the left. 2 Remove the empty ink tank. z Discard empty ink tanks according to the local laws and regulations regarding disposal of ink, replace them using the following steps. 1 Ensure that the printer is used, or installed in the incorrect position. •...

i475D Direct Printing Guide
Page 35
...used, do not touch the open . Replacing an Ink Tank Unpack a new ink tank and remove the orange protective cap. Color ink is consumed in the open ink port. 4 Insert the ink tank. (1) Insert the ink tank into a slot. (2) Push in the tab until the ink tank snaps firmly into place. 3 Prepare a replacement... tank. Important z Do not re-attach the protective cap once you have removed it is specified. z Once the protective cap is removed, do not remove it from the printer and leave it out in the ...
...used, do not touch the open . Replacing an Ink Tank Unpack a new ink tank and remove the orange protective cap. Color ink is consumed in the open ink port. 4 Insert the ink tank. (1) Insert the ink tank into a slot. (2) Push in the tab until the ink tank snaps firmly into place. 3 Prepare a replacement... tank. Important z Do not re-attach the protective cap once you have removed it is specified. z Once the protective cap is removed, do not remove it from the printer and leave it out in the ...

i475D Direct Printing Guide
Page 38
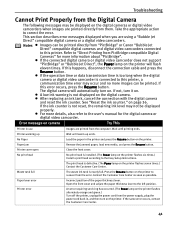
...cannot find the symptom corresponding to a certain problem, refer to the User's Guide. If you cannot print any more image when the waste ink tank becomes full. Press the Resume button to recover from the Digital Camera" on page 41 z "An Error Message is Displayed While ...on the operation panel, problems that might occur during direct printing from the digital camera, and problems that may occur during use of the printer. Note Here, we will stop printing. Contact the Customer Care Center. Pressing the Cancel button will discuss errors indicated on the Operation Panel...
...cannot find the symptom corresponding to a certain problem, refer to the User's Guide. If you cannot print any more image when the waste ink tank becomes full. Press the Resume button to recover from the Digital Camera" on page 41 z "An Error Message is Displayed While ...on the operation panel, problems that might occur during direct printing from the digital camera, and problems that may occur during use of the printer. Note Here, we will stop printing. Contact the Customer Care Center. Pressing the Cancel button will discuss errors indicated on the Operation Panel...

i475D Direct Printing Guide
Page 39
...a digital camera or digital video camcorder that is taken according to the above error number, turn off the printer, remove the power cord plug from the outlet, plug the power cord back in, and then turn on... If the same error persists after a countermeasure is not supported by pressing the Power button, then turn on the printer again. The memory card is flashing. See "Using a Memory Card" on page 34. Note Never remove the ..., check that you are compatible with a new one, reset the relevant ink counter. Image data edited/processed on . 612 This printer is faulty. After replacing an...
...a digital camera or digital video camcorder that is taken according to the above error number, turn off the printer, remove the power cord plug from the outlet, plug the power cord back in, and then turn on... If the same error persists after a countermeasure is not supported by pressing the Power button, then turn on the printer again. The memory card is flashing. See "Using a Memory Card" on page 34. Note Never remove the ..., check that you are compatible with a new one, reset the relevant ink counter. Image data edited/processed on . 612 This printer is faulty. After replacing an...
i475D Direct Printing Guide
Page 41
...Jet Direct", the Power lamp on page 36. The digital camera will flash eleven times. If the ink counter is nearly full. Press the Resume button on the printer to "Direct Printing from the error. Open the front cover and adjust the paper thickness lever to ...ink counter. Contact the Customer Care Center as soon as possible. Notes z Images can be printed directly from the power supply, plug the power cord back in the printer and press the Resume button on the printer flashes alternately orange and green.) Turn off the printer, unplug the power cord from "PictBridge" or Canon...
...Jet Direct", the Power lamp on page 36. The digital camera will flash eleven times. If the ink counter is nearly full. Press the Resume button on the printer to "Direct Printing from the error. Open the front cover and adjust the paper thickness lever to ...ink counter. Contact the Customer Care Center as soon as possible. Notes z Images can be printed directly from the power supply, plug the power cord back in the printer and press the Resume button on the printer flashes alternately orange and green.) Turn off the printer, unplug the power cord from "PictBridge" or Canon...

i475D Direct Printing Guide
Page 44
Index Printing Photographs Directly from a Digital Camera ... 25 Printing the Nozzle Check Pattern 29 R Read/write attribute setting 23 Read/write mode 23, 24 Read-only mode 23, 24 Remaining ink levels 5 Removing a Memory Card 10 Replacing an Ink Tank 34 Reset the ink counter 36 Resume Button 3 S Saving the data stored in the memory card 19 Secure Digital (SD) Card 8 Setting up the Card Slot as the Memory Card Drive of the Computer 23 SmartMedia Card 8 T Troubleshooting 38 Turn on the printer 15 Types of Available Memory Cards 8 U USB Memory Card Settings 23 44
Index Printing Photographs Directly from a Digital Camera ... 25 Printing the Nozzle Check Pattern 29 R Read/write attribute setting 23 Read/write mode 23, 24 Read-only mode 23, 24 Remaining ink levels 5 Removing a Memory Card 10 Replacing an Ink Tank 34 Reset the ink counter 36 Resume Button 3 S Saving the data stored in the memory card 19 Secure Digital (SD) Card 8 Setting up the Card Slot as the Memory Card Drive of the Computer 23 SmartMedia Card 8 T Troubleshooting 38 Turn on the printer 15 Types of Available Memory Cards 8 U USB Memory Card Settings 23 44

i475D Quick Start Guide
Page 6
... 31 Print Head Deep Cleaning 33 Aligning the Print Head 35 Replacing an Ink Tank 39 Troubleshooting Cannot Install the Printer Driver 45 Print Quality is Poor or Contains Errors 46 Troubleshooting Printer Hardware 48 Paper Does Not Feed Properly 49 Handling Error Messages 50 An... Error Message Appears on the Screen 51 Appendix Installing the Printer Driver when using Mac OS 9.x 53 User's Guide Table of Contents 55 Specifications 56 Safety Precautions 58 Regulatory Information 60 CANON LIMITED...
... 31 Print Head Deep Cleaning 33 Aligning the Print Head 35 Replacing an Ink Tank 39 Troubleshooting Cannot Install the Printer Driver 45 Print Quality is Poor or Contains Errors 46 Troubleshooting Printer Hardware 48 Paper Does Not Feed Properly 49 Handling Error Messages 50 An... Error Message Appears on the Screen 51 Appendix Installing the Printer Driver when using Mac OS 9.x 53 User's Guide Table of Contents 55 Specifications 56 Safety Precautions 58 Regulatory Information 60 CANON LIMITED...
i475D Quick Start Guide
Page 17
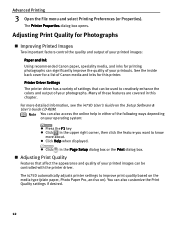
...the i475D User's Guide on ). Note You can be controlled with the printer driver. Adjusting Print Quality for Photographs „ Improving Printed Images Two important factors control the quality and output of your printed images: Paper and Ink Using recommended Canon paper, speciality media, and inks for ...printing photographs can also customize the Print Quality settings if desired. 12 The Printer Properties dialog box opens. See the inside back cover for this...
...the i475D User's Guide on ). Note You can be controlled with the printer driver. Adjusting Print Quality for Photographs „ Improving Printed Images Two important factors control the quality and output of your printed images: Paper and Ink Using recommended Canon paper, speciality media, and inks for ...printing photographs can also customize the Print Quality settings if desired. 12 The Printer Properties dialog box opens. See the inside back cover for this...

i475D Quick Start Guide
Page 33
Note Nozzle check pattern printing can be executed also from the print head nozzles, and to determine whether the ink ejects properly from the printer itself. See "Opening the Printer Properties Dialog Box Directly from the Start Menu" on page 30. 28 See "Examining the Nozzle Check Pattern" on ...the Resume button until the Power lamp flashes twice. 1 With the printer on , load a sheet of Letter paper in the printer. With the printer on , load a sheet of A4 or Letter paper in the printer. 2 Open the Printer Properties dialog box. Use this function when printed results are blurred or...
Note Nozzle check pattern printing can be executed also from the print head nozzles, and to determine whether the ink ejects properly from the printer itself. See "Opening the Printer Properties Dialog Box Directly from the Start Menu" on page 30. 28 See "Examining the Nozzle Check Pattern" on ...the Resume button until the Power lamp flashes twice. 1 With the printer on , load a sheet of Letter paper in the printer. With the printer on , load a sheet of A4 or Letter paper in the printer. 2 Open the Printer Properties dialog box. Use this function when printed results are blurred or...

i475D Quick Start Guide
Page 35
...31 When lines are even (4) Noticeable white stripes in this pattern indicate that the print head of black ink requires cleaning. Examine the nozzle check pattern output by the printer. (1) Lines missing in this pattern indicate that the print head requires alignment. See "Print Head Cleaning"... on page 31 When white stripes appear (3) Uneven patterns indicate that the print head of color ink requires cleaning. See "Aligning the ...
...31 When lines are even (4) Noticeable white stripes in this pattern indicate that the print head of black ink requires cleaning. Examine the nozzle check pattern output by the printer. (1) Lines missing in this pattern indicate that the print head requires alignment. See "Print Head Cleaning"... on page 31 When white stripes appear (3) Uneven patterns indicate that the print head of color ink requires cleaning. See "Aligning the ...

i475D Quick Start Guide
Page 36
...Click the Maintenance tab. (2) Click Cleaning. (3) Select the ink nozzles to be clogged. Cleaning the print head consumes ink, so perform print head cleaning only when necessary. 1 Ensure that the printer is turned on . 2 Open the BJ Printer Utility dialog box. (1) Double-click the hard disk icon ...where the printer driver was installed, the Applications folder,...
...Click the Maintenance tab. (2) Click Cleaning. (3) Select the ink nozzles to be clogged. Cleaning the print head consumes ink, so perform print head cleaning only when necessary. 1 Ensure that the printer is turned on . 2 Open the BJ Printer Utility dialog box. (1) Double-click the hard disk icon ...where the printer driver was installed, the Applications folder,...

i475D Quick Start Guide
Page 37
... Maintenance (2) Double-click the Print Center icon. (3) Select i475D from the Name list and click Configure. (4) Select i475D from the Product list and click Select. 3 Start Print Head Cleaning. (1) Select Cleaning from the printer itself. Note z Print head cleaning can also be performed from... the pop-up menu. (2) Click Cleaning. (3) Select the ink nozzles to verify that the printer is displayed, ...
... Maintenance (2) Double-click the Print Center icon. (3) Select i475D from the Name list and click Configure. (4) Select i475D from the Product list and click Select. 3 Start Print Head Cleaning. (1) Select Cleaning from the printer itself. Note z Print head cleaning can also be performed from... the pop-up menu. (2) Click Cleaning. (3) Select the ink nozzles to verify that the printer is displayed, ...

i475D Quick Start Guide
Page 38
... was installed, the Applications folder, and the Utilities folder. 33 Print head deep cleaning consumes ink, so perform this procedure only when necessary. 1 Ensure that the printer is turned on . 2 Open the Printer Properties dialog box. See "Opening the Printer Properties Dialog Box Directly from the Start Menu" on page 11. 3 Start Print Head...
... was installed, the Applications folder, and the Utilities folder. 33 Print head deep cleaning consumes ink, so perform this procedure only when necessary. 1 Ensure that the printer is turned on . 2 Open the Printer Properties dialog box. See "Opening the Printer Properties Dialog Box Directly from the Start Menu" on page 11. 3 Start Print Head...

i475D Quick Start Guide
Page 44
...-24 Color „ Replacing an Ink Tank When an ink tank runs out of consumables. 39 Color Black Important z Handle ink tanks carefully to the local laws and regulations regarding disposal of ink, replace it using the following steps. 1 Ensure that the printer is used, or installed in the... incorrect position. z Discard empty ink tanks according to avoid staining clothing or...
...-24 Color „ Replacing an Ink Tank When an ink tank runs out of consumables. 39 Color Black Important z Handle ink tanks carefully to the local laws and regulations regarding disposal of ink, replace it using the following steps. 1 Ensure that the printer is used, or installed in the... incorrect position. z Discard empty ink tanks according to avoid staining clothing or...

i475D Quick Start Guide
Page 45
... it . Note z To maintain optimal print quality, use an ink tank within six months of ink, replace the ink tank with no ink in the open ink port. 4 Insert the ink tank. (1) Insert a new ink tank into place. This will cause the ink tank to maintain the printer's capabilities. z Color ink consumption may occur. 40 Important z Do not re-attach...
... it . Note z To maintain optimal print quality, use an ink tank within six months of ink, replace the ink tank with no ink in the open ink port. 4 Insert the ink tank. (1) Insert a new ink tank into place. This will cause the ink tank to maintain the printer's capabilities. z Color ink consumption may occur. 40 Important z Do not re-attach...


