
i475D PictBridge Instructions
Page 3
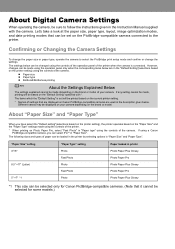
... the instructions given in the description given below. The settings below can be displayed on the PictBridge-compatible camera connected to select the PictBridge print setup mode and confirm or change the settings. The items which the "Default Setting" is connected. "Paper Size" setting 4"×6" 8.5" ×11" (Letter) 5" ×7" *1 "Paper Type" setting Photo Fast Photo Photo Fast Photo Photo Paper loaded in "Paper Size". Different names may be loaded in the printer by selecting options in "Paper Size" and "Paper Type". If using a Canon PictBridge-compatible camera...
... the instructions given in the description given below. The settings below can be displayed on the PictBridge-compatible camera connected to select the PictBridge print setup mode and confirm or change the settings. The items which the "Default Setting" is connected. "Paper Size" setting 4"×6" 8.5" ×11" (Letter) 5" ×7" *1 "Paper Type" setting Photo Fast Photo Photo Fast Photo Photo Paper loaded in "Paper Size". Different names may be loaded in the printer by selecting options in "Paper Size" and "Paper Type". If using a Canon PictBridge-compatible camera...
i475D PictBridge Guide
Page 3
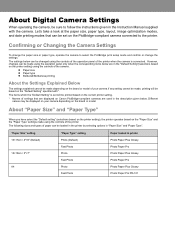
... PictBridge print setup mode and confirm or change the settings. However, changes can be loaded in the printer by selecting options in the "Default Setting"(selections based on the "Paper Size" and the "Paper Type" settings made using the operation panel only when the corresponding items below . About "Paper Size" and "Paper Type" When you have select the "Default setting" (selections based on the printer setting), the printer operates based on the printer setting) using the controls of the operation panel of the camera. "Paper Size" setting...
... PictBridge print setup mode and confirm or change the settings. However, changes can be loaded in the printer by selecting options in the "Default Setting"(selections based on the "Paper Size" and the "Paper Type" settings made using the operation panel only when the corresponding items below . About "Paper Size" and "Paper Type" When you have select the "Default setting" (selections based on the printer setting), the printer operates based on the printer setting) using the controls of the operation panel of the camera. "Paper Size" setting...

i475D Easy Setup Instructions
Page 1
... the right of the print head holder. Protective Cap 2 Insert the black ink tank into place. i475D Series Desktop Photo Printer 5 Connect the Printer and Load Paper 1 Turn the printer off the orange protective cap. Electrical Contacts Print Head Nozzles 3 Press the Power button. The printer will need this later to register the product. 4 Install the Ink Tanks 1 Remove the black ink tank (BCI-24 Black) from its package. IMPORTANT: For correct printer operation, make sure ink tanks are secure...
... the right of the print head holder. Protective Cap 2 Insert the black ink tank into place. i475D Series Desktop Photo Printer 5 Connect the Printer and Load Paper 1 Turn the printer off the orange protective cap. Electrical Contacts Print Head Nozzles 3 Press the Power button. The printer will need this later to register the product. 4 Install the Ink Tanks 1 Remove the black ink tank (BCI-24 Black) from its package. IMPORTANT: For correct printer operation, make sure ink tanks are secure...

i475D Easy Setup Instructions
Page 2
... support. P-i475D-ESI-0603-V02 Printed in the Mac OS X IMPORTANT: If your CD-ROM drive. 3 Read the License Agreement, then click Yes to install. NOTE: For Windows 98/Me, click Start, Settings, then Printers. Double-click on -screen instructions. 5 When the Printer Port window appears, TURN THE PRINTER ON so the printer port (connection) can be installed. Print head alignment is your computer cannot folder. Part no. Power Button Power Lamp off 6 Register your administrator name and password...
... support. P-i475D-ESI-0603-V02 Printed in the Mac OS X IMPORTANT: If your CD-ROM drive. 3 Read the License Agreement, then click Yes to install. NOTE: For Windows 98/Me, click Start, Settings, then Printers. Double-click on -screen instructions. 5 When the Printer Port window appears, TURN THE PRINTER ON so the printer port (connection) can be installed. Print head alignment is your computer cannot folder. Part no. Power Button Power Lamp off 6 Register your administrator name and password...
i475D Direct Printing Guide
Page 2
...Check Pattern 29 Print Head Cleaning 30 Print Head Deep Cleaning 31 Aligning the Print Head 32 Replacing an Ink Tank Replacing Ink Tanks 34 How Low Ink Setting Works 37 Troubleshooting An Error Message is Displayed on the Camera - DPOF Printing 20 Changing the Date Style 22 Setting up the Card Slot as the Memory Card Drive of Available Memory Cards 8 Inserting a Memory Card 8 Removing a Memory Card 10 Printing a Photograph Printing an Image List - Contents Contents Operation Panel Names and Functions Operation Panel 3 Icons on the LCD 4 Printing Flow 6 Using a Memory Card Types...
...Check Pattern 29 Print Head Cleaning 30 Print Head Deep Cleaning 31 Aligning the Print Head 32 Replacing an Ink Tank Replacing Ink Tanks 34 How Low Ink Setting Works 37 Troubleshooting An Error Message is Displayed on the Camera - DPOF Printing 20 Changing the Date Style 22 Setting up the Card Slot as the Memory Card Drive of Available Memory Cards 8 Inserting a Memory Card 8 Removing a Memory Card 10 Printing a Photograph Printing an Image List - Contents Contents Operation Panel Names and Functions Operation Panel 3 Icons on the LCD 4 Printing Flow 6 Using a Memory Card Types...

i475D Direct Printing Guide
Page 39
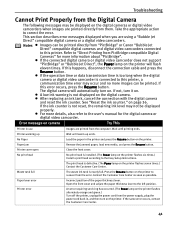
... the Customer Care Center. The memory card cannot be printed from the outlet, plug the power cord back in the Easy Setup Instructions. 403 The print head is flashing). The ? Error Icon/Problem Try This stays lit. Turn off the printer, remove the power cord plug from the computer. An ink counter has not been reset after checking its orientation. Troubleshooting Error Number/Problem Try This 302 Paper jammed. If the error is still unresolved, there...
... the Customer Care Center. The memory card cannot be printed from the outlet, plug the power cord back in the Easy Setup Instructions. 403 The print head is flashing). The ? Error Icon/Problem Try This stays lit. Turn off the printer, remove the power cord plug from the computer. An ink counter has not been reset after checking its orientation. Troubleshooting Error Number/Problem Try This 302 Paper jammed. If the error is still unresolved, there...
i475D Direct Printing Guide
Page 41
Refer to "Direct Printing from the computer. z After replacing an ink tank, cancel the connection with the digital camera and reset the ink counter. If the ink counter is connected to this printer. Paper Jam Remove the jammed paper, load new media, and press the Resume button. Open the front cover and adjust the paper thickness lever to correct the error. If this error occurs, press the Resume button. z If the operation time or data transmission time is too long when the digital...
Refer to "Direct Printing from the computer. z After replacing an ink tank, cancel the connection with the digital camera and reset the ink counter. If the ink counter is connected to this printer. Paper Jam Remove the jammed paper, load new media, and press the Resume button. Open the front cover and adjust the paper thickness lever to correct the error. If this error occurs, press the Resume button. z If the operation time or data transmission time is too long when the digital...
i475D Direct Printing Guide
Page 42
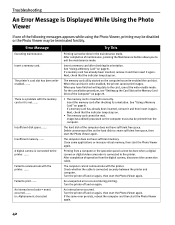
... a memory card has already been inserted, remove it and then insert it again. Check whether the cable is Displayed While Using the Photo Viewer If one of maintenance, pressing the Maintenance button allows you have finished writing data to the card, cancel the write-enable mode. Troubleshooting An Error Message is connected securely between the printer and computer. Failed to create sufficient free space, then start the Photo Viewer again. An internal error (code...
... a memory card has already been inserted, remove it and then insert it again. Check whether the cable is Displayed While Using the Photo Viewer If one of maintenance, pressing the Maintenance button allows you have finished writing data to the card, cancel the write-enable mode. Troubleshooting An Error Message is connected securely between the printer and computer. Failed to create sufficient free space, then start the Photo Viewer again. An internal error (code...

i475D Quick Start Guide
Page 6
... Printing Becomes Faint or Colors are Incorrect 27 Printing the Nozzle Check Pattern 28 Print Head Cleaning 31 Print Head Deep Cleaning 33 Aligning the Print Head 35 Replacing an Ink Tank 39 Troubleshooting Cannot Install the Printer Driver 45 Print Quality is Poor or Contains Errors 46 Troubleshooting Printer Hardware 48 Paper Does Not Feed Properly 49 Handling Error Messages 50 An Error Message Appears on the Screen 51 Appendix Installing the Printer Driver when using Mac OS 9.x 53 User's Guide Table of Contents 55 Specifications...
... Printing Becomes Faint or Colors are Incorrect 27 Printing the Nozzle Check Pattern 28 Print Head Cleaning 31 Print Head Deep Cleaning 33 Aligning the Print Head 35 Replacing an Ink Tank 39 Troubleshooting Cannot Install the Printer Driver 45 Print Quality is Poor or Contains Errors 46 Troubleshooting Printer Hardware 48 Paper Does Not Feed Properly 49 Handling Error Messages 50 An Error Message Appears on the Screen 51 Appendix Installing the Printer Driver when using Mac OS 9.x 53 User's Guide Table of Contents 55 Specifications...

i475D Quick Start Guide
Page 11
... use the applications included on how to print from sticking together. ** Print settings are much easier to the Photo Application Guide. 6 For instructions on the Setup Software & User's Guide CD-ROM when printing with Photo Paper Pro Perforated. Basic Printing „ Canon Speciality Media Media Name Photo Paper Pro Photo Paper Pro Perforated Photo Paper Plus Glossy Paper Rest Load Limit Paper Thickness Lever Position Letter: up to 10 sheets* Left 4" x 6" : up to 20 sheets 4" x 6" : up to 20 sheets Left Printer Driver Settings...
... use the applications included on how to print from sticking together. ** Print settings are much easier to the Photo Application Guide. 6 For instructions on the Setup Software & User's Guide CD-ROM when printing with Photo Paper Pro Perforated. Basic Printing „ Canon Speciality Media Media Name Photo Paper Pro Photo Paper Pro Perforated Photo Paper Plus Glossy Paper Rest Load Limit Paper Thickness Lever Position Letter: up to 10 sheets* Left 4" x 6" : up to 20 sheets 4" x 6" : up to 20 sheets Left Printer Driver Settings...

i475D Quick Start Guide
Page 26
..., edit, add a caption and print them as photo-lab quality prints. Easy-WebPrint automatically adjusts the layout when printing a screen. PhotoRecord is Exif Print (Exif 2.2)* compatible. „ PhotoStitch (Windows/Macintosh**) You can record data tags for specific camera settings and functions such as trimming and image rotation. Under Exif 2.2, the digital camera can select multiple photographs and merge them . Using the Bundle Software Advanced Printing The Setup Software & User's Guide CD...
..., edit, add a caption and print them as photo-lab quality prints. Easy-WebPrint automatically adjusts the layout when printing a screen. PhotoRecord is Exif Print (Exif 2.2)* compatible. „ PhotoStitch (Windows/Macintosh**) You can record data tags for specific camera settings and functions such as trimming and image rotation. Under Exif 2.2, the digital camera can select multiple photographs and merge them . Using the Bundle Software Advanced Printing The Setup Software & User's Guide CD...

i475D Quick Start Guide
Page 44
... disposal of ink, replace it using the following steps. 1 Ensure that the printer is used, or installed in the incorrect position. Color Black Important z Handle ink tanks carefully to the left. 2 Remove the empty ink tank. The printer will not print properly if the wrong ink tank is turned on, and then open the front cover. Replacing an Ink Tank Printing Maintenance When replacing an ink tank, check the model number very carefully. The print head holder moves...
... disposal of ink, replace it using the following steps. 1 Ensure that the printer is used, or installed in the incorrect position. Color Black Important z Handle ink tanks carefully to the left. 2 Remove the empty ink tank. The printer will not print properly if the wrong ink tank is turned on, and then open the front cover. Replacing an Ink Tank Printing Maintenance When replacing an ink tank, check the model number very carefully. The print head holder moves...

i475D Quick Start Guide
Page 49
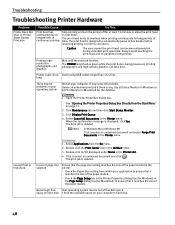
... Install the Printer Driver" on page 45 • "Print Quality is Poor or Contains Errors" on page 46 • "Troubleshooting Printer Hardware" on page 48 • "Paper Does Not Feed Properly" on page 49 • "Handling Error Messages" on page 50 • "An Error Message Appears on the Screen" on page 51 When an Error Occurs The BJ Status Monitor opens and displays a message. The message may vary depending on topics not covered in the message. Troubleshooting Troubleshooting Troubleshooting usually...
... Install the Printer Driver" on page 45 • "Print Quality is Poor or Contains Errors" on page 46 • "Troubleshooting Printer Hardware" on page 48 • "Paper Does Not Feed Properly" on page 49 • "Handling Error Messages" on page 50 • "An Error Message Appears on the Screen" on page 51 When an Error Occurs The BJ Status Monitor opens and displays a message. The message may vary depending on topics not covered in the message. Troubleshooting Troubleshooting Troubleshooting usually...
i475D Quick Start Guide
Page 50
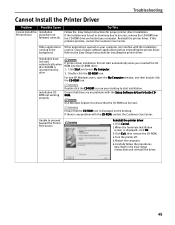
... the printer driver. Use Windows Explorer to an error, remove the CD-ROM from the CD-ROM drive and restart your computer. Click Start and select My Computer. 2. Ensure that the CD-ROM can interfere with the Setup Software & User's Guide CDROM. Reinstall the printer driver. Ensure that there are no problems with the installation running in the Easy Setup Instructions and reinstall the driver. 45 Troubleshooting Cannot Install the Printer Driver Problem...
... the printer driver. Use Windows Explorer to an error, remove the CD-ROM from the CD-ROM drive and restart your computer. Click Start and select My Computer. 2. Ensure that the CD-ROM can interfere with the Setup Software & User's Guide CDROM. Reinstall the printer driver. Ensure that there are no problems with the installation running in the Easy Setup Instructions and reinstall the driver. 45 Troubleshooting Cannot Install the Printer Driver Problem...
i475D Quick Start Guide
Page 53
... matches the size of the paper loaded. - Not enough free Your operating system may solve the problem. Caution The area around the print head can take time. It may be problems in Macintosh for long periods of time. Select Cancel All Documents in the Printer List. 4. Always avoid touching the print head and its peripheral components. The POWER lamp flashes green while the print data is any. Double-click the Print Center...
... matches the size of the paper loaded. - Not enough free Your operating system may solve the problem. Caution The area around the print head can take time. It may be problems in Macintosh for long periods of time. Select Cancel All Documents in the Printer List. 4. Always avoid touching the print head and its peripheral components. The POWER lamp flashes green while the print data is any. Double-click the Print Center...
i475D Quick Start Guide
Page 55
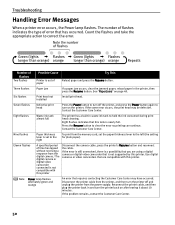
... the ink consumed during print head cleaning. Seven flashes Defective print head Press the Power button to turn off the printer, and press the Power button again to turn the printer off and unplug the printer from the memory card, set to correct the error. Count the flashes and take the appropriate action to the right To print from the power supply. Troubleshooting Handling Error Messages When a printer error occurs, the Power lamp flashes. The number of flashes indicates the type of paper Reload paper and...
... the ink consumed during print head cleaning. Seven flashes Defective print head Press the Power button to turn off the printer, and press the Power button again to turn the printer off and unplug the printer from the memory card, set to correct the error. Count the flashes and take the appropriate action to the right To print from the power supply. Troubleshooting Handling Error Messages When a printer error occurs, the Power lamp flashes. The number of flashes indicates the type of paper Reload paper and...
i475D Quick Start Guide
Page 56
... connected to the computer and try printing again. Note If you are using switching hub or other device, disconnect the printer and reconnect it directly to the computer and try printing again. There could also be a problem with the cable(s). Printer port error Verify the printer port status. Double-click Universal Serial Bus (USB) controllers on the Device Manager dialog box, then double-click Canon i475D to uninstall driver. 3. Refer to the User's Guide for instructions...
... connected to the computer and try printing again. Note If you are using switching hub or other device, disconnect the printer and reconnect it directly to the computer and try printing again. There could also be a problem with the cable(s). Printer port error Verify the printer port status. Double-click Universal Serial Bus (USB) controllers on the Device Manager dialog box, then double-click Canon i475D to uninstall driver. 3. Refer to the User's Guide for instructions...
i475D Quick Start Guide
Page 60
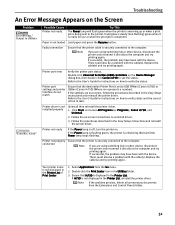
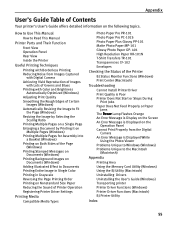
...) Troubleshooting Cannot Install Printer Driver Print Quality is Poor Printer Does Not Start or Stops During Print Jobs Paper Does Not Feed Properly or Paper Jams The Power Lamp Flashes Orange An Error Message is Display on the Screen An Error Message is Displayed on the following topics. Appendix User's Guide Table of Contents Your printer's User's Guide offers detailed information on the Operation Panel Cannot Print Properly from the Digital Camera An Error Message is Displayed While Using the Photo Viewer Problems Unique to Windows (Windows) Problems...
...) Troubleshooting Cannot Install Printer Driver Print Quality is Poor Printer Does Not Start or Stops During Print Jobs Paper Does Not Feed Properly or Paper Jams The Power Lamp Flashes Orange An Error Message is Display on the Screen An Error Message is Displayed on the following topics. Appendix User's Guide Table of Contents Your printer's User's Guide offers detailed information on the Operation Panel Cannot Print Properly from the Digital Camera An Error Message is Displayed While Using the Photo Viewer Problems Unique to Windows (Windows) Problems...
i475D Quick Start Guide
Page 66
... paper or ink cartridges, as to be defective upon inspection, will be repaired, exchanged for new or comparable rebuilt parts, or exchanged for a refurbished Product, as is given by you in new condition in the operating instructions. (b) Use of parts or supplies (other than those sold by Canon USA) that may be no responsibility for such items except for compatible Canon brand peripheral equipment covered...
... paper or ink cartridges, as to be defective upon inspection, will be repaired, exchanged for new or comparable rebuilt parts, or exchanged for a refurbished Product, as is given by you in new condition in the operating instructions. (b) Use of parts or supplies (other than those sold by Canon USA) that may be no responsibility for such items except for compatible Canon brand peripheral equipment covered...
i475D Quick Start Guide
Page 68
... Installing the Printer Driver when using Mac OS 9.x ..... 53 L Load Limit Mark 4 Loading Paper 3 Low Ink Warning 42 Low Ink Warning Setting 52 M Matte Photo Paper 6 Media Type 6, 8, 10 Media Types Suitable for Borderless Printing ........ 22, 24 N Nozzle Check 28, 29 Nozzle Check Pattern examining 30 printing 28 O Opening the Printer Properties Dialog Box Directly from the Start Menu 11 Opening the Printer Properties Dialog Box from Your Application Program 11 P Page Setup 9, 48 Page Setup dialog box 48 Paper feed roller 49 Paper Jams 49 Paper Rest Load Limit 6 Paper Size...
... Installing the Printer Driver when using Mac OS 9.x ..... 53 L Load Limit Mark 4 Loading Paper 3 Low Ink Warning 42 Low Ink Warning Setting 52 M Matte Photo Paper 6 Media Type 6, 8, 10 Media Types Suitable for Borderless Printing ........ 22, 24 N Nozzle Check 28, 29 Nozzle Check Pattern examining 30 printing 28 O Opening the Printer Properties Dialog Box Directly from the Start Menu 11 Opening the Printer Properties Dialog Box from Your Application Program 11 P Page Setup 9, 48 Page Setup dialog box 48 Paper feed roller 49 Paper Jams 49 Paper Rest Load Limit 6 Paper Size...


