User Manual
Page 121
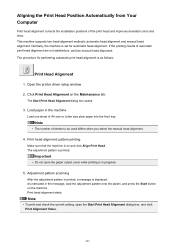
... Automatically from Your Computer Print head alignment corrects the installation positions of A4 size or Letter size plain paper into the front tray. Adjustment pattern scanning After the adjustment pattern is printed, a message is in progress. 5. This machine supports two head alignment methods: automatic head alignment and manual head ...Note • To print and check the current setting, open the paper output cover while printing is displayed. Normally, the machine is printed. As instructed in the machine Load one sheet of the print head and improves deviated colors and lines.
... Automatically from Your Computer Print head alignment corrects the installation positions of A4 size or Letter size plain paper into the front tray. Adjustment pattern scanning After the adjustment pattern is printed, a message is in progress. 5. This machine supports two head alignment methods: automatic head alignment and manual head ...Note • To print and check the current setting, open the paper output cover while printing is displayed. Normally, the machine is printed. As instructed in the machine Load one sheet of the print head and improves deviated colors and lines.
User Manual
Page 184
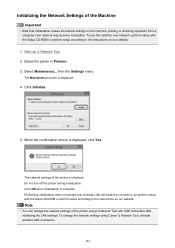
Initializing the Network Settings of the printer using Canon IJ Network Tool, activate wireless LAN in Printers:. 3. The Maintenance ... the Machine Important • Note that initialization erases all network settings on the machine, printing or scanning operation from the Settings menu. Note • You can change the network settings using IJ Network Tool... will break the connection, so perform setup with the Setup CD-ROM or perform setup according to the instructions on our website. 1. Start up IJ Network Tool. 2. Select Maintenance... Click OK when initialization is initialized...
Initializing the Network Settings of the printer using Canon IJ Network Tool, activate wireless LAN in Printers:. 3. The Maintenance ... the Machine Important • Note that initialization erases all network settings on the machine, printing or scanning operation from the Settings menu. Note • You can change the network settings using IJ Network Tool... will break the connection, so perform setup with the Setup CD-ROM or perform setup according to the instructions on our website. 1. Start up IJ Network Tool. 2. Select Maintenance... Click OK when initialization is initialized...

Fax Guide
Page 5
...will apply: • You will not be able to send or receive faxes, make copies, or scan originals. • When you are connecting the telephone, whether or not you set to the instruction on the LCD. Setting the Receive Mode Set the receiving operation (receiving mode). Easy setup If you...unsent and received faxes, will be set the fax setting according to your telephone line. 3. Connecting the Telephone Line Connect the machine to the instruction on the LCD, the receive mode is a power failure or if you accidentally disconnect the power plug, the date/time settings will be lost....
...will apply: • You will not be able to send or receive faxes, make copies, or scan originals. • When you are connecting the telephone, whether or not you set to the instruction on the LCD. Setting the Receive Mode Set the receiving operation (receiving mode). Easy setup If you...unsent and received faxes, will be set the fax setting according to your telephone line. 3. Connecting the Telephone Line Connect the machine to the instruction on the LCD, the receive mode is a power failure or if you accidentally disconnect the power plug, the date/time settings will be lost....
Fax Guide
Page 21
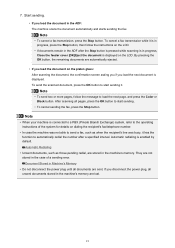
...displayed on the LCD. Note • To send two or more pages, follow the instructions on the platen glass: After scanning the document, the confirmation screen asking you if you disconnect the power plug, all ... If you load the document on the LCD. • If documents remain in the ADF: The machine scans the document automatically and starts sending the fax. Document Stored in Machine's Memory • Do not disconnect ... OK button, the remaining documents are lost. 21 To send the scanned document, press the OK button to the operating instructions of a sending error.
...displayed on the LCD. Note • To send two or more pages, follow the instructions on the platen glass: After scanning the document, the confirmation screen asking you if you disconnect the power plug, all ... If you load the document on the LCD. • If documents remain in the ADF: The machine scans the document automatically and starts sending the fax. Document Stored in Machine's Memory • Do not disconnect ... OK button, the remaining documents are lost. 21 To send the scanned document, press the OK button to the operating instructions of a sending error.

Fax Guide
Page 23
...then press the OK button. Note • For manual redialing, the machine memorizes up to adjust the scan contrast and resolution, see Sending Faxes with the Numeric Buttons. 5. Adjust the scan contrast and resolution as necessary. The Fax standby screen is displayed. 6. Load documents on the LCD. Press... a fax transmission while it is in progress, press the Stop button, then follow the instructions on the LCD. • If documents remain in the ADF after the Stop button is pressed while scanning is in progress, Close the feeder cover [OK]Eject the document is turned on how ...
...then press the OK button. Note • For manual redialing, the machine memorizes up to adjust the scan contrast and resolution, see Sending Faxes with the Numeric Buttons. 5. Adjust the scan contrast and resolution as necessary. The Fax standby screen is displayed. 6. Load documents on the LCD. Press... a fax transmission while it is in progress, press the Stop button, then follow the instructions on the LCD. • If documents remain in the ADF after the Stop button is pressed while scanning is in progress, Close the feeder cover [OK]Eject the document is turned on how ...

Fax Guide
Page 26
To cancel a fax transmission while it is in progress, press the Stop button, then follow the instructions on the LCD. By pressing the OK button, the remaining documents are automatically ejected. 26 When you hear a high-pitched signal, press the Color button ... Stop button. Important • Color transmission is displayed on the LCD. • If documents remain in the ADF after the Stop button is pressed while scanning is in progress, Close the feeder cover [OK]Eject the document is available only when the recipient's fax machine supports color faxing. 10. Hang up...
To cancel a fax transmission while it is in progress, press the Stop button, then follow the instructions on the LCD. By pressing the OK button, the remaining documents are automatically ejected. 26 When you hear a high-pitched signal, press the Color button ... Stop button. Important • Color transmission is displayed on the LCD. • If documents remain in the ADF after the Stop button is pressed while scanning is in progress, Close the feeder cover [OK]Eject the document is available only when the recipient's fax machine supports color faxing. 10. Hang up...

Fax Guide
Page 28
... the Numeric buttons to automatically redial the number after the Stop button is pressed while scanning is in progress, Close the feeder cover [OK]Eject the document is in progress, press the Stop button, then follow the instructions on the LCD. • If documents remain in the ADF after a specified interval. To...
... the Numeric buttons to automatically redial the number after the Stop button is pressed while scanning is in progress, Close the feeder cover [OK]Eject the document is in progress, press the Stop button, then follow the instructions on the LCD. • If documents remain in the ADF after a specified interval. To...
Fax Guide
Page 30
...press the Stop button. To cancel a fax transmission while it has the function to automatically redial the number after the Stop button is pressed while scanning is in the ADF after a specified interval. Automatic redialing is available only when the recipient's fax machine supports color faxing. Use the button.... want to send a fax, such as when the recipient's line was busy, it is in progress, press the Stop button, then follow the instructions on the LCD. • If documents remain in progress, Close the feeder cover [OK]Eject the document is displayed on how to that entered ...
...press the Stop button. To cancel a fax transmission while it has the function to automatically redial the number after the Stop button is pressed while scanning is in the ADF after a specified interval. Automatic redialing is available only when the recipient's fax machine supports color faxing. Use the button.... want to send a fax, such as when the recipient's line was busy, it is in progress, press the Stop button, then follow the instructions on the LCD. • If documents remain in progress, Close the feeder cover [OK]Eject the document is displayed on how to that entered ...
Fax Guide
Page 32
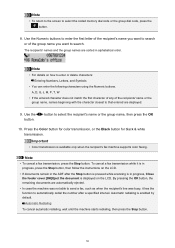
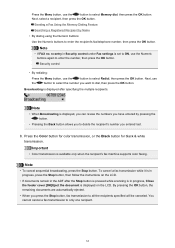
...can review the numbers you entered last. 6. To cancel a fax transmission while it is in progress, press the Stop button, then follow the instructions on the LCD. • If documents remain in the ADF after specifying the multiple recipients. Press the Color button for color transmission, or the... to select Memory dial, then press the OK button. Important • Color transmission is displayed after the Stop button is pressed while scanning is in Security control under Fax settings is displayed on the LCD. Press the Menu button, use the button to only one recipient. 32...
...can review the numbers you entered last. 6. To cancel a fax transmission while it is in progress, press the Stop button, then follow the instructions on the LCD. • If documents remain in the ADF after specifying the multiple recipients. Press the Color button for color transmission, or the... to select Memory dial, then press the OK button. Important • Color transmission is displayed after the Stop button is pressed while scanning is in Security control under Fax settings is displayed on the LCD. Press the Menu button, use the button to only one recipient. 32...

Fax Guide
Page 36
To cancel a fax transmission while it is in progress, press the Stop button, then follow the instructions on the LCD. • If documents remain in the ADF after the Stop button is pressed while scanning is in progress, Close the feeder cover [OK]Eject the document is available only when the recipient's fax...
To cancel a fax transmission while it is in progress, press the Stop button, then follow the instructions on the LCD. • If documents remain in the ADF after the Stop button is pressed while scanning is in progress, Close the feeder cover [OK]Eject the document is available only when the recipient's fax...

Scanning Guide
Page 23
When Document (ADF Manual Duplex) is selected for details on -screen instructions to cancel the scan. Scanning starts. Note • The screens for scanning with Orientation set to Portrait are used as examples in the Settings dialog box. Follow the on the setting items in the following pages for Select Source, proceed to the following descriptions. 23 Click Document. Settings (Document Scan) Dialog Box Settings (Custom Scan) Dialog Box 7. Note • Click Cancel to place the documents. The IJ Scan Utility main screen appears. Note • Refer to Step 8. 8.
When Document (ADF Manual Duplex) is selected for details on -screen instructions to cancel the scan. Scanning starts. Note • The screens for scanning with Orientation set to Portrait are used as examples in the Settings dialog box. Follow the on the setting items in the following pages for Select Source, proceed to the following descriptions. 23 Click Document. Settings (Document Scan) Dialog Box Settings (Custom Scan) Dialog Box 7. Note • Click Cancel to place the documents. The IJ Scan Utility main screen appears. Note • Refer to Step 8. 8.

Scanning Guide
Page 36
Instructions Opens this guide. Displays the Settings dialog box in which you can make image corrections and color adjustments when scanning. Settings... Scan/save settings and the response after scanning can be specified in which you can specify the scan/save settings and applications can be specified in which you can scan the left and right halves...
Instructions Opens this guide. Displays the Settings dialog box in which you can make image corrections and color adjustments when scanning. Settings... Scan/save settings and the response after scanning can be specified in which you can specify the scan/save settings and applications can be specified in which you can scan the left and right halves...

Scanning Guide
Page 41
... from the pull-down menu. Do not start from the pull-down menu. Defaults You can specify the application from the pull-down menu. Instructions Opens this when you want to start any application Saves to the default settings. 41 • Windows 7: My Documents folder • Windows Vista...• When the Settings dialog box is displayed from My Image Garden, this option does not appear. (3) Application Settings Area Open with the scanned images attached. You can restore the settings in the displayed screen to the folder specified in Save in . Attach to e-mail Select this when...
... from the pull-down menu. Do not start from the pull-down menu. Defaults You can specify the application from the pull-down menu. Instructions Opens this when you want to start any application Saves to the default settings. 41 • Windows 7: My Documents folder • Windows Vista...• When the Settings dialog box is displayed from My Image Garden, this option does not appear. (3) Application Settings Area Open with the scanned images attached. You can restore the settings in the displayed screen to the folder specified in Save in . Attach to e-mail Select this when...

Scanning Guide
Page 44
...Destination Folder dialog box displayed by selecting Add... Check scan results Displays the Save Settings dialog box after scanning. You can specify the e-mail client you to browse or organize images. Instructions Opens this when you also want to use the scanned images as follows. • Windows 8: My ...this option does not appear. (3) Application Settings Area Open with an application Select this when you want to enhance or correct the scanned images. You can restore the settings in the displayed screen to a folder other than the one specified in Save in the Select...
...Destination Folder dialog box displayed by selecting Add... Check scan results Displays the Save Settings dialog box after scanning. You can specify the e-mail client you to browse or organize images. Instructions Opens this when you also want to use the scanned images as follows. • Windows 8: My ...this option does not appear. (3) Application Settings Area Open with an application Select this when you want to enhance or correct the scanned images. You can restore the settings in the displayed screen to a folder other than the one specified in Save in the Select...

Scanning Guide
Page 50
...you want to convert text in . from the pull-down menu. Attach to e-mail Select this when you want to send e-mails with the scanned images attached. You can specify the application from the pull-down menu. Send to a folder Select this guide. You can specify the e-mail ...specified OCR software. Note • Specify the application or folder in . Do not start from the pull-down menu. Instructions Opens this when you want to save the scanned images to the default settings. 50 Defaults You can specify the application from the pull-down menu. You can restore ...
...you want to convert text in . from the pull-down menu. Attach to e-mail Select this when you want to send e-mails with the scanned images attached. You can specify the application from the pull-down menu. Send to a folder Select this guide. You can specify the e-mail ...specified OCR software. Note • Specify the application or folder in . Do not start from the pull-down menu. Instructions Opens this when you want to save the scanned images to the default settings. 50 Defaults You can specify the application from the pull-down menu. You can restore ...

Scanning Guide
Page 60
...this when you also want to save folders are in an application that allows you to the default settings. 60 Instructions Opens this when you want to save the scanned images. from the pull-down menu. Note • Specify the application or folder in the Select Application or ...(3) Application Settings Area Open with an application Select this when you want to the folder specified in Save in. Check scan results Displays the Save Settings dialog box after scanning. You can restore the settings in the displayed screen to browse or organize images. Send to an application Select this...
...this when you also want to save folders are in an application that allows you to the default settings. 60 Instructions Opens this when you want to save the scanned images. from the pull-down menu. Note • Specify the application or folder in the Select Application or ...(3) Application Settings Area Open with an application Select this when you want to the folder specified in Save in. Check scan results Displays the Save Settings dialog box after scanning. You can restore the settings in the displayed screen to browse or organize images. Send to an application Select this...

Scanning Guide
Page 63
... the pull-down menu. Instructions Opens this guide. Start OCR Select this when you want to the folder specified in Save in the image into text data using specified OCR software. Note • Specify the application or folder in the displayed screen to send e-mails with the scanned images attached. from the...
... the pull-down menu. Instructions Opens this guide. Start OCR Select this when you want to the folder specified in Save in the image into text data using specified OCR software. Note • Specify the application or folder in the displayed screen to send e-mails with the scanned images attached. from the...

Scanning Guide
Page 66
.... (3) Application Settings Area Open with an application Select this when you want to save the scanned images to a folder other than the one specified in Save in. Send to an application Select this when... you want to use the scanned images as they are in the Select Application or Select Destination Folder dialog box displayed by selecting ...to browse or organize images. You can restore the settings in . Instructions Opens this when you to enhance or correct the scanned images. Send to a folder Select this guide.
.... (3) Application Settings Area Open with an application Select this when you want to save the scanned images to a folder other than the one specified in Save in. Send to an application Select this when... you want to use the scanned images as they are in the Select Application or Select Destination Folder dialog box displayed by selecting ...to browse or organize images. You can restore the settings in . Instructions Opens this when you to enhance or correct the scanned images. Send to a folder Select this guide.

Scanning Guide
Page 68
... Set from the pull-down menu. from the pull-down menu. Note • Specify the application or folder in the displayed screen to use the scanned images as follows. • Windows 8: My Documents folder • Windows 7: My Documents folder • Windows Vista: Documents folder • Windows XP: My Documents folder ... an application Select this when you save folders are as they are appended to the set the quality of the images to be saved. Instructions Opens this when you to be saved, keyword search of PDF files, and the data format in which to enhance or correct the...
... Set from the pull-down menu. from the pull-down menu. Note • Specify the application or folder in the displayed screen to use the scanned images as follows. • Windows 8: My Documents folder • Windows 7: My Documents folder • Windows Vista: Documents folder • Windows XP: My Documents folder ... an application Select this when you save folders are as they are appended to the set the quality of the images to be saved. Instructions Opens this when you to be saved, keyword search of PDF files, and the data format in which to enhance or correct the...

Scanning Guide
Page 72
...the one specified in Save in. Defaults You can specify the application from the pull-down menu. Note • Specify the application or folder in . Instructions Opens this when you to browse or organize images. You can restore the settings in the displayed screen to the default settings. 72 You can...from the pull-down menu. Send to an application Select this when you want to use the scanned images as they are in an application that allows you also want to save the scanned images to the folder specified in Save in the Select Application or Select Destination Folder dialog box ...
...the one specified in Save in. Defaults You can specify the application from the pull-down menu. Note • Specify the application or folder in . Instructions Opens this when you to browse or organize images. You can restore the settings in the displayed screen to the default settings. 72 You can...from the pull-down menu. Send to an application Select this when you want to use the scanned images as they are in an application that allows you also want to save the scanned images to the folder specified in Save in the Select Application or Select Destination Folder dialog box ...


