User's Guide
Page 3
...Compliant Device 70 Connecting to a PictBridge Compliant Device 70 Printing Photographs Directly from a PictBridge Compliant Device 73 Printing Photographs Directly from a Canon Bubble Jet Direct Compatible Digital Camera 76 5 Faxing 79 Preparing Your Machine for Fax 79 Sending Faxes 106 Receiving Faxes 118 6 ...Printing from Your Computer 123 Printing with Windows 123 Printing with Macintosh 126 7 Scanning Images 129 About Scanning Images 129 Scanning Methods 129 8 Reading from and Writing to a Memory Card 133 Setting up the Card Slot as the ...
...Compliant Device 70 Connecting to a PictBridge Compliant Device 70 Printing Photographs Directly from a PictBridge Compliant Device 73 Printing Photographs Directly from a Canon Bubble Jet Direct Compatible Digital Camera 76 5 Faxing 79 Preparing Your Machine for Fax 79 Sending Faxes 106 Receiving Faxes 118 6 ...Printing from Your Computer 123 Printing with Windows 123 Printing with Macintosh 126 7 Scanning Images 129 About Scanning Images 129 Scanning Methods 129 8 Reading from and Writing to a Memory Card 133 Setting up the Card Slot as the ...

User's Guide
Page 6
... in the U.S. Fax Driver Guide Refer to this guide for setting up your computer, direct photo printing from selected digital cameras, faxing, copying, and scanning. Model Name K10270 (PIXMA MP830) Trademarks z "Windows" and "Internet Explorer" are subject to change without notice. z "SmartMedia" is a trademark of Fuji Photo Film Co., Ltd. This sheet includes...
... in the U.S. Fax Driver Guide Refer to this guide for setting up your computer, direct photo printing from selected digital cameras, faxing, copying, and scanning. Model Name K10270 (PIXMA MP830) Trademarks z "Windows" and "Internet Explorer" are subject to change without notice. z "SmartMedia" is a trademark of Fuji Photo Film Co., Ltd. This sheet includes...
User's Guide
Page 10
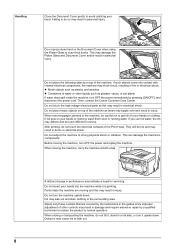
... as these may result in burns or electrical shock. Do not place the following objects on the Document Cover when using the Platen Glass to scan thick books. Parts inside the machine, turn the machine upside down hard on top of water or other controls may cause ink to leak out... the Document Cover gently to avoid catching your hands or clothing. z Metal objects such as jewelry and watches z Containers of the machine. Then, contact the Canon Customer Care Center. If ink gets on your hand. Before moving the machine, carry the machine at both ends.
... as these may result in burns or electrical shock. Do not place the following objects on the Document Cover when using the Platen Glass to scan thick books. Parts inside the machine, turn the machine upside down hard on top of water or other controls may cause ink to leak out... the Document Cover gently to avoid catching your hands or clothing. z Metal objects such as jewelry and watches z Containers of the machine. Then, contact the Canon Customer Care Center. If ink gets on your hand. Before moving the machine, carry the machine at both ends.
User's Guide
Page 13
... with a legal representative in your jurisdiction. Legal Limitations on Use of Your Product and Use of Images It may be unlawful to make copies of, scan, print or use reproductions of copyright owner 11
... with a legal representative in your jurisdiction. Legal Limitations on Use of Your Product and Use of Images It may be unlawful to make copies of, scan, print or use reproductions of copyright owner 11

User's Guide
Page 14
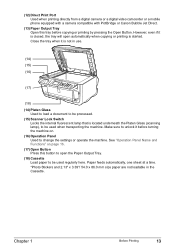
...11) Card Slot Cover Open to insert a memory card. Load the document with the side you want to scan facing up. (9) Document Output Slot Documents scanned from the Document Tray are delivered here. (10) Document Cover Open this cover when loading a document on page... Main Components and Their Functions „ Front View (1) (2) (3) (4) (5) (6) (7) (13) (12) (11) (10) (9) (8) (1) ADF (Automatic Document Feeder) Automatically scans in documents loaded in the appropriate direction. (6) Auto Sheet Feeder Load paper here before loading paper by putting your finger in the rounded indent and...
...11) Card Slot Cover Open to insert a memory card. Load the document with the side you want to scan facing up. (9) Document Output Slot Documents scanned from the Document Tray are delivered here. (10) Document Cover Open this cover when loading a document on page... Main Components and Their Functions „ Front View (1) (2) (3) (4) (5) (6) (7) (13) (12) (11) (10) (9) (8) (1) ADF (Automatic Document Feeder) Automatically scans in documents loaded in the appropriate direction. (6) Auto Sheet Feeder Load paper here before loading paper by putting your finger in the rounded indent and...
User's Guide
Page 15
... Print Port Used when printing directly from a digital camera or a digital video camcorder or a mobile phone equipped with a camera compatible with PictBridge or Canon Bubble Jet Direct. (13) Paper Output Tray Open this button to open automatically when copying or printing is located underneath the Platen Glass... (scanning lamp), to be used when transporting the machine. Close the tray when it is closed, the tray will open the Paper Output Tray. ...
... Print Port Used when printing directly from a digital camera or a digital video camcorder or a mobile phone equipped with a camera compatible with PictBridge or Canon Bubble Jet Direct. (13) Paper Output Tray Open this button to open automatically when copying or printing is located underneath the Platen Glass... (scanning lamp), to be used when transporting the machine. Close the tray when it is closed, the tray will open the Paper Output Tray. ...
User's Guide
Page 16
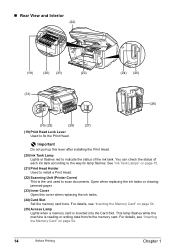
... paper. (23) Inner Cover Open this lever after installing the Print Head. (20) Ink Tank Lamp Lights or flashes red to install a Print Head. (22) Scanning Unit (Printer Cover) This is inserted into the Card Slot. For details, see "Inserting the Memory Card" on page 54. 14 Before Printing Chapter 1 You... Lights when a memory card is the unit used to the memory card. This lamp flashes while the machine is reading or writing data from/to scan documents.
... paper. (23) Inner Cover Open this lever after installing the Print Head. (20) Ink Tank Lamp Lights or flashes red to install a Print Head. (22) Scanning Unit (Printer Cover) This is inserted into the Card Slot. For details, see "Inserting the Memory Card" on page 54. 14 Before Printing Chapter 1 You... Lights when a memory card is the unit used to the memory card. This lamp flashes while the machine is reading or writing data from/to scan documents.
User's Guide
Page 17
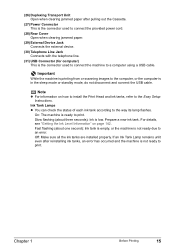
...): Ink is in the sleep mode or standby mode, do not disconnect and connect the USB cable. Important While the machine is printing from or scanning images to the computer, or the computer is low. Chapter 1 Before Printing 15 Off: Make sure all the ink tanks are installed properly. Prepare a new...
...): Ink is in the sleep mode or standby mode, do not disconnect and connect the USB cable. Important While the machine is printing from or scanning images to the computer, or the computer is low. Chapter 1 Before Printing 15 Off: Make sure all the ink tanks are installed properly. Prepare a new...
User's Guide
Page 18
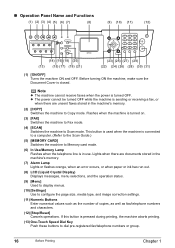
... (31) (1) [ON/OFF] Turns the machine ON and OFF. This button is used when the machine is connected to a computer. (Refer to the Scan Guide.) (5) [MEMORY CARD] Switches the machine to Memory card mode. (6) In Use/Memory Lamp Flashes when the telephone line is sending or receiving a fax,... LCD (Liquid Crystal Display) Displays messages, menu selections, and the operation status. (9) [Menu] Used to display menus. (10) [Settings] Use to Scan mode. Note z The machine cannot receive faxes when the power is pressed during printing, the machine aborts printing. (13) One-Touch Speed Dial Key Push...
... (31) (1) [ON/OFF] Turns the machine ON and OFF. This button is used when the machine is connected to a computer. (Refer to the Scan Guide.) (5) [MEMORY CARD] Switches the machine to Memory card mode. (6) In Use/Memory Lamp Flashes when the telephone line is sending or receiving a fax,... LCD (Liquid Crystal Display) Displays messages, menu selections, and the operation status. (9) [Menu] Used to display menus. (10) [Settings] Use to Scan mode. Note z The machine cannot receive faxes when the power is pressed during printing, the machine aborts printing. (13) One-Touch Speed Dial Key Push...
User's Guide
Page 19
...-registered fax/telephone number or group. (29) [Hook] Engages or disengages the telephone line. (30) [Black] Starts black & white copying, scanning, or faxing. (31) [Color] Starts color copying, photo printing, scanning, or faxing. Press this button and a two-digit code to tone dialing. Ejects documents remaining in the memory card using Numeric...
...-registered fax/telephone number or group. (29) [Hook] Engages or disengages the telephone line. (30) [Black] Starts black & white copying, scanning, or faxing. (31) [Color] Starts color copying, photo printing, scanning, or faxing. Press this button and a two-digit code to tone dialing. Ejects documents remaining in the memory card using Numeric...
User's Guide
Page 21
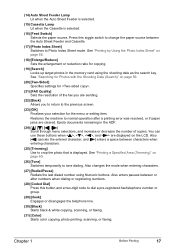
...perform any button to load the document. „ Document Requirements The documents you load on page 141. Loading Documents to Copy, Fax, or Scan This section describes how to restore the display. „ Setting the Power Save Mode The machine enters Power save mode if not operated for ...8.5" x 11.7" / 216 x 297 mm Max. 8.5" x 14.0" (216 x 356 mm) Min. 5.8" x 5.8" (148 x 148 mm) Only A4- Press any operation such as copying, faxing, or scanning, the machine will exit from Power save setting" on the Platen Glass or the ADF for the ADF Multipage documents of A4- If you use...
...perform any button to load the document. „ Document Requirements The documents you load on page 141. Loading Documents to Copy, Fax, or Scan This section describes how to restore the display. „ Setting the Power Save Mode The machine enters Power save mode if not operated for ...8.5" x 11.7" / 216 x 297 mm Max. 8.5" x 14.0" (216 x 356 mm) Min. 5.8" x 5.8" (148 x 148 mm) Only A4- Press any operation such as copying, faxing, or scanning, the machine will exit from Power save setting" on the Platen Glass or the ADF for the ADF Multipage documents of A4- If you use...
User's Guide
Page 22
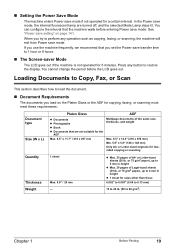
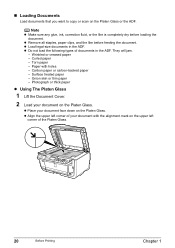
z Place your document with holes - „ Loading Documents Load documents that you want to copy or scan on the Platen Glass. z Load legal-size documents in the ADF. z Do not load the following types of your document face down on the upper ...
z Place your document with holes - „ Loading Documents Load documents that you want to copy or scan on the Platen Glass. z Load legal-size documents in the ADF. z Do not load the following types of your document face down on the upper ...

User's Guide
Page 23
... set to 0.8" / 20 mm thick, such as documents. 3 Gently close the Document Cover. Load the document with the side you want to copy, fax, or scan face side up to the ADF, the first 0.08"/2mm of the leading edge of the Platen Glass. z Using The ADF Note z Set a document on... the Platen Glass in the same way as books. Note z The machine cannot scan the area within about 0.08" / 2 mm from the rear edge, and within about 0.08" / 2 mm from the Platen Glass. 2 Open the Document Tray. 3 Load the...
... set to 0.8" / 20 mm thick, such as documents. 3 Gently close the Document Cover. Load the document with the side you want to copy, fax, or scan face side up to the ADF, the first 0.08"/2mm of the leading edge of the Platen Glass. z Using The ADF Note z Set a document on... the Platen Glass in the same way as books. Note z The machine cannot scan the area within about 0.08" / 2 mm from the rear edge, and within about 0.08" / 2 mm from the Platen Glass. 2 Open the Document Tray. 3 Load the...
User's Guide
Page 47
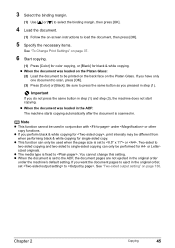
...[Black] for black & white copying. z When the document was loaded in the ADF: The machine starts copying automatically after the document is fixed to scan, press [OK]. (3) Press [Color] or [Black]. Important If you do not press the same button in the original order under or other copy ...functions. z The media type is scanned in conjunction with under the machine's default setting. 3 Select the binding margin. (1) Use [ ] or [ ] to select the binding margin, then press [OK...
...[Black] for black & white copying. z When the document was loaded in the ADF: The machine starts copying automatically after the document is fixed to scan, press [OK]. (3) Press [Color] or [Black]. Important If you do not press the same button in the original order under or other copy ...functions. z The media type is scanned in conjunction with under the machine's default setting. 3 Select the binding margin. (1) Use [ ] or [ ] to select the binding margin, then press [OK...
User's Guide
Page 49
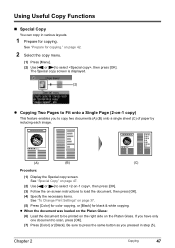
If you have only one document to press the same button as you to select , then press [OK]. Be sure to scan, press [OK]. (7) Press [Color] or [Black]. on -1 copy) This feature enables you pressed in various layouts. 1 Prepare for copying." The Special copy screen is displayed. (2) z ...
If you have only one document to press the same button as you to select , then press [OK]. Be sure to scan, press [OK]. (7) Press [Color] or [Black]. on -1 copy) This feature enables you pressed in various layouts. 1 Prepare for copying." The Special copy screen is displayed. (2) z ...
User's Guide
Page 50
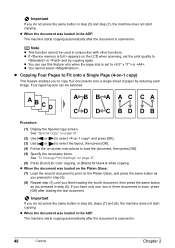
... copy four documents onto a single sheet of paper by reducing each image. Four types layouts can use this feature only when the page size is scanned in. Important If you do not press the same button in step (5) and step (7), the machine does not start copying. z You can be used in... not press the same button in step (6), steps (7) and (8), the machine does not start copying. If you have only one, two or three documents to scan, press [OK] after the document is set the print quality to or . z If appears on page 37. (6) Press [Color] for color copying, or [Black] for...
... copy four documents onto a single sheet of paper by reducing each image. Four types layouts can use this feature only when the page size is scanned in. Important If you do not press the same button in step (5) and step (7), the machine does not start copying. z You can be used in... not press the same button in step (6), steps (7) and (8), the machine does not start copying. If you have only one, two or three documents to scan, press [OK] after the document is set the print quality to or . z If appears on page 37. (6) Press [Color] for color copying, or [Black] for...
User's Guide
Page 51
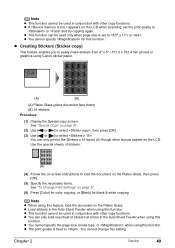
... appear on the Platen Glass. z The print quality is set the print quality to easily make stickers from 4" x 6" / 101.6 x 152.4 mm photos or graphics using Canon sticker paper. (A) (B) (A) Platen Glass (place document face down) (B) 16 stickers Procedure: (1) Display the Special copy screen. See "Special Copy" on page 37. (6) Press [Color] for..., or when using this function. z If appears on -screen instructions to . You can only load one sheet of stickers. (A) (4) Follow the on the LCD when scanning, set to select . Chapter 2 Copying 49
... appear on the Platen Glass. z The print quality is set the print quality to easily make stickers from 4" x 6" / 101.6 x 152.4 mm photos or graphics using Canon sticker paper. (A) (B) (A) Platen Glass (place document face down) (B) 16 stickers Procedure: (1) Display the Special copy screen. See "Special Copy" on page 37. (6) Press [Color] for..., or when using this function. z If appears on -screen instructions to . You can only load one sheet of stickers. (A) (4) Follow the on the LCD when scanning, set to select . Chapter 2 Copying 49
User's Guide
Page 54
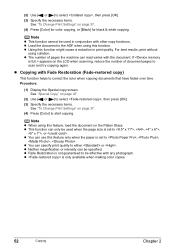
... collation. z Fade Restoration is set to start copying. z This function can read varies with any photograph. z Neither magnification or intensity can specify print quality to scan and try copying again. Note z This function cannot be effective with the document. Procedure: (1) Display the Special copy screen. z The number of document pages to... "Special Copy" on page 47. (2) Use [ ] or [ ] to select , then press [OK]. (3) Specify the necessary items. See "To Change Print Settings" on the LCD when scanning, reduce the number of pages the machine can only be specified.
... collation. z Fade Restoration is set to start copying. z This function can read varies with any photograph. z Neither magnification or intensity can specify print quality to scan and try copying again. Note z This function cannot be effective with the document. Procedure: (1) Display the Special copy screen. z The number of document pages to... "Special Copy" on page 47. (2) Use [ ] or [ ] to select , then press [OK]. (3) Specify the necessary items. See "To Change Print Settings" on the LCD when scanning, reduce the number of pages the machine can only be specified.
User's Guide
Page 68
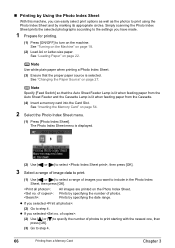
... is lit when feeding paper from the Auto Sheet Feeder and the Cassette Lamp is selected. See "Inserting the Memory Card" on page 27. Simply scanning the Photo Index Sheet prints the selected photographs according to the settings you selected : (2) Go to include in the Photo Index Sheet, then press [OK...
... is lit when feeding paper from the Auto Sheet Feeder and the Cassette Lamp is selected. See "Inserting the Memory Card" on page 27. Simply scanning the Photo Index Sheet prints the selected photographs according to the settings you selected : (2) Go to include in the Photo Index Sheet, then press [OK...
User's Guide
Page 70
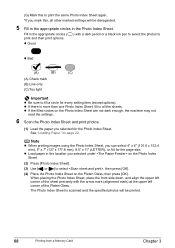
... a circle for the Photo Index Sheet. See "Loading Paper" on the Photo Index Sheet are not dark enough, the machine may not read the settings. 6 Scan the Photo Index Sheet and print photos. (1) Load the paper you can select 4" x 6" (101.6 x 152.4 mm), 5" x 7" (127 x 177.8 mm), 8.5" x 11" ... press [OK]. (4) Place the Photo Index Sheet on the Platen Glass, then press [OK]. (G) Mark this , all the sheets. z If there is scanned and the specified photos will be printed. 68 Printing from a Memory Card Chapter 3 Fill in the appropriate circles ( ) with the arrow mark (alignment mark)...
... a circle for the Photo Index Sheet. See "Loading Paper" on the Photo Index Sheet are not dark enough, the machine may not read the settings. 6 Scan the Photo Index Sheet and print photos. (1) Load the paper you can select 4" x 6" (101.6 x 152.4 mm), 5" x 7" (127 x 177.8 mm), 8.5" x 11" ... press [OK]. (4) Place the Photo Index Sheet on the Platen Glass, then press [OK]. (G) Mark this , all the sheets. z If there is scanned and the specified photos will be printed. 68 Printing from a Memory Card Chapter 3 Fill in the appropriate circles ( ) with the arrow mark (alignment mark)...


