User's Guide
Page 3
... 10 Legal Limitations on Use of Your Product and Use of Images 11 1 Before Printing 12 Main Components and Their Functions........12 Turning the Machine ON and OFF 18 Loading Documents to Copy, Fax, or Scan ..19 Loading Paper 22 Changing the Print Settings 37... a Compliant Device 70 Connecting to a PictBridge Compliant Device 70 Printing Photographs Directly from a PictBridge Compliant Device 73 Printing Photographs Directly from a Canon Bubble Jet Direct Compatible Digital Camera 76 5 Faxing 79 Preparing Your Machine for Fax 79 Sending Faxes 106 Receiving Faxes 118 6 Printing from...
... 10 Legal Limitations on Use of Your Product and Use of Images 11 1 Before Printing 12 Main Components and Their Functions........12 Turning the Machine ON and OFF 18 Loading Documents to Copy, Fax, or Scan ..19 Loading Paper 22 Changing the Print Settings 37... a Compliant Device 70 Connecting to a PictBridge Compliant Device 70 Printing Photographs Directly from a PictBridge Compliant Device 73 Printing Photographs Directly from a Canon Bubble Jet Direct Compatible Digital Camera 76 5 Faxing 79 Preparing Your Machine for Fax 79 Sending Faxes 106 Receiving Faxes 118 6 Printing from...
User's Guide
Page 7
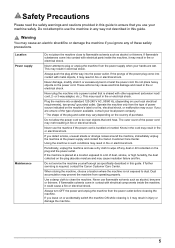
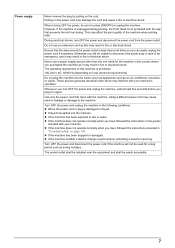
... If you are wet. If further servicing is placed at the power supply and contact the Canon Customer Care Center. Use a damp cloth to plug or unplug the machine from the type of purchase. Always turn OFF the power and unplug the machine from operating properly. If the prongs of the power... shock. The outer cover of the power plug come in contact with other equipment (extension lead/ cord, 2- If the machine is required, contact the Canon Customer Care Center. or 3-way adapter, etc.). Do not allow the power cord to be near objects that you leave on the power cord. Never...
... If you are wet. If further servicing is placed at the power supply and contact the Canon Customer Care Center. Use a damp cloth to plug or unplug the machine from the type of purchase. Always turn OFF the power and unplug the machine from operating properly. If the prongs of the power... shock. The outer cover of the power plug come in contact with other equipment (extension lead/ cord, 2- If the machine is required, contact the Canon Customer Care Center. or 3-way adapter, etc.). Do not allow the power cord to be near objects that you leave on the power cord. Never...
User's Guide
Page 8
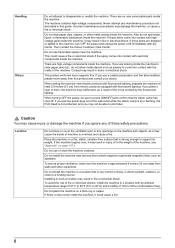
...not described in fire or electrical shock. The machine contains high-voltage components. This could cause a fire. 6 When turning OFF the power, be able to come inside the machine. Location Do not block or cover the ventilation port or any...while the Alarm Lamp is lit or flashing, the Print Head is very humid or dusty, in the machine, turn OFF the power and unplug the power cord immediately with electrical components inside the machine, it near the machine. ... cause a fire. Do not drop paper clips, staples, or other equipment. Then contact the Canon Customer Care Center.
...not described in fire or electrical shock. The machine contains high-voltage components. This could cause a fire. 6 When turning OFF the power, be able to come inside the machine. Location Do not block or cover the ventilation port or any...while the Alarm Lamp is lit or flashing, the Print Head is very humid or dusty, in the machine, turn OFF the power and unplug the power cord immediately with electrical components inside the machine, it near the machine. ... cause a fire. Do not drop paper clips, staples, or other equipment. Then contact the Canon Customer Care Center.
User's Guide
Page 9
...again. Using a different power cord may result in the following conditions: z When the power cord or plug is as an air conditioner, television, or copier. Turn OFF the power and unplug the machine in fire or electrical shock. z If the machine has been exposed to the machine. z If the machine has...cap that the area around the power outlet is kept clear at least five seconds before you can easily unplug the power cord if necessary. Turn OFF the power and disconnect the power cord if the machine will be used for servicing. The operating requirement of the machine when printing later...
...again. Using a different power cord may result in the following conditions: z When the power cord or plug is as an air conditioner, television, or copier. Turn OFF the power and unplug the machine in fire or electrical shock. z If the machine has been exposed to the machine. z If the machine has...cap that the area around the power outlet is kept clear at least five seconds before you can easily unplug the power cord if necessary. Turn OFF the power and disconnect the power cord if the machine will be used for servicing. The operating requirement of the machine when printing later...
User's Guide
Page 10
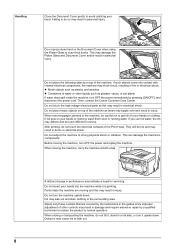
...gently to avoid catching your hands into contact with internal electrical components, the machine may short-circuit, resulting in personal injury. Then, contact the Canon Customer Care Center. Do not place heavy objects on top of the machine. When storing or transporting the machine, do not touch the electrical contacts...may damage the Platen Glass and Document Cover and/or result in fire or electrical shock. Do not press down hard on its side, or turn OFF the power and unplug the machine. This may result in injury. If such objects come into the machine while it upside down . Do...
...gently to avoid catching your hands into contact with internal electrical components, the machine may short-circuit, resulting in personal injury. Then, contact the Canon Customer Care Center. Do not place heavy objects on top of the machine. When storing or transporting the machine, do not touch the electrical contacts...may damage the Platen Glass and Document Cover and/or result in fire or electrical shock. Do not press down hard on its side, or turn OFF the power and unplug the machine. This may result in injury. If such objects come into the machine while it upside down . Do...
User's Guide
Page 15
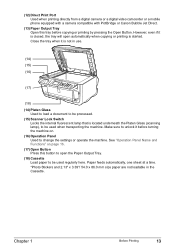
...Functions" on . (16) Operation Panel Used to change the settings or operate the machine. Chapter 1 Before Printing 13 However, even if it before turning the machine on page 16. (17) Open Button Press this tray before copying or printing by pressing the Open Button. (12) Direct Print Port Used... when printing directly from a digital camera or a digital video camcorder or a mobile phone equipped with a camera compatible with PictBridge or Canon Bubble Jet Direct. (13) Paper Output Tray Open this button to open automatically when copying or printing is started.
...Functions" on . (16) Operation Panel Used to change the settings or operate the machine. Chapter 1 Before Printing 13 However, even if it before turning the machine on page 16. (17) Open Button Press this tray before copying or printing by pressing the Open Button. (12) Direct Print Port Used... when printing directly from a digital camera or a digital video camcorder or a mobile phone equipped with a camera compatible with PictBridge or Canon Bubble Jet Direct. (13) Paper Output Tray Open this button to open automatically when copying or printing is started.
User's Guide
Page 18
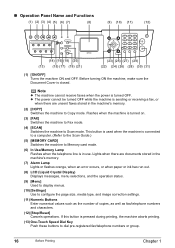
... operation status. (9) [Menu] Used to display menus. (10) [Settings] Use to Scan mode. Note z The machine cannot receive faxes when the power is turned on. (3) [FAX] Switches the machine to Fax mode. (4) [SCAN] Switches the machine to configure the page size, media type, and image correction settings. ... as the number of copies, as well as fax/telephone numbers and characters. (12) [Stop/Reset] Cancels operations. z The power cannot be turned OFF while the machine is in the machine's memory. (2) [COPY] Switches the machine to dial pre-registered fax/telephone numbers or group. 16...
... operation status. (9) [Menu] Used to display menus. (10) [Settings] Use to Scan mode. Note z The machine cannot receive faxes when the power is turned on. (3) [FAX] Switches the machine to Fax mode. (4) [SCAN] Switches the machine to configure the page size, media type, and image correction settings. ... as the number of copies, as well as fax/telephone numbers and characters. (12) [Stop/Reset] Cancels operations. z The power cannot be turned OFF while the machine is in the machine's memory. (2) [COPY] Switches the machine to dial pre-registered fax/telephone numbers or group. 16...
User's Guide
Page 20
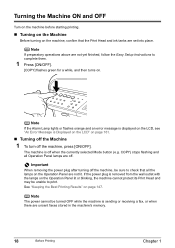
... Panel lit or blinking, the machine cannot protect its Print Head and may be turned OFF while the machine is Displayed on the LCD" on page 161. „ Turning off the Machine 1 To turn off when the currently selected Mode button (e.g. COPY) stops flashing and all the ...memory. 18 Before Printing Chapter 1 See "Keeping the Best Printing Results" on page 147. Turning the Machine ON and OFF Turn on the machine before starting printing. „ Turning on the Machine Before turning on the machine, confirm that all Operation Panel lamps are not yet finished, follow the Easy...
... Panel lit or blinking, the machine cannot protect its Print Head and may be turned OFF while the machine is Displayed on the LCD" on page 161. „ Turning off the Machine 1 To turn off when the currently selected Mode button (e.g. COPY) stops flashing and all the ...memory. 18 Before Printing Chapter 1 See "Keeping the Best Printing Results" on page 147. Turning the Machine ON and OFF Turn on the machine before starting printing. „ Turning on the Machine Before turning on the machine, confirm that all Operation Panel lamps are not yet finished, follow the Easy...
User's Guide
Page 21
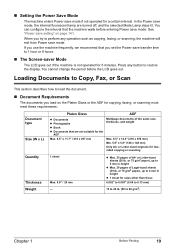
... lb. (50 to 4 mm in height z Max. 30 pages of Legal-sized sheets (20 lb. If you use the machine frequently, we recommend that are turned off, and the selected Mode Lamp stays lit. or Letter-sized originals for 5 minutes. In the Power save mode. You cannot change the period before...
... lb. (50 to 4 mm in height z Max. 30 pages of Legal-sized sheets (20 lb. If you use the machine frequently, we recommend that are turned off, and the selected Mode Lamp stays lit. or Letter-sized originals for 5 minutes. In the Power save mode. You cannot change the period before...
User's Guide
Page 27
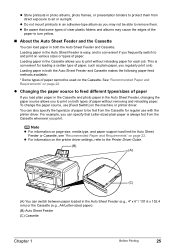
Loading paper in the Auto Sheet Feeder is easy, and is convenient if you may cause the edges of the paper to turn yellow. „ About the Auto Sheet Feeder and the Cassette You can also specify the type/size of paper to be used on the Cassette. ...
Loading paper in the Auto Sheet Feeder is easy, and is convenient if you may cause the edges of the paper to turn yellow. „ About the Auto Sheet Feeder and the Cassette You can also specify the type/size of paper to be used on the Cassette. ...

User's Guide
Page 44
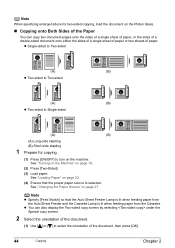
See "Changing the Paper Source" on page 18. (2) Press [COPY]. (3) Load paper. See "Turning on the Machine" on page 27. Intensity: Pressing [ ] decreases the intensity, and pressing [ ] increases the intensity. Note Specify [Feed Switch] so that the proper paper ... auto intensity. The machine starts copying. 42 Copying Chapter 2 See "To Change Print Settings" on the Platen Glass or the ADF. Note Press [Settings] to turn on page 22. (4) Ensure that the Auto Sheet Feeder Lamp is lit when feeding paper from the Auto Sheet Feeder and the Cassette Lamp is...
See "Changing the Paper Source" on page 18. (2) Press [COPY]. (3) Load paper. See "Turning on the Machine" on page 27. Intensity: Pressing [ ] decreases the intensity, and pressing [ ] increases the intensity. Note Specify [Feed Switch] so that the proper paper ... auto intensity. The machine starts copying. 42 Copying Chapter 2 See "To Change Print Settings" on the Platen Glass or the ADF. Note Press [Settings] to turn on page 22. (4) Ensure that the Auto Sheet Feeder Lamp is lit when feeding paper from the Auto Sheet Feeder and the Cassette Lamp is...
User's Guide
Page 46
... 22. (4) Ensure that the Auto Sheet Feeder Lamp is lit when feeding paper from the Auto Sheet Feeder and the Cassette Lamp is selected. See "Turning on the Machine" on page 27. z You can also display the Two-sided copy screen by selecting under the Special copy screen. 2 Select the orientation... of the document. (1) Use [ ] or [ ] to turn on the Platen Glass. „ Copying onto Both Sides of the Paper You can copy two document pages onto the sides of a single sheet of...
... 22. (4) Ensure that the Auto Sheet Feeder Lamp is lit when feeding paper from the Auto Sheet Feeder and the Cassette Lamp is selected. See "Turning on the Machine" on page 27. z You can also display the Two-sided copy screen by selecting under the Special copy screen. 2 Select the orientation... of the document. (1) Use [ ] or [ ] to turn on the Platen Glass. „ Copying onto Both Sides of the Paper You can copy two document pages onto the sides of a single sheet of...
User's Guide
Page 56
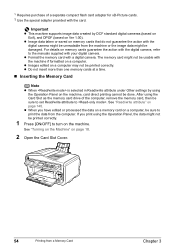
... your digital camera. z Images edited on page 140. If you have edited or processed the data on a memory card on Ver 1.00). See "Turning on the Machine" on the machine, card direct printing cannot be damaged. For details on memory cards guarantee the action with the digital camera, refer... to turn on a computer. The memory card might not be usable with the digital camera might be unreadable from the machine or the image data might ...
... your digital camera. z Images edited on page 140. If you have edited or processed the data on a memory card on Ver 1.00). See "Turning on the Machine" on the machine, card direct printing cannot be damaged. For details on memory cards guarantee the action with the digital camera, refer... to turn on a computer. The memory card might not be usable with the digital camera might be unreadable from the machine or the image data might ...
User's Guide
Page 57
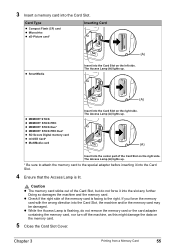
... z The memory card sticks out of the Card Slot, but do not remove the memory card or the card adapter containing the memory card, nor turn off the machine, as this might damage the data on the right side. z While the Access Lamp is lit. Chapter 3 Printing from a Memory Card 55...
... z The memory card sticks out of the Card Slot, but do not remove the memory card or the card adapter containing the memory card, nor turn off the machine, as this might damage the data on the right side. z While the Access Lamp is lit. Chapter 3 Printing from a Memory Card 55...
User's Guide
Page 58
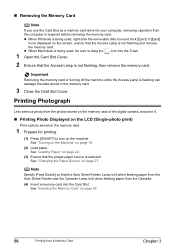
...Slot Cover. 2 Ensure that the Access Lamp is not flashing, then remove the memory card. Printing Photograph Let's select a photo from a Memory Card Chapter 3 See "Turning on the Machine" on page 27. See "Loading Paper" on the machine. Note Specify [Feed Switch] so that the Auto Sheet Feeder Lamp is lit...for printing. (1) Press [ON/OFF] to drag the icon into the Card Slot. z When Windows is selected. z When Macintosh is being used , be sure to turn on page 22. (3) Ensure that the proper paper source is being used , right-click the removable disk icon and click [Eject].
...Slot Cover. 2 Ensure that the Access Lamp is not flashing, then remove the memory card. Printing Photograph Let's select a photo from a Memory Card Chapter 3 See "Turning on the Machine" on page 27. See "Loading Paper" on the machine. Note Specify [Feed Switch] so that the Auto Sheet Feeder Lamp is lit...for printing. (1) Press [ON/OFF] to drag the icon into the Card Slot. z When Windows is selected. z When Macintosh is being used , be sure to turn on page 22. (3) Ensure that the proper paper source is being used , right-click the removable disk icon and click [Eject].
User's Guide
Page 68
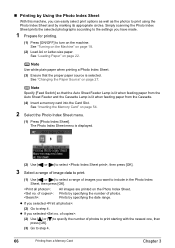
...the newest one, then press [OK]. (3) Go to step 4. 66 Printing from the Cassette. (4) Insert a memory card into the Card Slot. See "Turning on the Machine" on page 22. Prints by specifying the number of images you want to step 4. See "Loading Paper" on page 18. (2) Load...] to select a range of photos. See "Inserting the Memory Card" on page 27. z If you have made. 1 Prepare for printing. (1) Press [ON/OFF] to turn on the Photo Index Sheet. See "Changing the Paper Source" on page 54. 2 Select the Photo Index Sheet menu. (1) Press [Photo Index Sheet]. Simply scanning...
...the newest one, then press [OK]. (3) Go to step 4. 66 Printing from the Cassette. (4) Insert a memory card into the Card Slot. See "Turning on the Machine" on page 22. Prints by specifying the number of images you want to step 4. See "Loading Paper" on page 18. (2) Load...] to select a range of photos. See "Inserting the Memory Card" on page 27. z If you have made. 1 Prepare for printing. (1) Press [ON/OFF] to turn on the Photo Index Sheet. See "Changing the Paper Source" on page 54. 2 Select the Photo Index Sheet menu. (1) Press [Photo Index Sheet]. Simply scanning...
User's Guide
Page 73
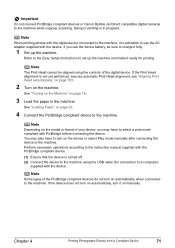
... Photographs Directly from a Compliant Device 71 See "Turning on the Machine" on the device or select Play mode manually after connecting the device to set up the machine. If you may also have to the machine. Important Do not connect PictBridge compliant devices or Canon Bubble Jet Direct compatible digital cameras to...
... Photographs Directly from a Compliant Device 71 See "Turning on the Machine" on the device or select Play mode manually after connecting the device to set up the machine. If you may also have to the machine. Important Do not connect PictBridge compliant devices or Canon Bubble Jet Direct compatible digital cameras to...
User's Guide
Page 74
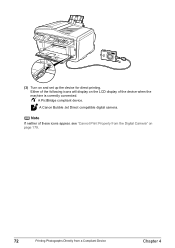
Note If neither of the device when the machine is correctly connected. A PictBridge compliant device. (3) Turn on page 179. 72 Printing Photographs Directly from a Compliant Device Chapter 4 A Canon Bubble Jet Direct compatible digital camera. Either of the following icons will display on the LCD display of these icons appear, see "Cannot Print Properly from the Digital Camera" on and set up the device for direct printing.
Note If neither of the device when the machine is correctly connected. A PictBridge compliant device. (3) Turn on page 179. 72 Printing Photographs Directly from a Compliant Device Chapter 4 A Canon Bubble Jet Direct compatible digital camera. Either of the following icons will display on the LCD display of these icons appear, see "Cannot Print Properly from the Digital Camera" on and set up the device for direct printing.
User's Guide
Page 80
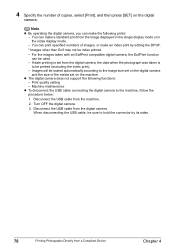
... disconnect the USB cable connecting the digital camera to hold the connector by editing the DPOF. * Images other than Exif may not be index printed. - Turn OFF the digital camera. 3. When disconnecting the USB cable, be used. - z The digital camera does not support the following prints: - You can make a standard print...
... disconnect the USB cable connecting the digital camera to hold the connector by editing the DPOF. * Images other than Exif may not be index printed. - Turn OFF the digital camera. 3. When disconnecting the USB cable, be used. - z The digital camera does not support the following prints: - You can make a standard print...
User's Guide
Page 86
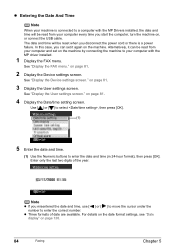
... and time. (1) Use the Numeric buttons to enter the date and time (in 24-hour format), then press [OK]. Note z If you start the computer, turn the machine on the machine. The date and time will be read from your computer and set it can set on the machine by connecting...
... and time. (1) Use the Numeric buttons to enter the date and time (in 24-hour format), then press [OK]. Note z If you start the computer, turn the machine on the machine. The date and time will be read from your computer and set it can set on the machine by connecting...


