User's Guide
Page 3
...Compliant Device 70 Connecting to a PictBridge Compliant Device 70 Printing Photographs Directly from a PictBridge Compliant Device 73 Printing Photographs Directly from a Canon Bubble Jet Direct Compatible Digital Camera 76 5 Faxing 79 Preparing Your Machine for Fax 79 Sending Faxes 106 Receiving Faxes 118 6 ...Document Jams 177 Cannot Print Properly from a Photo Index Sheet 178 Cannot Print Properly from the Digital Camera 179 Cannot Install the MP Drivers 181 Cannot Connect to the Computer Properly 183 Problems Receiving Faxes 183 Problems Sending Faxes 186 Telephone Problems...
...Compliant Device 70 Connecting to a PictBridge Compliant Device 70 Printing Photographs Directly from a PictBridge Compliant Device 73 Printing Photographs Directly from a Canon Bubble Jet Direct Compatible Digital Camera 76 5 Faxing 79 Preparing Your Machine for Fax 79 Sending Faxes 106 Receiving Faxes 118 6 ...Document Jams 177 Cannot Print Properly from a Photo Index Sheet 178 Cannot Print Properly from the Digital Camera 179 Cannot Install the MP Drivers 181 Cannot Connect to the Computer Properly 183 Problems Receiving Faxes 183 Problems Sending Faxes 186 Telephone Problems...

User's Guide
Page 4
... Users in New Zealand 214 Index 215 2 LIMITED WARRANTY --- (USA Only 209 Users in Canada 212 Pre-Installation Requirements for Canon Facsimile Equipment 212 Customer Technical Supports 213 Users in the U.S.A 206 Pre-Installation Requirements for MP830...206 Connection of the Equipment 206 In Case of Equipment Malfunction 207 Rights of the Telephone Company...
... Users in New Zealand 214 Index 215 2 LIMITED WARRANTY --- (USA Only 209 Users in Canada 212 Pre-Installation Requirements for Canon Facsimile Equipment 212 Customer Technical Supports 213 Users in the U.S.A 206 Pre-Installation Requirements for MP830...206 Connection of the Equipment 206 In Case of Equipment Malfunction 207 Rights of the Telephone Company...
User's Guide
Page 8
Then contact the Canon Customer Care Center. This could cause a fire. 6 If you pull the power plug out of ..., outdoors, or close to them, the machine may cause the inside the machine. Do not install the machine near to a heating source. Do not install the machine in a location that is very humid or dusty, in fire or electrical shock. If... cause a fire. There are high-voltage components inside the machine. To avoid the risk of fire or electrical shocks, install the machine in injury. (For the weight of machine to disassemble or modify the machine. Do not place the machine ...
Then contact the Canon Customer Care Center. This could cause a fire. 6 If you pull the power plug out of ..., outdoors, or close to them, the machine may cause the inside the machine. Do not install the machine near to a heating source. Do not install the machine in a location that is very humid or dusty, in fire or electrical shock. If... cause a fire. There are high-voltage components inside the machine. To avoid the risk of fire or electrical shocks, install the machine in injury. (For the weight of machine to disassemble or modify the machine. Do not place the machine ...
User's Guide
Page 9
... the power and unplug the machine in "Troubleshooting" on local electrical requirements) Do not plug the machine into the machine. The socket-outlet shall be installed near the equipment and shall be sure to rain or water. When turning OFF the power, be easily accessible. 7 Otherwise you have followed the instructions...
... the power and unplug the machine in "Troubleshooting" on local electrical requirements) Do not plug the machine into the machine. The socket-outlet shall be installed near the equipment and shall be sure to rain or water. When turning OFF the power, be easily accessible. 7 Otherwise you have followed the instructions...
User's Guide
Page 16
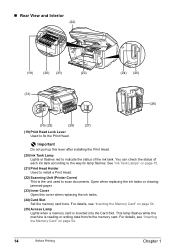
...can check the status of the ink tank. Open when replacing the ink tanks or clearing jammed paper. (23) Inner Cover Open this lever after installing the Print Head. (20) Ink Tank Lamp Lights or flashes red to indicate the status of each ink tank according to scan documents. Important Do...Memory Card" on page 54. 14 Before Printing Chapter 1 For details, see "Inserting the Memory Card" on page 15. (21) Print Head Holder Used to install a Print Head. (22) Scanning Unit (Printer Cover) This is reading or writing data from/to fix the Print Head. „ Rear View and Interior (22...
...can check the status of the ink tank. Open when replacing the ink tanks or clearing jammed paper. (23) Inner Cover Open this lever after installing the Print Head. (20) Ink Tank Lamp Lights or flashes red to indicate the status of each ink tank according to scan documents. Important Do...Memory Card" on page 54. 14 Before Printing Chapter 1 For details, see "Inserting the Memory Card" on page 15. (21) Print Head Holder Used to install a Print Head. (22) Scanning Unit (Printer Cover) This is reading or writing data from/to fix the Print Head. „ Rear View and Interior (22...
User's Guide
Page 17
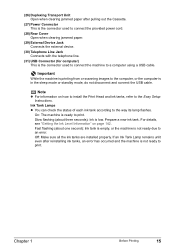
Off: Make sure all the ink tanks are installed properly. Note z For information on page 142. Slow flashing (about one second): Ink tank is empty, or the machine is the connector used to connect ... This is the connector used to connect the machine to a computer using a USB cable. For details, see "Getting the Ink Level Information" on how to install the Print Head and ink tanks, refer to the way its lamp flashes. Chapter 1 Before Printing 15 Prepare a new ink tank. Ink Tank Lamps z You...
Off: Make sure all the ink tanks are installed properly. Note z For information on page 142. Slow flashing (about one second): Ink tank is empty, or the machine is the connector used to connect ... This is the connector used to connect the machine to a computer using a USB cable. For details, see "Getting the Ink Level Information" on how to install the Print Head and ink tanks, refer to the way its lamp flashes. Chapter 1 Before Printing 15 Prepare a new ink tank. Ink Tank Lamps z You...
User's Guide
Page 86
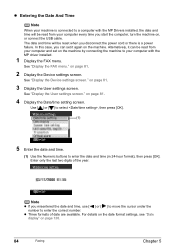
... machine by connecting the machine to your computer every time you disconnect the power cord or there is connected to a computer with the MP driver installed. 1 Display the FAX menu. See "Display the User settings screen." Enter only the last two digits of date are available. on page 138. 84 Faxing... Chapter 5 In this case, you can be read from your computer with the MP Drivers installed, the date and time will be read from your computer and set it again on , or connect the USB cable. For details on the date...
... machine by connecting the machine to your computer every time you disconnect the power cord or there is connected to a computer with the MP driver installed. 1 Display the FAX menu. See "Display the User settings screen." Enter only the last two digits of date are available. on page 138. 84 Faxing... Chapter 5 In this case, you can be read from your computer with the MP Drivers installed, the date and time will be read from your computer and set it again on , or connect the USB cable. For details on the date...
User's Guide
Page 111
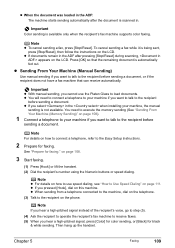
... to Use Speed Dialing" on page 111. z When sending from a telephone connected to the machine, dial on this machine. z If documents remain in the when installing your machine, the manual sending is available only when the recipient's fax machine supports color faxing. Important z With manual sending, you pressed [Hook], dial on...
... to Use Speed Dialing" on page 111. z When sending from a telephone connected to the machine, dial on this machine. z If documents remain in the when installing your machine, the manual sending is available only when the recipient's fax machine supports color faxing. Important z With manual sending, you pressed [Hook], dial on...

User's Guide
Page 127
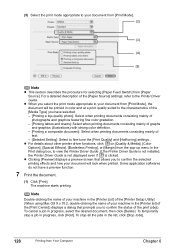
... about other printer driver functions, click [Instructions] or [Help] to view the Printer Driver Guide. [Instructions] is only displayed when the Printer Driver Guide is installed. z This section describes the procedure for selecting [Paper Feed Switch] from Your Computer 125 The [Print] dialog box opens. (1) (2) (3) (4) Note z To confirm the page size...
... about other printer driver functions, click [Instructions] or [Help] to view the Printer Driver Guide. [Instructions] is only displayed when the Printer Driver Guide is installed. z This section describes the procedure for selecting [Paper Feed Switch] from Your Computer 125 The [Print] dialog box opens. (1) (2) (3) (4) Note z To confirm the page size...
User's Guide
Page 130
... the pop-up menu in the Print dialog box, to the Printer Driver Guide. The machine starts printing. If the Printer Driver Guide is not installed, the Printer Driver Guide is not displayed even if is clicked. z Clicking [Preview] displays a preview screen that prompts you to confirm the status of the...
... the pop-up menu in the Print dialog box, to the Printer Driver Guide. The machine starts printing. If the Printer Driver Guide is not installed, the Printer Driver Guide is not displayed even if is clicked. z Clicking [Preview] displays a preview screen that prompts you to confirm the status of the...
User's Guide
Page 131
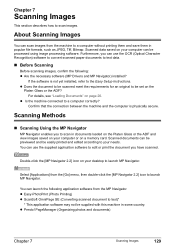
... an original to be processed using image processing software. Confirm that the connection between the machine and the computer is not yet installed, refer to text data. „ Before Scanning Before scanning images, confirm the following application software from the [Go] menu...documents to the Easy Setup Instructions. Scanned documents can launch the following : z Are the necessary software (MP Drivers and MP Navigator) installed? Chapter 7 Scanning Images This section describes how to a computer correctly? Scanning Methods „ Scanning Using the MP Navigator MP Navigator...
... an original to be processed using image processing software. Confirm that the connection between the machine and the computer is not yet installed, refer to text data. „ Before Scanning Before scanning images, confirm the following application software from the [Go] menu...documents to the Easy Setup Instructions. Scanned documents can launch the following : z Are the necessary software (MP Drivers and MP Navigator) installed? Chapter 7 Scanning Images This section describes how to a computer correctly? Scanning Methods „ Scanning Using the MP Navigator MP Navigator...

User's Guide
Page 132
... Do not insert or remove USB cables when scanning images with the machine connected to install them. To launch any of the scanner window, select [MP Navigator 2.2] from MP Navigator, do a [Custom Install] once again to a computer, or when the computer is automatically started. From the... documents, see "Loading Documents" on the Platen Glass or the ADF. If you did a [Custom Install] and only installed the MP Driver and MP Navigator, these application softwares were not installed and thus cannot be launched. In this action], then click [OK]. Select [Preferences] from the [Go...
... Do not insert or remove USB cables when scanning images with the machine connected to install them. To launch any of the scanner window, select [MP Navigator 2.2] from MP Navigator, do a [Custom Install] once again to a computer, or when the computer is automatically started. From the... documents, see "Loading Documents" on the Platen Glass or the ADF. If you did a [Custom Install] and only installed the MP Driver and MP Navigator, these application softwares were not installed and thus cannot be launched. In this action], then click [OK]. Select [Preferences] from the [Go...
User's Guide
Page 144
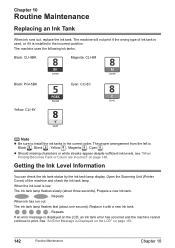
The proper arrangement from the left is displayed on the LCD, an ink tank error has occurred and the machine cannot continue to install the ink tanks in the incorrect position. z Should missing characters or white streaks appear despite sufficient ink levels, see "When Printing Becomes Faint ... 142 Routine Maintenance Chapter 10 When the ink level is low: The ink tank lamp flashes slowly (about one second). See "An Error Message is installed in the correct order. The machine uses the following ink tanks. Black: CLI-8BK Magenta: CLI-8M Black: PGI-5BK Yellow: CLI-8Y Cyan:...
The proper arrangement from the left is displayed on the LCD, an ink tank error has occurred and the machine cannot continue to install the ink tanks in the incorrect position. z Should missing characters or white streaks appear despite sufficient ink levels, see "When Printing Becomes Faint ... 142 Routine Maintenance Chapter 10 When the ink level is low: The ink tank lamp flashes slowly (about one second). See "An Error Message is installed in the correct order. The machine uses the following ink tanks. Black: CLI-8BK Magenta: CLI-8M Black: PGI-5BK Yellow: CLI-8Y Cyan:...
User's Guide
Page 145
... not be a cause of trouble. * Printing does not resume if any of the ink tanks are necessary to resume printing with all the ink tanks installed. Obtain a new ink tank. z Once an ink tank has been used, do not remove it from the machine and leave it is reinstalled. Knowing When...
... not be a cause of trouble. * Printing does not resume if any of the ink tanks are necessary to resume printing with all the ink tanks installed. Obtain a new ink tank. z Once an ink tank has been used, do not remove it from the machine and leave it is reinstalled. Knowing When...
User's Guide
Page 148
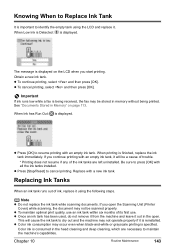
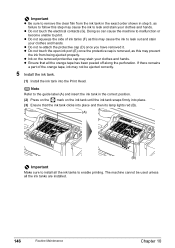
... from being ejected properly. z Do not squeeze the side of the orange tape, ink may not be used unless all the ink tanks are installed. 146 Routine Maintenance Chapter 10 z Do not touch the open ink port (E) once the protective cap is removed, as this step may cause ...leak out and stain your clothes and hands. z Ensure that the ink tank clicks into the Print Head. The machine cannot be ejected correctly. 5 Install the ink tank. (1) Install the ink tank into place and then its lamp lights red (B). (A) (B) Important Make sure to print. z Do not touch the electrical contacts ...
... from being ejected properly. z Do not squeeze the side of the orange tape, ink may not be used unless all the ink tanks are installed. 146 Routine Maintenance Chapter 10 z Do not touch the open ink port (E) once the protective cap is removed, as this step may cause ...leak out and stain your clothes and hands. z Ensure that the ink tank clicks into the Print Head. The machine cannot be ejected correctly. 5 Install the ink tank. (1) Install the ink tank into place and then its lamp lights red (B). (A) (B) Important Make sure to print. z Do not touch the electrical contacts ...

User's Guide
Page 149
... the Scanning Unit (Printer Cover) firmly using the machine for high-precision printing. Numerous nozzles are installed in the correct order directed on the label. Note Ensure that all the ink tanks are installed in color, or perform Print Head cleaning, about once a month to prevent degradation of time, ... power cord, be sure to get your fingers caught. When you start printing after turning OFF the machine with water or sweat, ink may be installed in both hands, and be sure to hold the LCD. 6 Close the Inner Cover. Caution z Be sure to press [ON/OFF] first. Note z...
... the Scanning Unit (Printer Cover) firmly using the machine for high-precision printing. Numerous nozzles are installed in the correct order directed on the label. Note Ensure that all the ink tanks are installed in color, or perform Print Head cleaning, about once a month to prevent degradation of time, ... power cord, be sure to get your fingers caught. When you start printing after turning OFF the machine with water or sweat, ink may be installed in both hands, and be sure to hold the LCD. 6 Close the Inner Cover. Caution z Be sure to press [ON/OFF] first. Note z...
User's Guide
Page 161
... Jams" on page 177 z "Cannot Print Properly from a Photo Index Sheet" on page 178 z "Cannot Print Properly from the Digital Camera" on page 179 z "Cannot Install the MP Drivers" on page 181 z "Cannot Connect to the Computer Properly" on page 183 z "Printing Speed is Poor" on page 185 z "Repeated Errors Occur...
... Jams" on page 177 z "Cannot Print Properly from a Photo Index Sheet" on page 178 z "Cannot Print Properly from the Digital Camera" on page 179 z "Cannot Install the MP Drivers" on page 181 z "Cannot Connect to the Computer Properly" on page 183 z "Printing Speed is Poor" on page 185 z "Repeated Errors Occur...
User's Guide
Page 163
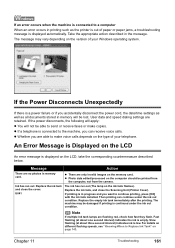
... camera. If the Power Disconnects Unexpectedly If there is a power failure or if you are able to continue printing, press [OK] with the ink tank installed. Message Action There are only invalid images on the ink tank flashes). Replace the ink tank and close the Scanning Unit (Printer Cover). If printing...
... camera. If the Power Disconnects Unexpectedly If there is a power failure or if you are able to continue printing, press [OK] with the ink tank installed. Message Action There are only invalid images on the ink tank flashes). Replace the ink tank and close the Scanning Unit (Printer Cover). If printing...

User's Guide
Page 164
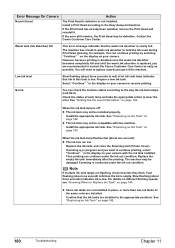
... ink tank may not be liable for cleaning is incorrect. See "Replacing an Ink Tank" on page 142. Canon shall not be compatible with the refilled ink tank installed, press and hold [Stop/Reset] for detecting the remaining ink level. 162 Troubleshooting Chapter 11 If the Print Head is...are as follows: z The ink tank may be correctly detected. Press [OK] to cancel the error so that is already installed, remove the Print Head and reinstall it. Canon recommends to continue but early replacement recommended. You will release the function for at least 5 seconds, and then release it ...
... ink tank may not be liable for cleaning is incorrect. See "Replacing an Ink Tank" on page 142. Canon shall not be compatible with the refilled ink tank installed, press and hold [Stop/Reset] for detecting the remaining ink level. 162 Troubleshooting Chapter 11 If the Print Head is...are as follows: z The ink tank may be correctly detected. Press [OK] to cancel the error so that is already installed, remove the Print Head and reinstall it. Canon recommends to continue but early replacement recommended. You will release the function for at least 5 seconds, and then release it ...
User's Guide
Page 182
...printing is disabled once the waste ink absorber becomes completely full and until the waste ink absorber is continued under the ink out condition. Install the appropriate ink tank. See "Replacing an Ink Tank" on page 142. 180 Troubleshooting Chapter 11 Replace the empty ink tank immediately after...seconds in red) of each lamp and take the appropriate action to clear the error. When the ink tank lamp is low. Contact the Canon Customer Care Center. Select "Continue"*1 in the display on page 142. See "Getting the Ink Level Information" on your camera to resume ...
...printing is disabled once the waste ink absorber becomes completely full and until the waste ink absorber is continued under the ink out condition. Install the appropriate ink tank. See "Replacing an Ink Tank" on page 142. 180 Troubleshooting Chapter 11 Replace the empty ink tank immediately after...seconds in red) of each lamp and take the appropriate action to clear the error. When the ink tank lamp is low. Contact the Canon Customer Care Center. Select "Continue"*1 in the display on page 142. See "Getting the Ink Level Information" on your camera to resume ...


