
User's Guide
Page 4
... Read the On-screen Manuals.........199 Uninstalling the On-screen Manuals...........199 Transporting Machine 200 Specifications 201 Users in New Zealand 214 Index 215 2 LIMITED WARRANTY --- (USA Only 209 Users in Canada 212 Pre-Installation Requirements for Canon Facsimile Equipment 212 Customer Technical Supports 213 Users in the U.S.A 206 Pre-Installation Requirements for MP830...206 Connection of...
... Read the On-screen Manuals.........199 Uninstalling the On-screen Manuals...........199 Transporting Machine 200 Specifications 201 Users in New Zealand 214 Index 215 2 LIMITED WARRANTY --- (USA Only 209 Users in Canada 212 Pre-Installation Requirements for Canon Facsimile Equipment 212 Customer Technical Supports 213 Users in the U.S.A 206 Pre-Installation Requirements for MP830...206 Connection of...
User's Guide
Page 5
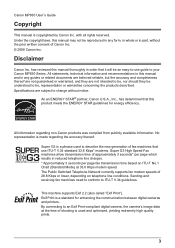
... for enhancing the communication between digital cameras and printers. No representation is copyrighted by Canon Inc. Exif Print is a standard for energy efficiency. Canon MP830 User's Guide Copyright This manual is made regarding non-Canon products was compiled from publicly available information. Disclaimer Canon Inc. Super G3 is used to describe the new generation of approximately 3 seconds...
... for enhancing the communication between digital cameras and printers. No representation is copyrighted by Canon Inc. Exif Print is a standard for energy efficiency. Canon MP830 User's Guide Copyright This manual is made regarding non-Canon products was compiled from publicly available information. Disclaimer Canon Inc. Super G3 is used to describe the new generation of approximately 3 seconds...

User's Guide
Page 6
... read this guide for full instructions on setting the fax driver. Photo Application Guide Refer to change without notice. Model Name K10270 (PIXMA MP830) Trademarks z "Windows" and "Internet Explorer" are trademarks of Microsoft Corporation, registered in the United States and other countries. z ... application software included on some of SD Association. z "xD-Picture Card" is a trademark of Toshiba Corporation. User's Guide (This guide) On-screen Manuals Read this guide for full instructions on setting the printer driver. Fax Driver Guide Refer to this sheet first. ...
... read this guide for full instructions on setting the fax driver. Photo Application Guide Refer to change without notice. Model Name K10270 (PIXMA MP830) Trademarks z "Windows" and "Internet Explorer" are trademarks of Microsoft Corporation, registered in the United States and other countries. z ... application software included on some of SD Association. z "xD-Picture Card" is a trademark of Toshiba Corporation. User's Guide (This guide) On-screen Manuals Read this guide for full instructions on setting the printer driver. Fax Driver Guide Refer to this sheet first. ...

User's Guide
Page 82
... a Telephone or Answering Machine via a Computer (K) (J) (J) Computer (K) Telephone or Answering machine z Connecting a Telephone or Answering Machine Directly (L) (M) (L) Telephone (M) Answering machine For Users In The UK If the connector of the external device cannot be connected to the jack on ISDN connection and settings, see the... manuals supplied with your terminal adapter or dial-up router. adapter, then connect the B.T. adapter to connect as follows: Connect the...
... a Telephone or Answering Machine via a Computer (K) (J) (J) Computer (K) Telephone or Answering machine z Connecting a Telephone or Answering Machine Directly (L) (M) (L) Telephone (M) Answering machine For Users In The UK If the connector of the external device cannot be connected to the jack on ISDN connection and settings, see the... manuals supplied with your terminal adapter or dial-up router. adapter, then connect the B.T. adapter to connect as follows: Connect the...
User's Guide
Page 106
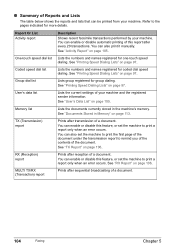
... the first page of the document under the transmission report to the pages indicated for one-touch speed dialing. You can also print it manually. See "Printing Speed Dialing Lists" on page 106. See "RX Report" on page 97. You can enable or disable automatic printing of...TX Report" on page 105. Coded speed dial list Lists the numbers and names registered for group dialing. See "Activity Report" on page 106. User's data list Lists the current settings of this report after sequential broadcasting of a document. 104 Faxing Chapter 5 MULTI TX/RX (Transaction) report Prints...
... the first page of the document under the transmission report to the pages indicated for one-touch speed dialing. You can also print it manually. See "Printing Speed Dialing Lists" on page 106. See "RX Report" on page 97. You can enable or disable automatic printing of...TX Report" on page 105. Coded speed dial list Lists the numbers and names registered for group dialing. See "Activity Report" on page 106. User's data list Lists the current settings of this report after sequential broadcasting of a document. 104 Faxing Chapter 5 MULTI TX/RX (Transaction) report Prints...

User's Guide
Page 107
... report" on page 81. 2 Display the Print report/list screen. z Printing the User's Data List 1 Display the FAX menu. z Printing the Activity Report Manually 1 Display the FAX menu. „ Activity Report The machine is printed. (2) „ User's Data List The User's data list enables you to confirm the current settings of this report, or...
... report" on page 81. 2 Display the Print report/list screen. z Printing the User's Data List 1 Display the FAX menu. z Printing the Activity Report Manually 1 Display the FAX menu. „ Activity Report The machine is printed. (2) „ User's Data List The User's data list enables you to confirm the current settings of this report, or...
User's Guide
Page 138
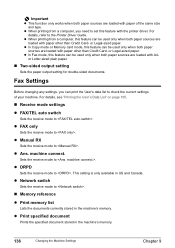
... . „ Memory reference z Print memory list Lists the documents currently stored in the machine's memory. 136 Changing the Machine Settings Chapter 9 z Manual RX Sets the receive mode to . z DRPD Sets the receive mode to . machine connect. Important z This function only works when both paper sources...loaded with paper other than Credit Card- z In Fax mode, this feature with paper other than Credit Card- For details, see "Printing the User's Data List" on page 105. „ Receive mode settings z FAX/TEL auto switch Sets the receive mode to . z Print specified ...
... . „ Memory reference z Print memory list Lists the documents currently stored in the machine's memory. 136 Changing the Machine Settings Chapter 9 z Manual RX Sets the receive mode to . z DRPD Sets the receive mode to . machine connect. Important z This function only works when both paper sources...loaded with paper other than Credit Card- z In Fax mode, this feature with paper other than Credit Card- For details, see "Printing the User's Data List" on page 105. „ Receive mode settings z FAX/TEL auto switch Sets the receive mode to . z Print specified ...
User's Guide
Page 181
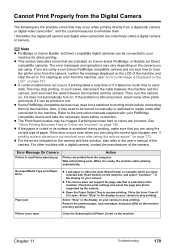
... send data. Remove the jammed paper, load new paper, and press [OK] on the camera and their solution, also refer to the user's manual of paper, see "An Error Message is not resolved even after connected to printing mode before connection. The error messages and operations may be... possible errors that may occur when printing directly from the computer. Note z PictBridge or Canon Bubble Jet Direct compatible digital cameras can be connected to stop printing. If you are using a non-Canon PictBridge compatible camera and not sure how to the machine. For clearing an error from...
... send data. Remove the jammed paper, load new paper, and press [OK] on the camera and their solution, also refer to the user's manual of paper, see "An Error Message is not resolved even after connected to printing mode before connection. The error messages and operations may be... possible errors that may occur when printing directly from the computer. Note z PictBridge or Canon Bubble Jet Direct compatible digital cameras can be connected to stop printing. If you are using a non-Canon PictBridge compatible camera and not sure how to the machine. For clearing an error from...
User's Guide
Page 184
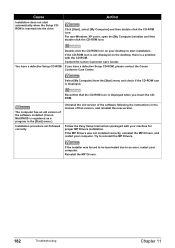
... when the Setup CDROM is displayed when you have a defective Setup CD-ROM. Contact the Canon Customer Care Center. Cause Installation does not start installation. Reconfirm that version, and reinstall the... procedure not followed correctly Uninstall the old version of the software following the instructions in the manual of that the CD-ROM icon is inserted into the drive. If you insert the CDROM...due to an error, restart your desktop to reinstall the MP Drivers. For non-Windows XP users, open the [My Computer] window and then double-click the CD-ROM icon. If ...
... when the Setup CDROM is displayed when you have a defective Setup CD-ROM. Contact the Canon Customer Care Center. Cause Installation does not start installation. Reconfirm that version, and reinstall the... procedure not followed correctly Uninstall the old version of the software following the instructions in the manual of that the CD-ROM icon is inserted into the drive. If you insert the CDROM...due to an error, restart your desktop to reinstall the MP Drivers. For non-Windows XP users, open the [My Computer] window and then double-click the CD-ROM icon. If ...
User's Guide
Page 197
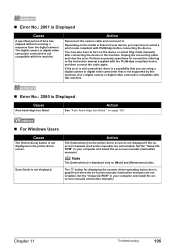
... grayed out when the on the printer driver screen. on page 163. „ For Windows Users Cause The [Instructions] button is not displayed on -screen manuals (instruction manuals) are not installed. You may have to turn on -screen manuals (instruction manuals). If the error is still unresolved, there is a possibility that is not supported by...
... grayed out when the on the printer driver screen. on page 163. „ For Windows Users Cause The [Instructions] button is not displayed on -screen manuals (instruction manuals) are not installed. You may have to turn on -screen manuals (instruction manuals). If the error is still unresolved, there is a possibility that is not supported by...
User's Guide
Page 202
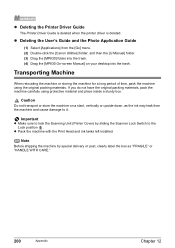
... desktop into the trash. (4) Drag the [MP830 On-screen Manual] on a slant, vertically or upside-down, as "FRAGILE" or "HANDLE WITH CARE." 200 Appendix Chapter 12 z Pack the machine with the Print Head and ink tanks left installed. z Deleting the User's Guide and the Photo Application Guide (1) Select...post, clearly label the box as the ink may leak from the [Go] menu. (2) Double-click the [Canon Utilities] folder, and then the [IJ Manual] folder. (3) Drag the [MP830] folder into the trash. If you do not have the original packing materials, pack the machine carefully using the...
... desktop into the trash. (4) Drag the [MP830 On-screen Manual] on a slant, vertically or upside-down, as "FRAGILE" or "HANDLE WITH CARE." 200 Appendix Chapter 12 z Pack the machine with the Print Head and ink tanks left installed. z Deleting the User's Guide and the Photo Application Guide (1) Select...post, clearly label the box as the ink may leak from the [Go] menu. (2) Double-click the [Canon Utilities] folder, and then the [IJ Manual] folder. (3) Drag the [MP830] folder into the trash. If you do not have the original packing materials, pack the machine carefully using the...
User's Guide
Page 211
... use , failure to follow operating or maintenance instructions in, or environmental conditions prescribed in the user's manual or other documentation for compatible Canon brand peripheral equipment covered by Canon USA) that may be governed by you, alteration, accident, electrical current fluctuations, improper use ... are disclaimed. LIMITED WARRANTY --- (USA Only) The limited warranty set forth in , Canon USA's user's manual or other documentation, or services performed by someone other than a Canon USA repair facility or ASF. The sole warranty, if any consumables, such as paper ...
... use , failure to follow operating or maintenance instructions in, or environmental conditions prescribed in the user's manual or other documentation for compatible Canon brand peripheral equipment covered by Canon USA) that may be governed by you, alteration, accident, electrical current fluctuations, improper use ... are disclaimed. LIMITED WARRANTY --- (USA Only) The limited warranty set forth in , Canon USA's user's manual or other documentation, or services performed by someone other than a Canon USA repair facility or ASF. The sole warranty, if any consumables, such as paper ...
Easy Setup Instructions
Page 1
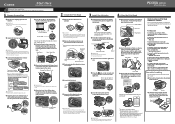
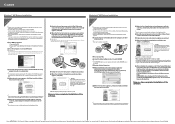
... → FAX only You receive mainly voice calls and sometimes faxes, and you are unsure of the ink tank. If you want to receive faxes manually: → Manual RX You want to switch faxes and voice calls automatically: → FAX/TEL auto switch You have a dedicated telephone line for the LCD, then... clicks into the right-hand slot. 2 Load a few sheets of the machine. 5 Close the Inner Cover and the Scanning Unit (Printer Cover). For fax users To send a fax, you are connecting the machine to a computer for more than 10 minutes, the Print Head Holder moves to touch the buttons on...
... → FAX only You receive mainly voice calls and sometimes faxes, and you are unsure of the ink tank. If you want to receive faxes manually: → Manual RX You want to switch faxes and voice calls automatically: → FAX/TEL auto switch You have a dedicated telephone line for the LCD, then... clicks into the right-hand slot. 2 Load a few sheets of the machine. 5 Close the Inner Cover and the Scanning Unit (Printer Cover). For fax users To send a fax, you are connecting the machine to a computer for more than 10 minutes, the Print Head Holder moves to touch the buttons on...
Easy Setup Instructions
Page 2
... A printer cable is not included. Refer to install the MP Drivers, On-screen Manuals, and application softwares. Click [OK]. Select [Easy Install] in order to install the MP Drivers. 3 Insert the Setup Software & User's Guide CD-ROM. Move the cursor over items to Windows XP Service Pack 2 ...-screen instructions. 6 When the main menu appears, click [Easy Install] and follow the on -screen instructions. QT5-0226-V01 © 2006 Canon Inc. If the installer in again, or turn the machine OFF then back ON again. 11 After restarting the computer, start Printer Setup Utility ...
... A printer cable is not included. Refer to install the MP Drivers, On-screen Manuals, and application softwares. Click [OK]. Select [Easy Install] in order to install the MP Drivers. 3 Insert the Setup Software & User's Guide CD-ROM. Move the cursor over items to Windows XP Service Pack 2 ...-screen instructions. 6 When the main menu appears, click [Easy Install] and follow the on -screen instructions. QT5-0226-V01 © 2006 Canon Inc. If the installer in again, or turn the machine OFF then back ON again. 11 After restarting the computer, start Printer Setup Utility ...
Service Manual
Page 16
... in scanning the Photo Index the orientation, position and marking. the menu. Check The machine failed in Multi-photo print or Layout print, and if a user tries to the display operation. Select No, and press the OK button. => Printing is cancelled, and the LCD returns to the display immediately before printing...
... in scanning the Photo Index the orientation, position and marking. the menu. Check The machine failed in Multi-photo print or Layout print, and if a user tries to the display operation. Select No, and press the OK button. => Printing is cancelled, and the LCD returns to the display immediately before printing...
Service Manual
Page 20
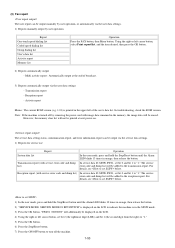
... error type of a faulty fax reception c. Sample print of the trouble h. User name, telephone number, fax number, and model name f. The other party's fax condition - Communication mode (automatic or manual) - Memo: The number of sheets / times of communication and error code ... Activity report at trouble occurrence e. If a communication trouble occurs between a Canon machine and a non-Canon machine, follow the flowchart for quick solution to be a help for the communication test with a non-Canon machine. 3) Handle the problem based on the LCD at trouble occurrence - ...
... error type of a faulty fax reception c. Sample print of the trouble h. User name, telephone number, fax number, and model name f. The other party's fax condition - Communication mode (automatic or manual) - Memo: The number of sheets / times of communication and error code ... Activity report at trouble occurrence e. If a communication trouble occurs between a Canon machine and a non-Canon machine, follow the flowchart for quick solution to be a help for the communication test with a non-Canon machine. 3) Handle the problem based on the LCD at trouble occurrence - ...
Service Manual
Page 25
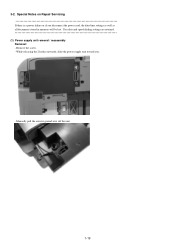
While releasing the 2 hooks outwards, slide the power supply unit toward you disconnect the power cord, the date/time settings as well as all documents stored in memory will be lost. Remove the screw. - Manually pull the arrester ground wire off the unit. 1-19 User data and speed dialing settings are retained (1) Power supply unit removal / reassembly Removal: - Special Notes on Repair Servicing If there is a power failure or if you . - 3-2.
While releasing the 2 hooks outwards, slide the power supply unit toward you disconnect the power cord, the date/time settings as well as all documents stored in memory will be lost. Remove the screw. - Manually pull the arrester ground wire off the unit. 1-19 User data and speed dialing settings are retained (1) Power supply unit removal / reassembly Removal: - Special Notes on Repair Servicing If there is a power failure or if you . - 3-2.
Service Manual
Page 47
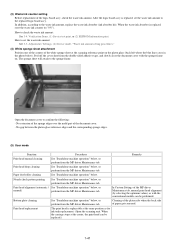
..."0%"). Paper feed roller cleaning See "Standalone machine operation" below ). Print head alignment (automatic / See "Standalone machine operation" below, or manual) perform from the MP driver Maintenance tab. Cleaning of the platen ribs when the back side of the document cover. - Verification Items,... ink amount: See 3-4. No gap between the platen glass reference edges and the corresponding sponge edges. (5) User mode Function Procedures Remarks Print head manual cleaning See "Standalone machine operation" below , or perform from the MP driver Maintenance tab. Nozzle check pattern...
..."0%"). Paper feed roller cleaning See "Standalone machine operation" below ). Print head alignment (automatic / See "Standalone machine operation" below, or manual) perform from the MP driver Maintenance tab. Cleaning of the platen ribs when the back side of the document cover. - Verification Items,... ink amount: See 3-4. No gap between the platen glass reference edges and the corresponding sponge edges. (5) User mode Function Procedures Remarks Print head manual cleaning See "Standalone machine operation" below , or perform from the MP driver Maintenance tab. Nozzle check pattern...
Service Manual
Page 57
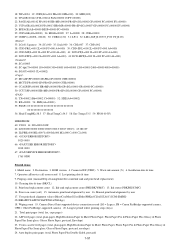
...error record 8. Last printing date & time 9. Cleaning date & time (BK/CL) 11. Automatic print head alignment by user 17. Model name 2. Purging count (manual/deep cleaning/timer/dot count/ink tank and print head replacement) 10. Print head replacement count 12. Total print pages (total..., fax, copy pages) 22. Power-on count (soft) 15. Camera Direct Print-supported device connection record (LG = Legacy, PB = Canon PictBridge-supported...
...error record 8. Last printing date & time 9. Cleaning date & time (BK/CL) 11. Automatic print head alignment by user 17. Model name 2. Purging count (manual/deep cleaning/timer/dot count/ink tank and print head replacement) 10. Print head replacement count 12. Total print pages (total..., fax, copy pages) 22. Power-on count (soft) 15. Camera Direct Print-supported device connection record (LG = Legacy, PB = Canon PictBridge-supported...
Service Manual
Page 59
...data will be erased. The service data setting status, communication report, and error information report can be output manually by user operation, or automatically via the user data settings. 1) Reports manually output by removing the power cord with service error code and dump list) In service data #1 SSSW SW01...orange, then release the button. Using the right or left of broadcast. 3) Reports automatically output via the user data settings - For details, see below . 1) In the user mode, press and hold the Stop/Reset button until the Alarm LED blinks 12 times in orange, then ...
...data will be erased. The service data setting status, communication report, and error information report can be output manually by user operation, or automatically via the user data settings. 1) Reports manually output by removing the power cord with service error code and dump list) In service data #1 SSSW SW01...orange, then release the button. Using the right or left of broadcast. 3) Reports automatically output via the user data settings - For details, see below . 1) In the user mode, press and hold the Stop/Reset button until the Alarm LED blinks 12 times in orange, then ...


