PIXMA MP750/780 Quick Start Guide
Page 10
...out and stain clothing or the surrounding area. • Never touch the print head. 9 If a child ingests any ink, consult a doctor immediately. • Do not shake print heads or ink tanks. This may result in personal injury. • When moving and this machine is printing. Pulling on the cord.... Otherwise you can easily unplug the power cord if necessary. z Print head/Ink tanks • For safety reasons, store print heads and ink tanks out of the reach of small children. Failing to do so may result in personal injury. • Do...
...out and stain clothing or the surrounding area. • Never touch the print head. 9 If a child ingests any ink, consult a doctor immediately. • Do not shake print heads or ink tanks. This may result in personal injury. • When moving and this machine is printing. Pulling on the cord.... Otherwise you can easily unplug the power cord if necessary. z Print head/Ink tanks • For safety reasons, store print heads and ink tanks out of the reach of small children. Failing to do so may result in personal injury. • Do...
PIXMA MP750/780 Quick Start Guide
Page 15
... warranty period of sale will be presumed to which there shall be governed by the Canon USA repair facility or the ASF. The sole warranty, if any consumables, such as paper or ink cartridges, as determined by the terms of warranty service. This warranty does not cover ...any accessories, or any , with compatible computers, peripheral equipment and software. Canon USA shall have resulted from the date of original purchase for ...
... warranty period of sale will be presumed to which there shall be governed by the Canon USA repair facility or the ASF. The sole warranty, if any consumables, such as paper or ink cartridges, as determined by the terms of warranty service. This warranty does not cover ...any accessories, or any , with compatible computers, peripheral equipment and software. Canon USA shall have resulted from the date of original purchase for ...
PIXMA MP750/780 Quick Start Guide
Page 22
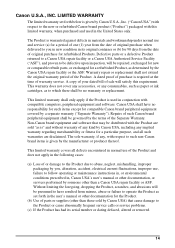
z Rear view and interior (16) (17) (18) (19) (20) (21) (22) (25) (24) (23) (16) Scanning Unit (Printer Cover) Lift this unit until it locks into place when the Inner Cover 2 needs to be opened. (17) Print Head Holder Used to install a print head. (18) Inner Cover 2 Open this cover when replacing the ink tanks, or clearing a paper jam. (19) Inner Cover 1 Open this cover when replacing the ink tanks, or clearing a paper jam. (20) Power Connector Used to connect the power cord to the machine. (21) Rear Cover Open when clearing jammed paper. 21 Introduction Chapter 1
z Rear view and interior (16) (17) (18) (19) (20) (21) (22) (25) (24) (23) (16) Scanning Unit (Printer Cover) Lift this unit until it locks into place when the Inner Cover 2 needs to be opened. (17) Print Head Holder Used to install a print head. (18) Inner Cover 2 Open this cover when replacing the ink tanks, or clearing a paper jam. (19) Inner Cover 1 Open this cover when replacing the ink tanks, or clearing a paper jam. (20) Power Connector Used to connect the power cord to the machine. (21) Rear Cover Open when clearing jammed paper. 21 Introduction Chapter 1

PIXMA MP750/780 Quick Start Guide
Page 24
... temporarily to photo print mode. (10) Alarm Lamp Flashes when the machine is turned ON or OFF, when an error occurs, or when paper or ink has run out. (11) [Enlarge/Reduce] Sets the enlargement or reduction ratio for copying. (12) [Collate] Selects software collation (sorting). (13) [Paper] Selects the paper...
... temporarily to photo print mode. (10) Alarm Lamp Flashes when the machine is turned ON or OFF, when an error occurs, or when paper or ink has run out. (11) [Enlarge/Reduce] Sets the enlargement or reduction ratio for copying. (12) [Collate] Selects software collation (sorting). (13) [Paper] Selects the paper...
PIXMA MP750/780 Quick Start Guide
Page 26
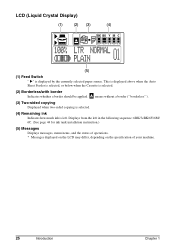
means without a border (" borderless" ). (3) Two-sided copying Displayed when two-sided copying is selected. (4) Remaining ink Indicates how much ink is selected. (2) Borderless/with border Indicates whether a border should be applied. This is displayed above when the Auto Sheet Feeder is selected..., or below when the Cassette is left in the following sequence: 6BK/3eBK/6Y/6M/ 6C. (See page 44 for ink tank installation instruction.) (5) Messages Displays messages, menu items, and the status of operations. * Messages displayed on the LCD may differ, depending on ...
means without a border (" borderless" ). (3) Two-sided copying Displayed when two-sided copying is selected. (4) Remaining ink Indicates how much ink is selected. (2) Borderless/with border Indicates whether a border should be applied. This is displayed above when the Auto Sheet Feeder is selected..., or below when the Cassette is left in the following sequence: 6BK/3eBK/6Y/6M/ 6C. (See page 44 for ink tank installation instruction.) (5) Messages Displays messages, menu items, and the status of operations. * Messages displayed on the LCD may differ, depending on ...
PIXMA MP750/780 Quick Start Guide
Page 45
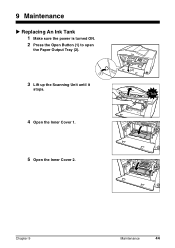
Chapter 9 Maintenance 44 9 Maintenance X Replacing An Ink Tank 1 Make sure the power is turned ON. 2 Press the Open Button (1) to open the Paper Output Tray (2). (1) 3 Lift up the Scanning Unit until it stops. 4 Open the Inner Cover 1. (2) Click 5 Open the Inner Cover 2.
Chapter 9 Maintenance 44 9 Maintenance X Replacing An Ink Tank 1 Make sure the power is turned ON. 2 Press the Open Button (1) to open the Paper Output Tray (2). (1) 3 Lift up the Scanning Unit until it stops. 4 Open the Inner Cover 1. (2) Click 5 Open the Inner Cover 2.
PIXMA MP750/780 Quick Start Guide
Page 46
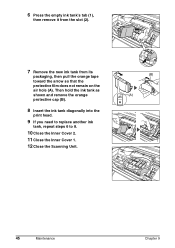
Then hold the ink tank as shown and remove the orange protective cap (B). 8 Insert the ink tank diagonally into the print head. 9 If you need to replace another ink tank, repeat steps 6 to 8. 10 Close the Inner Cover 2. 11 Close the Inner Cover 1. 12 Close the Scanning Unit. (1) (B) (A) 45 Maintenance Chapter 9 6 Press the empty ink tank's tab (1), then remove it from the slot (2). (2) 7 Remove the new ink tank from its packaging, then pull the orange tape toward the arrow so that the protective film does not remain on the air hole (A).
Then hold the ink tank as shown and remove the orange protective cap (B). 8 Insert the ink tank diagonally into the print head. 9 If you need to replace another ink tank, repeat steps 6 to 8. 10 Close the Inner Cover 2. 11 Close the Inner Cover 1. 12 Close the Scanning Unit. (1) (B) (A) 45 Maintenance Chapter 9 6 Press the empty ink tank's tab (1), then remove it from the slot (2). (2) 7 Remove the new ink tank from its packaging, then pull the orange tape toward the arrow so that the protective film does not remain on the air hole (A).
PIXMA MP750/780 Quick Start Guide
Page 49
One Canon Plaza, Lake Success, NY 11042, U.S.A. Ltd. 1 Harbour Front Avenue #04-00 Keppel Bay Tower, Singapore 098632 The following ink tanks are compatible with this guide. Canon Inc. 30-2, Shimomaruko 3-chome, Ohta-ku, Tokyo 146-8501, Japan Canon Australia Pty. For details on ink tank replacement, refer to "Maintenance" in this printer. Ltd. 1 Thomas Holt Drive, North Ryde, Sydney, N.S.W. 2113, Australia Canon Singapore Pte. HT7-0030-000-V.2.0 XX2004XX ©CANON INC.2004 PRINTED IN CHINA Quick Start Guide Canon U.S.A., Inc.
One Canon Plaza, Lake Success, NY 11042, U.S.A. Ltd. 1 Harbour Front Avenue #04-00 Keppel Bay Tower, Singapore 098632 The following ink tanks are compatible with this guide. Canon Inc. 30-2, Shimomaruko 3-chome, Ohta-ku, Tokyo 146-8501, Japan Canon Australia Pty. For details on ink tank replacement, refer to "Maintenance" in this printer. Ltd. 1 Thomas Holt Drive, North Ryde, Sydney, N.S.W. 2113, Australia Canon Singapore Pte. HT7-0030-000-V.2.0 XX2004XX ©CANON INC.2004 PRINTED IN CHINA Quick Start Guide Canon U.S.A., Inc.
PIXMA MP750/780 Easy Setup Instructions
Page 1
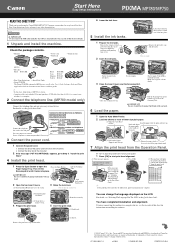
... the other documentation. Do not touch! Click Click Lower the lock lever until you are connecting the machine to a computer for purchasing the Canon PIXMA MP780/750. Do not touch! Push it locks into place. Make sure to press it . IMPORTANT Be sure to hold the Scanning Unit firmly...place. Lift the Scanning Unit. Check the package contents. • Machine • Power cord • Print head • Telephone line MP780 MP750 • Ink tanks Black BCI-3eBK Black BCI-6BK Cyan BCI-6C Magenta BCI-6M Yellow BCI-6Y • Easy Setup Instructions • Quick Start Guide...
... the other documentation. Do not touch! Click Click Lower the lock lever until you are connecting the machine to a computer for purchasing the Canon PIXMA MP780/750. Do not touch! Push it locks into place. Make sure to press it . IMPORTANT Be sure to hold the Scanning Unit firmly...place. Lift the Scanning Unit. Check the package contents. • Machine • Power cord • Print head • Telephone line MP780 MP750 • Ink tanks Black BCI-3eBK Black BCI-6BK Cyan BCI-6C Magenta BCI-6M Yellow BCI-6Y • Easy Setup Instructions • Quick Start Guide...


