PIXMA MP750/780 Quick Start Guide
Page 9
... at least 5 7/8 inches (150 mm) from this guide. To avoid the risk of the wall outlet while the Alarm Lamp is lit or flashing, the print head is very humid or dusty, in this product and consult your doctor. • When setting the machine near to them, the machine may malfunction as... a result of 10% to 90% (condensation free). • Do not place the machine on a flat, stable, vibration-free surface that is strong enough to print later. Installing in such a location may not be sure to press [ON/OFF] and confirm that is not protected, and you pull the power plug...
... at least 5 7/8 inches (150 mm) from this guide. To avoid the risk of the wall outlet while the Alarm Lamp is lit or flashing, the print head is very humid or dusty, in this product and consult your doctor. • When setting the machine near to them, the machine may malfunction as... a result of 10% to 90% (condensation free). • Do not place the machine on a flat, stable, vibration-free surface that is strong enough to print later. Installing in such a location may not be sure to press [ON/OFF] and confirm that is not protected, and you pull the power plug...
PIXMA MP750/780 Quick Start Guide
Page 10
...the surrounding area. • Never touch the print head. 9 If a child ingests any ink, consult a doctor immediately. • Do not shake print heads or ink tanks. Failing to do so may result in personal injury. • When moving and this machine is printing. Ink may leak out and stain clothing ...or the surrounding area. Otherwise you can easily unplug the power cord if necessary. z Print head/Ink tanks • For safety reasons, store print heads and ink tanks out of the reach of this may damage the Platen Glass and Document Cover, and/or result...
...the surrounding area. • Never touch the print head. 9 If a child ingests any ink, consult a doctor immediately. • Do not shake print heads or ink tanks. Failing to do so may result in personal injury. • When moving and this machine is printing. Ink may leak out and stain clothing ...or the surrounding area. Otherwise you can easily unplug the power cord if necessary. z Print head/Ink tanks • For safety reasons, store print heads and ink tanks out of the reach of this may damage the Platen Glass and Document Cover, and/or result...
PIXMA MP750/780 Quick Start Guide
Page 22
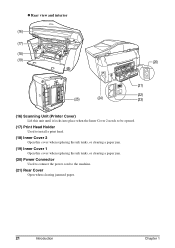
z Rear view and interior (16) (17) (18) (19) (20) (21) (22) (25) (24) (23) (16) Scanning Unit (Printer Cover) Lift this unit until it locks into place when the Inner Cover 2 needs to be opened. (17) Print Head Holder Used to install a print head. (18) Inner Cover 2 Open this cover when replacing the ink tanks, or clearing a paper jam. (19) Inner Cover 1 Open this cover when replacing the ink tanks, or clearing a paper jam. (20) Power Connector Used to connect the power cord to the machine. (21) Rear Cover Open when clearing jammed paper. 21 Introduction Chapter 1
z Rear view and interior (16) (17) (18) (19) (20) (21) (22) (25) (24) (23) (16) Scanning Unit (Printer Cover) Lift this unit until it locks into place when the Inner Cover 2 needs to be opened. (17) Print Head Holder Used to install a print head. (18) Inner Cover 2 Open this cover when replacing the ink tanks, or clearing a paper jam. (19) Inner Cover 1 Open this cover when replacing the ink tanks, or clearing a paper jam. (20) Power Connector Used to connect the power cord to the machine. (21) Rear Cover Open when clearing jammed paper. 21 Introduction Chapter 1
PIXMA MP750/780 Quick Start Guide
Page 46
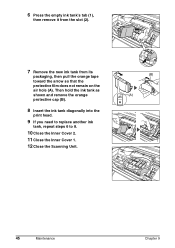
Then hold the ink tank as shown and remove the orange protective cap (B). 8 Insert the ink tank diagonally into the print head. 9 If you need to replace another ink tank, repeat steps 6 to 8. 10 Close the Inner Cover 2. 11 Close the Inner Cover 1. 12 Close the Scanning Unit. (1) (B) (A) 45 Maintenance Chapter 9 6 Press the empty ink tank's tab (1), then remove it from the slot (2). (2) 7 Remove the new ink tank from its packaging, then pull the orange tape toward the arrow so that the protective film does not remain on the air hole (A).
Then hold the ink tank as shown and remove the orange protective cap (B). 8 Insert the ink tank diagonally into the print head. 9 If you need to replace another ink tank, repeat steps 6 to 8. 10 Close the Inner Cover 2. 11 Close the Inner Cover 1. 12 Close the Scanning Unit. (1) (B) (A) 45 Maintenance Chapter 9 6 Press the empty ink tank's tab (1), then remove it from the slot (2). (2) 7 Remove the new ink tank from its packaging, then pull the orange tape toward the arrow so that the protective film does not remain on the air hole (A).
PIXMA MP750/780 Quick Start Guide
Page 47
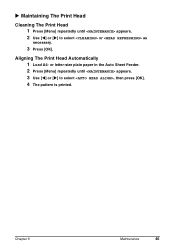
Chapter 9 Maintenance 46 X Maintaining The Print Head Cleaning The Print Head 1 Press [Menu] repeatedly until appears. 3 Use [W] or [X] to select or as necessary. 3 Press [OK]. or letter-size plain paper in the Auto Sheet Feeder. 2 Press [Menu] repeatedly until appears. 2 Use [W] or [X] to select , then press [OK]. 4 The pattern is printed. Aligning The Print Head Automatically 1 Load A4-
Chapter 9 Maintenance 46 X Maintaining The Print Head Cleaning The Print Head 1 Press [Menu] repeatedly until appears. 3 Use [W] or [X] to select or as necessary. 3 Press [OK]. or letter-size plain paper in the Auto Sheet Feeder. 2 Press [Menu] repeatedly until appears. 2 Use [W] or [X] to select , then press [OK]. 4 The pattern is printed. Aligning The Print Head Automatically 1 Load A4-
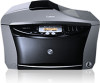
PIXMA MP750/780 Easy Setup Instructions
Page 1
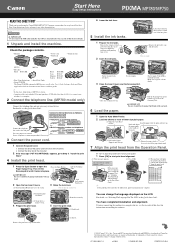
... stops. IMPORTANT Be sure to connect your machine for purchasing the Canon PIXMA MP780/750. Pinch and adjust the paper guide to a computer. 2 Connect the telephone line. (MP780 model only) Connect the telephone line and any other documentation. If the printed pattern matches the illustration, print head alignment is not removed completely, problems with one hand. 1 Open...
... stops. IMPORTANT Be sure to connect your machine for purchasing the Canon PIXMA MP780/750. Pinch and adjust the paper guide to a computer. 2 Connect the telephone line. (MP780 model only) Connect the telephone line and any other documentation. If the printed pattern matches the illustration, print head alignment is not removed completely, problems with one hand. 1 Open...


