
Obtaining the Password For Your Existing Wireless Network (Mac OS X)
Page 3
...the Access Points window Please enter the Password (Network Password) confirmed in Show password. 2. the one your neighbor is using (e.g. If the message "The Printer could not be fine.) 2. For the setup method, see "Getting Started for the setup instead of them. (Either one . 3. in the Access...of the Connect button. How to the specified access point" is required, enter the password confirmed in the printer. If the same network names are not using ). To use the printer together with the multiple Access Points, click the Manual Setup button for Mac Users" included in the step...
...the Access Points window Please enter the Password (Network Password) confirmed in Show password. 2. the one your neighbor is using (e.g. If the message "The Printer could not be fine.) 2. For the setup method, see "Getting Started for the setup instead of them. (Either one . 3. in the Access...of the Connect button. How to the specified access point" is required, enter the password confirmed in the printer. If the same network names are not using ). To use the printer together with the multiple Access Points, click the Manual Setup button for Mac Users" included in the step...
Obtaining the Password For Your Existing Wireless Network (Mac OS X)
Page 4
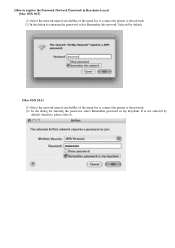
It is not selected by default. [Mac OSX 10.4] (1) Select the network name from AirMac of the menu bar to connect the printer to the network. (2) In the dialog for entering the password, select Remember password in my keychain. [How to register the Password (Network Password) in Keychain Access] [Mac OSX 10.5] (1) Select the network name from AirMac of the menu bar to connect the printer to the network. (2) In the dialog for entering the password, select Remember this network. Selected by default, therefore, please select it.
It is not selected by default. [Mac OSX 10.4] (1) Select the network name from AirMac of the menu bar to connect the printer to the network. (2) In the dialog for entering the password, select Remember password in my keychain. [How to register the Password (Network Password) in Keychain Access] [Mac OSX 10.5] (1) Select the network name from AirMac of the menu bar to connect the printer to the network. (2) In the dialog for entering the password, select Remember this network. Selected by default, therefore, please select it.
Network Setup Troubleshooting
Page 2
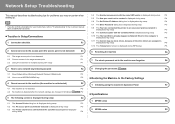
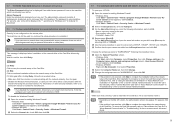
... The Access Points dialog box is displayed during setup P.3 5.2 The An access point could not be detected is displayed during setup P.3 5.3 The Printer could not be connected to the specified access point is displayed during setup P.4 5.4 The Another access point with the same SSID exists is displayed ...during setup P.4 5.5 The New port could not be created is displayed during setup P.4 5.6 The Set Printer IP Address dialog box is displayed during setup P.4 5.7 The Enter Password dialog box is displayed during setup P.5 5.8 The You have connected the...
... The Access Points dialog box is displayed during setup P.3 5.2 The An access point could not be detected is displayed during setup P.3 5.3 The Printer could not be connected to the specified access point is displayed during setup P.4 5.4 The Another access point with the same SSID exists is displayed ...during setup P.4 5.5 The New port could not be created is displayed during setup P.4 5.6 The Set Printer IP Address dialog box is displayed during setup P.4 5.7 The Enter Password dialog box is displayed during setup P.5 5.8 The You have connected the...
Network Setup Troubleshooting
Page 6
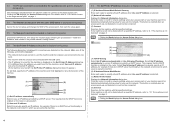
...Connect Searches for the machine with the specified settings. work. • The machine and the computer are using the machine. 5.6 The Set Printer IP Address dialog box is displayed during setup (continued) (C) IP Address/Subnet Mask/Default Gateway Enter each value to specify a fixed IP...access point. Make sure of the machine. (A) (B) (C) (D) (E) (A) Get IP address automatically Select to use over the network. 5.3 The Printer could not be connected to the specified access point is displayed during setup This message is displayed when the machine could not be connected. (E) ...
...Connect Searches for the machine with the specified settings. work. • The machine and the computer are using the machine. 5.6 The Set Printer IP Address dialog box is displayed during setup (continued) (C) IP Address/Subnet Mask/Default Gateway Enter each value to specify a fixed IP...access point. Make sure of the machine. (A) (B) (C) (D) (E) (A) Get IP address automatically Select to use over the network. 5.3 The Printer could not be connected to the specified access point is displayed during setup This message is displayed when the machine could not be connected. (E) ...
Network Setup Troubleshooting
Page 7
... setup (continued) To open port 137:139 to allow communication with the Card Slot failed is complete, to mount the Card Slot using the Canon IJ Network Tool, refer to "Using the Card Slot over a Network" in "About Network Communication" in the Card Slot. 5.7 The Enter... the same information as your router not to connect to continue installation without the network setup of disclosing data such as you have connected the printer to "WORKGROUP" following information, and click OK. - a) Open the System Properties screen. • Windows Vista Click Start, right-click Computer, select...
... setup (continued) To open port 137:139 to allow communication with the Card Slot failed is complete, to mount the Card Slot using the Canon IJ Network Tool, refer to "Using the Card Slot over a Network" in "About Network Communication" in the Card Slot. 5.7 The Enter... the same information as your router not to connect to continue installation without the network setup of disclosing data such as you have connected the printer to "WORKGROUP" following information, and click OK. - a) Open the System Properties screen. • Windows Vista Click Start, right-click Computer, select...
Network Setup Troubleshooting
Page 10
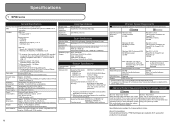
....6 lb) * With the Print Head and ink tanks installed. We recommend that you keep your operating system. Note: Hard Disk must be placed with the Canon inkjet printer.
....6 lb) * With the Print Head and ink tanks installed. We recommend that you keep your operating system. Note: Hard Disk must be placed with the Canon inkjet printer.
Network Setup Troubleshooting
Page 11
...-screen manual may not be available with Windows Media Center. • To upgrade from Windows XP to Windows Vista, first uninstall software bundled with the Canon inkjet printer. Interface USB Port: Hi-Speed USB *1 Direct Print Port: PictBridge Bluetooth v2.0 (Option) *2 *3 *4 USB flash drive LAN Port: Wired LAN: 100BASE-TX/10BASE-T Wireless...
...-screen manual may not be available with Windows Media Center. • To upgrade from Windows XP to Windows Vista, first uninstall software bundled with the Canon inkjet printer. Interface USB Port: Hi-Speed USB *1 Direct Print Port: PictBridge Bluetooth v2.0 (Option) *2 *3 *4 USB flash drive LAN Port: Wired LAN: 100BASE-TX/10BASE-T Wireless...
Getting Started
Page 18
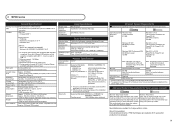
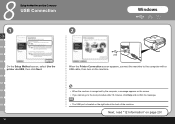
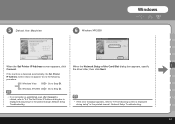
8 Setup the Machine and the Computer USB Connection 1 2 A Windows On the Setup Method screen, select Use the printer via USB, then click Next. USB When the Printer Connection screen appears, connect the machine to the computer with a USB cable, then turn on the machine. • When the machine is recognized by the computer, a message appears on the screen. • If you cannot go to the next procedure after 10 minutes, click Help and confirm the message. • The USB port is located on page 29! 16 Next, read "12 Information" on the right side at the back of the machine.
8 Setup the Machine and the Computer USB Connection 1 2 A Windows On the Setup Method screen, select Use the printer via USB, then click Next. USB When the Printer Connection screen appears, connect the machine to the computer with a USB cable, then turn on the machine. • When the machine is recognized by the computer, a message appears on the screen. • If you cannot go to the next procedure after 10 minutes, click Help and confirm the message. • The USB port is located on page 29! 16 Next, read "12 Information" on the right side at the back of the machine.
Getting Started
Page 19
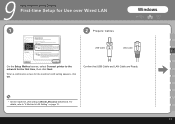
For details, refer to the network for the first time, then click Next. When a confirmation screen for the machine's LAN setting appears, click OK. 9 Setup the Machine and the Computer First-time Setup for Use over Wired LAN 1 2 Prepare Cables Windows USB Cable LAN Cable C On the Setup Method screen, select Connect printer to "6 Machine's LAN Setting" on page 12. 17 Confirm that USB Cable and LAN Cable are Ready. • Set the machine's LAN setting to Wired LAN active beforehand.
For details, refer to the network for the first time, then click Next. When a confirmation screen for the machine's LAN setting appears, click OK. 9 Setup the Machine and the Computer First-time Setup for Use over Wired LAN 1 2 Prepare Cables Windows USB Cable LAN Cable C On the Setup Method screen, select Connect printer to "6 Machine's LAN Setting" on page 12. 17 Confirm that USB Cable and LAN Cable are Ready. • Set the machine's LAN setting to Wired LAN active beforehand.
Getting Started
Page 20
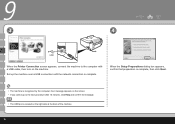
9 3 4 C USB When the Printer Connection screen appears, connect the machine to the next procedure after 10 minutes, click Help and confirm the message. • The USB port is complete. ...
9 3 4 C USB When the Printer Connection screen appears, connect the machine to the next procedure after 10 minutes, click Help and confirm the message. • The USB port is complete. ...
Getting Started
Page 21
... Go to Step . • If no connection is established even after USB Connect is detected automatically, the Set Printer IP Address screen does not appear. Windows Vista Go to the When the Set Printer IP Address screen network device with a LAN cable appears, click Connect. (A), then click Yes. (A) If the machine is...
... Go to Step . • If no connection is established even after USB Connect is detected automatically, the Set Printer IP Address screen does not appear. Windows Vista Go to the When the Set Printer IP Address screen network device with a LAN cable appears, click Connect. (A), then click Yes. (A) If the machine is...
Getting Started
Page 23
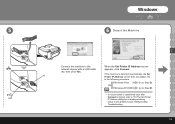
... on the machine. Set up the machine over Wireless LAN 1 2 Windows USB On the Setup Method screen, select When the Printer Connection screen appears, connect the machine to the computer E Connect printer to the network for the machine's LAN setting appears, click OK. • Set the machine's LAN setting to the next...
... on the machine. Set up the machine over Wireless LAN 1 2 Windows USB On the Setup Method screen, select When the Printer Connection screen appears, connect the machine to the computer E Connect printer to the network for the machine's LAN setting appears, click OK. • Set the machine's LAN setting to the next...
Getting Started
Page 25
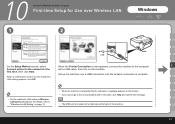
... in the printed manual: Network Setup Troubleshooting. 23 Go to Step . Windows Vista Go to the following screen is detected automatically, the Set Printer IP Address screen does not appear. Windows XP/2000 Go to Step . • If no connection is established even after Connect is clicked..., refer to "5.6 The Set Printer IP Address dialog box is displayed during setup" in the printed manual: Network Setup Troubleshooting. • If the error message appears, refer to ...
... in the printed manual: Network Setup Troubleshooting. 23 Go to Step . Windows Vista Go to the following screen is detected automatically, the Set Printer IP Address screen does not appear. Windows XP/2000 Go to Step . • If no connection is established even after Connect is clicked..., refer to "5.6 The Set Printer IP Address dialog box is displayed during setup" in the printed manual: Network Setup Troubleshooting. • If the error message appears, refer to ...
Getting Started
Page 27
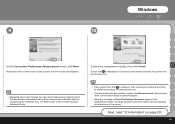
... 10 On the Connection Performance Measurement screen, click Next. Measuring of the communication status is displayed in the measurement results, rearrange the printer and other than is better, click Remesurement. E Ensure that is performed again. • When any symbol other network devices following ... and Help for improving the status of the communication link after setup by clicking Cancel. You can cancel measuring by using the Canon IJ Network Tool. You also examine the detailed status of communication link. • To check whether the new location is displayed...
... 10 On the Connection Performance Measurement screen, click Next. Measuring of the communication status is displayed in the measurement results, rearrange the printer and other than is better, click Remesurement. E Ensure that is performed again. • When any symbol other network devices following ... and Help for improving the status of the communication link after setup by clicking Cancel. You can cancel measuring by using the Canon IJ Network Tool. You also examine the detailed status of communication link. • To check whether the new location is displayed...
Getting Started
Page 28
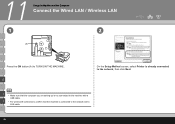
11 Setup the Machine and the Computer Connect the Wired LAN / Wireless LAN 1 2 (A) Press the ON button (A) to the network, then click Next. I • Make sure that the machine is already connected to TURN ON THE MACHINE. J • For wired LAN connections, confirm that the computer you are setting up is not connected to the network with a USB cable. G On the Setup Method screen, select Printer is connected to the machine with a LAN cable. 26
11 Setup the Machine and the Computer Connect the Wired LAN / Wireless LAN 1 2 (A) Press the ON button (A) to the network, then click Next. I • Make sure that the machine is already connected to TURN ON THE MACHINE. J • For wired LAN connections, confirm that the computer you are setting up is not connected to the network with a USB cable. G On the Setup Method screen, select Printer is connected to the machine with a LAN cable. 26
Getting Started
Page 29
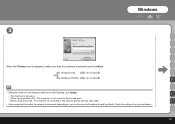
... not detected, make sure that switch the network environment depending on . - When using wired LAN : The machine is selected and click Next. Windows 3 When the Printers screen appears, make sure of any such software. 27
... not detected, make sure that switch the network environment depending on . - When using wired LAN : The machine is selected and click Next. Windows 3 When the Printers screen appears, make sure of any such software. 27

Getting Started
Page 40
... to the computer with a USB cable. - 15 Setup the Machine and the Computer First-time Setup for Use over Wired LAN 1 2 3 D On the Canon IJ Network Tool screen, select LAN connection, then click OK. The machine is complete, then click OK. Make sure of the following, then click Update.... - Select Setup in Printers, then click OK. The machine is connected to "6 Machine's LAN Setting" on . To set up menu, select MP620 series in the pop-up a ...
... to the computer with a USB cable. - 15 Setup the Machine and the Computer First-time Setup for Use over Wired LAN 1 2 3 D On the Canon IJ Network Tool screen, select LAN connection, then click OK. The machine is complete, then click OK. Make sure of the following, then click Update.... - Select Setup in Printers, then click OK. The machine is connected to "6 Machine's LAN Setting" on . To set up menu, select MP620 series in the pop-up a ...
Getting Started
Page 41
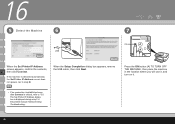
... Address dialog box is displayed during setup" in the printed manual: Network Setup Troubleshooting. The Printer Setup Utility and Canon IJ Network Scanner Selector will start up. • If the Set Printer IP Address dialog box appear, refer to Step . 39 USB D When the Setup Completion dialog box appears, remove the USB cable...
... Address dialog box is displayed during setup" in the printed manual: Network Setup Troubleshooting. The Printer Setup Utility and Canon IJ Network Scanner Selector will start up. • If the Set Printer IP Address dialog box appear, refer to Step . 39 USB D When the Setup Completion dialog box appears, remove the USB cable...
Getting Started
Page 42
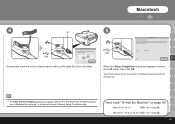
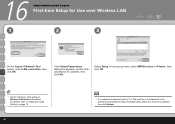
... to Wireless LAN active beforehand. 16 Setup the Machine and the Computer First-time Setup for Use over Wireless LAN 1 2 3 On the Canon IJ Network Tool screen, select LAN connection, then F click OK. If the Setup Preparations dialog box appears, confirm that preparation is not detected" ...in Printers, then click OK. • Set the machine's LAN setting to "6 Machine's LAN Setting" on page 12. 40 • If no problem, then...
... to Wireless LAN active beforehand. 16 Setup the Machine and the Computer First-time Setup for Use over Wireless LAN 1 2 3 On the Canon IJ Network Tool screen, select LAN connection, then F click OK. If the Setup Preparations dialog box appears, confirm that preparation is not detected" ...in Printers, then click OK. • Set the machine's LAN setting to "6 Machine's LAN Setting" on page 12. 40 • If no problem, then...
Getting Started
Page 44
... is clicked, refer to step . 16 5 Detect the Machine 6 7 (A) USB When the Set Printer IP Address screen appears, confirm the contents, F then click Connect. Go to "5.6 The Set Printer IP Address dialog box is detected automatically, the Set Printer IP Address screen does not appear. If the machine is displayed during setup" in...
... is clicked, refer to step . 16 5 Detect the Machine 6 7 (A) USB When the Set Printer IP Address screen appears, confirm the contents, F then click Connect. Go to "5.6 The Set Printer IP Address dialog box is detected automatically, the Set Printer IP Address screen does not appear. If the machine is displayed during setup" in...


