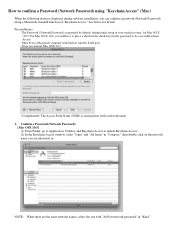
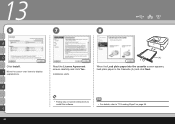
Obtaining the Password For Your Existing Wireless Network (Mac OS X)
Page 1
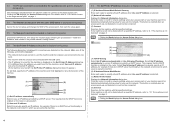
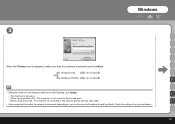
The Password / Network Password is registered by default, during software installation, you can confirm a password (Network Password) using "Keychain Access" (Mac) When the following dialog is synonymous with a network name. 1. The Access Point Name (SSID) ...
The Password / Network Password is registered by default, during software installation, you can confirm a password (Network Password) using "Keychain Access" (Mac) When the following dialog is synonymous with a network name. 1. The Access Point Name (SSID) ...
Network Setup Troubleshooting
Page 3
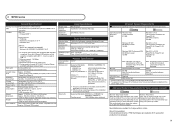
...the network. If the WEP/WPA/WPA2 (encryption key) is set to the access point. c Click Wireless Networks tab and confirm that your security software is turned on page 3. 2.1 The target access point is attempting to ANY. For details, refer to "5.1 The Access Points dialog box is ...and the network device is , turn it . When encryption is not set to use the identi- Windows XP may be used may appear warning that Canon software is not detected (continued) • The wireless channel to "About Network Communication" - If the network name is checked. If so, click Manual...
...the network. If the WEP/WPA/WPA2 (encryption key) is set to the access point. c Click Wireless Networks tab and confirm that your security software is turned on page 3. 2.1 The target access point is attempting to ANY. For details, refer to "5.1 The Access Points dialog box is ...and the network device is , turn it . When encryption is not set to use the identi- Windows XP may be used may appear warning that Canon software is not detected (continued) • The wireless channel to "About Network Communication" - If the network name is checked. If so, click Manual...
Network Setup Troubleshooting
Page 4
... used in Windows Wait until the IP address is different in the AirPort Base Station. - Example: Using 64 bit key length, when the string "canon" is different in Wireless Security of the access point. If not, change the channel set the machine to the computer. Key 2: 87 C0 FB ... network name/SSID. For details, refer to the manual provided with the machine via the access point. 3.2 How to restart your access point or application software. 3.2 How to set a WEP/WPA/WPA2 key (continued) • When using AirPort, confirm the settings in the machine and the access point, the ...
... used in Windows Wait until the IP address is different in the AirPort Base Station. - Example: Using 64 bit key length, when the string "canon" is different in Wireless Security of the access point. If not, change the channel set the machine to the computer. Key 2: 87 C0 FB ... network name/SSID. For details, refer to the manual provided with the machine via the access point. 3.2 How to restart your access point or application software. 3.2 How to set a WEP/WPA/WPA2 key (continued) • When using AirPort, confirm the settings in the machine and the access point, the ...
Network Setup Troubleshooting
Page 6
... detected or could not be created is displayed during setup Uninstall the MP Drivers, then setup the machine again following the procedures in "Install the Software" and onward in the printed manual: Getting Started. 5.6 The Set Printer IP Address dialog box is displayed during setup The following IP address to manually...
... detected or could not be created is displayed during setup Uninstall the MP Drivers, then setup the machine again following the procedures in "Install the Software" and onward in the printed manual: Getting Started. 5.6 The Set Printer IP Address dialog box is displayed during setup The following IP address to manually...
Network Setup Troubleshooting
Page 7
...the computer is communicating with the network properly, then try again. • Disable the Windows Firewall function, or open the other security software, refer to its instruction manual or contact its manufacturer. • If you disabled the firewall function, disconnect your router not to connect ...; Change the workgroup name to "WORKGROUP" following information, and click OK. - After installation is complete, to mount the Card Slot using the Canon IJ Network Tool, refer to "Using the Card Slot over a Network" in "About Network Communication" in the Computer name, domain, and workgroup...
...the computer is communicating with the network properly, then try again. • Disable the Windows Firewall function, or open the other security software, refer to its instruction manual or contact its manufacturer. • If you disabled the firewall function, disconnect your router not to connect ...; Change the workgroup name to "WORKGROUP" following information, and click OK. - After installation is complete, to mount the Card Slot using the Canon IJ Network Tool, refer to "Using the Card Slot over a Network" in "About Network Communication" in the Computer name, domain, and workgroup...
Network Setup Troubleshooting
Page 8
... push button method, and 10 minutes for the PIN code method). All settings previously set up the machine again, follow the procedures in "Install the Software" and onward in the printed manual: Getting Started. • If you have changed name is displayed. The port name includes the fixed prefix "CNBJNP_",...10 The The Card Slot is already mapped as the network drive. Port Name Port names should consist of the Card Slot again using the Canon IJ Network Tool. 5.12 The Timeout error screen is displayed during WPS setup This screen is displayed when WPS setup is not completed within two...
... push button method, and 10 minutes for the PIN code method). All settings previously set up the machine again, follow the procedures in "Install the Software" and onward in the printed manual: Getting Started. • If you have changed name is displayed. The port name includes the fixed prefix "CNBJNP_",...10 The The Card Slot is already mapped as the network drive. Port Name Port names should consist of the Card Slot again using the Canon IJ Network Tool. 5.12 The Timeout error screen is displayed during WPS setup This screen is displayed when WPS setup is not completed within two...
Network Setup Troubleshooting
Page 10
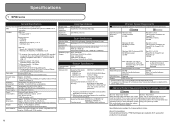
... with Windows Update. Browser Internet Explorer 6.0 or later Safari Hard Disk Space 650 MB Note: For bundled software installation. 750 MB Note: For bundled software installation. We recommend that complies with Hi-Speed USB standard is for printing only. *6 Setup possible through WPS...XP to change without notice. About Consumables Consumables (ink tanks / FINE Cartridges) are subject to Windows Vista, first uninstall software bundled with the Canon inkjet printer. Supported Standards: IEEE802.3u (100BASE-TX)/ IEEE802.3 (10BASE-T) Transfer speed: 10M/100Mbps (auto switching) ...
... with Windows Update. Browser Internet Explorer 6.0 or later Safari Hard Disk Space 650 MB Note: For bundled software installation. 750 MB Note: For bundled software installation. We recommend that complies with Hi-Speed USB standard is for printing only. *6 Setup possible through WPS...XP to change without notice. About Consumables Consumables (ink tanks / FINE Cartridges) are subject to Windows Vista, first uninstall software bundled with the Canon inkjet printer. Supported Standards: IEEE802.3u (100BASE-TX)/ IEEE802.3 (10BASE-T) Transfer speed: 10M/100Mbps (auto switching) ...
Network Setup Troubleshooting
Page 11
...on your operating system. Browser Internet Explorer 6.0 or later Safari Hard Disk Space 650 MB Note: For bundled software installation. 750 MB Note: For bundled software installation. CD-ROM Drive Required Display XGA 1024 x 768 • Some functions may not be displayed properly ... on your not be available with Windows Media Center. • To upgrade from Windows XP to Windows Vista, first uninstall software bundled with the Canon inkjet printer. Supported Standards: IEEE802.3u (100BASE-TX)/ IEEE802.3 (10BASE-T) Transfer speed: 10M/100Mbps (auto switching) Minimum ...
...on your operating system. Browser Internet Explorer 6.0 or later Safari Hard Disk Space 650 MB Note: For bundled software installation. 750 MB Note: For bundled software installation. CD-ROM Drive Required Display XGA 1024 x 768 • Some functions may not be displayed properly ... on your not be available with Windows Media Center. • To upgrade from Windows XP to Windows Vista, first uninstall software bundled with the Canon inkjet printer. Supported Standards: IEEE802.3u (100BASE-TX)/ IEEE802.3 (10BASE-T) Transfer speed: 10M/100Mbps (auto switching) Minimum ...
Getting Started
Page 12
...IP address • The configuration, router functions, setup procedures and security functions of your security software is turned on the warning message may appear that Canon software is displayed during the installation process. Read the following screen is attempting to the network, ...be necessary to the conventional wireless LAN settings. Disable Stealth (closed network) function - If the warning message appears, set the security software to always allow access. • In an office setup, consult your computer during setup" in addition to restart your network administrator....
...IP address • The configuration, router functions, setup procedures and security functions of your security software is turned on the warning message may appear that Canon software is displayed during the installation process. Read the following screen is attempting to the network, ...be necessary to the conventional wireless LAN settings. Disable Stealth (closed network) function - If the warning message appears, set the security software to always allow access. • In an office setup, consult your computer during setup" in addition to restart your network administrator....
Getting Started
Page 14
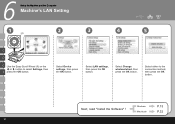
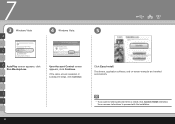
Select either to select Settings, then F press the OK button. Select Change wireless/wired, then press the OK button. Select LAN settings, then press the OK button. Next, read "Install the Software" ! Select Device settings, then press the OK button. Windows Macintosh P.13 P.32 12 6 Setup the Machine and the Computer Machine's LAN Setting 1 (A) 2 3 4 5 C D E Use the Easy-Scroll Wheel (A) or the [ or ] button to the connection method, then press the OK button.
Select either to select Settings, then F press the OK button. Select Change wireless/wired, then press the OK button. Select LAN settings, then press the OK button. Next, read "Install the Software" ! Select Device settings, then press the OK button. Windows Macintosh P.13 P.32 12 6 Setup the Machine and the Computer Machine's LAN Setting 1 (A) 2 3 4 5 C D E Use the Easy-Scroll Wheel (A) or the [ or ] button to the connection method, then press the OK button.
Getting Started
Page 15
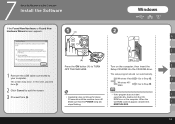
Windows Vista Go to TURN Turn on the computer. The setup program should run automatically. 7 Setup the Machine and the Computer Install the Software If the Found New Hardware or Found New Hardware Wizard screen appears: 1 (A) Windows 2 A C (B) Press the ON button (A) to Step . In this case, proceed from . • ...
Windows Vista Go to TURN Turn on the computer. The setup program should run automatically. 7 Setup the Machine and the Computer Install the Software If the Found New Hardware or Found New Hardware Wizard screen appears: 1 (A) Windows 2 A C (B) Press the ON button (A) to Step . In this case, proceed from . • ...
Getting Started
Page 16
If the same screen reappears in subsequent steps, click Continue. The drivers, application software, and on -screen instructions to install, click Custom Install and follow the on -screen manuals are installed automatically. 7 3 Windows Vista 4 Windows Vista 5 A C E AutoPlay screen appears, click Run Msetup4.exe. I J • If you want to select particular items to proceed with the installation. 14 G User Account Control screen appears, click Continue. Click Easy Install.
If the same screen reappears in subsequent steps, click Continue. The drivers, application software, and on -screen instructions to install, click Custom Install and follow the on -screen manuals are installed automatically. 7 3 Windows Vista 4 Windows Vista 5 A C E AutoPlay screen appears, click Run Msetup4.exe. I J • If you want to select particular items to proceed with the installation. 14 G User Account Control screen appears, click Continue. Click Easy Install.

Getting Started
Page 17
Windows 6 7 Click Install. Move the cursor over items to your connection method! Read the License Agreement screen carefully and click Yes. A Go to either of the following procedures C according to display explanations. Installation starts. • Follow any on-screen instructions to install the software. A USB P.16 C Wired LAN P.17 E E Wireless LAN P.21 G WPS P.26 I WCN P.26 G J Additional Computer P.26 I J 15
Windows 6 7 Click Install. Move the cursor over items to your connection method! Read the License Agreement screen carefully and click Yes. A Go to either of the following procedures C according to display explanations. Installation starts. • Follow any on-screen instructions to install the software. A USB P.16 C Wired LAN P.17 E E Wireless LAN P.21 G WPS P.26 I WCN P.26 G J Additional Computer P.26 I J 15
Getting Started
Page 29
... wireless LAN : The computer is turned on your environment will enable a firewall by default. I - Windows 3 When the Printers screen appears, make sure of any such software. 27 Windows XP/2000 Go to Step .
... wireless LAN : The computer is turned on your environment will enable a firewall by default. I - Windows 3 When the Printers screen appears, make sure of any such software. 27 Windows XP/2000 Go to Step .
Getting Started
Page 34
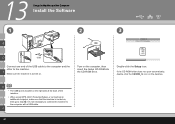
..., then insert the Setup CD-ROM into the CD-ROM drive. Double-click the Setup icon. 13 Setup the Machine and the Computer Install the Software 1 B 2 3 D USB Connect one end of the machine. • When using WPS (Wi-Fi Protected Setup) or connecting an additional computer, make sure that the machine...
..., then insert the Setup CD-ROM into the CD-ROM drive. Double-click the Setup icon. 13 Setup the Machine and the Computer Install the Software 1 B 2 3 D USB Connect one end of the machine. • When using WPS (Wi-Fi Protected Setup) or connecting an additional computer, make sure that the machine...
Getting Started
Page 35
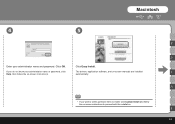
If you want to select particular items to install, click Custom Install and follow the on -screen instructions to proceed with the installation. Click Easy Install. H • If you do not know your administrator name and password. Macintosh 4 5 B D Enter your administrator name or password, click The drivers, application software, and on-screen manuals are installed F Help, then follow the on -screen instructions. K 33 automatically. Click OK.
If you want to select particular items to install, click Custom Install and follow the on -screen instructions to proceed with the installation. Click Easy Install. H • If you do not know your administrator name and password. Macintosh 4 5 B D Enter your administrator name or password, click The drivers, application software, and on-screen manuals are installed F Help, then follow the on -screen instructions. K 33 automatically. Click OK.
Getting Started
Page 36
Read the License Agreement screen carefully and click Yes. 13 6 7 8 B D Click Install. F Move the cursor over items to "21 Loading Paper" on page 56. Installation starts. H (A) When the Load plain paper into the cassette screen appears, load plain paper in the Cassette (A) and click Next. • Follow any on-screen instructions to install the software. • For details, refer to display explanations. K 34
Read the License Agreement screen carefully and click Yes. 13 6 7 8 B D Click Install. F Move the cursor over items to "21 Loading Paper" on page 56. Installation starts. H (A) When the Load plain paper into the cassette screen appears, load plain paper in the Cassette (A) and click Next. • Follow any on-screen instructions to install the software. • For details, refer to display explanations. K 34
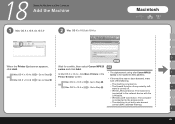
Getting Started
Page 47
...The computer is not set to the access point. - The machine is connected to use access control (MAC address filtering). sure of any security software is connected to Step . 18 Setup the Machine and the Computer Add the Machine 1 Mac OS X v.10.4.x/v.10.3.9 2 Mac OS X ...v.10.5.x/v.10.4.x Macintosh D When the Printer List screen appears, Wait for a while, then select Canon MP620 click Add. series and click Add. • The alphanumeric string after Canon MP620 F Mac OS X v.10.4.x Go to Step . - Mac OS X v.10.4.x Go to Step . H - Printer ...
...The computer is not set to the access point. - The machine is connected to use access control (MAC address filtering). sure of any security software is connected to Step . 18 Setup the Machine and the Computer Add the Machine 1 Mac OS X v.10.4.x/v.10.3.9 2 Mac OS X ...v.10.5.x/v.10.4.x Macintosh D When the Printer List screen appears, Wait for a while, then select Canon MP620 click Add. series and click Add. • The alphanumeric string after Canon MP620 F Mac OS X v.10.4.x Go to Step . - Mac OS X v.10.4.x Go to Step . H - Printer ...
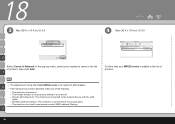
Getting Started
Page 48
The firewall function of any security software is not set to use access control (MAC address filtering). K 46 The machine is turned off. ...is connected to the access point. - Wireless LAN Connection: The computer is turned on. - H • The alphanumeric string after Canon MP620 series is connected to the network device with the LAN cable. - Wired LAN Connection: The machine is the machine's MAC address...detected, make sure of the following. - 18 3 Mac OS X v.10.4.x/v.10.3.9 4 Mac OS X v.10.4.x/v.10.3.9 D Select Canon IJ Network in the list of printers, then click Add.
The firewall function of any security software is not set to use access control (MAC address filtering). K 46 The machine is turned off. ...is connected to the access point. - Wireless LAN Connection: The computer is turned on. - H • The alphanumeric string after Canon MP620 series is connected to the network device with the LAN cable. - Wired LAN Connection: The machine is the machine's MAC address...detected, make sure of the following. - 18 3 Mac OS X v.10.4.x/v.10.3.9 4 Mac OS X v.10.4.x/v.10.3.9 D Select Canon IJ Network in the list of printers, then click Add.
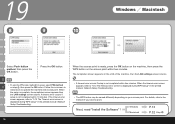
Getting Started
Page 52
... on step , then press the OK button. If the timeout error screen appears, refer to operate the machine and access point. Next, read "Install the Software" ! Windows Macintosh P.13 P.32 Step When the setup is not completed within 10 minutes. The completion screen appears on your access point. For details, refer...
... on step , then press the OK button. If the timeout error screen appears, refer to operate the machine and access point. Next, read "Install the Software" ! Windows Macintosh P.13 P.32 Step When the setup is not completed within 10 minutes. The completion screen appears on your access point. For details, refer...


