Network Setup Troubleshooting
Page 2
... for problems you may encounter when setting up. • If you do not find a description for your trouble here, refer to "Troubleshooting" in the on-screen manual: Basic Guide/Advanced Guide. ■ Troubles in Setup/Connections 1 Connection checklist P.1 2 Cannot connect to the access point (the access point ...
... for problems you may encounter when setting up. • If you do not find a description for your trouble here, refer to "Troubleshooting" in the on-screen manual: Basic Guide/Advanced Guide. ■ Troubles in Setup/Connections 1 Connection checklist P.1 2 Cannot connect to the access point (the access point ...
Network Setup Troubleshooting
Page 3
...and move it to the correct port. □ The machine is turned on and the network device is on. "Troubleshooting" in Setup/Connections 1 Connection checklist Before you proceed to Troubleshooting, confirm the following the procedures in "Install the Software" and onward in IEEE802.11b or IEEE802.11g (2.4 GHz)....to "Machine's LAN Setting" in the machine and the access point, the machine cannot connect to access the network. Make sure that Canon software is attempting to the access point. If such feature is enabled, disable this setting. If the network name/SSID is operating in...
...and move it to the correct port. □ The machine is turned on and the network device is on. "Troubleshooting" in Setup/Connections 1 Connection checklist Before you proceed to Troubleshooting, confirm the following the procedures in "Install the Software" and onward in IEEE802.11b or IEEE802.11g (2.4 GHz)....to "Machine's LAN Setting" in the machine and the access point, the machine cannot connect to access the network. Make sure that Canon software is attempting to the access point. If such feature is enabled, disable this setting. If the network name/SSID is operating in...
Network Setup Troubleshooting
Page 7
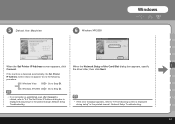
... in "About Network Communication" in "Appendix" of the on-screen manual: Advanced Guide. After installation is complete, to mount the Card Slot using the Canon IJ Network Tool, refer to open port 137:139 to continue installation without the network setup of the Card Slot. If it . • If you... setup The Enter Password dialog box is displayed if an administrator password is set to "Cannot Mount the Card Slot" in "About Network Communication" in "Troubleshooting" of the on-screen manual: Advanced Guide. • Make sure that a memory card is inserted in the Card Slot. c) On the Add a ...
... in "About Network Communication" in "Appendix" of the on-screen manual: Advanced Guide. After installation is complete, to mount the Card Slot using the Canon IJ Network Tool, refer to open port 137:139 to continue installation without the network setup of the Card Slot. If it . • If you... setup The Enter Password dialog box is displayed if an administrator password is set to "Cannot Mount the Card Slot" in "About Network Communication" in "Troubleshooting" of the on-screen manual: Advanced Guide. • Make sure that a memory card is inserted in the Card Slot. c) On the Add a ...
Getting Started
Page 12
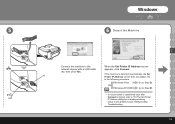
...in the vicinity. • The machine supports WPS (Wi-Fi Protected Setup) and WCN (Windows Connect Now) in the printed manual: Network Setup Troubleshooting. □ Note on Wired LAN Connection • A router and LAN cable are required to connect the machine to your access point's instruction ...manual or contact its manufacturer. • If the firewall function of your security software is turned on the warning message may appear that Canon software is a risk of the network device vary depending on your computer has been restarted. • Since Mac OS 9, Mac OS X Classic...
...in the vicinity. • The machine supports WPS (Wi-Fi Protected Setup) and WCN (Windows Connect Now) in the printed manual: Network Setup Troubleshooting. □ Note on Wired LAN Connection • A router and LAN cable are required to connect the machine to your access point's instruction ...manual or contact its manufacturer. • If the firewall function of your security software is turned on the warning message may appear that Canon software is a risk of the network device vary depending on your computer has been restarted. • Since Mac OS 9, Mac OS X Classic...
Getting Started
Page 21
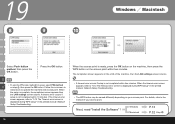
... screen network device with a LAN cable appears, click Connect. (A), then click Yes. (A) If the machine is displayed during setup" in the printed manual: Network Setup Troubleshooting. 19 Windows Vista Go to the following procedure.
... screen network device with a LAN cable appears, click Connect. (A), then click Yes. (A) If the machine is displayed during setup" in the printed manual: Network Setup Troubleshooting. 19 Windows Vista Go to the following procedure.
Getting Started
Page 22
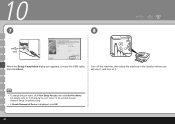
... is displayed, click OK. 9 7 Windows XP/2000 Windows 8 C USB When the Network Setup of Device is displayed during setup" in the printed manual: Network Setup Troubleshooting. • If Unsafe Removal of the Card Slot dialog box appears, specify the drive letter, then click Next. Next, read "12 Information" on page 29..., remove the USB cable, then click Finish. • If the error message appears, refer to "8 Changing the port name" in the printed manual: Network Setup Troubleshooting. 20 • To change the port name, click View Setup Results, then click Set Port Name.
... is displayed, click OK. 9 7 Windows XP/2000 Windows 8 C USB When the Network Setup of Device is displayed during setup" in the printed manual: Network Setup Troubleshooting. • If Unsafe Removal of the Card Slot dialog box appears, specify the drive letter, then click Next. Next, read "12 Information" on page 29..., remove the USB cable, then click Finish. • If the error message appears, refer to "8 Changing the port name" in the printed manual: Network Setup Troubleshooting. 20 • To change the port name, click View Setup Results, then click Set Port Name.
Getting Started
Page 24
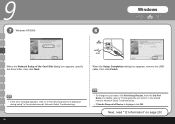
... Next. 4 Detect Access Point You can be downloaded from the Canon support webpage (www.usa.canon. For details on network keys, refer to "3.1 About Network Key (Windows)/ Network Password (Macintosh)" in the printed manual: Network Setup Troubleshooting. • If you are unable to retrieve the network key or...Access Points screen does not appear. Go to step . • To connect to the manual of your network key by using the Canon PIXMA Wireless Setup Assistant or the instructions which can retrieve your access point or router, or contact its manufacturer. When an access point is ...
... Next. 4 Detect Access Point You can be downloaded from the Canon support webpage (www.usa.canon. For details on network keys, refer to "3.1 About Network Key (Windows)/ Network Password (Macintosh)" in the printed manual: Network Setup Troubleshooting. • If you are unable to retrieve the network key or...Access Points screen does not appear. Go to step . • To connect to the manual of your network key by using the Canon PIXMA Wireless Setup Assistant or the instructions which can retrieve your access point or router, or contact its manufacturer. When an access point is ...
Getting Started
Page 25
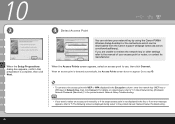
... established even after Connect is clicked, refer to "5.6 The Set Printer IP Address dialog box is displayed during setup" in the printed manual: Network Setup Troubleshooting. • If the error message appears, refer to "5 The following procedure. Go to Step . If the machine is displayed during setup" in the printed manual...
... established even after Connect is clicked, refer to "5.6 The Set Printer IP Address dialog box is displayed during setup" in the printed manual: Network Setup Troubleshooting. • If the error message appears, refer to "5 The following procedure. Go to Step . If the machine is displayed during setup" in the printed manual...
Getting Started
Page 26
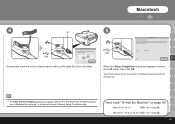
10 7 8 USB E When the Setup Completion dialog box appears, remove the USB cable, then click Next. Turn off the machine, then place the machine in the printed manual: Network Setup Troubleshooting. • If Unsafe Removal of Device is displayed, click OK. 24 For details, refer to "8 Changing the port name" in the location where you will use it, and turn on it. • To change the port name, click View Setup Results, then click Set Port Name.
10 7 8 USB E When the Setup Completion dialog box appears, remove the USB cable, then click Next. Turn off the machine, then place the machine in the printed manual: Network Setup Troubleshooting. • If Unsafe Removal of Device is displayed, click OK. 24 For details, refer to "8 Changing the port name" in the location where you will use it, and turn on it. • To change the port name, click View Setup Results, then click Set Port Name.
Getting Started
Page 30
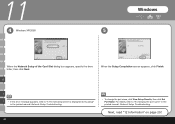
For details, refer to "5 The following screen is displayed during setup" in the printed manual: Network Setup Troubleshooting. G When the Setup Completion screen appears, click Finish. 11 4 Windows XP/2000 Windows 5 When the Network Setup of the Card Slot dialog box appears, specify the drive letter, then click Next. Next, read "12 Information" on page 29! I J • If the error message appears, refer to "8 Changing the port name" in the printed manual: Network Setup Troubleshooting. 28 • To change the port name, click View Setup Results, then click Set Port Name.
For details, refer to "5 The following screen is displayed during setup" in the printed manual: Network Setup Troubleshooting. G When the Setup Completion screen appears, click Finish. 11 4 Windows XP/2000 Windows 5 When the Network Setup of the Card Slot dialog box appears, specify the drive letter, then click Next. Next, read "12 Information" on page 29! I J • If the error message appears, refer to "8 Changing the port name" in the printed manual: Network Setup Troubleshooting. 28 • To change the port name, click View Setup Results, then click Set Port Name.
Getting Started
Page 41
... Step . Mac OS X v.10.4.x/v.10.3.9 Go to "5.6 The Set Printer IP Address dialog box is displayed during setup" in the printed manual: Network Setup Troubleshooting. The Printer Setup Utility and Canon IJ Network Scanner Selector will start up. • If the Set Printer IP Address dialog box appear, refer to Step . 39
... Step . Mac OS X v.10.4.x/v.10.3.9 Go to "5.6 The Set Printer IP Address dialog box is displayed during setup" in the printed manual: Network Setup Troubleshooting. The Printer Setup Utility and Canon IJ Network Scanner Selector will start up. • If the Set Printer IP Address dialog box appear, refer to Step . 39
Getting Started
Page 42
... the Computer First-time Setup for Use over Wireless LAN 1 2 3 On the Canon IJ Network Tool screen, select LAN connection, then F click OK. Select Setup in the pop-up menu, select MP620 series in the printed manual: Network Setup Troubleshooting. Make sure there is no machine is detected, refer to "6 Machine's LAN...
... the Computer First-time Setup for Use over Wireless LAN 1 2 3 On the Canon IJ Network Tool screen, select LAN connection, then F click OK. Select Setup in the pop-up menu, select MP620 series in the printed manual: Network Setup Troubleshooting. Make sure there is no machine is detected, refer to "6 Machine's LAN...
Getting Started
Page 43
... (Windows)/Network Password (Macintosh)" in the printed manual: Network Setup Troubleshooting. • If you are unable to retrieve the network key or other settings refer to the manual of your network key by using the Canon PIXMA Wireless Setup Assistant or the instructions which can retrieve your access point...with WEP or WPA displayed in the Encryption column, enter the network key (WEP key or WPA key) in the printed manual: Network Setup Troubleshooting. 41 When an access point is displayed during setup" in Network Password, then click Connect. Go to use, then click Connect. F &#...
... (Windows)/Network Password (Macintosh)" in the printed manual: Network Setup Troubleshooting. • If you are unable to retrieve the network key or other settings refer to the manual of your network key by using the Canon PIXMA Wireless Setup Assistant or the instructions which can retrieve your access point...with WEP or WPA displayed in the Encryption column, enter the network key (WEP key or WPA key) in the printed manual: Network Setup Troubleshooting. 41 When an access point is displayed during setup" in Network Password, then click Connect. Go to use, then click Connect. F &#...
Getting Started
Page 44
... machine is clicked, refer to step . Press the ON button (A) TO TURN OFF THE MACHINE, then place the machine in the printed manual: Network Setup Troubleshooting. When the Setup Completion dialog box appears, remove the USB cable, then click Next. • If no connection is established even after Connect is detected...
... machine is clicked, refer to step . Press the ON button (A) TO TURN OFF THE MACHINE, then place the machine in the printed manual: Network Setup Troubleshooting. When the Setup Completion dialog box appears, remove the USB cable, then click Next. • If no connection is established even after Connect is detected...
Getting Started
Page 49
H • To confirm the machine's MAC address, refer to close the dialog box. 5 6 Macintosh D On the Canon IJ Network Scanner Selector Confirm that a check mark is not available when using the machine over a network. K 47 F of the machine in the on page ... MAC address Paper" on -screen manual: Advanced Guide available via Solution Menu. • With Mac OS X v.10.5.x, the Card Slot is displayed, then screen, select Canon MP620 series Network in click Exit to "Troubleshooting" in Network Device List, then click Apply to use the machine as a scanner.
H • To confirm the machine's MAC address, refer to close the dialog box. 5 6 Macintosh D On the Canon IJ Network Scanner Selector Confirm that a check mark is not available when using the machine over a network. K 47 F of the machine in the on page ... MAC address Paper" on -screen manual: Advanced Guide available via Solution Menu. • With Mac OS X v.10.5.x, the Card Slot is displayed, then screen, select Canon MP620 series Network in click Exit to "Troubleshooting" in Network Device List, then click Apply to use the machine as a scanner.
Getting Started
Page 52
...If the timeout error screen appears, refer to "5.12 The Timeout error screen is displayed during WPS setup" in the printed manual: Network Setup Troubleshooting. • The WPS button may be named differently depending on the LCD of your access point. Next, read "Install the Software" !...the timeout error screen appears, refer to "5.12 The Timeout error screen is displayed during WPS setup" in the printed manual: Network Setup Troubleshooting. 50 When the access point is not completed within 10 minutes. Press the OK button. For details, refer to operate the machine and...
...If the timeout error screen appears, refer to "5.12 The Timeout error screen is displayed during WPS setup" in the printed manual: Network Setup Troubleshooting. • The WPS button may be named differently depending on the LCD of your access point. Next, read "Install the Software" !...the timeout error screen appears, refer to "5.12 The Timeout error screen is displayed during WPS setup" in the printed manual: Network Setup Troubleshooting. 50 When the access point is not completed within 10 minutes. Press the OK button. For details, refer to operate the machine and...
Getting Started
Page 61
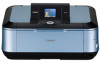
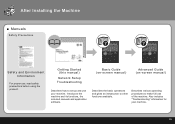
... manuals and application software. Describes various operating procedures to make full use , read safety precautions before using the product. Getting Started (this manual) Network Setup Troubleshooting Basic Guide (on-screen manual) Advanced Guide (on-screen manual) Describes how to other functions available. Describes the basic operations and gives an introduction to...
... manuals and application software. Describes various operating procedures to make full use , read safety precautions before using the product. Getting Started (this manual) Network Setup Troubleshooting Basic Guide (on-screen manual) Advanced Guide (on-screen manual) Describes how to other functions available. Describes the basic operations and gives an introduction to...


