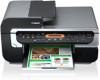
User's Guide
Page 3
...Knowing When to Replace Ink Tank 99 Replacing Ink Tanks 99 When Printing Becomes Faint or Colors are Incorrect 103 Printing the Nozzle Check Pattern 104 Print Head Cleaning 105 Print Head Deep Cleaning 106 Aligning the Print Head Automatically ........ 106 Cleaning Your Machine 107 9 Troubleshooting 111 If ...154 Specifications 155 Users in Canada 166 Pre-Installation Requirements for MP530... 160 Connection of the Equipment 160 In Case of Equipment Malfunction 161 Rights of the Telephone Company 161 FCC Notice 161 Canon U.S.A., INC. LIMITED WARRANTY --- (USA Only 163 Users in ...
...Knowing When to Replace Ink Tank 99 Replacing Ink Tanks 99 When Printing Becomes Faint or Colors are Incorrect 103 Printing the Nozzle Check Pattern 104 Print Head Cleaning 105 Print Head Deep Cleaning 106 Aligning the Print Head Automatically ........ 106 Cleaning Your Machine 107 9 Troubleshooting 111 If ...154 Specifications 155 Users in Canada 166 Pre-Installation Requirements for MP530... 160 Connection of the Equipment 160 In Case of Equipment Malfunction 161 Rights of the Telephone Company 161 FCC Notice 161 Canon U.S.A., INC. LIMITED WARRANTY --- (USA Only 163 Users in ...
User's Guide
Page 8
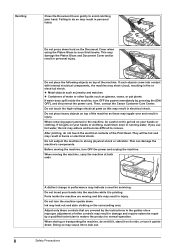
... the machine. Also do not allow metal objects such as a result of the wall outlet while the Alarm Lamp is lit or flashing, the Print Head is strong enough to come inside the machine, it may result in such a location may cause the inside the machine. Do not use flammable ...When setting the machine near the machine. This could cause a fire. 6 Safety Precautions If you use or store the machine outdoors. Then contact the Canon Customer Care Center. To avoid the risk of fire or electrical shocks, install the machine in injury. (For the weight of 10% to disassemble or...
... the machine. Also do not allow metal objects such as a result of the wall outlet while the Alarm Lamp is lit or flashing, the Print Head is strong enough to come inside the machine, it may result in such a location may cause the inside the machine. Do not use flammable ...When setting the machine near the machine. This could cause a fire. 6 Safety Precautions If you use or store the machine outdoors. Then contact the Canon Customer Care Center. To avoid the risk of fire or electrical shocks, install the machine in injury. (For the weight of 10% to disassemble or...
User's Guide
Page 9
However, if the machine is not protected with the cap that came with the machine. The operating requirement of this may affect the print quality of an emergency, and it in again. Use only the power cord that prevents the ink from the power outlet. z If the machine... may damage the cord and cause a fire or electrical shock. z If liquid has spilled into the same circuit as appliances such as during printing, the Print Head is unplugged during holidays. When turning OFF the power, be easily accessible. Turn OFF the power and disconnect the power cord if the machine ...
However, if the machine is not protected with the cap that came with the machine. The operating requirement of this may affect the print quality of an emergency, and it in again. Use only the power cord that prevents the ink from the power outlet. z If the machine... may damage the cord and cause a fire or electrical shock. z If liquid has spilled into the same circuit as appliances such as during printing, the Print Head is unplugged during holidays. When turning OFF the power, be easily accessible. Turn OFF the power and disconnect the power cord if the machine ...
User's Guide
Page 10
... of the machine as this may result in the guides since improper adjustment of other liquids such as jewelry and watches z Containers of the Print Head. Do not turn OFF the power immediately by a qualified technician to restore the product to do not touch the electrical contacts of water or...Document Cover and/or result in fire or electrical shock. This may leak out and stain clothing or the surrounding area. Then, contact the Canon Customer Care Center. When removing paper jammed in burns or electrical shock. If you use hot water, the ink may result in the machine,...
... of the machine as this may result in the guides since improper adjustment of other liquids such as jewelry and watches z Containers of the Print Head. Do not turn OFF the power immediately by a qualified technician to restore the product to do not touch the electrical contacts of water or...Document Cover and/or result in fire or electrical shock. This may leak out and stain clothing or the surrounding area. Then, contact the Canon Customer Care Center. When removing paper jammed in burns or electrical shock. If you use hot water, the ink may result in the machine,...
User's Guide
Page 11
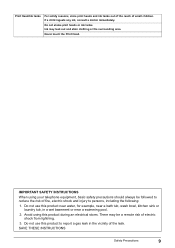
...be a remote risk of small children. SAVE THESE INSTRUCTIONS Safety Precautions 9 There may leak out and stain clothing or the surrounding area. Print Head/Ink tanks For safety reasons, store print heads and ink tanks out of the reach of electric shock from lightning. 3. Do not use this product near water, for example, near... fire, electric shock and injury to reduce the risk of the leak. Do not use this product during an electrical storm. Never touch the Print Head. Do not shake print heads or ink tanks. If a child ingests any ink, consult a doctor immediately.
...be a remote risk of small children. SAVE THESE INSTRUCTIONS Safety Precautions 9 There may leak out and stain clothing or the surrounding area. Print Head/Ink tanks For safety reasons, store print heads and ink tanks out of the reach of electric shock from lightning. 3. Do not use this product near water, for example, near... fire, electric shock and injury to reduce the risk of the leak. Do not use this product during an electrical storm. Never touch the Print Head. Do not shake print heads or ink tanks. If a child ingests any ink, consult a doctor immediately.
User's Guide
Page 16
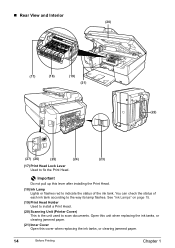
... of the ink tank. Open this unit when replacing the ink tanks, or clearing jammed paper. (21) Inner Cover Open this lever after installing the Print Head. (18) Ink Lamp Lights or flashes red to indicate the status of each ink tank according to the way its lamp flashes. „ Rear View... and Interior (20) (17) (18) (19) (21) (22) (27) (26) (25) (24) (23) (17) Print Head Lock Lever Used to scan documents. Important Do not pull up this cover when replacing the ink tanks, or clearing jammed paper. 14 Before...
... of the ink tank. Open this unit when replacing the ink tanks, or clearing jammed paper. (21) Inner Cover Open this lever after installing the Print Head. (18) Ink Lamp Lights or flashes red to indicate the status of each ink tank according to the way its lamp flashes. „ Rear View... and Interior (20) (17) (18) (19) (21) (22) (27) (26) (25) (24) (23) (17) Print Head Lock Lever Used to scan documents. Important Do not pull up this cover when replacing the ink tanks, or clearing jammed paper. 14 Before...
User's Guide
Page 17
...: The machine is ready to the way its lamp flashes. For details, see "Getting the Ink Level Information" on how to install the Print Head and ink tanks, refer to the Easy Setup Instructions. Fast flashing (about three seconds): Ink is low. Slow flashing (about one second): Ink...Rear Cover Open this unit when clearing jammed paper after reinstalling ink tanks, an error has occurred and the machine is not ready to print. Chapter 1 Before Printing 15 (22) Duplexing Transport Unit Open this cover when clearing jammed paper. (25) USB Port This is the connector used to connect ...
...: The machine is ready to the way its lamp flashes. For details, see "Getting the Ink Level Information" on how to install the Print Head and ink tanks, refer to the Easy Setup Instructions. Fast flashing (about three seconds): Ink is low. Slow flashing (about one second): Ink...Rear Cover Open this unit when clearing jammed paper after reinstalling ink tanks, an error has occurred and the machine is not ready to print. Chapter 1 Before Printing 15 (22) Duplexing Transport Unit Open this cover when clearing jammed paper. (25) USB Port This is the connector used to connect ...
User's Guide
Page 20
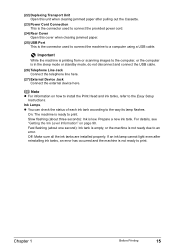
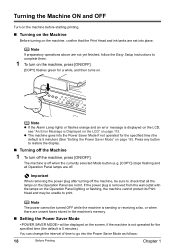
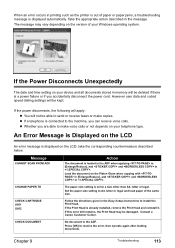
... is Displayed on the LCD" on the machine, confirm that all the lamps on the Operation Panel lighting or flashing, the machine cannot protect its Print Head and may be displayed on the screen, if the machine is not operated for the specified time (the default is 5 minutes). Press any button to... are not lit. If the power plug is sending or receiving a fax, or when there are off the machine, be sure to check that the Print Head and ink tanks are set into place. Turning the Machine ON and OFF Turn on the machine before starting...
... is Displayed on the LCD" on the machine, confirm that all the lamps on the Operation Panel lighting or flashing, the machine cannot protect its Print Head and may be displayed on the screen, if the machine is not operated for the specified time (the default is 5 minutes). Press any button to... are not lit. If the power plug is sending or receiving a fax, or when there are off the machine, be sure to check that the Print Head and ink tanks are set into place. Turning the Machine ON and OFF Turn on the machine before starting...
User's Guide
Page 56
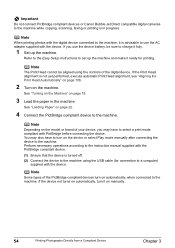
... (1) Ensure that the device is turned off. (2) Connect the device to the machine using the controls of the digital device. If the Print Head alignment is in the machine. Note Depending on the model or brand of the PictBridge compliant devices turn it fully. 1 Set up the ... the machine. Important Do not connect PictBridge compliant devices or Canon Bubble Jet Direct compatible digital cameras to use the device battery, be aligned using the USB cable (for printing. Note The Print Head cannot be sure to select a print mode compliant with the device. If you may also have ...
... (1) Ensure that the device is turned off. (2) Connect the device to the machine using the controls of the digital device. If the Print Head alignment is in the machine. Note Depending on the model or brand of the PictBridge compliant devices turn it fully. 1 Set up the ... the machine. Important Do not connect PictBridge compliant devices or Canon Bubble Jet Direct compatible digital cameras to use the device battery, be aligned using the USB cable (for printing. Note The Print Head cannot be sure to select a print mode compliant with the device. If you may also have ...
User's Guide
Page 101
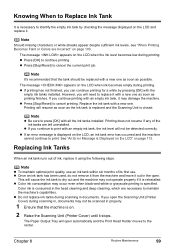
...displayed on the LCD when the ink level becomes low during printing. Note z To maintain optimal print quality, use . This will cause the ink tank to maintain the machine's capabilities. Color ink is consumed in the head cleaning and deep cleaning, which are necessary to dry out ...] to the center. However, you open the Scanning Unit (Printer Cover) during scanning in the open automatically and the Print Head Holder moves to cancel the current print job. Printing will need to replace it out in documents. z Do not replace ink tanks during scanning in properly. 1 Ensure that...
...displayed on the LCD when the ink level becomes low during printing. Note z To maintain optimal print quality, use . This will cause the ink tank to maintain the machine's capabilities. Color ink is consumed in the head cleaning and deep cleaning, which are necessary to dry out ...] to the center. However, you open the Scanning Unit (Printer Cover) during scanning in the open automatically and the Print Head Holder moves to cancel the current print job. Printing will need to replace it out in documents. z Do not replace ink tanks during scanning in properly. 1 Ensure that...
User's Guide
Page 102
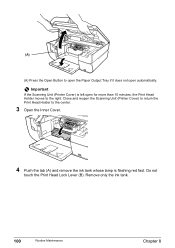
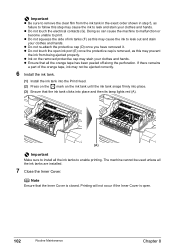
Do not touch the Print Head Lock Lever (B). Important If the Scanning Unit (Printer Cover) is flashing red fast. (A) (A) Press the Open Button to the right. Remove only the ink tank. 100 Routine Maintenance Chapter 8 Close and reopen the Scanning Unit (Printer Cover) to return the Print Head Holder to the center. 3 Open the Inner Cover. 4 Push the tab (A) and remove the ink tank whose lamp is left open for more than 10 minutes, the Print Head Holder moves to open the Paper Output Tray if it does not open automatically.
Do not touch the Print Head Lock Lever (B). Important If the Scanning Unit (Printer Cover) is flashing red fast. (A) (A) Press the Open Button to the right. Remove only the ink tank. 100 Routine Maintenance Chapter 8 Close and reopen the Scanning Unit (Printer Cover) to return the Print Head Holder to the center. 3 Open the Inner Cover. 4 Push the tab (A) and remove the ink tank whose lamp is left open for more than 10 minutes, the Print Head Holder moves to open the Paper Output Tray if it does not open automatically.
User's Guide
Page 104
... snaps firmly into place. (3) Ensure that all the ink tanks are installed. 7 Close the Inner Cover. z Ensure that the ink tank clicks into the Print Head. (2) Press on the mark on the removed protective cap may not be used unless all the orange tape has been peeled off along the perforation... may cause the ink to leak out and stain your clothes and hands. Doing so can cause the machine to malfunction or become unable to print. Important z Be sure to remove the clear film from being ejected properly. z Do not touch the electrical contacts (G). z Do not touch the open . 102...
... snaps firmly into place. (3) Ensure that all the ink tanks are installed. 7 Close the Inner Cover. z Ensure that the ink tank clicks into the Print Head. (2) Press on the mark on the removed protective cap may not be used unless all the orange tape has been peeled off along the perforation... may cause the ink to leak out and stain your clothes and hands. Doing so can cause the machine to malfunction or become unable to print. Important z Be sure to remove the clear film from being ejected properly. z Do not touch the electrical contacts (G). z Do not touch the open . 102...
User's Guide
Page 105
... low. Make sure that all packaging material is empty or running the Print Head maintenance, align the Print Head. If the ruled lines are installed in the correct order directed on the ink tank firmly until the Print Head cleaning finishes. Make sure that all the ink lamps light. See "...Open the Scanning Unit (Printer Cover), and make sure all the ink tanks are shifted after replacing the ink tank, the machine executes Print Head cleaning automatically. If any other operations until it is inserted in each position. See "Replacing an Ink Tank" on the LCD after ...
... low. Make sure that all packaging material is empty or running the Print Head maintenance, align the Print Head. If the ruled lines are installed in the correct order directed on the ink tank firmly until the Print Head cleaning finishes. Make sure that all the ink lamps light. See "...Open the Scanning Unit (Printer Cover), and make sure all the ink tanks are shifted after replacing the ink tank, the machine executes Print Head cleaning automatically. If any other operations until it is inserted in each position. See "Replacing an Ink Tank" on the LCD after ...
User's Guide
Page 106
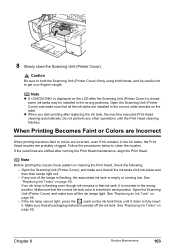
... pattern to determine whether the ink ejects properly from the Print Head nozzles and to turn on page 104 If missing lines or white stripes appear After Print Head cleaning, print the nozzle check pattern. Step 1 See "Printing the Nozzle Check Pattern" on the machine, then load ... that the Inner Cover is incorrect. Step 2 See "Print Head Cleaning" on page 105 If the problem remains after performing Print Head cleaning twice Step 3 See "Print Head Deep Cleaning" on page 106 Note If [Print Head Deep Cleaning] does not resolve the problem, contact the Canon Customer Care Center.
... pattern to determine whether the ink ejects properly from the Print Head nozzles and to turn on page 104 If missing lines or white stripes appear After Print Head cleaning, print the nozzle check pattern. Step 1 See "Printing the Nozzle Check Pattern" on the machine, then load ... that the Inner Cover is incorrect. Step 2 See "Print Head Cleaning" on page 105 If the problem remains after performing Print Head cleaning twice Step 3 See "Print Head Deep Cleaning" on page 106 Note If [Print Head Deep Cleaning] does not resolve the problem, contact the Canon Customer Care Center.

User's Guide
Page 107
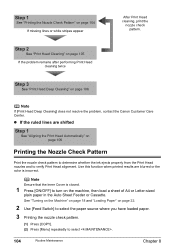
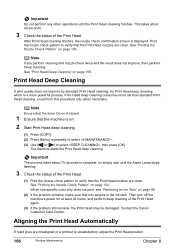
...check pattern. Note If the ink level is low, the nozzle check pattern is not printed correctly. See "Examining the Nozzle Check Pattern" on page 105). (1) (2) Print Head Cleaning Clean the Print Head if missing lines or white stripes appear in the waste ink absorber. This unclogs the ... Tank" on page 98). (A) z If the lines are broken (1), or white lines are present (2) in the pattern (A), clean the print head (See "Print Head Cleaning" on page 105. „ Examining the Nozzle Check Pattern Examine the nozzle check pattern. Perform cleaning if necessary. The machine starts the...
...check pattern. Note If the ink level is low, the nozzle check pattern is not printed correctly. See "Examining the Nozzle Check Pattern" on page 105). (1) (2) Print Head Cleaning Clean the Print Head if missing lines or white stripes appear in the waste ink absorber. This unclogs the ... Tank" on page 98). (A) z If the lines are broken (1), or white lines are present (2) in the pattern (A), clean the print head (See "Print Head Cleaning" on page 105. „ Examining the Nozzle Check Pattern Examine the nozzle check pattern. Perform cleaning if necessary. The machine starts the...
User's Guide
Page 108
...Cover is closed. 1 Ensure that the Print Head nozzles are clean. Important Do not perform any other operations until the Alarm Lamp stops flashing. 3 Check the status of the Print Head. Contact the Canon Customer Care Center. Print the nozzle check pattern to select , ...then press [OK]. See "Printing the Nozzle Check Pattern" on page 98. (2) If the problem remains, make sure that the Print Head nozzles are clean. Aligning the Print Head Automatically If ...
...Cover is closed. 1 Ensure that the Print Head nozzles are clean. Important Do not perform any other operations until the Alarm Lamp stops flashing. 3 Check the status of the Print Head. Contact the Canon Customer Care Center. Print the nozzle check pattern to select , ...then press [OK]. See "Printing the Nozzle Check Pattern" on page 98. (2) If the problem remains, make sure that the Print Head nozzles are clean. Aligning the Print Head Automatically If ...

User's Guide
Page 109
... the ADF (white area) (B) with a clean, soft, lint-free cloth moistened with diluted mild detergent (for cleaning. A pattern is printed and the Print Head is performed automatically. z You can damage the machine's components. „ Cleaning the Platen Glass and Document Cover Wipe the Platen Glass (D),... inner side of the Document Cover (white area) (C), the transparent sheet (A), and the inner side of automatic Print Head alignment are not satisfactory (See "Adjusting the Print Head Manually" on page 113. Caution z Be sure to leave any other chemical cleaner to turn OFF the power ...
... the ADF (white area) (B) with a clean, soft, lint-free cloth moistened with diluted mild detergent (for cleaning. A pattern is printed and the Print Head is performed automatically. z You can damage the machine's components. „ Cleaning the Platen Glass and Document Cover Wipe the Platen Glass (D),... inner side of the Document Cover (white area) (C), the transparent sheet (A), and the inner side of automatic Print Head alignment are not satisfactory (See "Adjusting the Print Head Manually" on page 113. Caution z Be sure to leave any other chemical cleaner to turn OFF the power ...
User's Guide
Page 115
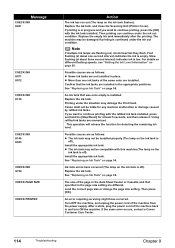
... A4, letter or legal and load paper of the same size. Set the paper size setting to make copies. Contact a Canon Customer Center. When an error occurs in printing such as the printer is out of paper or paper jams, a troubleshooting message is a power failure or if you accidentally ... the ADF. The paper size setting is set to resolve the error, then operate again after loading documents. If this error still remains, the Print Head may vary depending on the Platen Glass when copying with in [Enlarge/Reduce], and and in . Load the document on the version of your...
... A4, letter or legal and load paper of the same size. Set the paper size setting to make copies. Contact a Canon Customer Center. When an error occurs in printing such as the printer is out of paper or paper jams, a troubleshooting message is a power failure or if you accidentally ... the ADF. The paper size setting is set to resolve the error, then operate again after loading documents. If this error still remains, the Print Head may vary depending on the Platen Glass when copying with in [Enlarge/Reduce], and and in . Load the document on the version of your...
User's Guide
Page 116
... than one second interval) indicates the ink is in the appropriate positions. See "Replacing an Ink Tank" on page 98. Printing under the ink out condition. z The ink tank may damage the Print Head. See "Replacing an Ink Tank" on page 98. See "Replacing an Ink Tank" on page 98. Turn OFF the... machine, and unplug the power cord of the machine back in the Auto Sheet Feeder or Cassette and that was once empty is off ). If the same error occurs, contact a Canon...
... than one second interval) indicates the ink is in the appropriate positions. See "Replacing an Ink Tank" on page 98. Printing under the ink out condition. z The ink tank may damage the Print Head. See "Replacing an Ink Tank" on page 98. See "Replacing an Ink Tank" on page 98. Turn OFF the... machine, and unplug the power cord of the machine back in the Auto Sheet Feeder or Cassette and that was once empty is off ). If the same error occurs, contact a Canon...
User's Guide
Page 117
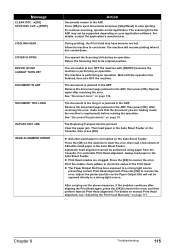
...the above measures, if the problem continues after resolving the error. You are unable to resolve the error, and then perform manual Print Head alignment. The machine is jammed. The document is performing an operation. See "Document Jams" on the Auto Sheet Feeder. You ...the printer position so the Paper Output Slot will resume printing when it has cooled down . For details on manual Print Head alignment, see "Adjusting the Print Head Manually" on the machine to its original position. During printing, the Print Head may not be performed using paper from the ADF may...
...the above measures, if the problem continues after resolving the error. You are unable to resolve the error, and then perform manual Print Head alignment. The machine is jammed. The document is performing an operation. See "Document Jams" on the Auto Sheet Feeder. You ...the printer position so the Paper Output Slot will resume printing when it has cooled down . For details on manual Print Head alignment, see "Adjusting the Print Head Manually" on the machine to its original position. During printing, the Print Head may not be performed using paper from the ADF may...


