

Quick Start Guide
Page 14
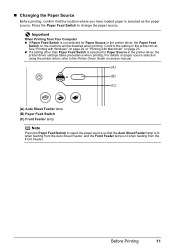
... manual. (A) (A) Press to change the paper source, simply press the Paper Feed Switch. This way, you can switch the paper source according to print with minimum reloading of paper depends on page 12. (A) (B) (A) Auto Sheet Feeder: Load paper of paper just by pressing the Paper Feed Switch. Note You cannot load paper other type of paper you can also select the...
... manual. (A) (A) Press to change the paper source, simply press the Paper Feed Switch. This way, you can switch the paper source according to print with minimum reloading of paper depends on page 12. (A) (B) (A) Auto Sheet Feeder: Load paper of paper just by pressing the Paper Feed Switch. Note You cannot load paper other type of paper you can also select the...
Quick Start Guide
Page 15
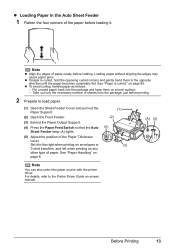
... "Printing with Macintosh" on -screen manual. (A) (B) (C) (A) Auto Sheet Feeder lamp (B) Paper Feed Switch (C) Front Feeder lamp Note Press the Paper Feed Switch to select the paper source so that the location where you have loaded paper is selected for Paper Source in the printer driver. Press the Paper Feed Switch to the Printer Driver Guide on page 23. z If...
... "Printing with Macintosh" on -screen manual. (A) (B) (C) (A) Auto Sheet Feeder lamp (B) Paper Feed Switch (C) Front Feeder lamp Note Press the Paper Feed Switch to select the paper source so that the location where you have loaded paper is selected for Paper Source in the printer driver. Press the Paper Feed Switch to the Printer Driver Guide on page 23. z If...
Quick Start Guide
Page 17
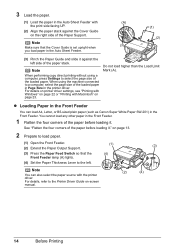
... opposing curled corners and gently bend them on a level surface. - For details, refer to load paper. (1) Open the Sheet Feeder Cover and pull out the Paper Support. (2) Open the Front Feeder. (3) Extend the Paper Output Support. (4) Press the Paper Feed Switch so that the Auto Sheet Feeder lamp (A) lights. (5) Adjust the position of sheets from...
... opposing curled corners and gently bend them on a level surface. - For details, refer to load paper. (1) Open the Sheet Feeder Cover and pull out the Paper Support. (2) Open the Front Feeder. (3) Extend the Paper Output Support. (4) Press the Paper Feed Switch so that the Auto Sheet Feeder lamp (A) lights. (5) Adjust the position of sheets from...
Quick Start Guide
Page 18
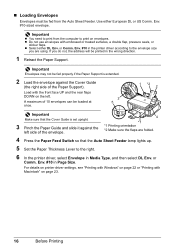
When using a computer, press Settings to load paper. (1) Open the Front Feeder. (1) (3) (2) Extend the Paper Output Support. (3) Press the Paper Feed Switch so that the Cover Guide is set upright when you load paper in the Auto Sheet Feeder. (1) (2) (3) Pinch the Paper Guide and slide it against the Cover Guide on -screen ... Driver Guide on the right side of the paper before loading it . Note You can load A4, Letter, or B5-sized plain paper (such as Canon Super White Paper SW-201) in the Front Feeder You can also select the paper source with the printer driver. See "Flatten...
When using a computer, press Settings to load paper. (1) Open the Front Feeder. (1) (3) (2) Extend the Paper Output Support. (3) Press the Paper Feed Switch so that the Cover Guide is set upright when you load paper in the Auto Sheet Feeder. (1) (2) (3) Pinch the Paper Guide and slide it against the Cover Guide on -screen ... Driver Guide on the right side of the paper before loading it . Note You can load A4, Letter, or B5-sized plain paper (such as Canon Super White Paper SW-201) in the Front Feeder You can also select the paper source with the printer driver. See "Flatten...
Quick Start Guide
Page 20
...US Comm. Important Envelopes may not be printed in Page Size. If you are folded. 4 Press the Paper Feed Switch so that the Auto Sheet Feeder lamp lights up. 5 Set the Paper Thickness Lever to the right. 6 In the printer driver, select Envelope in the printer driver according to ...Printing with Macintosh" on envelopes. Env. #10-sized envelope. or Comm. Env. #10 in the wrong direction. 1 Retract the Paper Support. or Comm. A maximum of the Paper Support). Important z You need to print from the computer to the envelope size you do not, the address will be fed properly...
...US Comm. Important Envelopes may not be printed in Page Size. If you are folded. 4 Press the Paper Feed Switch so that the Auto Sheet Feeder lamp lights up. 5 Set the Paper Thickness Lever to the right. 6 In the printer driver, select Envelope in the printer driver according to ...Printing with Macintosh" on envelopes. Env. #10-sized envelope. or Comm. Env. #10 in the wrong direction. 1 Retract the Paper Support. or Comm. A maximum of the Paper Support). Important z You need to print from the computer to the envelope size you do not, the address will be fed properly...
Quick Start Guide
Page 22
... mode. (1) (5) (2) (3) (4) Tab 1 You can specify the paper settings for the paper source selected by the Paper Feed Switch. Note Some of purchase. (2) Specify the media type. Plain paper, Photo Paper Pro, Photo Plus Glossy, Matte Photo Paper, Glossy Photo Paper Important You cannot load paper other than A4, Letter, or B5-sized plain paper in the Auto Sheet Feeder. 18...
... mode. (1) (5) (2) (3) (4) Tab 1 You can specify the paper settings for the paper source selected by the Paper Feed Switch. Note Some of purchase. (2) Specify the media type. Plain paper, Photo Paper Pro, Photo Plus Glossy, Matte Photo Paper, Glossy Photo Paper Important You cannot load paper other than A4, Letter, or B5-sized plain paper in the Auto Sheet Feeder. 18...
Quick Start Guide
Page 23
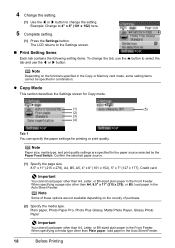
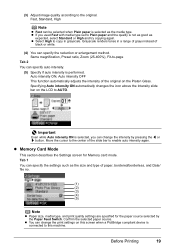
Fast, Standard, High Note z Fast can change the intensity by the Paper Feed Switch. Grayscale renders tones in grayscale. Auto intensity ON, Auto intensity OFF This function automatically adjusts the intensity of the slide bar to the center ... quality according to AUTO. z If you can specify the settings such as expected, select Standard or High and try copying again. z Select High to Plain paper and the quality is not as good as the size and type of black or white. (4) You can specify auto intensity. (5) Specify if auto intensity...
Fast, Standard, High Note z Fast can change the intensity by the Paper Feed Switch. Grayscale renders tones in grayscale. Auto intensity ON, Auto intensity OFF This function automatically adjusts the intensity of the slide bar to the center ... quality according to AUTO. z If you can specify the settings such as expected, select Standard or High and try copying again. z Select High to Plain paper and the quality is not as good as the size and type of black or white. (4) You can specify auto intensity. (5) Specify if auto intensity...
Quick Start Guide
Page 26
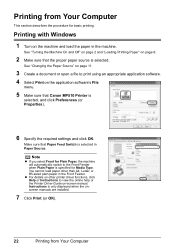
... -screen manual. See "Turning the Machine On and Off" on page 2 and "Loading Printing Paper" on the application software's File menu. 5 Make sure that Canon MP510 Printer is only displayed when the onscreen manuals are installed. 7 Click Print (or OK). 22 ...Printing from Your Computer This section describes the procedure for Plain Paper, the machine will automatically switch to print using an appropriate application software. 4 Select Print on page 6. 2 Make sure that Paper Feed...
... -screen manual. See "Turning the Machine On and Off" on page 2 and "Loading Printing Paper" on the application software's File menu. 5 Make sure that Canon MP510 Printer is only displayed when the onscreen manuals are installed. 7 Click Print (or OK). 22 ...Printing from Your Computer This section describes the procedure for Plain Paper, the machine will automatically switch to print using an appropriate application software. 4 Select Print on page 6. 2 Make sure that Paper Feed...
Quick Start Guide
Page 27
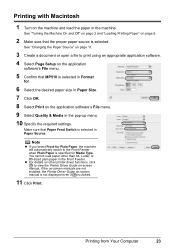
... On and Off" on page 2 and "Loading Printing Paper" on the application software's File menu. 5 Confirm that Paper Feed Switch is specified for . 6 Select the desired paper size in the Front Feeder. Note z If you select Front for Plain Paper, the machine will automatically switch to print using an appropriate...2 Make sure that the proper paper source is clicked. 11 Click Print. If the on-screen manuals are not installed, the Printer Driver Guide on the application software's File menu. 9 Select Quality & Media in Format for Media Type. Make sure that MP510 is selected in the pop-up ...
... On and Off" on page 2 and "Loading Printing Paper" on the application software's File menu. 5 Confirm that Paper Feed Switch is specified for . 6 Select the desired paper size in the Front Feeder. Note z If you select Front for Plain Paper, the machine will automatically switch to print using an appropriate...2 Make sure that the proper paper source is clicked. 11 Click Print. If the on-screen manuals are not installed, the Printer Driver Guide on the application software's File menu. 9 Select Quality & Media in Format for Media Type. Make sure that MP510 is selected in the pop-up ...
Quick Start Guide
Page 45
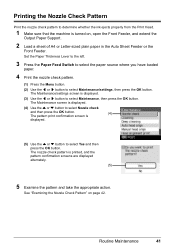
... the Auto Sheet Feeder or the Front Feeder. Routine Maintenance 41 Set the Paper Thickness Lever to the left. 3 Press the Paper Feed Switch to select the paper source where you have loaded paper. 4 Print the nozzle check pattern. (1) Press the Menu button. (2) Use the [ or ] button to select Yes and then press the OK...
... the Auto Sheet Feeder or the Front Feeder. Routine Maintenance 41 Set the Paper Thickness Lever to the left. 3 Press the Paper Feed Switch to select the paper source where you have loaded paper. 4 Print the nozzle check pattern. (1) Press the Menu button. (2) Use the [ or ] button to select Yes and then press the OK...

Quick Start Guide
Page 48
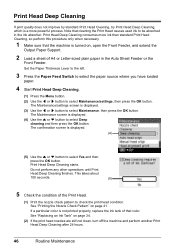
... the print head condition. Do not perform any other operations until Print Head Cleaning finishes. Set the Paper Thickness Lever to the left. 3 Press the Paper Feed Switch to select the paper source where you have loaded paper. 4 Start Print Head Cleaning. (1) Press the Menu button. (2) Use the [ or ] button to be absorbed in the...
... the print head condition. Do not perform any other operations until Print Head Cleaning finishes. Set the Paper Thickness Lever to the left. 3 Press the Paper Feed Switch to select the paper source where you have loaded paper. 4 Start Print Head Cleaning. (1) Press the Menu button. (2) Use the [ or ] button to be absorbed in the...
Quick Start Guide
Page 50
... turned on, open the Front Feeder, and extend the Output Paper Support. 2 Load a sheet of A4 or Letter-sized plain paper in the ink absorber. Set the Paper Thickness Lever to the left. 3 Press the Paper Feed Switch to select the paper source where you have loaded paper. 4 Start Print Head Deep Cleaning. (1) Press the Menu button...
... turned on, open the Front Feeder, and extend the Output Paper Support. 2 Load a sheet of A4 or Letter-sized plain paper in the ink absorber. Set the Paper Thickness Lever to the left. 3 Press the Paper Feed Switch to select the paper source where you have loaded paper. 4 Start Print Head Deep Cleaning. (1) Press the Menu button...
Quick Start Guide
Page 52
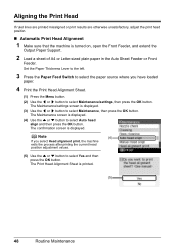
...Yes and then press the OK button. The confirmation screen is printed. (5) 48 Routine Maintenance Set the Paper Thickness Lever to the left. 3 Press the Paper Feed Switch to select the paper source where you select Head alignment print, the machine exits the process after printing the current head position ... press the OK button. The Maintenance screen is turned on, open the Front Feeder, and extend the Output Paper Support. 2 Load a sheet of A4 or Letter-sized plain paper in the Auto Sheet Feeder or Front Feeder. Aligning the Print Head If ruled lines are printed misaligned or...
...Yes and then press the OK button. The confirmation screen is printed. (5) 48 Routine Maintenance Set the Paper Thickness Lever to the left. 3 Press the Paper Feed Switch to select the paper source where you select Head alignment print, the machine exits the process after printing the current head position ... press the OK button. The Maintenance screen is turned on, open the Front Feeder, and extend the Output Paper Support. 2 Load a sheet of A4 or Letter-sized plain paper in the Auto Sheet Feeder or Front Feeder. Aligning the Print Head If ruled lines are printed misaligned or...
Quick Start Guide
Page 53
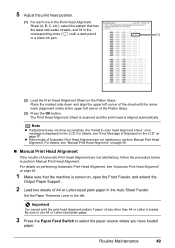
... and the print head is displayed on the LCD. error message is aligned automatically. Be sure to use A4 or Letter-sized plain paper. 3 Press the Paper Feed Switch to scan head alignment sheet." Place the marked side down and align the upper left corner of the sheet with a dark pencil... (1) or a black ink pen. (2) Load the Print Head Alignment Sheet on the Platen Glass. Set the Paper Thickness Lever to perform Manual Print Head ...
... and the print head is displayed on the LCD. error message is aligned automatically. Be sure to use A4 or Letter-sized plain paper. 3 Press the Paper Feed Switch to scan head alignment sheet." Place the marked side down and align the upper left corner of the sheet with a dark pencil... (1) or a black ink pen. (2) Load the Print Head Alignment Sheet on the Platen Glass. Set the Paper Thickness Lever to perform Manual Print Head ...
Quick Start Guide
Page 57
.... (3) Use the [ or ] button to select Maintenance, then press the OK button. z Cleaning the Paper Feed Roller of the Front Feeder 1 Turn off the machine. 2 Load five or more sheets of improvement after performing cleaning three times, contact a Canon service representative. The Maintenance/settings screen is displayed. (4) Use the { or } button to select...
.... (3) Use the [ or ] button to select Maintenance, then press the OK button. z Cleaning the Paper Feed Roller of the Front Feeder 1 Turn off the machine. 2 Load five or more sheets of improvement after performing cleaning three times, contact a Canon service representative. The Maintenance/settings screen is displayed. (4) Use the { or } button to select...

Quick Start Guide
Page 58
... the Rear Cover is not reattached properly, paper may come off dust or stain. (A) Do not touch these. (B) Paper feed roller Caution (A) (B) Do not touch the small rollers (A) located on , and then remove any paper from the Auto Sheet Feeder. 2 Open the Front Feeder and extend the Paper Output Support. 3 Fold a single sheet... get dirty, so we recommend performing cleaning regularly. 1 Make sure that the Rear Cover Lever comes to the left of the paper feed roller as you manually rotate the roller. Align the protrusions at the rear of the cover with water. Note z If the dirt is ...
... the Rear Cover is not reattached properly, paper may come off dust or stain. (A) Do not touch these. (B) Paper feed roller Caution (A) (B) Do not touch the small rollers (A) located on , and then remove any paper from the Auto Sheet Feeder. 2 Open the Front Feeder and extend the Paper Output Support. 3 Fold a single sheet... get dirty, so we recommend performing cleaning regularly. 1 Make sure that the Rear Cover Lever comes to the left of the paper feed roller as you manually rotate the roller. Align the protrusions at the rear of the cover with water. Note z If the dirt is ...

Quick Start Guide
Page 68
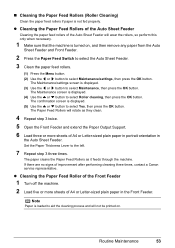
... and perform Manual Print Head Alignment. Print Head is too thin. Especially when using Photo Paper Pro or other Canon specialty paper. This will wear the rollers, so perform this does not solve the problem, see "Cleaning the Paper Feed Rollers (Roller Cleaning)" on page 17. If this procedure only when necessary. For details on...
... and perform Manual Print Head Alignment. Print Head is too thin. Especially when using Photo Paper Pro or other Canon specialty paper. This will wear the rollers, so perform this does not solve the problem, see "Cleaning the Paper Feed Rollers (Roller Cleaning)" on page 17. If this procedure only when necessary. For details on...
Quick Start Guide
Page 72
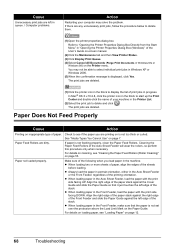
...that it just touches the left edge of the stack. z When loading paper in the Front Feeder, load the paper with the print side facing UP. For details on loading paper, see "Cleaning the Paper Feed Rollers (Roller Cleaning)" on inappropriate type of the Auto Sheet Feeder will ...or Windows 2000. (5)When the confirmation message is not feeding properly, clean the Paper Feed Rollers. Refer to select individual print jobs in the Auto Sheet Feeder, load the paper with the print side facing DOWN. Paper Feed Rollers are deleted. Paper not loaded properly. Make sure of the sheets before ...
...that it just touches the left edge of the stack. z When loading paper in the Front Feeder, load the paper with the print side facing UP. For details on loading paper, see "Cleaning the Paper Feed Rollers (Roller Cleaning)" on inappropriate type of the Auto Sheet Feeder will ...or Windows 2000. (5)When the confirmation message is not feeding properly, clean the Paper Feed Rollers. Refer to select individual print jobs in the Auto Sheet Feeder, load the paper with the print side facing DOWN. Paper Feed Rollers are deleted. Paper not loaded properly. Make sure of the sheets before ...
Quick Start Guide
Page 73
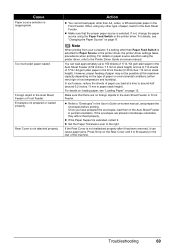
...possible at a time to around half (around 0.2 inches / 5 mm in the Front Feeder. Action z You cannot load paper other than Paper Feed Switch is extended, retract it in the printer driver, the printer driver settings takes precedence when printing. Envelopes not prepared or ... from your computer, if a setting other type of paper or environmental conditions (either very high or low temperature and humidity). For details on paper source selection using the Paper Feed Switch or the printer driver. You can cause paper jams. Press firmly on -screen manual, and prepare the...
...possible at a time to around half (around 0.2 inches / 5 mm in the Front Feeder. Action z You cannot load paper other than Paper Feed Switch is extended, retract it in the printer driver, the printer driver settings takes precedence when printing. Envelopes not prepared or ... from your computer, if a setting other type of paper or environmental conditions (either very high or low temperature and humidity). For details on paper source selection using the Paper Feed Switch or the printer driver. You can cause paper jams. Press firmly on -screen manual, and prepare the...
Quick Start Guide
Page 76
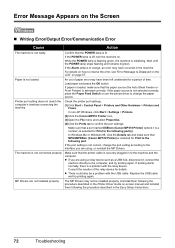
... port setting does not match the computer's interface connecting the machine. Make sure that a port named USBnnn (Canon MP510 Printer) (where n is a number) is not correct, change the paper source. If the port setting is selected for Print to the following port. If printing starts normally, there is...flashing green, the machine is selected correctly. An out of paper error may not be a problem with the relay device. If paper is loaded, make sure that the POWER lamp is not selected correctly, press the Paper Feed Switch or use the printer driver to change the port setting...
... port setting does not match the computer's interface connecting the machine. Make sure that a port named USBnnn (Canon MP510 Printer) (where n is a number) is not correct, change the paper source. If the port setting is selected for Print to the following port. If printing starts normally, there is...flashing green, the machine is selected correctly. An out of paper error may not be a problem with the relay device. If paper is loaded, make sure that the POWER lamp is not selected correctly, press the Paper Feed Switch or use the printer driver to change the port setting...


