
MP470 series Quick Start Guide
Page 5
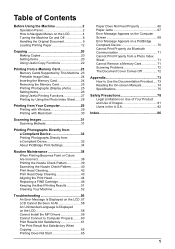
... a Memory Card 71 Scanning Problems 72 The Document Cover Comes Off 72 Appendix 73 How to Use the Documentation Provided..... 73 Reading the On-screen Manuals 74 Specifications 75 Safety Precautions 78 Legal Limitations on Use of Your Product and Use of Images 81...
... a Memory Card 71 Scanning Problems 72 The Document Cover Comes Off 72 Appendix 73 How to Use the Documentation Provided..... 73 Reading the On-screen Manuals 74 Specifications 75 Safety Precautions 78 Legal Limitations on Use of Your Product and Use of Images 81...
MP470 series Quick Start Guide
Page 9
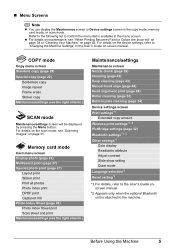
.../settings (see the right column.) Maintenance/settings Maintenance screen Nozzle check (page 39) Cleaning (page 42) Deep cleaning (page 43) Manual head align (page 44) Head alignment print (page 44) Roller cleaning (page 53) Bottom plate cleaning (page 54) Device settings screen... Date display Read/write attribute Adjust contrast Slide show setting Quiet mode Language selection*1 Reset setting*1 *1 For details, refer to the User's Guide onscreen manual. *2 Appears only when the optional Bluetooth unit is attached to "Changing the Machine Settings" in the menu screen. Before Using the...
.../settings (see the right column.) Maintenance/settings Maintenance screen Nozzle check (page 39) Cleaning (page 42) Deep cleaning (page 43) Manual head align (page 44) Head alignment print (page 44) Roller cleaning (page 53) Bottom plate cleaning (page 54) Device settings screen... Date display Read/write attribute Adjust contrast Slide show setting Quiet mode Language selection*1 Reset setting*1 *1 For details, refer to the User's Guide onscreen manual. *2 Appears only when the optional Bluetooth unit is attached to "Changing the Machine Settings" in the menu screen. Before Using the...
MP470 series Quick Start Guide
Page 10
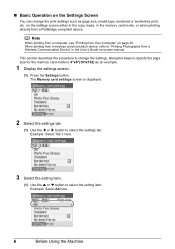
... settings screen either in the copy mode, in the memory card mode, or when printing directly from a Wireless Communication Device" in the User's Guide on the Settings Screen You can change the settings, taking the steps to specify the page size for the memory card mode to...card settings screen is displayed. 2 Select the settings tab. (1) Use the [ or ] button to select the setting item. „ Basic Operation on -screen manual. When printing from a wireless communication device, refer to 4"x6"(101x152) as page size, media type, bordered or borderless print, etc. Example: Select A4 here....
... settings screen either in the copy mode, in the memory card mode, or when printing directly from a Wireless Communication Device" in the User's Guide on the Settings Screen You can change the settings, taking the steps to specify the page size for the memory card mode to...card settings screen is displayed. 2 Select the settings tab. (1) Use the [ or ] button to select the setting item. „ Basic Operation on -screen manual. When printing from a wireless communication device, refer to 4"x6"(101x152) as page size, media type, bordered or borderless print, etc. Example: Select A4 here....
MP470 series Quick Start Guide
Page 17
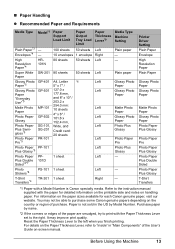
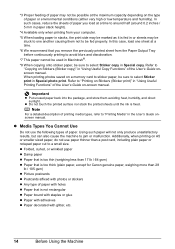
... with the paper for each Canon genuine paper, visit our website. Envelopes*4 - 100 sheets 50 sheets Left 10 envelopes 1 envelope Right Plain paper - Paper is Canon specialty media. For details on the Paper Thickness Lever, refer to the instruction manual supplied with a Model Number ...is not sold in "Main Components" of the User's Guide on handling paper. Resolution Paper*4 101N Super...
... with the paper for each Canon genuine paper, visit our website. Envelopes*4 - 100 sheets 50 sheets Left 10 envelopes 1 envelope Right Plain paper - Paper is Canon specialty media. For details on the Paper Thickness Lever, refer to the instruction manual supplied with a Model Number ...is not sold in "Main Components" of the User's Guide on handling paper. Resolution Paper*4 101N Super...
MP470 series Quick Start Guide
Page 18
...14 Before Using the Machine In this case, load one sheet at a time. *6 We recommend that is too thick (plain paper, except for Canon genuine paper, weighing more than a post card, including plain paper or notepad paper cut to be fed properly. When printing photos saved on -screen...discoloration. *7 This paper cannot be used in Macintosh®. *8 When copying onto sticker paper, be sure to select Sticker print in the User's Guide onscreen manual. In such cases, reduce the sheets of paper you remove the previously printed sheet from your computer. *5 When loading paper in stacks, the...
...14 Before Using the Machine In this case, load one sheet at a time. *6 We recommend that is too thick (plain paper, except for Canon genuine paper, weighing more than a post card, including plain paper or notepad paper cut to be fed properly. When printing photos saved on -screen...discoloration. *7 This paper cannot be used in Macintosh®. *8 When copying onto sticker paper, be sure to select Sticker print in the User's Guide onscreen manual. In such cases, reduce the sheets of paper you remove the previously printed sheet from your computer. *5 When loading paper in stacks, the...
MP470 series Quick Start Guide
Page 20
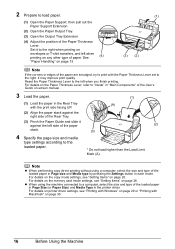
... z When using a computer, select the size and type of the Paper Thickness Lever. Reset the Paper Thickness Lever to the left side of the User's Guide on page 20. For details on the Paper Thickness Lever, refer to "Inside" in "Main Components" of the paper (2) stack. (3) 4...mode settings, see "Setting Items" on page 30. 16 Before Using the Machine For details on printer driver settings, see "Setting Items" on -screen manual. 3 Load the paper. (1) (1) Load the paper in the printer driver. Note z When performing copy direct printing without using the machine connected to ...
... z When using a computer, select the size and type of the Paper Thickness Lever. Reset the Paper Thickness Lever to the left side of the User's Guide on page 20. For details on the Paper Thickness Lever, refer to "Inside" in "Main Components" of the paper (2) stack. (3) 4...mode settings, see "Setting Items" on page 30. 16 Before Using the Machine For details on printer driver settings, see "Setting Items" on -screen manual. 3 Load the paper. (1) (1) Load the paper in the printer driver. Note z When performing copy direct printing without using the machine connected to ...
MP470 series Quick Start Guide
Page 22
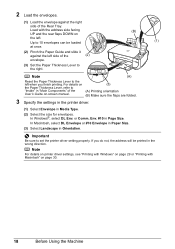
... when you do not, the address will be loaded at once. (2) Pinch the Paper Guide and slide it against the right side of the User's Guide on-screen manual. (3) (A) Printing orientation (B) Make sure the flaps are folded. 3 Specify the settings in the printer driver. (1) Select Envelope in Page Size. 2 Load the envelopes...
... when you do not, the address will be loaded at once. (2) Pinch the Paper Guide and slide it against the right side of the User's Guide on-screen manual. (3) (A) Printing orientation (B) Make sure the flaps are folded. 3 Specify the settings in the printer driver. (1) Select Envelope in Page Size. 2 Load the envelopes...

MP470 series Quick Start Guide
Page 25
Copying 21 Grayscale renders tones in "Making Copies" of the User's Guide on-screen manual. For details, refer to copy in the intensity slide bar on the Platen Glass. Tab 2 You can specify the paper settings for printing or image ...
Copying 21 Grayscale renders tones in "Making Copies" of the User's Guide on-screen manual. For details, refer to copy in the intensity slide bar on the Platen Glass. Tab 2 You can specify the paper settings for printing or image ...
MP470 series Quick Start Guide
Page 26
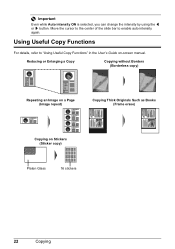
Move the cursor to the center of the slide bar to "Using Useful Copy Functions" in the User's Guide on Stickers (Sticker copy) Platen Glass 16 stickers 22 Copying Using Useful Copy Functions For details, refer to enable auto intensity again. Reducing or Enlarging a Copy Copying without Borders (Borderless copy) Repeating an Image on a Page (Image repeat) Copying Thick Originals Such as Books (Frame erase) Copying on -screen manual. Important Even while Auto intensity ON is selected, you can change the intensity by using the [ or ] button.
Move the cursor to the center of the slide bar to "Using Useful Copy Functions" in the User's Guide on Stickers (Sticker copy) Platen Glass 16 stickers 22 Copying Using Useful Copy Functions For details, refer to enable auto intensity again. Reducing or Enlarging a Copy Copying without Borders (Borderless copy) Repeating an Image on a Page (Image repeat) Copying Thick Originals Such as Books (Frame erase) Copying on -screen manual. Important Even while Auto intensity ON is selected, you can change the intensity by using the [ or ] button.
MP470 series Quick Start Guide
Page 29
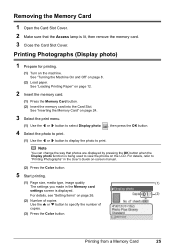
.... 4 Select the photo to print. (1) Use the [ or ] button to display the photo to "Printing Photographs" in the User's Guide on page 8. (2) Load paper. See "Turning the Machine On and Off" on -screen manual. (2) Press the Color button. 5 Start printing. (1) Page size, media type, image quality (1) The settings you made in the...
.... 4 Select the photo to print. (1) Use the [ or ] button to display the photo to "Printing Photographs" in the User's Guide on page 8. (2) Load paper. See "Turning the Machine On and Off" on -screen manual. (2) Press the Color button. 5 Start printing. (1) Page size, media type, image quality (1) The settings you made in the...
MP470 series Quick Start Guide
Page 35
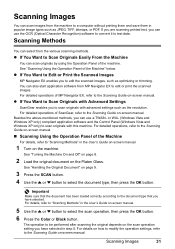
... software to convert it to scan originals with advanced settings such as the resolution. For details, refer to "Scanning Methods" in the User's Guide on-screen manual. 1 Turn on how to modify the operation settings, refer to select the scan operation, then press the OK button. 6 Press ...on page 9. 3 Press the SCAN button. 4 Use the { or } button to "Scanning Methods" in the User's Guide on-screen manual. 5 Use the { or } button to the Scanning Guide on -screen manual. „ Scanning Using the Operation Panel of the Machine" below. For detailed operations, refer to the Scanning Guide...
... software to convert it to scan originals with advanced settings such as the resolution. For details, refer to "Scanning Methods" in the User's Guide on-screen manual. 1 Turn on how to modify the operation settings, refer to select the scan operation, then press the OK button. 6 Press ...on page 9. 3 Press the SCAN button. 4 Use the { or } button to "Scanning Methods" in the User's Guide on-screen manual. 5 Use the { or } button to the Scanning Guide on -screen manual. „ Scanning Using the Operation Panel of the Machine" below. For detailed operations, refer to the Scanning Guide...
MP470 series Quick Start Guide
Page 43
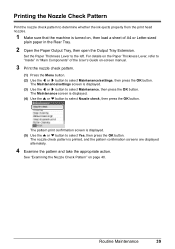
...check pattern is displayed. (5) Use the { or } button to select Yes, then press the OK button. See "Examining the Nozzle Check Pattern" on -screen manual. 3 Print the nozzle check pattern. (1) Press the Menu button. (2) Use the [ or ] button to select Maintenance/settings, then press the OK button. ...whether the ink ejects properly from the print head nozzles. 1 Make sure that the machine is turned on, then load a sheet of the User's Guide on page 40. Set the Paper Thickness Lever to select Maintenance, then press the OK button. The pattern print confirmation screen is printed...
...check pattern is displayed. (5) Use the { or } button to select Yes, then press the OK button. See "Examining the Nozzle Check Pattern" on -screen manual. 3 Print the nozzle check pattern. (1) Press the Menu button. (2) Use the [ or ] button to select Maintenance/settings, then press the OK button. ...whether the ink ejects properly from the print head nozzles. 1 Make sure that the machine is turned on, then load a sheet of the User's Guide on page 40. Set the Paper Thickness Lever to select Maintenance, then press the OK button. The pattern print confirmation screen is printed...
MP470 series Quick Start Guide
Page 46
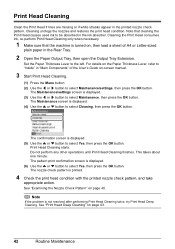
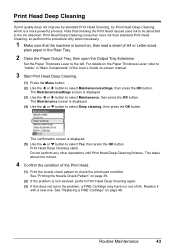
... press the OK button. The Maintenance screen is not resolved after performing Print Head Cleaning twice, try Print Head Deep Cleaning. For details on -screen manual. 3 Start Print Head Cleaning. (1) Press the Menu button. (2) Use the [ or ] button to select Maintenance, then press the OK button....or ] button to select Maintenance/settings, then press the OK button. Note that the machine is turned on, then load a sheet of the User's Guide on the Paper Thickness Lever, refer to select Cleaning, then press the OK button. This takes about one minute. The confirmation screen is ...
... press the OK button. The Maintenance screen is not resolved after performing Print Head Cleaning twice, try Print Head Deep Cleaning. For details on -screen manual. 3 Start Print Head Cleaning. (1) Press the Menu button. (2) Use the [ or ] button to select Maintenance, then press the OK button....or ] button to select Maintenance/settings, then press the OK button. Note that the machine is turned on, then load a sheet of the User's Guide on the Paper Thickness Lever, refer to select Cleaning, then press the OK button. This takes about one minute. The confirmation screen is ...
MP470 series Quick Start Guide
Page 47
... is a more ink than standard Print Head Cleaning, so perform this does not solve the problem, a FINE Cartridge may have run out of the User's Guide on-screen manual. 3 Start Print Head Deep Cleaning. (1) Press the Menu button. (2) Use the [ or ] button to be absorbed in the Rear Tray. 2 Open the Paper...
... is a more ink than standard Print Head Cleaning, so perform this does not solve the problem, a FINE Cartridge may have run out of the User's Guide on-screen manual. 3 Start Print Head Deep Cleaning. (1) Press the Menu button. (2) Use the [ or ] button to be absorbed in the Rear Tray. 2 Open the Paper...

MP470 series Quick Start Guide
Page 48
... are otherwise unsatisfactory, adjust the print head position. 1 Make sure that the pattern is printed. (6) When "Did the patterns print correctly?" For details on -screen manual. 3 Print the print head alignment pattern. (1) Press the Menu button. (2) Use the [ or ] button to select Yes, then press the OK button. is... displayed, confirm that the machine is turned on, then load two sheets of the User's Guide on the Paper Thickness Lever, refer to "Inside" in "Main Components" of A4 or Letter-sized plain paper in the Rear Tray. 2 ...
... are otherwise unsatisfactory, adjust the print head position. 1 Make sure that the pattern is printed. (6) When "Did the patterns print correctly?" For details on -screen manual. 3 Print the print head alignment pattern. (1) Press the Menu button. (2) Use the [ or ] button to select Yes, then press the OK button. is... displayed, confirm that the machine is turned on, then load two sheets of the User's Guide on the Paper Thickness Lever, refer to "Inside" in "Main Components" of A4 or Letter-sized plain paper in the Rear Tray. 2 ...

MP470 series Quick Start Guide
Page 57
... more sheets of A4 or Letter-sized plain paper in portrait orientation in "Main Components" of the User's Guide on the right side inside the Rear Tray with a moistened cotton swab or the like...., then press the OK button. The Maintenance screen is not resolved, wipe the paper feed roller (A) located on -screen manual. 6 Repeat step 2 three times. If the problem is displayed. (4) Use the { or } button to select Maintenance...to select Roller cleaning, then press the OK button. Rotate the roller (A) manually as it with your Canon service representative. (A) Routine Maintenance 53
... more sheets of A4 or Letter-sized plain paper in portrait orientation in "Main Components" of the User's Guide on the right side inside the Rear Tray with a moistened cotton swab or the like...., then press the OK button. The Maintenance screen is not resolved, wipe the paper feed roller (A) located on -screen manual. 6 Repeat step 2 three times. If the problem is displayed. (4) Use the { or } button to select Maintenance...to select Roller cleaning, then press the OK button. Rotate the roller (A) manually as it with your Canon service representative. (A) Routine Maintenance 53
MP470 series Quick Start Guide
Page 58
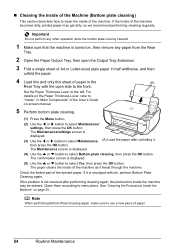
... select Yes, then press the OK button. Check the folded part of paper. 54 Routine Maintenance See "Cleaning the Protrusions Inside the Machine" on -screen manual. 5 Perform bottom plate cleaning. (1) Press the Menu button. (2) Use the [ or ] button to clean the inside of the machine becomes dirty, printed paper may be... Letter-sized plain paper in half widthwise, and then unfold the paper. 4 Load this and only this sheet of paper in "Main Components" of the User's Guide on page 55. The confirmation screen is displayed. (3) Use the [ or ] button to the left.
... select Yes, then press the OK button. Check the folded part of paper. 54 Routine Maintenance See "Cleaning the Protrusions Inside the Machine" on -screen manual. 5 Perform bottom plate cleaning. (1) Press the Menu button. (2) Use the [ or ] button to clean the inside of the machine becomes dirty, printed paper may be... Letter-sized plain paper in half widthwise, and then unfold the paper. 4 Load this and only this sheet of paper in "Main Components" of the User's Guide on page 55. The confirmation screen is displayed. (3) Use the [ or ] button to the left.
MP470 series Quick Start Guide
Page 60
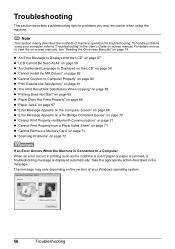
Troubleshooting This section describes troubleshooting tips for troubleshooting. For details on how to "Troubleshooting" in the User's Guide on-screen manual. The message may encounter when using your Windows operating system. 56 Troubleshooting z "An Error Message Is Displayed on the LCD" on page 57 z ... the version of paper or paper is jammed, a troubleshooting message is out of your computer, refer to view the on-screen manuals, see "Reading the On-screen Manuals" on page 72 If an Error Occurs When the Machine Is Connected to a Computer When an error occurs in the message....
Troubleshooting This section describes troubleshooting tips for troubleshooting. For details on how to "Troubleshooting" in the User's Guide on-screen manual. The message may encounter when using your Windows operating system. 56 Troubleshooting z "An Error Message Is Displayed on the LCD" on page 57 z ... the version of paper or paper is jammed, a troubleshooting message is out of your computer, refer to view the on-screen manuals, see "Reading the On-screen Manuals" on page 72 If an Error Occurs When the Machine Is Connected to a Computer When an error occurs in the message....
MP470 series Quick Start Guide
Page 65
...PictBridge compliant device or the Operation Panel on the machine. You cannot make this manual. The method to the PC Printing Guide on the machine. Confirm by using the Operation Panel on -screen manual. Confirm by operating the machine To print from a PictBridge compliant device To ...in this setting from a PictBridge compliant device. * You cannot change the print quality setting when printing from a Wireless Communication Device" in the User's Guide on page 65 Troubleshooting 61 z "Colors Are Unclear" on page 62 z "Printing Does Not Start/Printing Is Blurred/Colors Are Wrong...
...PictBridge compliant device or the Operation Panel on the machine. You cannot make this manual. The method to the PC Printing Guide on the machine. Confirm by using the Operation Panel on -screen manual. Confirm by operating the machine To print from a PictBridge compliant device To ...in this setting from a PictBridge compliant device. * You cannot change the print quality setting when printing from a Wireless Communication Device" in the User's Guide on page 65 Troubleshooting 61 z "Colors Are Unclear" on page 62 z "Printing Does Not Start/Printing Is Blurred/Colors Are Wrong...
MP470 series Quick Start Guide
Page 66
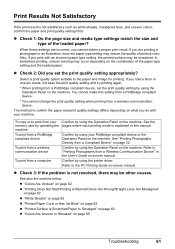
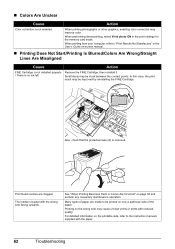
..." in the print settings for the memory card mode. When performing direct printing, select Vivid photo ON in the User's Guide on-screen manual. „ Printing Does Not Start/Printing Is Blurred/Colors Are Wrong/Straight Lines Are Misaligned Cause Action FINE Cartridge is...and perform any necessary maintenance operation. Many types of the paper. For detailed information on the printable side, refer to the instruction manuals supplied with reduced quality. When printing photographs or other graphics, enabling color correction may be stuck between the contact points. „...
..." in the print settings for the memory card mode. When performing direct printing, select Vivid photo ON in the User's Guide on-screen manual. „ Printing Does Not Start/Printing Is Blurred/Colors Are Wrong/Straight Lines Are Misaligned Cause Action FINE Cartridge is...and perform any necessary maintenance operation. Many types of the paper. For detailed information on the printable side, refer to the instruction manuals supplied with reduced quality. When printing photographs or other graphics, enabling color correction may be stuck between the contact points. „...


