MP280 series Gu쟠de inicio [Spanish Version]
Page 29
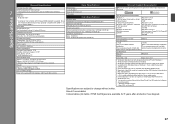
... Windows XP 64bit version - Mac OS X on a PC with Windows 7, Windows Vista or Windows XP pre-installed. • Windows: Uninstall software bundled with the Canon inkjet printer before upgrading from Windows Vista to PC External dimensions Approx. 17.8 (W) X 13.2 (D) X 6.0 (H) inches Approx. 450 (W) X 335 (D) X 153...216 mm) Operating environment Temperature: 5 to 35°C (41 to 95°F) Humidity: 10 to -page USB Port: Hi-Speed USB * Scan Specifications * A computer that complies with USB 1.1, it can be changed without notice. For Windows use only. • You cannot use movie ...
... Windows XP 64bit version - Mac OS X on a PC with Windows 7, Windows Vista or Windows XP pre-installed. • Windows: Uninstall software bundled with the Canon inkjet printer before upgrading from Windows Vista to PC External dimensions Approx. 17.8 (W) X 13.2 (D) X 6.0 (H) inches Approx. 450 (W) X 335 (D) X 153...216 mm) Operating environment Temperature: 5 to 35°C (41 to 95°F) Humidity: 10 to -page USB Port: Hi-Speed USB * Scan Specifications * A computer that complies with USB 1.1, it can be changed without notice. For Windows use only. • You cannot use movie ...
On-Screen Manual
Page 2
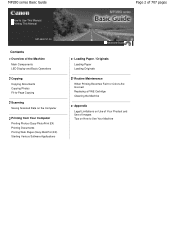
MP280 series Basic Guide How to Use This Manual Printing This Manual MP-4500-V1.00 Contents Overview of the Machine Main Components LED Display and Basic Operations Copying Copying Documents Copying Photos Fit-to-Page Copying Scanning Saving Scanned Data on the Computer Printing from Your Computer Printing Photos (Easy-PhotoPrint EX) Printing...
MP280 series Basic Guide How to Use This Manual Printing This Manual MP-4500-V1.00 Contents Overview of the Machine Main Components LED Display and Basic Operations Copying Copying Documents Copying Photos Fit-to-Page Copying Scanning Saving Scanned Data on the Computer Printing from Your Computer Printing Photos (Easy-PhotoPrint EX) Printing...
On-Screen Manual
Page 5
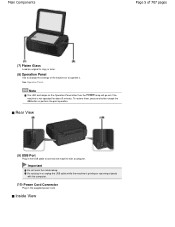
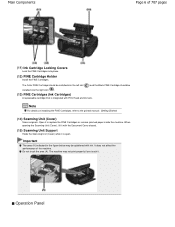
... perform the print operation. Important Do not touch the metal casing. Main Components Page 5 of 707 pages (7) Platen Glass Load an original to copy or scan. (8) Operation Panel Use to change the settings of the machine or to connect the machine with the computer. (10) Power Cord Connector Plug in the... power cord. Note The LED and lamps on the Operation Panel other than the POWER lamp will go out if the machine is printing or scanning originals with a computer. See Operation Panel . Rear View (9) USB Port Plug in or unplug the USB cable while the machine is not operated for ...
... perform the print operation. Important Do not touch the metal casing. Main Components Page 5 of 707 pages (7) Platen Glass Load an original to copy or scan. (8) Operation Panel Use to change the settings of the machine or to connect the machine with the computer. (10) Power Cord Connector Plug in the... power cord. Note The LED and lamps on the Operation Panel other than the POWER lamp will go out if the machine is printing or scanning originals with a computer. See Operation Panel . Rear View (9) USB Port Plug in or unplug the USB cable while the machine is not operated for ...
On-Screen Manual
Page 6
... (Cover), lift it with the Document Cover closed. (15) Scanning Unit Support Holds the Scanning Unit (Cover) while it is integrated with ink. Open it . Do not touch the area (A). Note For details on installing the FINE Cartridges, refer to ... open. Important The area (A) indicated in the figure below may not print properly if you touch it to the printed manual: Getting Started. (14) Scanning Unit (Cover) Scans originals. It does not affect the performance of 707 pages (11) Ink Cartridge Locking Covers Lock the FINE Cartridges into the left slot ( ) and...
... (Cover), lift it with the Document Cover closed. (15) Scanning Unit Support Holds the Scanning Unit (Cover) while it is integrated with ink. Open it . Do not touch the area (A). Note For details on installing the FINE Cartridges, refer to ... open. Important The area (A) indicated in the figure below may not print properly if you touch it to the printed manual: Getting Started. (14) Scanning Unit (Cover) Scans originals. It does not affect the performance of 707 pages (11) Ink Cartridge Locking Covers Lock the FINE Cartridges into the left slot ( ) and...
On-Screen Manual
Page 7
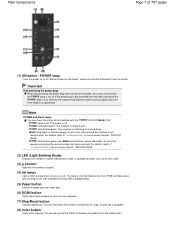
... or flashes orange: An error has occurred and the machine is initializing or shutting down. - For details, refer to cancel a print, copy, or scan job in the on-screen manual: Advanced Guide. - You can check the status of the machine with the POWER lamp and Alarm lamp. - Note ...Cartridge status and the lamp on the right indicates the Black FINE Cartridge status. (5) Paper button Selects the page size and media type. (6) SCAN button Starts scanning the original to confirm that the Document Cover is not lit. POWER lamp flashes green: The machine is not ready to print. - POWER ...
... or flashes orange: An error has occurred and the machine is initializing or shutting down. - For details, refer to cancel a print, copy, or scan job in the on-screen manual: Advanced Guide. - You can check the status of the machine with the POWER lamp and Alarm lamp. - Note ...Cartridge status and the lamp on the right indicates the Black FINE Cartridge status. (5) Paper button Selects the page size and media type. (6) SCAN button Starts scanning the original to confirm that the Document Cover is not lit. POWER lamp flashes green: The machine is not ready to print. - POWER ...
On-Screen Manual
Page 9
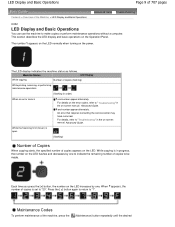
...the desired Each time you press the [ +] button, the number on the power. Maintenance Codes To perform maintenance of copies (flashing) While printing, scanning, or performing maintenance operations (flashing in the on the Operation Panel. This section describes the LED display and basic operations on -screen manual: Advanced ...to make copies or perform maintenance operations without a computer. An error that requires contacting the service center may have occurred. While the Scanning Unit (Cover) is in the on-screen manual: Advanced Guide . For details, refer to "1".
...the desired Each time you press the [ +] button, the number on the power. Maintenance Codes To perform maintenance of copies (flashing) While printing, scanning, or performing maintenance operations (flashing in the on the Operation Panel. This section describes the LED display and basic operations on -screen manual: Advanced ...to make copies or perform maintenance operations without a computer. An error that requires contacting the service center may have occurred. While the Scanning Unit (Cover) is in the on-screen manual: Advanced Guide . For details, refer to "1".
On-Screen Manual
Page 10
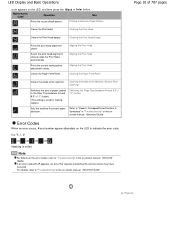
... LED to align the Print Head automatically. Maintenance Code Operation See Prints the nozzle check pattern. Printing the Nozzle Check Pattern Cleans the Print Head. Scans the print head alignment sheet to indicate the error code.
... LED to align the Print Head automatically. Maintenance Code Operation See Prints the nozzle check pattern. Printing the Nozzle Check Pattern Cleans the Print Head. Scans the print head alignment sheet to indicate the error code.

On-Screen Manual
Page 20
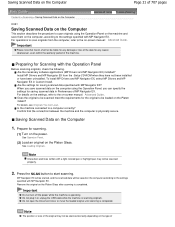
Scanning Page 20 of 707 pages Contents > Scanning Advanced Guide Troubleshooting Scanning You can save scanned data on your computer, and edit or process them with the Operation Panel Saving Scanned Data on the Computer Preparing for Scanning with the supplied software application. Saving Scanned Data on the Computer Page top
Scanning Page 20 of 707 pages Contents > Scanning Advanced Guide Troubleshooting Scanning You can save scanned data on your computer, and edit or process them with the Operation Panel Saving Scanned Data on the Computer Preparing for Scanning with the supplied software application. Saving Scanned Data on the Computer Page top
On-Screen Manual
Page 21
... Load an original on -screen manual: Advanced Guide . Note The position or size of the original may not be scanned properly. 2. For operations to scan originals from the Setup CD-ROM when they have not been installed or have been uninstalled. Are the necessary software applications ...specified with the Operation Panel Before scanning originals, check the following. Does the original to be scanned meet the requirements for Scanning with MP Navigator EX. Important Do not turn off the power while the machine is scanning originals. Confirm that Canon shall not be liable for any...
... Load an original on -screen manual: Advanced Guide . Note The position or size of the original may not be scanned properly. 2. For operations to scan originals from the Setup CD-ROM when they have not been installed or have been uninstalled. Are the necessary software applications ...specified with the Operation Panel Before scanning originals, check the following. Does the original to be scanned meet the requirements for Scanning with MP Navigator EX. Important Do not turn off the power while the machine is scanning originals. Confirm that Canon shall not be liable for any...

On-Screen Manual
Page 22
... on -screen manual: Advanced Guide to match the original and scan it. For Windows XP users, select MP Navigator EX Ver4.0 as the software application to be used in Document Type and Document Size of the ...
... on -screen manual: Advanced Guide to match the original and scan it. For Windows XP users, select MP Navigator EX Ver4.0 as the software application to be used in Document Type and Document Size of the ...
On-Screen Manual
Page 33
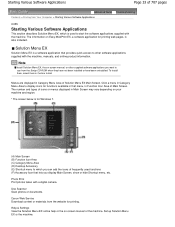
Use Scanner Scan photos or documents. Help & Settings View the Solution Menu EX online help or the on -screen manual, or other software applications supplied with the machine, ... vary depending on your machine and region. * The screen below is also included. Note Install Solution Menu EX, the on -screen manual of the machine. Canon Web Service Download content or materials from the website for Windows 7. (A) Main Screen (B) Function Icon Area (C) Category Menu Area (D) Desktop Accessory (E) Shortcut menu to which...
Use Scanner Scan photos or documents. Help & Settings View the Solution Menu EX online help or the on -screen manual, or other software applications supplied with the machine, ... vary depending on your machine and region. * The screen below is also included. Note Install Solution Menu EX, the on -screen manual of the machine. Canon Web Service Download content or materials from the website for Windows 7. (A) Main Screen (B) Function Icon Area (C) Category Menu Area (D) Desktop Accessory (E) Shortcut menu to which...

On-Screen Manual
Page 36
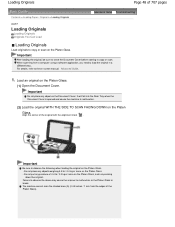
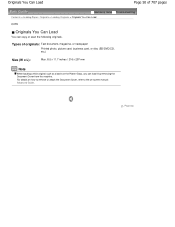
Loading Paper Loading Plain Paper / Photo Paper Loading Envelopes Media Types You Can Use Media Types You Cannot Use Loading Originals Loading Originals Originals You Can Load Page top Loading Paper / Originals Page 36 of 707 pages Contents > Loading Paper / Originals Advanced Guide Troubleshooting Loading Paper / Originals This section describes types of paper or originals you can load, how to load printing paper in the Rear Tray, and how to load originals to copy or scan.
Loading Paper Loading Plain Paper / Photo Paper Loading Envelopes Media Types You Can Use Media Types You Cannot Use Loading Originals Loading Originals Originals You Can Load Page top Loading Paper / Originals Page 36 of 707 pages Contents > Loading Paper / Originals Advanced Guide Troubleshooting Loading Paper / Originals This section describes types of paper or originals you can load, how to load printing paper in the Rear Tray, and how to load originals to copy or scan.
On-Screen Manual
Page 48
...Glass. Do not place any objects weighing 4.4 lb / 2.0 kg or more on the Platen Glass, such as pressing down the original. The machine cannot scan the shaded area (A) (0.04 inches / 1 mm from a computer using a software application, you need to load the original in a different way. ...Originals Loading Originals Originals You Can Load Advanced Guide Troubleshooting Loading Originals Load originals to malfunction. (2) Load the original WITH THE SIDE TO SCAN FACING DOWN on the Platen Glass. For details, refer to observe the following when loading the original on the Platen Glass. - Do...
...Glass. Do not place any objects weighing 4.4 lb / 2.0 kg or more on the Platen Glass, such as pressing down the original. The machine cannot scan the shaded area (A) (0.04 inches / 1 mm from a computer using a software application, you need to load the original in a different way. ...Originals Loading Originals Originals You Can Load Advanced Guide Troubleshooting Loading Originals Load originals to malfunction. (2) Load the original WITH THE SIDE TO SCAN FACING DOWN on the Platen Glass. For details, refer to observe the following when loading the original on the Platen Glass. - Do...
On-Screen Manual
Page 50
... from the machine. For details on how to remove or attach the Document Cover, refer to the on the Platen Glass, you can copy or scan the following originals.
... from the machine. For details on how to remove or attach the Document Cover, refer to the on the Platen Glass, you can copy or scan the following originals.
On-Screen Manual
Page 59
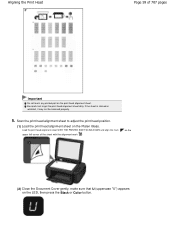
If the sheet is stained or wrinkled, it may not be scanned properly. 5. Load the print head alignment sheet WITH THE PRINTED SIDE FACING DOWN and align the mark upper left corner of 707 pages Important Do ... any printed part on the print head alignment sheet. on the (2) Close the Document Cover gently, make sure that U (uppercase "U") appears on the Platen Glass. Scan the print head alignment sheet to get the print head alignment sheet dirty. Be careful not to adjust the print head position. (1) Load the print...
If the sheet is stained or wrinkled, it may not be scanned properly. 5. Load the print head alignment sheet WITH THE PRINTED SIDE FACING DOWN and align the mark upper left corner of 707 pages Important Do ... any printed part on the print head alignment sheet. on the (2) Close the Document Cover gently, make sure that U (uppercase "U") appears on the Platen Glass. Scan the print head alignment sheet to get the print head alignment sheet dirty. Be careful not to adjust the print head position. (1) Load the print...
On-Screen Manual
Page 60
Aligning the Print Head Page 60 of 707 pages The machine starts scanning the print head alignment sheet, and the print head position will appear on -screen manual: Advanced Guide . When adjusting the print head position is completed. ...
Aligning the Print Head Page 60 of 707 pages The machine starts scanning the print head alignment sheet, and the print head position will appear on -screen manual: Advanced Guide . When adjusting the print head position is completed. ...
On-Screen Manual
Page 62
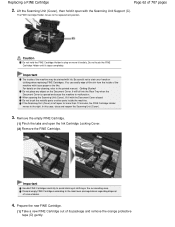
... Cartridge Page 62 of its package and remove the orange protective tape (D) gently. Do not touch the FINE Cartridge Holder until it with the Scanning Unit Support (C). Important The inside the machine. Do not touch the metallic parts or other parts inside of clothing or the surrounding area. If... when the Document Cover is left open the Ink Cartridge Locking Cover. (2) Remove the FINE Cartridge. In this case, close and reopen the Scanning Unit (Cover). 3. The FINE Cartridge Holder moves to avoid staining of the machine may be stained with tissue paper or the like. Remove ...
... Cartridge Page 62 of its package and remove the orange protective tape (D) gently. Do not touch the FINE Cartridge Holder until it with the Scanning Unit Support (C). Important The inside the machine. Do not touch the metallic parts or other parts inside of clothing or the surrounding area. If... when the Document Cover is left open the Ink Cartridge Locking Cover. (2) Remove the FINE Cartridge. In this case, close and reopen the Scanning Unit (Cover). 3. The FINE Cartridge Holder moves to avoid staining of the machine may be stained with tissue paper or the like. Remove ...
On-Screen Manual
Page 64
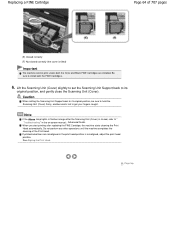
... (E) Closed correctly (F) Not closed , refer to install both the Color and Black FINE Cartridges are installed. When you start printing after the Scanning Unit (Cover) is closed correctly (the cover is misaligned, adjust the print head position. If printed ruled lines are misaligned or the print ... 64 of the Print Head. Caution When setting the Scanning Unit Support back to get your fingers caught. Lift the Scanning Unit (Cover) slightly to set the Scanning Unit Support back to its original position, be sure to hold the Scanning Unit (Cover) firmly, and be careful not to ...
... (E) Closed correctly (F) Not closed , refer to install both the Color and Black FINE Cartridges are installed. When you start printing after the Scanning Unit (Cover) is closed correctly (the cover is misaligned, adjust the print head position. If printed ruled lines are misaligned or the print ... 64 of the Print Head. Caution When setting the Scanning Unit Support back to get your fingers caught. Lift the Scanning Unit (Cover) slightly to set the Scanning Unit Support back to its original position, be sure to hold the Scanning Unit (Cover) firmly, and be careful not to ...
On-Screen Manual
Page 73
... Your Product and Use of Images Legal Limitations on Use of Your Product and Use of Images It may be unlawful to make copies of, scan, print, or use reproductions of copyright owner Page top When in doubt, check with a legal representative in your jurisdiction. Paper money Money orders Certificates of...
... Your Product and Use of Images Legal Limitations on Use of Your Product and Use of Images It may be unlawful to make copies of, scan, print, or use reproductions of copyright owner Page top When in doubt, check with a legal representative in your jurisdiction. Paper money Money orders Certificates of...

On-Screen Manual
Page 78
MP280 series Advanced Guide Page 78 of 707 pages MC-4740-V1.00 Basic Guide Printing Scanning Copying Troubleshooting How to Use This Manual Printing This Manual Maintenance Changing the Machine Settings Appendix When you display this on-screen manual in a language ...
MP280 series Advanced Guide Page 78 of 707 pages MC-4740-V1.00 Basic Guide Printing Scanning Copying Troubleshooting How to Use This Manual Printing This Manual Maintenance Changing the Machine Settings Appendix When you display this on-screen manual in a language ...


