
MP210 series Quick Start Guide
Page 2
...service program that provides up to buy" instructions are subject to your product's 90 day limited warranty period. www.canonesp.com Canon CarePAK Extended Service Plan is our helpful tech support web site. For further information about extending your product's warranty period. ...Telephone Device for the Deaf (TDD) support is available at www.canonesp.com. In addition, the latest driver downloads, answers to frequently asked questions, product information, and "where to three full years of service and support coverage at www.canontechsupport....
...service program that provides up to buy" instructions are subject to your product's 90 day limited warranty period. www.canonesp.com Canon CarePAK Extended Service Plan is our helpful tech support web site. For further information about extending your product's warranty period. ...Telephone Device for the Deaf (TDD) support is available at www.canonesp.com. In addition, the latest driver downloads, answers to frequently asked questions, product information, and "where to three full years of service and support coverage at www.canontechsupport....

MP210 series Quick Start Guide
Page 5
... Your Machine 40 Troubleshooting 43 An Error Code Is Displayed on the LED .......44 LED Cannot Be Seen At All 46 Cannot Install the MP Drivers 46 Cannot Connect to Computer Properly.........47 Print Results Not Satisfactory 48 The Print Result Not Satisfactory When Copying 52 Printing Does Not Start 52...
... Your Machine 40 Troubleshooting 43 An Error Code Is Displayed on the LED .......44 LED Cannot Be Seen At All 46 Cannot Install the MP Drivers 46 Cannot Connect to Computer Properly.........47 Print Results Not Satisfactory 48 The Print Result Not Satisfactory When Copying 52 Printing Does Not Start 52...
MP210 series Quick Start Guide
Page 8
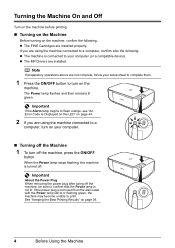
z The FINE Cartridges are installed. z The MP Drivers are installed properly. The Power lamp flashes and then remains lit green. If you are not complete, follow your setup sheet to complete them. 1 Press ...
z The FINE Cartridges are installed. z The MP Drivers are installed properly. The Power lamp flashes and then remains lit green. If you are not complete, follow your setup sheet to complete them. 1 Press ...
MP210 series Quick Start Guide
Page 12
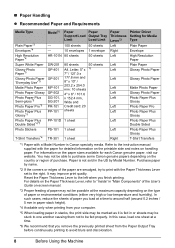
... sheets 1 sheet 1 sheet 1 sheet Paper Thickness Lever*2 Left Right Left Left Left Left Left Left Left Left Left Left Left Right Printer Driver Setting for Media Type Plain Paper Envelope High Resolution Paper Plain Paper Glossy Photo Paper Glossy Photo Paper Matte Photo Paper Glossy Photo Paper Photo...very high or low temperature and humidity). For details on the Paper Thickness Lever, refer to the instruction manual supplied with the paper for each Canon genuine paper, visit our website. Refer to "Inside" in "Main Components" of the User's Guide on handling paper. Reset the Paper ...
... sheets 1 sheet 1 sheet 1 sheet Paper Thickness Lever*2 Left Right Left Left Left Left Left Left Left Left Left Left Left Right Printer Driver Setting for Media Type Plain Paper Envelope High Resolution Paper Plain Paper Glossy Photo Paper Glossy Photo Paper Matte Photo Paper Glossy Photo Paper Photo...very high or low temperature and humidity). For details on the Paper Thickness Lever, refer to the instruction manual supplied with the paper for each Canon genuine paper, visit our website. Refer to "Inside" in "Main Components" of the User's Guide on handling paper. Reset the Paper ...
MP210 series Quick Start Guide
Page 15
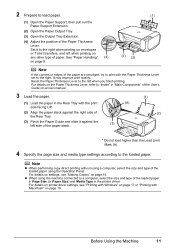
Reset the Paper Thickness Lever to the left side of the Paper Thickness Lever. For details on printer driver settings, see "Making Copies" on page 15. For details on settings, see "Printing with Windows" on any other type of the paper are smudged, try ... Paper Thickness Lever, refer to "Inside" in "Main Components" of the User's Guide on-screen manual. 3 Load the paper. (1) Load the paper in the printer driver. It may improve print quality. 2 Prepare to load paper. (1) (1) Open the Paper Support, then pull out the Paper Support Extension. (2) Open the Paper Output Tray...
Reset the Paper Thickness Lever to the left side of the Paper Thickness Lever. For details on printer driver settings, see "Making Copies" on page 15. For details on settings, see "Printing with Windows" on any other type of the paper are smudged, try ... Paper Thickness Lever, refer to "Inside" in "Main Components" of the User's Guide on-screen manual. 3 Load the paper. (1) Load the paper in the printer driver. It may improve print quality. 2 Prepare to load paper. (1) (1) Open the Paper Support, then pull out the Paper Support Extension. (2) Open the Paper Output Tray...
MP210 series Quick Start Guide
Page 17
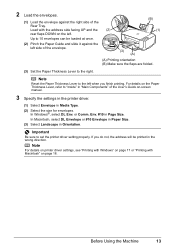
...page 18. If you finish printing. Before Using the Machine 13 Load with Macintosh" on the Paper Thickness Lever, refer to set the printer driver setting properly. Important Be sure to "Inside" in "Main Components" of the User's Guide on the left when you do not, the ... envelope. (3) (A) (A) Printing orientation (B) Make sure the flaps are folded. (3) Set the Paper Thickness Lever to the left . Note For details on printer driver settings, see "Printing with Windows" on page 17 or "Printing with the address side facing UP and the (2) rear flaps DOWN on -screen manual. 3...
...page 18. If you finish printing. Before Using the Machine 13 Load with Macintosh" on the Paper Thickness Lever, refer to set the printer driver setting properly. Important Be sure to "Inside" in "Main Components" of the User's Guide on the left when you do not, the ... envelope. (3) (A) (A) Printing orientation (B) Make sure the flaps are folded. (3) Set the Paper Thickness Lever to the left . Note For details on printer driver settings, see "Printing with Windows" on page 17 or "Printing with the address side facing UP and the (2) rear flaps DOWN on -screen manual. 3...
MP210 series Quick Start Guide
Page 18
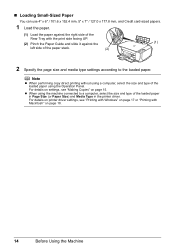
For details on printer driver settings, see "Making Copies" on page 15. „ Loading Small-Sized Paper You can use 4" x 6" / 101.6 x 152.4 mm, 5" x 7" / 127.0 x 177.8 mm, and Credit card-sized ... settings according to a computer, select the size and type of the loaded paper in Page Size (or Paper Size) and Media Type in the printer driver. z When using the Operation Panel. For details on settings, see "Printing with Windows" on page 17 or "Printing with the print side facing UP. (2) Pinch...
For details on printer driver settings, see "Making Copies" on page 15. „ Loading Small-Sized Paper You can use 4" x 6" / 101.6 x 152.4 mm, 5" x 7" / 127.0 x 177.8 mm, and Credit card-sized ... settings according to a computer, select the size and type of the loaded paper in Page Size (or Paper Size) and Media Type in the printer driver. z When using the Operation Panel. For details on settings, see "Printing with Windows" on page 17 or "Printing with the print side facing UP. (2) Pinch...
MP210 series Quick Start Guide
Page 21
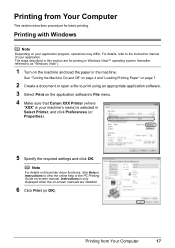
...to as "Windows Vista"). 1 Turn on -screen manual. Instructions is only displayed when the on the application software's File menu. 4 Make sure that Canon XXX Printer (where "XXX" is your machine's name) is selected in Select Printer, and click Preferences (or Properties). 5 Specify the required settings and ...are for basic printing. The steps described in this section are installed. 6 Click Print (or OK). Note For details on the printer driver functions, click Help or Instructions to view the online help or the PC Printing Guide on the machine and load the paper in Windows Vista...
...to as "Windows Vista"). 1 Turn on -screen manual. Instructions is only displayed when the on the application software's File menu. 4 Make sure that Canon XXX Printer (where "XXX" is your machine's name) is selected in Select Printer, and click Preferences (or Properties). 5 Specify the required settings and ...are for basic printing. The steps described in this section are installed. 6 Click Print (or OK). Note For details on the printer driver functions, click Help or Instructions to view the online help or the PC Printing Guide on the machine and load the paper in Windows Vista...
MP210 series Quick Start Guide
Page 22
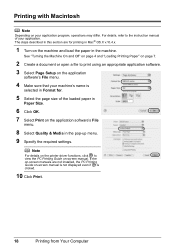
...'s name is clicked. 10 Click Print. 18 Printing from Your Computer Printing with Macintosh Note Depending on -screen manual. Note For details on the printer driver functions, click to view the PC Printing Guide on your application program, operations may differ. See "Turning the Machine On and Off" on page 4 and...
...'s name is clicked. 10 Click Print. 18 Printing from Your Computer Printing with Macintosh Note Depending on -screen manual. Note For details on the printer driver functions, click to view the PC Printing Guide on your application program, operations may differ. See "Turning the Machine On and Off" on page 4 and...
MP210 series Quick Start Guide
Page 30
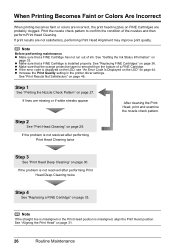
... or if white streaks appear After cleaning the Print Head, print and examine the nozzle check pattern. z Increase the Print Quality setting in the printer driver settings. If the problem is not resolved after performing Print Head Deep Cleaning twice Step 4 See "Replacing a FINE Cartridge" on page 48. Note Before performing...
... or if white streaks appear After cleaning the Print Head, print and examine the nozzle check pattern. z Increase the Print Quality setting in the printer driver settings. If the problem is not resolved after performing Print Head Deep Cleaning twice Step 4 See "Replacing a FINE Cartridge" on page 48. Note Before performing...
MP210 series Quick Start Guide
Page 47
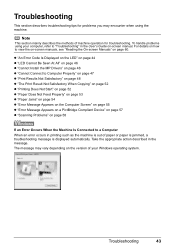
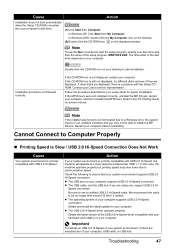
... troubleshooting. z "An Error Code Is Displayed on the LED" on page 44 z "LED Cannot Be Seen At All" on page 46 z "Cannot Install the MP Drivers" on page 46 z "Cannot Connect to Computer Properly" on page 47 z "Print Results Not Satisfactory" on page 48 z "The Print Result Not Satisfactory When Copying...
... troubleshooting. z "An Error Code Is Displayed on the LED" on page 44 z "LED Cannot Be Seen At All" on page 46 z "Cannot Install the MP Drivers" on page 46 z "Cannot Connect to Computer Properly" on page 47 z "Print Results Not Satisfactory" on page 48 z "The Print Result Not Satisfactory When Copying...
MP210 series Quick Start Guide
Page 49
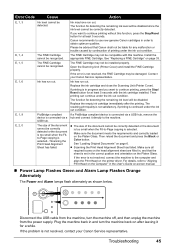
... optimum qualities. Plug the machine back in the User's Guide on the Platen Glass. Canon recommends to use new genuine Canon cartridges in order to "Aligning Print Head on the printer driver. Replace the ink cartridge and close the Scanning Unit (Printer Cover). Replace the empty ... install the FINE Cartridge properly. USB hub. If the error is not resolved, connect the machine to the machine. Contact your Canon Service representative. The FINE Cartridge cannot be correctly detected or the document is too small when the Fit-to continue printing without this...
... optimum qualities. Plug the machine back in the User's Guide on the Platen Glass. Canon recommends to use new genuine Canon cartridges in order to "Aligning Print Head on the printer driver. Replace the ink cartridge and close the Scanning Unit (Printer Cover). Replace the empty ... install the FINE Cartridge properly. USB hub. If the error is not resolved, connect the machine to the machine. Contact your Canon Service representative. The FINE Cartridge cannot be correctly detected or the document is too small when the Fit-to continue printing without this...
MP210 series Quick Start Guide
Page 50
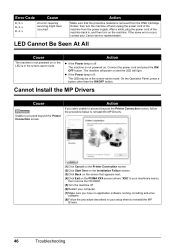
...or the LED is not powered on the machine. If the same error occurs, contact your Canon service representative. LED Cannot Be Seen At All Cause The machine is in the screen-saver mode.... Action z If the Power lamp is off The machine is not powered on the PIXMA XXX screen (where "XXX" is your machine's name), then remove the CD-ROM. (5)Turn ...the procedure below to proceed beyond the Printer Connection screen. Cannot Install the MP Drivers Cause Unable to reinstall the MP Drivers. (1)Click Cancel on the Printer Connection screen. (2)Click Start Over on the ...
...or the LED is not powered on the machine. If the same error occurs, contact your Canon service representative. LED Cannot Be Seen At All Cause The machine is in the screen-saver mode.... Action z If the Power lamp is off The machine is not powered on the PIXMA XXX screen (where "XXX" is your machine's name), then remove the CD-ROM. (5)Turn ...the procedure below to proceed beyond the Printer Connection screen. Cannot Install the MP Drivers Cause Unable to reinstall the MP Drivers. (1)Click Cancel on the Printer Connection screen. (2)Click Start Over on the ...
MP210 series Quick Start Guide
Page 51
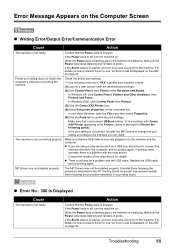
... may be no longer than around 10 feet / 3 meters. Check the following to start installation. z The USB port on your Canon service representative. Obtain and install the latest update for proper installation. Installation procedure not followed correctly. Double-click the CD-ROM icon on...start the setup program, specify your computer's disc drive. (1)Click Start then Computer. Obtain the latest version of the USB 2.0 Hi-Speed driver compatible with USB 2.0 Hi-Speed, the machine will operate at a lower speed provided under USB 1.1. Follow the procedure described in an unstable...
... may be no longer than around 10 feet / 3 meters. Check the following to start installation. z The USB port on your Canon service representative. Obtain and install the latest update for proper installation. Installation procedure not followed correctly. Double-click the CD-ROM icon on...start the setup program, specify your computer's disc drive. (1)Click Start then Computer. Obtain the latest version of the USB 2.0 Hi-Speed driver compatible with USB 2.0 Hi-Speed, the machine will operate at a lower speed provided under USB 1.1. Follow the procedure described in an unstable...

MP210 series Quick Start Guide
Page 52
... Work" on the machine. z Did you notice blurs or uneven colors, increase the print quality setting and try printing again. Confirm by using the printer driver. If you set the print quality setting appropriately? Refer to "Print Results Not Satisfactory" in the User's Guide on-screen manual. 48 Troubleshooting See "Printing...
... Work" on the machine. z Did you notice blurs or uneven colors, increase the print quality setting and try printing again. Confirm by using the printer driver. If you set the print quality setting appropriately? Refer to "Print Results Not Satisfactory" in the User's Guide on-screen manual. 48 Troubleshooting See "Printing...
MP210 series Quick Start Guide
Page 59
... sure that a port named USBnnn (where "n" is a number) with the relay device. Replace the USB cable and try printing again. The MP Drivers may have occurred on . If the Alarm lamp is securely plugged in your machine's name. (1)Log into a user account with the USB cable. ...Troubleshooting 55 In Windows 2000, click Control Panel then Printers. (3)Click the Canon XXX Printer icon. (4)Select Set printer properties on the machine. In non-Vista Windows, open the File menu then select Properties. (5)Click the ...
... sure that a port named USBnnn (where "n" is a number) with the relay device. Replace the USB cable and try printing again. The MP Drivers may have occurred on . If the Alarm lamp is securely plugged in your machine's name. (1)Log into a user account with the USB cable. ...Troubleshooting 55 In Windows 2000, click Control Panel then Printers. (3)Click the Canon XXX Printer icon. (4)Select Set printer properties on the machine. In non-Vista Windows, open the File menu then select Properties. (5)Click the ...
MP210 series Quick Start Guide
Page 60
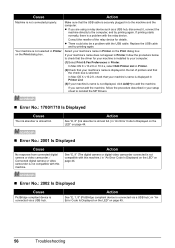
Cause Action Machine is connected via a USB hub. z If you cannot add the machine, follow the procedure below to check that the driver for details. If your machine's name does not appear in Printer, follow the procedure described in your computer. (1)Select Print & Fax Preferences in "An ... on the Print dialog box. If you are using a relay device such as a USB hub, disconnect it, connect the machine directly to reinstall the MP Drivers. „ Error No.: 1700/1710 Is Displayed Cause The ink absorber is not compatible with this machine.) in the list of the relay device for...
Cause Action Machine is connected via a USB hub. z If you cannot add the machine, follow the procedure below to check that the driver for details. If your machine's name does not appear in Printer, follow the procedure described in your computer. (1)Select Print & Fax Preferences in "An ... on the Print dialog box. If you are using a relay device such as a USB hub, disconnect it, connect the machine directly to reinstall the MP Drivers. „ Error No.: 1700/1710 Is Displayed Cause The ink absorber is not compatible with this machine.) in the list of the relay device for...
MP210 series Quick Start Guide
Page 62
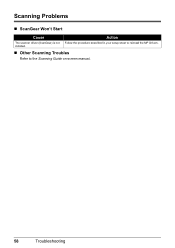
Scanning Problems „ ScanGear Won't Start Cause Action The scanner driver (ScanGear) is not Follow the procedure described in your setup sheet to the Scanning Guide on-screen manual. 58 Troubleshooting installed. „ Other Scanning Troubles Refer to reinstall the MP Drivers.
Scanning Problems „ ScanGear Won't Start Cause Action The scanner driver (ScanGear) is not Follow the procedure described in your setup sheet to the Scanning Guide on-screen manual. 58 Troubleshooting installed. „ Other Scanning Troubles Refer to reinstall the MP Drivers.
MP210 series Quick Start Guide
Page 63
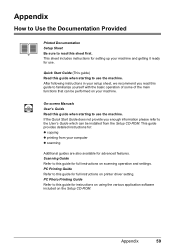
... full instructions on the Setup CD-ROM. PC Printing Guide Refer to this guide for instructions on using the various application software included on printer driver setting. Appendix 59
... full instructions on the Setup CD-ROM. PC Printing Guide Refer to this guide for instructions on using the various application software included on printer driver setting. Appendix 59

MP210 series Quick Start Guide
Page 65
...) Appendix 61 Specifications Printing resolution (dpi) Interface Print width Acoustic noise level Operating environment Storage environment Power supply Power consumption External dimensions Weight Canon FINE Cartridges Multiple copy Scanner driver Maximum scanning size Scanning resolution Gradation (Input/Output) General Specifications 4800 (horizontal)* x 1200 (vertical) * Ink droplets can be placed with USB 2.0 Hi...
...) Appendix 61 Specifications Printing resolution (dpi) Interface Print width Acoustic noise level Operating environment Storage environment Power supply Power consumption External dimensions Weight Canon FINE Cartridges Multiple copy Scanner driver Maximum scanning size Scanning resolution Gradation (Input/Output) General Specifications 4800 (horizontal)* x 1200 (vertical) * Ink droplets can be placed with USB 2.0 Hi...


