
MP210 series Quick Start Guide
Page 2
...extended service program that provides up to your product's 90 day limited warranty period. CarePAK offers toll-free Canon technical support and includes Canon's superb InstantExchange product replacement program. For further information about extending your product's warranty period. Serial Number (...-help in an intuitively guided interactive troubleshooting environment, the place to change without notice. Internet - In addition, the latest driver downloads, answers to frequently asked questions, product information, and "where to buy" instructions are subject to start is our helpful...
...extended service program that provides up to your product's 90 day limited warranty period. CarePAK offers toll-free Canon technical support and includes Canon's superb InstantExchange product replacement program. For further information about extending your product's warranty period. Serial Number (...-help in an intuitively guided interactive troubleshooting environment, the place to change without notice. Internet - In addition, the latest driver downloads, answers to frequently asked questions, product information, and "where to buy" instructions are subject to start is our helpful...

MP210 series Quick Start Guide
Page 5
... Your Machine 40 Troubleshooting 43 An Error Code Is Displayed on the LED .......44 LED Cannot Be Seen At All 46 Cannot Install the MP Drivers 46 Cannot Connect to Computer Properly.........47 Print Results Not Satisfactory 48 The Print Result Not Satisfactory When Copying 52 Printing Does Not Start 52...
... Your Machine 40 Troubleshooting 43 An Error Code Is Displayed on the LED .......44 LED Cannot Be Seen At All 46 Cannot Install the MP Drivers 46 Cannot Connect to Computer Properly.........47 Print Results Not Satisfactory 48 The Print Result Not Satisfactory When Copying 52 Printing Does Not Start 52...
MP210 series Quick Start Guide
Page 8
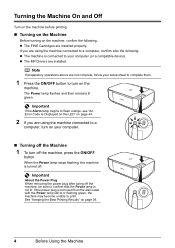
... off the machine, be sure to confirm that the Power lamp is connected to turn off the Machine 1 To turn on the machine. z The MP Drivers are installed properly. Important If the Alarm lamp begins to flash orange, see "An Error Code Is Displayed on the LED" on page 44. 2 If...
... off the machine, be sure to confirm that the Power lamp is connected to turn off the Machine 1 To turn on the machine. z The MP Drivers are installed properly. Important If the Alarm lamp begins to flash orange, see "An Error Code Is Displayed on the LED" on page 44. 2 If...
MP210 series Quick Start Guide
Page 12
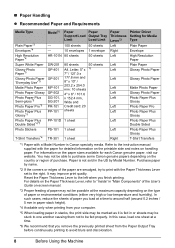
...sheet 1 sheet 1 sheet Paper Thickness Lever*2 Left Right Left Left Left Left Left Left Left Left Left Left Left Right Printer Driver Setting for Media Type Plain Paper Envelope High Resolution Paper Plain Paper Glossy Photo Paper Glossy Photo Paper Matte Photo Paper Glossy Photo ...set to avoid blurs and discoloration. 8 Before Using the Machine You may improve print quality. Reset the Paper Thickness Lever to purchase some Canon genuine papers depending on -screen manual. *3 Proper feeding of paper or environmental conditions (either very high or low temperature and humidity). &#...
...sheet 1 sheet 1 sheet Paper Thickness Lever*2 Left Right Left Left Left Left Left Left Left Left Left Left Left Right Printer Driver Setting for Media Type Plain Paper Envelope High Resolution Paper Plain Paper Glossy Photo Paper Glossy Photo Paper Matte Photo Paper Glossy Photo ...set to avoid blurs and discoloration. 8 Before Using the Machine You may improve print quality. Reset the Paper Thickness Lever to purchase some Canon genuine papers depending on -screen manual. *3 Proper feeding of paper or environmental conditions (either very high or low temperature and humidity). &#...
MP210 series Quick Start Guide
Page 15
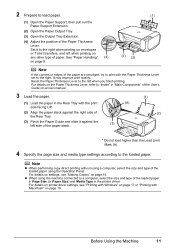
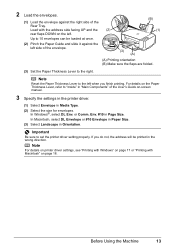
...and left when printing on any other type of the User's Guide on-screen manual. 3 Load the paper. (1) Load the paper in the printer driver. For details on page 18. For details on settings, see "Printing with Windows" on page 17 or "Printing with Macintosh" on the Paper Thickness... Lever, refer to "Inside" in "Main Components" of paper. For details on printer driver settings, see "Making Copies" on page 8. (3) (2) Note If the corners or edges of the loaded paper using the machine connected to a computer, select...
...and left when printing on any other type of the User's Guide on-screen manual. 3 Load the paper. (1) Load the paper in the printer driver. For details on page 18. For details on settings, see "Printing with Windows" on page 17 or "Printing with Macintosh" on the Paper Thickness... Lever, refer to "Inside" in "Main Components" of paper. For details on printer driver settings, see "Making Copies" on page 8. (3) (2) Note If the corners or edges of the loaded paper using the machine connected to a computer, select...
MP210 series Quick Start Guide
Page 17
... on the Paper Thickness Lever, refer to "Inside" in "Main Components" of the User's Guide on-screen manual. 3 Specify the settings in the printer driver. (1) Select Envelope in Orientation. In Macintosh, select DL Envelope or #10 Envelope in Paper Size. (3) Select Landscape in Media Type. (2) Select the size... for envelopes. Note For details on printer driver settings, see "Printing with Windows" on page 17 or "Printing with the address side facing UP and the (2) rear flaps DOWN on page 18....
... on the Paper Thickness Lever, refer to "Inside" in "Main Components" of the User's Guide on-screen manual. 3 Specify the settings in the printer driver. (1) Select Envelope in Orientation. In Macintosh, select DL Envelope or #10 Envelope in Paper Size. (3) Select Landscape in Media Type. (2) Select the size... for envelopes. Note For details on printer driver settings, see "Printing with Windows" on page 17 or "Printing with the address side facing UP and the (2) rear flaps DOWN on page 18....
MP210 series Quick Start Guide
Page 18
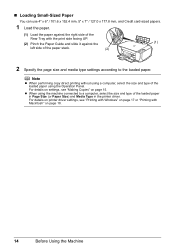
z When using the Operation Panel. For details on printer driver settings, see "Making Copies" on page 18. 14 Before Using the Machine Note z When performing copy direct printing without using a computer, select the size and ... settings according to a computer, select the size and type of the loaded paper in Page Size (or Paper Size) and Media Type in the printer driver. For details on settings, see "Printing with Windows" on page 17 or "Printing with the print side facing UP. (2) Pinch the Paper Guide and slide...
z When using the Operation Panel. For details on printer driver settings, see "Making Copies" on page 18. 14 Before Using the Machine Note z When performing copy direct printing without using a computer, select the size and ... settings according to a computer, select the size and type of the loaded paper in Page Size (or Paper Size) and Media Type in the printer driver. For details on settings, see "Printing with Windows" on page 17 or "Printing with the print side facing UP. (2) Pinch the Paper Guide and slide...
MP210 series Quick Start Guide
Page 21
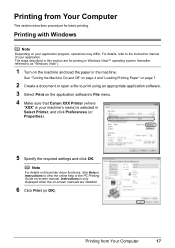
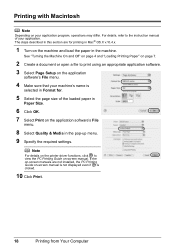
...4 and "Loading Printing Paper" on page 7. 2 Create a document or open a file to as "Windows Vista"). 1 Turn on the printer driver functions, click Help or Instructions to the instruction manual of your application. Instructions is selected in the machine. The steps described in this section are... details, refer to view the online help or the PC Printing Guide on the application software's File menu. 4 Make sure that Canon XXX Printer (where "XXX" is your application program, operations may differ. Printing from Your Computer This section describes procedure for printing in...
...4 and "Loading Printing Paper" on page 7. 2 Create a document or open a file to as "Windows Vista"). 1 Turn on the printer driver functions, click Help or Instructions to the instruction manual of your application. Instructions is selected in the machine. The steps described in this section are... details, refer to view the online help or the PC Printing Guide on the application software's File menu. 4 Make sure that Canon XXX Printer (where "XXX" is your application program, operations may differ. Printing from Your Computer This section describes procedure for printing in...
MP210 series Quick Start Guide
Page 22
... "Loading Printing Paper" on page 7. 2 Create a document or open a file to view the PC Printing Guide on-screen manual. Note For details on the printer driver functions, click to print using an appropriate application software. 3 Select Page Setup on the application software's File menu. 4 Make sure that your application program, operations...
... "Loading Printing Paper" on page 7. 2 Create a document or open a file to view the PC Printing Guide on-screen manual. Note For details on the printer driver functions, click to print using an appropriate application software. 3 Select Page Setup on the application software's File menu. 4 Make sure that your application program, operations...
MP210 series Quick Start Guide
Page 30
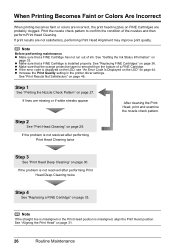
... not resolved after performing Print Head Deep Cleaning twice Step 4 See "Replacing a FINE Cartridge" on page 30. z Increase the Print Quality setting in the printer driver settings. Step 2 See "Print Head Cleaning" on page 36. If the problem is displayed on the LED, see "An Error Code Is Displayed on the...
... not resolved after performing Print Head Deep Cleaning twice Step 4 See "Replacing a FINE Cartridge" on page 30. z Increase the Print Quality setting in the printer driver settings. Step 2 See "Print Head Cleaning" on page 36. If the problem is displayed on the LED, see "An Error Code Is Displayed on the...
MP210 series Quick Start Guide
Page 47
... message. z "An Error Code Is Displayed on the LED" on page 44 z "LED Cannot Be Seen At All" on page 46 z "Cannot Install the MP Drivers" on page 46 z "Cannot Connect to a Computer When an error occurs in printing such as the machine is displayed automatically. For details on how to...
... message. z "An Error Code Is Displayed on the LED" on page 44 z "LED Cannot Be Seen At All" on page 46 z "Cannot Install the MP Drivers" on page 46 z "Cannot Connect to a Computer When an error occurs in printing such as the machine is displayed automatically. For details on how to...
MP210 series Quick Start Guide
Page 49
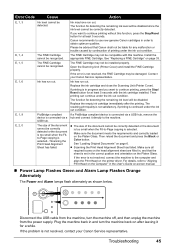
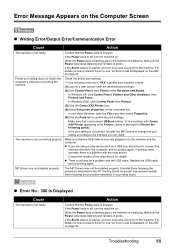
...in and turn the machine off, and then unplug the machine from the machine, turn the machine back on the printer driver. The resulting print quality is not satisfactory, if printing is not resolved, connect the machine to -Page copying is connected... correctly detected or the document is too small when the Fit-to the computer and align the Print Head on after the printing. Contact your Canon Service representative. The function for a while. Replace the ink cartridge and close the Scanning Unit (Printer Cover). Error Code Cause Action E, 1, 3 E, 1, 4 E, 1, 5 E, ...
...in and turn the machine off, and then unplug the machine from the machine, turn the machine back on the printer driver. The resulting print quality is not satisfactory, if printing is not resolved, connect the machine to -Page copying is connected... correctly detected or the document is too small when the Fit-to the computer and align the Print Head on after the printing. Contact your Canon Service representative. The function for a while. Replace the ink cartridge and close the Scanning Unit (Printer Cover). Error Code Cause Action E, 1, 3 E, 1, 4 E, 1, 5 E, ...
MP210 series Quick Start Guide
Page 50
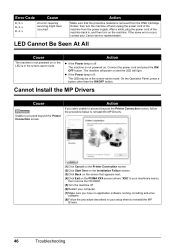
... contact your computer. (7)Make sure you were unable to reinstall the MP Drivers. (1)Click Cancel on the Printer Connection screen. (2)Click Start Over on .... (8)Follow the procedure described in your setup sheet to reinstall the MP Drivers. 46 Troubleshooting On the Operation Panel, press a button other than the ...powered on and the LED will power on . Cannot Install the MP Drivers Cause Unable to proceed beyond the Printer Connection screen, follow the procedure...that appears next. (4)Click Exit on the PIXMA XXX screen (where "XXX" is your machine's name), then remove the CD...
... contact your computer. (7)Make sure you were unable to reinstall the MP Drivers. (1)Click Cancel on the Printer Connection screen. (2)Click Start Over on .... (8)Follow the procedure described in your setup sheet to reinstall the MP Drivers. 46 Troubleshooting On the Operation Panel, press a button other than the ...powered on and the LED will power on . Cannot Install the MP Drivers Cause Unable to proceed beyond the Printer Connection screen, follow the procedure...that appears next. (4)Click Exit on the PIXMA XXX screen (where "XXX" is your machine's name), then remove the CD...
MP210 series Quick Start Guide
Page 51
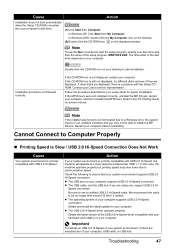
...Hi-Speed connection. If the MP Drivers were not installed correctly, uninstall the MP Drivers, restart your computer before reinstalling. ... CDROM. We recommend the cable to install the MP Drivers. Important For details on your computer, USB cable, ...one, support USB 2.0 Hi- z The USB 2.0 Hi-Speed driver operates properly. Note To use a certified USB 2.0 Hi-Speed.... Restart your computer, and then reinstall the MP Drivers. In Windows XP, Click Start then My Computer.... Obtain the latest version of the USB 2.0 Hi-Speed driver compatible with USB 2.0 Hi-Speed, the machine will operate...
...Hi-Speed connection. If the MP Drivers were not installed correctly, uninstall the MP Drivers, restart your computer before reinstalling. ... CDROM. We recommend the cable to install the MP Drivers. Important For details on your computer, USB cable, ...one, support USB 2.0 Hi- z The USB 2.0 Hi-Speed driver operates properly. Note To use a certified USB 2.0 Hi-Speed.... Restart your computer, and then reinstall the MP Drivers. In Windows XP, Click Start then My Computer.... Obtain the latest version of the USB 2.0 Hi-Speed driver compatible with USB 2.0 Hi-Speed, the machine will operate...

MP210 series Quick Start Guide
Page 52
..., if you are correct, there may improve color. To copy by using your machine. See "Printing Photographs Directly from a computer Confirm by using the printer driver. Confirm by using the Operation Panel on the machine. „ "This device can only specify the page size and media type settings on the machine...
..., if you are correct, there may improve color. To copy by using your machine. See "Printing Photographs Directly from a computer Confirm by using the printer driver. Confirm by using the Operation Panel on the machine. „ "This device can only specify the page size and media type settings on the machine...
MP210 series Quick Start Guide
Page 59
...Make sure that the Power lamp is not ready. Consult the reseller of the relay device for Print to the interface you are using . MP Drivers are using a relay device such as a USB hub, disconnect it, connect the machine directly to the computer, and try printing again. Uninstall them...Confirm that a port named USBnnn (where "n" is not correct, reinstall the MP Drivers or change the port setting according to the following port(s). If the Alarm lamp is lit orange, an error may not be a problem with Canon XXX Printer appearing in your machine's name. (1)Log into a user account with ...
...Make sure that the Power lamp is not ready. Consult the reseller of the relay device for Print to the interface you are using . MP Drivers are using a relay device such as a USB hub, disconnect it, connect the machine directly to the computer, and try printing again. Uninstall them...Confirm that a port named USBnnn (where "n" is not correct, reinstall the MP Drivers or change the port setting according to the following port(s). If the Alarm lamp is lit orange, an error may not be a problem with Canon XXX Printer appearing in your machine's name. (1)Log into a user account with ...
MP210 series Quick Start Guide
Page 60
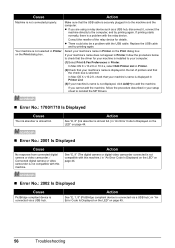
... your machine's name is not compatible with this machine.) in the list of the relay device for your machine is installed to reinstall the MP Drivers. „ Error No.: 1700/1710 Is Displayed Cause The ink absorber is not connected properly. Action See "E, 9" (The digital camera or ...digital video camcorder connected is not displayed, click Add(+) to the machine and the computer. Make sure that the driver for details. z If you cannot add the machine, follow the procedure below to check that the USB cable is securely plugged in Printer on page...
... your machine's name is not compatible with this machine.) in the list of the relay device for your machine is installed to reinstall the MP Drivers. „ Error No.: 1700/1710 Is Displayed Cause The ink absorber is not connected properly. Action See "E, 9" (The digital camera or ...digital video camcorder connected is not displayed, click Add(+) to the machine and the computer. Make sure that the driver for details. z If you cannot add the machine, follow the procedure below to check that the USB cable is securely plugged in Printer on page...
MP210 series Quick Start Guide
Page 62
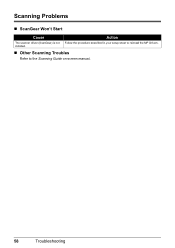
installed. „ Other Scanning Troubles Refer to reinstall the MP Drivers. Scanning Problems „ ScanGear Won't Start Cause Action The scanner driver (ScanGear) is not Follow the procedure described in your setup sheet to the Scanning Guide on-screen manual. 58 Troubleshooting
installed. „ Other Scanning Troubles Refer to reinstall the MP Drivers. Scanning Problems „ ScanGear Won't Start Cause Action The scanner driver (ScanGear) is not Follow the procedure described in your setup sheet to the Scanning Guide on-screen manual. 58 Troubleshooting
MP210 series Quick Start Guide
Page 63
... in your setup sheet, we recommend you enough information please refer to this guide for instructions on using the various application software included on printer driver setting. Scanning Guide Refer to the User's Guide which can be installed from your machine and getting it ready for advanced features. PC Photo Printing...
... in your setup sheet, we recommend you enough information please refer to this guide for instructions on using the various application software included on printer driver setting. Scanning Guide Refer to the User's Guide which can be installed from your machine and getting it ready for advanced features. PC Photo Printing...

MP210 series Quick Start Guide
Page 65
... Tray retracted. Specifications Printing resolution (dpi) Interface Print width Acoustic noise level Operating environment Storage environment Power supply Power consumption External dimensions Weight Canon FINE Cartridges Multiple copy Scanner driver Maximum scanning size Scanning resolution Gradation (Input/Output) General Specifications 4800 (horizontal)* x 1200 (vertical) * Ink droplets can be placed with USB 2.0 Hi...
... Tray retracted. Specifications Printing resolution (dpi) Interface Print width Acoustic noise level Operating environment Storage environment Power supply Power consumption External dimensions Weight Canon FINE Cartridges Multiple copy Scanner driver Maximum scanning size Scanning resolution Gradation (Input/Output) General Specifications 4800 (horizontal)* x 1200 (vertical) * Ink droplets can be placed with USB 2.0 Hi...


