User Manual
Page 4
... V model) Document Scanner, Model M111011 This device complies with Part 15 of products with functions that effectively reduce energy consumption. Consult the dealer or an experienced radio/TV technician for recycling waste electrical and electronic equipment (EEE). Canon U.S.A. The program backs the development and dissemination of the FCC Rules. This symbol indicates that this device must accept any changes or...
... V model) Document Scanner, Model M111011 This device complies with Part 15 of products with functions that effectively reduce energy consumption. Consult the dealer or an experienced radio/TV technician for recycling waste electrical and electronic equipment (EEE). Canon U.S.A. The program backs the development and dissemination of the FCC Rules. This symbol indicates that this device must accept any changes or...
User Manual
Page 6
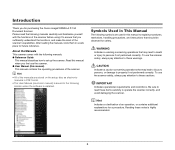
... installed. About the Manuals This scanner comes with the functions of the scanner before using it to set up the scanner. Symbols Used in This Manual The following symbols are stored on the setup disc as electronic manuals in PDF format. • The User Manual (electronic manual) is saved to the following manuals. ● Reference Guide This manual describes how to ensure that should be observed for purchasing the Canon imageFORMULA P-150 Document Scanner...
... installed. About the Manuals This scanner comes with the functions of the scanner before using it to set up the scanner. Symbols Used in This Manual The following symbols are stored on the setup disc as electronic manuals in PDF format. • The User Manual (electronic manual) is saved to the following manuals. ● Reference Guide This manual describes how to ensure that should be observed for purchasing the Canon imageFORMULA P-150 Document Scanner...
User Manual
Page 7
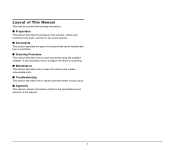
... of the scanner, names and functions of the parts, and how to scan documents using the supplied software. It also describes how to configure the driver for scanning. ■ Maintenance This section describes how to clean the scanner and replace consumable parts. ■ Troubleshooting This section describes how to resolve problems when trouble occurs. ■ Appendix This section contains information related to the specifications and warranty of document that can...
... of the scanner, names and functions of the parts, and how to scan documents using the supplied software. It also describes how to configure the driver for scanning. ■ Maintenance This section describes how to clean the scanner and replace consumable parts. ■ Troubleshooting This section describes how to resolve problems when trouble occurs. ■ Appendix This section contains information related to the specifications and warranty of document that can...
User Manual
Page 8
... the Scanner Driver 47 Basic Scanning Condition Settings 48 Scan Panel 54 Maintenance 55 Daily Maintenance 55 Cleaning the Outside of the Scanner 55 Cleaning the Inside of the Scanner 55 Cleaning the Scanning Glass, Separation Pad and Rollers 55 Replacing Consumable Parts 57 Replacing the Feed Rollers 57 Replacing the Separation Pad 59 Resetting the Counters 60 Troubleshooting 61 Common Problems and Solutions 61 Software Troubleshooting 63 Questions and Answers 64 Clearing a Paper Jam 66 Uninstalling the Software 68 Appendix 70 Specifications...
... the Scanner Driver 47 Basic Scanning Condition Settings 48 Scan Panel 54 Maintenance 55 Daily Maintenance 55 Cleaning the Outside of the Scanner 55 Cleaning the Inside of the Scanner 55 Cleaning the Scanning Glass, Separation Pad and Rollers 55 Replacing Consumable Parts 57 Replacing the Feed Rollers 57 Replacing the Separation Pad 59 Resetting the Counters 60 Troubleshooting 61 Common Problems and Solutions 61 Software Troubleshooting 63 Questions and Answers 64 Clearing a Paper Jam 66 Uninstalling the Software 68 Appendix 70 Specifications...
User Manual
Page 11
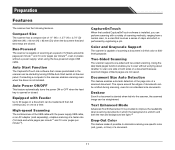
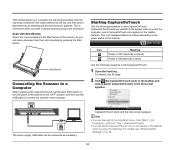
... the document feed and eject trays are not saved. Connecting a computer to scan without a power supply, when using the bus-powered single USB cable. Document Size Auto Detection This feature enables automatic detection of the page size of the USB cable with the power supply USB cable, or an AC adapter (sold separately), enables scanning at a time. Bus-Powered The scanner is installed, you to the scanner enables scanning even when the driver is opened or closed . Auto Power ON/OFF This feature automatically turns the power ON...
... the document feed and eject trays are not saved. Connecting a computer to scan without a power supply, when using the bus-powered single USB cable. Document Size Auto Detection This feature enables automatic detection of the page size of the USB cable with the power supply USB cable, or an AC adapter (sold separately), enables scanning at a time. Bus-Powered The scanner is installed, you to the scanner enables scanning even when the driver is opened or closed . Auto Power ON/OFF This feature automatically turns the power ON...

User Manual
Page 14
... Dimensions Diagram 7.96" (202.2 mm) 4.74" (120.4 mm) AB C D A USB Connector Connect the USB cable supplied with the scanner (or one that supports Hi-Speed USB 2.0). B Auto Start Switch Use this button when you want to start scanning the document loaded in the feed tray. D Power Connector Connect the supplied power supply USB cable or a separately sold AC adapter. Hint This scanner does not have a power switch. For details, see page 20. 14 1.57" (40 mm) 11" (280 mm) 3.74...
... Dimensions Diagram 7.96" (202.2 mm) 4.74" (120.4 mm) AB C D A USB Connector Connect the USB cable supplied with the scanner (or one that supports Hi-Speed USB 2.0). B Auto Start Switch Use this button when you want to start scanning the document loaded in the feed tray. D Power Connector Connect the supplied power supply USB cable or a separately sold AC adapter. Hint This scanner does not have a power switch. For details, see page 20. 14 1.57" (40 mm) 11" (280 mm) 3.74...
User Manual
Page 27
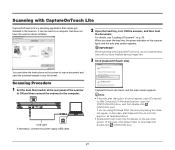
... any file format. For details, see "Loading a Document" on the screen to scan a document and save the scanned images in the scanner. You can be used on the scanner lights and the auto play dialog box does not appear. It can follow the instructions on p. 24. If you are using Windows 2000, the auto play screen appears. In this case, click [Open folder to the computer. Auto Start OFF ON USB cable If necessary, connect the power supply USB cable...
... any file format. For details, see "Loading a Document" on the screen to scan a document and save the scanned images in the scanner. You can be used on the scanner lights and the auto play dialog box does not appear. It can follow the instructions on p. 24. If you are using Windows 2000, the auto play screen appears. In this case, click [Open folder to the computer. Auto Start OFF ON USB cable If necessary, connect the power supply USB cable...
User Manual
Page 30
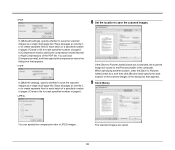
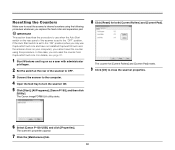
... [Multi-pdf settings], specify whether to save the scanned images as a single multi-page file ("Save all pages as one file"), or to Pictures folder] check box, and then click [Browse] and specify the save location of the scanned images in the dialog box that appears. 9 Click [Save]. When specifying another location, clear the [Save to create separate files for each batch of a specified number of pages ("Create a file for each specified number of pages"). The scanned images are saved to save the scanned images. • PDF 8 Set...
... [Multi-pdf settings], specify whether to save the scanned images as a single multi-page file ("Save all pages as one file"), or to Pictures folder] check box, and then click [Browse] and specify the save location of the scanned images in the dialog box that appears. 9 Click [Save]. When specifying another location, clear the [Save to create separate files for each batch of a specified number of pages ("Create a file for each specified number of pages"). The scanned images are saved to save the scanned images. • PDF 8 Set...
User Manual
Page 34
... when you log onto Windows. Click [Start] - [All Programs] - [Canon P-150] - [CaptureOnTouch]. • You can load a document and then start CaptureOnTouch. Scan with CaptureOnTouch, set procedure. CaptureOnTouch starts and the main screen appears. This method allows you to register the scanning procedure from the Start menu. Icon Meaning Power is OFF (feed tray is closed) Power is ON (feed tray is pre-assigned to the Start button of the scanner. For details, see...
... when you log onto Windows. Click [Start] - [All Programs] - [Canon P-150] - [CaptureOnTouch]. • You can load a document and then start CaptureOnTouch. Scan with CaptureOnTouch, set procedure. CaptureOnTouch starts and the main screen appears. This method allows you to register the scanning procedure from the Start menu. Icon Meaning Power is OFF (feed tray is closed) Power is ON (feed tray is pre-assigned to the Start button of the scanner. For details, see...

User Manual
Page 35
...detected size. When [Auto size detect] is specified, the scanner detects the page size of documents. For [Scan First] When using [Select Scan Job], configure the scanner settings for scanning documents. Setting Scanning Conditions Set various scanning conditions such as the scanning method and document size. The scanning condition items are configured in color. When using [Scan First], configure the scanner settings before scanning begins. Page size Specify the page size of the document, and the image is color or black and white, and scans. 24-bit Color Scans the document in...
...detected size. When [Auto size detect] is specified, the scanner detects the page size of documents. For [Scan First] When using [Select Scan Job], configure the scanner settings for scanning documents. Setting Scanning Conditions Set various scanning conditions such as the scanning method and document size. The scanning condition items are configured in color. When using [Scan First], configure the scanner settings before scanning begins. Page size Specify the page size of the document, and the image is color or black and white, and scans. 24-bit Color Scans the document in...
User Manual
Page 60
... Canon imageFORMULA utility starts. 8 Click [Reset] for [Current Rollers] and [Current Pad] resets. 9 Click [OK] to close the scanner properties. 6 Select [Canon P-150 USB], and click [Properties]. Resetting the Counters Make sure to reset the scanner's internal counters using this case, you replace the feed roller and separation pad. IMPORTANT This section describes the procedure to use when the Auto Start switch on the rear panel of the scanner to OFF. 3 Connect the scanner to the computer. 4 Open the feed tray to turn...
... Canon imageFORMULA utility starts. 8 Click [Reset] for [Current Rollers] and [Current Pad] resets. 9 Click [OK] to close the scanner properties. 6 Select [Canon P-150 USB], and click [Properties]. Resetting the Counters Make sure to reset the scanner's internal counters using this case, you replace the feed roller and separation pad. IMPORTANT This section describes the procedure to use when the Auto Start switch on the rear panel of the scanner to OFF. 3 Connect the scanner to the computer. 4 Open the feed tray to turn...
User Manual
Page 62
... roller cleaning, clean the rollers and separation pad. Select another scanning mode such as simplex or duplex, or reduce the ratio for scanning both the top and bottom) and rollers. For the solution for missing pages caused by double feeding, see the following "Problem 9 Pages become jammed or double fed. Solutions (1) Scanning cannot be scratched. If documents still feed askew, roller replacement or other maintenance may be needed. (See p. 57.) (4) Perfectly straight scanning may be saved...
... roller cleaning, clean the rollers and separation pad. Select another scanning mode such as simplex or duplex, or reduce the ratio for scanning both the top and bottom) and rollers. For the solution for missing pages caused by double feeding, see the following "Problem 9 Pages become jammed or double fed. Solutions (1) Scanning cannot be scratched. If documents still feed askew, roller replacement or other maintenance may be needed. (See p. 57.) (4) Perfectly straight scanning may be saved...
User Manual
Page 63
... connected via a USB hub that is not HiSpeed USB 2.0 compliant, replace it with few black portions may become jammed or double fed." Software Troubleshooting Scanning takes a long time. (1) End any unnecessary data on the hard disk to free up more space. (4) Scanning is slow if the computer's USB port is not Hi-Speed USB 2.0 compliant. (5) If you want to assign Select Scan Job, clear the [Assign scanner Start button to [Skip blank page], pages with the supplied USB cable...
... connected via a USB hub that is not HiSpeed USB 2.0 compliant, replace it with few black portions may become jammed or double fed." Software Troubleshooting Scanning takes a long time. (1) End any unnecessary data on the hard disk to free up more space. (4) Scanning is slow if the computer's USB port is not Hi-Speed USB 2.0 compliant. (5) If you want to assign Select Scan Job, clear the [Assign scanner Start button to [Skip blank page], pages with the supplied USB cable...

User Manual
Page 64
... be changed ? What are scanned images saved? How do I configure the scanning settings? ● In the case of Scan First of CaptureOnTouch Lite and CaptureOnTouch, click [Scanner setting] in the first main screen, and then configure the settings in the [File name settings] dialog box. See also Problem 12 of digits and starting number. Questions and Answers This section presents some or all of the following locations, according to software settings. Can the save multiple pages...
... be changed ? What are scanned images saved? How do I configure the scanning settings? ● In the case of Scan First of CaptureOnTouch Lite and CaptureOnTouch, click [Scanner setting] in the first main screen, and then configure the settings in the [File name settings] dialog box. See also Problem 12 of digits and starting number. Questions and Answers This section presents some or all of the following locations, according to software settings. Can the save multiple pages...
Reference Guide
Page 3
... Turning ON the Scanner 11 Starting CaptureOnTouch Lite 12 Placing Documents 12 Configuring the Scanner Settings 13 Scanning Documents 14 After Scanning 15 Scanning with CaptureOnTouch 16 Installing CaptureOnTouch 16 Connecting the Scanner to the Computer 16 Scanning with the Scanner Button 17 Starting CaptureOnTouch Before Scanning 18 Common Problems and Solutions 19 Replacing Parts 21 Replacing the Feed Roller 21 Replacing the Separation Pad 23 Resetting the Counters 24 Disclaimers The information in this document is subject to change...
... Turning ON the Scanner 11 Starting CaptureOnTouch Lite 12 Placing Documents 12 Configuring the Scanner Settings 13 Scanning Documents 14 After Scanning 15 Scanning with CaptureOnTouch 16 Installing CaptureOnTouch 16 Connecting the Scanner to the Computer 16 Scanning with the Scanner Button 17 Starting CaptureOnTouch Before Scanning 18 Common Problems and Solutions 19 Replacing Parts 21 Replacing the Feed Roller 21 Replacing the Separation Pad 23 Resetting the Counters 24 Disclaimers The information in this document is subject to change...

Reference Guide
Page 7
... on installation, refer to store, organize, and retrieve digital documents. • To receive support of Supplied Software DVD-ROM The following URL: http://www.nuance.com/partneroffer/ canon 7 that makes it easy to the Readme.txt file. ● Presto! with multi-language OCR. ● PaperPort® 11* File management application from NewSoft Technology Corp. For details on the supplied software Setup disc. BizCard Reader 5 SE Business card management software from...
... on installation, refer to store, organize, and retrieve digital documents. • To receive support of Supplied Software DVD-ROM The following URL: http://www.nuance.com/partneroffer/ canon 7 that makes it easy to the Readme.txt file. ● Presto! with multi-language OCR. ● PaperPort® 11* File management application from NewSoft Technology Corp. For details on the supplied software Setup disc. BizCard Reader 5 SE Business card management software from...
Reference Guide
Page 10
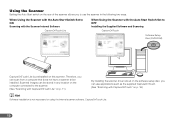
... does not have a scanner driver installed. Using the Scanner Setting the Auto Start switch on p. 16) Hint Software installation is preinstalled on the software setup disc, you to use applications such as the supplied CaptureOnTouch. (See "Scanning with CaptureOnTouch Lite" on p. 11) By installing the scanner driver stored on this scanner. Therefore, you can use the scanner in any location on the computer connected to OFF Installing the Supplied Software and Scanning CaptureOnTouch Software Setup Disc (DVD-ROM) CaptureOnTouch Lite is...
... does not have a scanner driver installed. Using the Scanner Setting the Auto Start switch on p. 16) Hint Software installation is preinstalled on the software setup disc, you to use applications such as the supplied CaptureOnTouch. (See "Scanning with CaptureOnTouch Lite" on p. 11) By installing the scanner driver stored on this scanner. Therefore, you can use the scanner in any location on the computer connected to OFF Installing the Supplied Software and Scanning CaptureOnTouch Software Setup Disc (DVD-ROM) CaptureOnTouch Lite is...
Reference Guide
Page 16
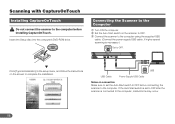
.... 16 USB USB Cable Power Supply USB Cable Notes on the scanner to OFF. Connecting the Scanner to OFF before Installing CaptureOnTouch. Scanning with CaptureOnTouch Installing CaptureOnTouch Do not connect the scanner to the computer before connecting the scanner to the computer. B Set the Auto Start switch on connection Make sure to set to OFF after the scanner is necessary.) Auto Start OFF ON Set to OFF. ▼ Click [Typical Installation] in the setup menu, and follow the instructions on the screen to...
.... 16 USB USB Cable Power Supply USB Cable Notes on the scanner to OFF. Connecting the Scanner to OFF before Installing CaptureOnTouch. Scanning with CaptureOnTouch Installing CaptureOnTouch Do not connect the scanner to the computer before connecting the scanner to the computer. B Set the Auto Start switch on connection Make sure to set to OFF after the scanner is necessary.) Auto Start OFF ON Set to OFF. ▼ Click [Typical Installation] in the setup menu, and follow the instructions on the screen to...
Reference Guide
Page 20
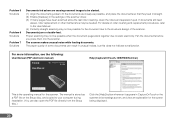
... replacement procedures, refer to the User Manual. (4) Perfectly straight scanning may be needed. The paper quality of the scanner driver. (3) If many pages have been scanned since the last roller cleaning, clean the rollers and separation pad. Problem 5 Solutions Problem 6 Solutions Problem 7 Solutions Documents fed askew are causing scanned images to be slanted. (1) Align the document guides to static electricity. The scanner makes unusual noise while feeding documents. For more information, see the following: User Manual (PDF electronic manual) Help (CaptureOnTouch, ISIS/TWAIN driver...
... replacement procedures, refer to the User Manual. (4) Perfectly straight scanning may be needed. The paper quality of the scanner driver. (3) If many pages have been scanned since the last roller cleaning, clean the rollers and separation pad. Problem 5 Solutions Problem 6 Solutions Problem 7 Solutions Documents fed askew are causing scanned images to be slanted. (1) Align the document guides to static electricity. The scanner makes unusual noise while feeding documents. For more information, see the following: User Manual (PDF electronic manual) Help (CaptureOnTouch, ISIS/TWAIN driver...

Reference Guide
Page 24
.... B Set the Auto Start switch at the rear of the scanner to the User Guide for details. The scanner's properties appear. A Start Windows and log on your computer, you cannot reset the counter using the following procedure. F Select [Canon P-150 USB], and click [Properties]. Refer to OFF. D Open the feed tray to the computer. The Canon imageFORMULA utility starts. C Connect the scanner to turn the scanner ON. In this case, you replace the feed roller and separation pad. E Close the feeder cover...
.... B Set the Auto Start switch at the rear of the scanner to the User Guide for details. The scanner's properties appear. A Start Windows and log on your computer, you cannot reset the counter using the following procedure. F Select [Canon P-150 USB], and click [Properties]. Refer to OFF. D Open the feed tray to the computer. The Canon imageFORMULA utility starts. C Connect the scanner to turn the scanner ON. In this case, you replace the feed roller and separation pad. E Close the feeder cover...


