DV Messenger Ver 1.0 Instruction Manual
Page 4
Contents Read Carefully Before Using 2 CANON SOFTWARE LICENCE AGREEMENT 2 Read This First ...5 Required Accessories ...6 Requirements for Using the DV Messenger 6 System Requirements ...7 What Can Be Accomplished With the ...Preparations for the DV Messenger 29 Checking the Camcorder Connection 29 Disabling the Firewall 30 Videoconferencing ...33 Starting the DV Messenger 33 Preparing the Camcorder for Communication 34 Starting a Videoconference 37 Screen Displays ...40 DVM Panel ...40 Taskbar ...41 DV Messenger Icon Menu 42 Operating Camcorders with DV Messenger 43 In [CAMERA] Mode...
Contents Read Carefully Before Using 2 CANON SOFTWARE LICENCE AGREEMENT 2 Read This First ...5 Required Accessories ...6 Requirements for Using the DV Messenger 6 System Requirements ...7 What Can Be Accomplished With the ...Preparations for the DV Messenger 29 Checking the Camcorder Connection 29 Disabling the Firewall 30 Videoconferencing ...33 Starting the DV Messenger 33 Preparing the Camcorder for Communication 34 Starting a Videoconference 37 Screen Displays ...40 DVM Panel ...40 Taskbar ...41 DV Messenger Icon Menu 42 Operating Camcorders with DV Messenger 43 In [CAMERA] Mode...
DV Messenger Ver 1.0 Instruction Manual
Page 29
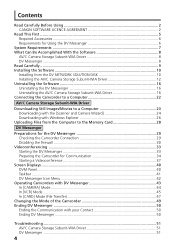
...From the [Tools] menu, select [Audio Tuning Wizard]. Checking the Camcorder Connection 1 Connect the power adapter to the camcorder. 2 Set the camcorder to TAPE CAMERA mode. 3 Connect the camcorder to the computer using the DV cable, do not connect any other ...devices to the camcorder's USB terminal. ¡ Do not connect two or more camcorders to the same computer. The DV Messenger may not operate correctly. E Connecting Precautions: ¡ Make sure the camcorder is correctly connected to disable the firewall ( 30...
...From the [Tools] menu, select [Audio Tuning Wizard]. Checking the Camcorder Connection 1 Connect the power adapter to the camcorder. 2 Set the camcorder to TAPE CAMERA mode. 3 Connect the camcorder to the computer using the DV cable, do not connect any other ...devices to the camcorder's USB terminal. ¡ Do not connect two or more camcorders to the same computer. The DV Messenger may not operate correctly. E Connecting Precautions: ¡ Make sure the camcorder is correctly connected to disable the firewall ( 30...
DV Messenger Ver 1.0 Instruction Manual
Page 30
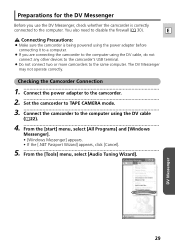
... Messenger Audio Update] from [Windows Update]. For further details, refer to display the device list and check if [Canon DV Device] is listed. • If [Canon DV Device] is installed on your computer by limiting or preventing access by other computers may be able to deactivate...Click [Next]. 7 Confirm that protects your computer, the firewall of the respective software. 30 In such case, you disable the function, other computers on your computer, or write files onto your camcorder is an important security system that your hard disk. Disabling the Firewall I About the ...
... Messenger Audio Update] from [Windows Update]. For further details, refer to display the device list and check if [Canon DV Device] is listed. • If [Canon DV Device] is installed on your computer by limiting or preventing access by other computers may be able to deactivate...Click [Next]. 7 Confirm that protects your computer, the firewall of the respective software. 30 In such case, you disable the function, other computers on your computer, or write files onto your camcorder is an important security system that your hard disk. Disabling the Firewall I About the ...

DV Messenger Ver 1.0 Instruction Manual
Page 56
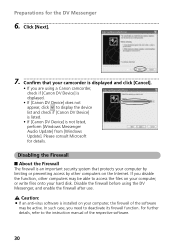
...10140; If a dialog for selecting an application to start when connecting the camcorder is set to the instruction manual of your contact, you cannot operate the camcorder of your contact, your contact's computer ( 30). ➜ If an anti-virus software is installed on the computer screen... of the respective software. ➜ If the Canon camcorder is displayed on the computer, the firewall function ...
...10140; If a dialog for selecting an application to start when connecting the camcorder is set to the instruction manual of your contact, you cannot operate the camcorder of your contact, your contact's computer ( 30). ➜ If an anti-virus software is installed on the computer screen... of the respective software. ➜ If the Canon camcorder is displayed on the computer, the firewall function ...

DV NETWORK SOLUTION DISK Ver.2 Software Instruction Manual
Page 38
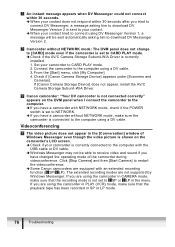
Video picture of your contact's camcorder Video picture of your contact from the DVM panel. The communication between your and your contact's DV Messenger starts and you click [Cancel], the request ... your computer screen that DV Messenger is send to download DV Messenger Version 2. 38 Videoconferencing You can now operate the camcorder of your camcorder • If your contact does not respond within 30 seconds after you press [Select], the connection will be listed. If you can only perform a videoconference with members who have...
Video picture of your contact's camcorder Video picture of your contact from the DVM panel. The communication between your and your contact's DV Messenger starts and you click [Cancel], the request ... your computer screen that DV Messenger is send to download DV Messenger Version 2. 38 Videoconferencing You can now operate the camcorder of your camcorder • If your contact does not respond within 30 seconds after you press [Select], the connection will be listed. If you can only perform a videoconference with members who have...

DV NETWORK SOLUTION DISK Ver.2 Software Instruction Manual
Page 58
... image. If you wish to be added. The file name appears as an example. Select the number of continuous shots between 2, 5, 10, 15, 20, 25, 30, 35, 40, 45, 50 and unlimited. Select the interval time between 640 x 480 pixels (VGA) and the maximum compatible size of Image Capture Window 1 2 3 4 5 6 ...click [Delete]. Up to 10 images. You can be used for all files. You can select the shutter sound. „ Setting of the camcorder. You can select between 1minute and 120 minutes by clicking or , or by directly entering a number. 58 Using the Image Capture Function If ...
... image. If you wish to be added. The file name appears as an example. Select the number of continuous shots between 2, 5, 10, 15, 20, 25, 30, 35, 40, 45, 50 and unlimited. Select the interval time between 640 x 480 pixels (VGA) and the maximum compatible size of Image Capture Window 1 2 3 4 5 6 ...click [Delete]. Up to 10 images. You can be used for all files. You can select the shutter sound. „ Setting of the camcorder. You can select between 1minute and 120 minutes by clicking or , or by directly entering a number. 58 Using the Image Capture Function If ...
DV NETWORK SOLUTION DISK Ver.2 Software Instruction Manual
Page 76
... your camcorder is correctly connected to the computer with an extended recording function ( SP/ LP). Check if [Canon Camera Storage Device] appears under [Scanners and Cameras]. If [Canon Camera Storage Device] does not appear, install the AV/C Camera Storage Subunit-WIA Driver. An instant message appears when DV Messenger could not connect within 30...
... your camcorder is correctly connected to the computer with an extended recording function ( SP/ LP). Check if [Canon Camera Storage Device] appears under [Scanners and Cameras]. If [Canon Camera Storage Device] does not appear, install the AV/C Camera Storage Subunit-WIA Driver. An instant message appears when DV Messenger could not connect within 30...
OPTURA40 OPTURA30 Instruction Manual
Page 6
...Accessories 8 Components Guide ...9 Basic Functions Preparations Preparing the Power Supply 13 Loading/Unloading a Cassette 16 Installing the Backup Battery 17 Preparing the Camcorder 18 Using the Wireless Controller 20 Setting the Time Zone, Date and Time 21 Recording Recording Movies on a Tape 24 Zooming ...28 ...Tips for Making Better Videos 30 Playback Playing Back a Tape ...31 Adjusting the Volume 33 Playing Back on a TV Screen 34 Advanced Functions Menus and Settings ...37...
...Accessories 8 Components Guide ...9 Basic Functions Preparations Preparing the Power Supply 13 Loading/Unloading a Cassette 16 Installing the Backup Battery 17 Preparing the Camcorder 18 Using the Wireless Controller 20 Setting the Time Zone, Date and Time 21 Recording Recording Movies on a Tape 24 Zooming ...28 ...Tips for Making Better Videos 30 Playback Playing Back a Tape ...31 Adjusting the Volume 33 Playing Back on a TV Screen 34 Advanced Functions Menus and Settings ...37...
OPTURA40 OPTURA30 Instruction Manual
Page 14
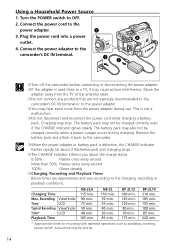
...not be charged correctly when a power outage occurs during use. NB-2L 110 min. 70 min. 55 min. 40 min. 30 min. 85 min. Actual time may stop , zooming, power on/off the camcorder before connecting or disconnecting the power adapter. ❍ If the adapter is used close to a TV, it ...back to the camcorder. ❍ When the power adapter or battery pack is not a malfunction. ❍ Do not disconnect ...
...not be charged correctly when a power outage occurs during use. NB-2L 110 min. 70 min. 55 min. 40 min. 30 min. 85 min. Actual time may stop , zooming, power on/off the camcorder before connecting or disconnecting the power adapter. ❍ If the adapter is used close to a TV, it ...back to the camcorder. ❍ When the power adapter or battery pack is not a malfunction. ❍ Do not disconnect ...
OPTURA40 OPTURA30 Instruction Manual
Page 15
...2 to 3 times longer than you think you might need. ❍ To conserve battery charge, turn off the camcorder instead of 32 ˚F to 104 ˚F (0 ˚C to 40 ˚C), the CHARGE indicator flashes rapidly and charging stops. ❍ A lithium ion battery pack can be charged ...at any charge state. Unlike E conventional battery packs, you do not need to completely use or discharge it in temperatures between 50 ˚F and 86 ˚F (10 ˚C and 30 &#...
...2 to 3 times longer than you think you might need. ❍ To conserve battery charge, turn off the camcorder instead of 32 ˚F to 104 ˚F (0 ˚C to 40 ˚C), the CHARGE indicator flashes rapidly and charging stops. ❍ A lithium ion battery pack can be charged ...at any charge state. Unlike E conventional battery packs, you do not need to completely use or discharge it in temperatures between 50 ˚F and 86 ˚F (10 ˚C and 30 &#...

OPTURA40 OPTURA30 Instruction Manual
Page 30
...More Stability Lean against your body. Tips for Making Better Videos Holding the Camcorder For maximum stability, grip the camcorder in your right hand and keep your right elbow pressed against a wall Put the camcorder on a table Lie on your elbow Use a tripod Lighting When recording outdoors...tripod, do not touch the microphone or lens. If necessary, support the camcorder with fastening screws longer than 0.2 inch (5.5 mm) as it may melt (due to direct sunlight as it may damage the camcorder. 30 Be careful that your fingers do not leave the viewfinder exposed to concentration ...
...More Stability Lean against your body. Tips for Making Better Videos Holding the Camcorder For maximum stability, grip the camcorder in your right hand and keep your right elbow pressed against a wall Put the camcorder on a table Lie on your elbow Use a tripod Lighting When recording outdoors...tripod, do not touch the microphone or lens. If necessary, support the camcorder with fastening screws longer than 0.2 inch (5.5 mm) as it may melt (due to direct sunlight as it may damage the camcorder. 30 Be careful that your fingers do not leave the viewfinder exposed to concentration ...

OPTURA40 OPTURA30 Instruction Manual
Page 57
This allows you can set it on a tripod or placing it to 1/30 in CAMERA mode and 1/15 in CARD CAMERA mode. CAMERA PLAY (VCR) CARD CAMERA CARD PLAY ( 37) CAMERA SETUP A.SL SHUTTER•ON Open the ... SETUP]. In CARD CAMERA mode, set the flash mode to (flash off). ❍ When set to [ON], moving subjects may leave a trailing afterimage. ❍ The camcorder retains the setting separately in CAMERA and CARD CAMERA mode. ❍ The setting cannot be changed when exposure is set to [AUTO] in Auto mode...
This allows you can set it on a tripod or placing it to 1/30 in CAMERA mode and 1/15 in CARD CAMERA mode. CAMERA PLAY (VCR) CARD CAMERA CARD PLAY ( 37) CAMERA SETUP A.SL SHUTTER•ON Open the ... SETUP]. In CARD CAMERA mode, set the flash mode to (flash off). ❍ When set to [ON], moving subjects may leave a trailing afterimage. ❍ The camcorder retains the setting separately in CAMERA and CARD CAMERA mode. ❍ The setting cannot be changed when exposure is set to [AUTO] in Auto mode...

OPTURA40 OPTURA30 Instruction Manual
Page 105
CAMERA PLAY (VCR) CARD CAMERA CARD PLAY 1. in 320 × 240 pixels and 30 sec. Doing so could result in the Camcorder CAMERA PLAY (VCR) CARD CAMERA CARD PLAY 1. Press the start /stop button to begin recording. • With SD Memory Cards up to 512 MB, ... Card). • With MultiMediaCards, the recording time is set to allow recording. ❍ Do not load/unload a cassette during recording. ❍ We recommend using a Canon SD Memory Card, or a SD Memory Card with a transfer rate of more than approx. 12 min. in 160 × 120. Using a Memory Card Recording from...
CAMERA PLAY (VCR) CARD CAMERA CARD PLAY 1. in 320 × 240 pixels and 30 sec. Doing so could result in the Camcorder CAMERA PLAY (VCR) CARD CAMERA CARD PLAY 1. Press the start /stop button to begin recording. • With SD Memory Cards up to 512 MB, ... Card). • With MultiMediaCards, the recording time is set to allow recording. ❍ Do not load/unload a cassette during recording. ❍ We recommend using a Canon SD Memory Card, or a SD Memory Card with a transfer rate of more than approx. 12 min. in 160 × 120. Using a Memory Card Recording from...

OPTURA40 OPTURA30 Instruction Manual
Page 146
... humidity, and at temperatures not higher than 86 ˚F (30 ˚C). ❍ After storage, check the functions of dust, in dusty or sandy places. Maintenance/Others Camcorder Handling Precautions ❍ Do not carry the camcorder by lighting equipment. ❍ Do not disassemble the camcorder. Dust and sand can also damage the lens. LCD Screen...
... humidity, and at temperatures not higher than 86 ˚F (30 ˚C). ❍ After storage, check the functions of dust, in dusty or sandy places. Maintenance/Others Camcorder Handling Precautions ❍ Do not carry the camcorder by lighting equipment. ❍ Do not disassemble the camcorder. Dust and sand can also damage the lens. LCD Screen...

OPTURA40 OPTURA30 Instruction Manual
Page 148
... removing it from fire (or it might explode). • Do not expose the battery pack to temperature higher than 86 ˚F (30 ˚C). Remove the cassette immediately and leave the cassette compartment open. After the condensation warning stops flashing, wait for approx. 4 seconds... and "h" starts flashing. ❍ If a cassette is detected: ❍ The camcorder stops operating and the warning message "CONDENSATION HAS BEEN DETECTED" appears for 1 more than 1 battery pack, perform these precautions at temperatures no...
... removing it from fire (or it might explode). • Do not expose the battery pack to temperature higher than 86 ˚F (30 ˚C). Remove the cassette immediately and leave the cassette compartment open. After the condensation warning stops flashing, wait for approx. 4 seconds... and "h" starts flashing. ❍ If a cassette is detected: ❍ The camcorder stops operating and the warning message "CONDENSATION HAS BEEN DETECTED" appears for 1 more than 1 battery pack, perform these precautions at temperatures no...
OPTURA40 OPTURA30 Instruction Manual
Page 149
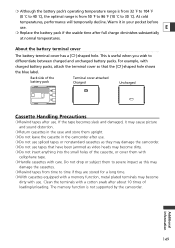
... from 50 ˚F to 86 ˚F (10 ˚C to 30 ˚C). If the tape becomes slack and damaged, it in your pocket... or cover them with cellophane tape. ❍ Handle cassettes with a memory function, metal plated terminals may damage the camcorder. ❍ Do not use . E ❍ Replace the battery pack if the usable time after use. ❍...; Although the battery pack's operating temperature range is from 32 ˚F to 104 ˚F (0 ˚C to 40 ˚C), the optimal range is useful when you wish to differentiate between charged and uncharged battery packs. About the battery...
... from 50 ˚F to 86 ˚F (10 ˚C to 30 ˚C). If the tape becomes slack and damaged, it in your pocket... or cover them with cellophane tape. ❍ Handle cassettes with a memory function, metal plated terminals may damage the camcorder. ❍ Do not use . E ❍ Replace the battery pack if the usable time after use. ❍...; Although the battery pack's operating temperature range is from 32 ˚F to 104 ˚F (0 ˚C to 40 ˚C), the optimal range is useful when you wish to differentiate between charged and uncharged battery packs. About the battery...

Digital Video Software (Macintosh) Ver.12 Instruction Manual
Page 5
Contents READ CAREFULLY BEFORE USING 2 Canon Software License Agreement 2 E Read This First ...6 Checking Supplied Accessories 7 System Requirements 8 What Can Be Accomplished with the Software 9 Installing the Digital Video Software 10 Connecting the Camcorder to a Computer 13 Downloading Images (ImageBrowser 14 Starting ImageBrowser 14 ...26 Playing Back Movies From a Memory Card 27 Editing Movies (MovieEdit Task) (Mac OS X Only 28 Running a Slide Show 30 Adding Sound to a Still Image 31 Adding Sound to a Still Image 31 Playing Back the Sound 32 Using the Sound Panel 32...
Contents READ CAREFULLY BEFORE USING 2 Canon Software License Agreement 2 E Read This First ...6 Checking Supplied Accessories 7 System Requirements 8 What Can Be Accomplished with the Software 9 Installing the Digital Video Software 10 Connecting the Camcorder to a Computer 13 Downloading Images (ImageBrowser 14 Starting ImageBrowser 14 ...26 Playing Back Movies From a Memory Card 27 Editing Movies (MovieEdit Task) (Mac OS X Only 28 Running a Slide Show 30 Adding Sound to a Still Image 31 Adding Sound to a Still Image 31 Playing Back the Sound 32 Using the Sound Panel 32...


