DV Messenger Ver 1.0 Instruction Manual
Page 29
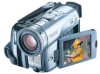
...camcorder. 2 Set the camcorder to TAPE CAMERA mode. 3 Connect the camcorder to the computer using the DV cable, do not connect any other devices to the camcorder's USB terminal. ¡ Do not connect two or more camcorders to the computer using the DV cable ( 22). 4 From the [start] menu,...161; If you use the DV Messenger, check whether the camcorder is correctly connected to disable the firewall ( 30). You also need to the computer. Preparations for the DV Messenger Before you are connecting the camcorder to the same computer. The DV Messenger may not operate correctly...
...camcorder. 2 Set the camcorder to TAPE CAMERA mode. 3 Connect the camcorder to the computer using the DV cable, do not connect any other devices to the camcorder's USB terminal. ¡ Do not connect two or more camcorders to the computer using the DV cable ( 22). 4 From the [start] menu,...161; If you use the DV Messenger, check whether the camcorder is correctly connected to disable the firewall ( 30). You also need to the computer. Preparations for the DV Messenger Before you are connecting the camcorder to the same computer. The DV Messenger may not operate correctly...
DV Messenger Ver 1.0 Instruction Manual
Page 33
... Messenger. ¡ Do not update Windows Messenger while DV Messenger is started. ¡ Do not connect two or more digital camcorders to the computer. 1 Set the camcorder to TAPE CAMERA mode. 2 Connect to the Internet. 3 Double-click the [DV Messenger] icon on the desktop, or select [DV...Messenger and starts DV Messenger. • DV Messenger starts. Videoconferencing Starting the DV Messenger E Caution: ¡ The DV Messenger will not start ] menu. • If a dialog appears prompting you have signed in ]. The DVM panel (DV Messenger panel) and Windows Messenger sign-in window appears....
... Messenger. ¡ Do not update Windows Messenger while DV Messenger is started. ¡ Do not connect two or more digital camcorders to the computer. 1 Set the camcorder to TAPE CAMERA mode. 2 Connect to the Internet. 3 Double-click the [DV Messenger] icon on the desktop, or select [DV...Messenger and starts DV Messenger. • DV Messenger starts. Videoconferencing Starting the DV Messenger E Caution: ¡ The DV Messenger will not start ] menu. • If a dialog appears prompting you have signed in ]. The DVM panel (DV Messenger panel) and Windows Messenger sign-in window appears....

DV Messenger Ver 1.0 Instruction Manual
Page 34
...) mode. • When you that you have signed in. Message on Your Computer Screen Preparing the Camcorder for Communication When you have signed in, set the camcorder to TAPE PLAY (VCR) mode, play back the tape. 2 Open the [Tools] menu and select [Audio Tuning Wizard]. 34 Videoconferencing • To use the DV Messenger, both you... signed in. If your contact is already online when you sign in when you are already online: A message appears automatically notifying you have set the camcorder and adjust the volume of Your Contact -
...) mode. • When you that you have signed in. Message on Your Computer Screen Preparing the Camcorder for Communication When you have signed in, set the camcorder to TAPE PLAY (VCR) mode, play back the tape. 2 Open the [Tools] menu and select [Audio Tuning Wizard]. 34 Videoconferencing • To use the DV Messenger, both you... signed in. If your contact is already online when you sign in when you are already online: A message appears automatically notifying you have set the camcorder and adjust the volume of Your Contact -
DV Messenger Ver 1.0 Instruction Manual
Page 52
... installed. 1. If you are using a camcorder supporting the memory card function, ask if the camcorder is not set to SP or LP in the menu. Click [Start Camera] to the computer with a extended recording function ( SP/ LP). From the [Start] menu, click [My Computer]. 3. If you... recording to a tape (e.g. Reset the setting in the [Conversation] window. the TAPE/CARD switch is in TAPE CAMERA mode, make sure that the recording mode is set for details. ? Click [Stop Camera] and then [Start Camera] to restart the videoconference. ➜ Some Canon camcorders are not supported ...
... installed. 1. If you are using a camcorder supporting the memory card function, ask if the camcorder is not set to SP or LP in the menu. Click [Start Camera] to the computer with a extended recording function ( SP/ LP). From the [Start] menu, click [My Computer]. 3. If you... recording to a tape (e.g. Reset the setting in the [Conversation] window. the TAPE/CARD switch is in TAPE CAMERA mode, make sure that the recording mode is set for details. ? Click [Stop Camera] and then [Start Camera] to restart the videoconference. ➜ Some Canon camcorders are not supported ...
DV NETWORK SOLUTION DISK Ver.2 Software Instruction Manual
Page 7
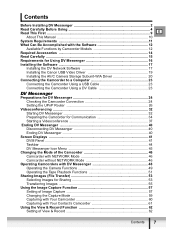
... the DV Network Software 17 Installing the Canon USB Video Driver 19 Installing the AV/C Camera Storage Subunit-WIA Driver 20 Connecting the Camcorder to a Computer 23 Connecting the Camcorder Using a USB Cable 23 Connecting the Camcorder Using a DV Cable 23 DV Messenger ...Panel ...41 Taskbar ...44 DV Messenger Icon Menu 45 Changing the Mode of the Camcorder 46 Camcorder with NETWORK Mode 46 Camcorder without NETWORK Mode 46 Operating Camcorders with DV Messenger 48 Operating the Camera Functions 49 Operating the Tape Playback Functions 51 Sharing Images (File Transfer...
... the DV Network Software 17 Installing the Canon USB Video Driver 19 Installing the AV/C Camera Storage Subunit-WIA Driver 20 Connecting the Camcorder to a Computer 23 Connecting the Camcorder Using a USB Cable 23 Connecting the Camcorder Using a DV Cable 23 DV Messenger ...Panel ...41 Taskbar ...44 DV Messenger Icon Menu 45 Changing the Mode of the Camcorder 46 Camcorder with NETWORK Mode 46 Camcorder without NETWORK Mode 46 Operating Camcorders with DV Messenger 48 Operating the Camera Functions 49 Operating the Tape Playback Functions 51 Sharing Images (File Transfer...

DV NETWORK SOLUTION DISK Ver.2 Software Instruction Manual
Page 34
Preparing the Camcorder for Communication When you have signed in, set the camcorder and adjust the volume of the speaker and microphone. Connect speaker or headphones as necessary. As microphone, use the microphone of the camcorder. 1 Set the camcorder to NETWORK mode. (Camcorder without NETWORK mode: Set the camcorder to CAMERA or PLAY (VCR) mode.) When you have set the camcorder to PLAY (VCR) mode, play back the tape. 2 Open the [Tools] menu and select [Audio Tuning Wizard]. 3 Click [Next]. 34 Videoconferencing
Preparing the Camcorder for Communication When you have signed in, set the camcorder and adjust the volume of the speaker and microphone. Connect speaker or headphones as necessary. As microphone, use the microphone of the camcorder. 1 Set the camcorder to NETWORK mode. (Camcorder without NETWORK mode: Set the camcorder to CAMERA or PLAY (VCR) mode.) When you have set the camcorder to PLAY (VCR) mode, play back the tape. 2 Open the [Tools] menu and select [Audio Tuning Wizard]. 3 Click [Next]. 34 Videoconferencing
DV NETWORK SOLUTION DISK Ver.2 Software Instruction Manual
Page 69
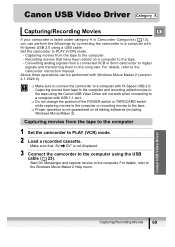
... DV Messenger and capture movies to the camcorder instruction manual. For details, refer to the computer. Above three operations can perform the followings by connecting the camcorder to a computer with Hi-Speed USB 2.0 using the Canon USB Video Driver will not work when connecting...details, refer to PLAY (VCR) mode. - Set the camcorder to the Windows Movie Maker 2 Help menu. Capturing movies from the tape to the tape using a USB cable. Capturing movies from the tape to the computer 1 Set the camcorder to the tape. - Recording movies that "AV DV" is listed under ...
... DV Messenger and capture movies to the camcorder instruction manual. For details, refer to the computer. Above three operations can perform the followings by connecting the camcorder to a computer with Hi-Speed USB 2.0 using the Canon USB Video Driver will not work when connecting...details, refer to PLAY (VCR) mode. - Set the camcorder to the Windows Movie Maker 2 Help menu. Capturing movies from the tape to the tape using a USB cable. Capturing movies from the tape to the computer 1 Set the camcorder to the tape. - Recording movies that "AV DV" is listed under ...
DV NETWORK SOLUTION DISK Ver.2 Software Instruction Manual
Page 70
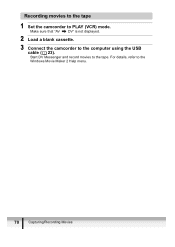
For details, refer to the tape. Start DV Messenger and record movies to the Windows Movie Maker 2 Help menu. 70 Capturing/Recording Movies Make sure that "AV DV" is not displayed. 2 Load a blank cassette. 3 Connect the camcorder to PLAY (VCR) mode. Recording movies to the tape 1 Set the camcorder to the computer using the USB cable ( 23).
For details, refer to the tape. Start DV Messenger and record movies to the Windows Movie Maker 2 Help menu. 70 Capturing/Recording Movies Make sure that "AV DV" is not displayed. 2 Load a blank cassette. 3 Connect the camcorder to PLAY (VCR) mode. Recording movies to the tape 1 Set the camcorder to the computer using the USB cable ( 23).
DV NETWORK SOLUTION DISK Ver.2 Software Instruction Manual
Page 76
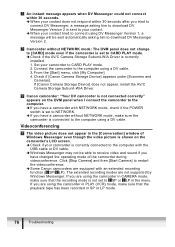
...connected to the computer using the camcorder in PLAY (VCR) mode, make sure that the playback tape has been recorded in the menu. Click [Stop Camera] and then [Start Camera] to restart the videoconference. Î Some Canon camcorders are using a DV cable. If [Canon Camera Storage Device] does not appear... are using the camcorder in CAMERA mode, make sure the camcorder is not set to NETWORK. Î If you tried to connect DV Messenger, a message asking him to connect using a DV cable. 3. An instant message appears when DV Messenger could not connect within 30 seconds. Î...
...connected to the computer using the camcorder in PLAY (VCR) mode, make sure that the playback tape has been recorded in the menu. Click [Stop Camera] and then [Start Camera] to restart the videoconference. Î Some Canon camcorders are using a DV cable. If [Canon Camera Storage Device] does not appear... are using the camcorder in CAMERA mode, make sure the camcorder is not set to NETWORK. Î If you tried to connect DV Messenger, a message asking him to connect using a DV cable. 3. An instant message appears when DV Messenger could not connect within 30 seconds. Î...
DV NETWORK SOLUTION DISK Ver.2 Software Instruction Manual
Page 77
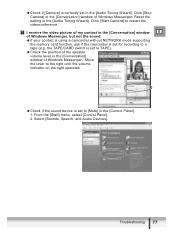
...to the right until the volume indicator on the right operates. Î Check if the sound device is set for recording to a tape (e.g. From the [Start] menu, select [Control Panel]. 2. Click [Stop Camera] in the [Audio Tuning Wizard]. Click [Start Camera] to restart the videoconference. Troubleshooting... Messenger, but not the sound. Î If your contact is using a camcorder without NETWORK mode supporting the memory card function, ask if the camcorder is set to [Mute] in the [Control Panel]. 1. the TAPE/CARD switch is correctly set in the [Audio Tuning Wizard]. Select [Sounds, ...
...to the right until the volume indicator on the right operates. Î Check if the sound device is set for recording to a tape (e.g. From the [Start] menu, select [Control Panel]. 2. Click [Stop Camera] in the [Audio Tuning Wizard]. Click [Start Camera] to restart the videoconference. Troubleshooting... Messenger, but not the sound. Î If your contact is using a camcorder without NETWORK mode supporting the memory card function, ask if the camcorder is set to [Mute] in the [Control Panel]. 1. the TAPE/CARD switch is correctly set in the [Audio Tuning Wizard]. Select [Sounds, ...
OPTURA40 OPTURA30 Instruction Manual
Page 5
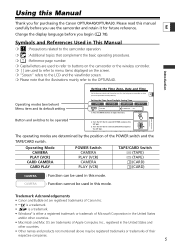
...read this manual carefully before you have replaced the backup battery. Turn the SET dial to the OPTURA40. Trademark Acknowledgements • Canon and Bubble Jet are registered trademarks of Canon Inc. • D is a trademark. • is a trademark. • Windows® is either a registered trademark...switch and the TAPE/CARD switch. Press the MENU button to open the menu. Introduction Operating modes (see below) Menu item and its default setting Setting the Time Zone, Date and Time Set the time zone, date and time when you first start using your camcorder, or when...
...read this manual carefully before you have replaced the backup battery. Turn the SET dial to the OPTURA40. Trademark Acknowledgements • Canon and Bubble Jet are registered trademarks of Canon Inc. • D is a trademark. • is a trademark. • Windows® is either a registered trademark...switch and the TAPE/CARD switch. Press the MENU button to open the menu. Introduction Operating modes (see below) Menu item and its default setting Setting the Time Zone, Date and Time Set the time zone, date and time when you first start using your camcorder, or when...
OPTURA40 OPTURA30 Instruction Manual
Page 25
... you to specification. E ❍ Bright light may be adjusted manually ( 60). ❍ The camcorder will shut off . OPTURA40: The audio recording level can rotate the LCD panel so that the screen...panel at 90 degrees before rotating it is not a malfunction. Press the MENU button to open the menu. 25 In such case, use the viewfinder while the subject can record ...operating to use the viewfinder instead. ❍ You can choose to protect tape and video heads. ❍ Wait until the tape counter stops completely before you start recording. ❍ When you do ...
... you to specification. E ❍ Bright light may be adjusted manually ( 60). ❍ The camcorder will shut off . OPTURA40: The audio recording level can rotate the LCD panel so that the screen...panel at 90 degrees before rotating it is not a malfunction. Press the MENU button to open the menu. 25 In such case, use the viewfinder while the subject can record ...operating to use the viewfinder instead. ❍ You can choose to protect tape and video heads. ❍ Wait until the tape counter stops completely before you start recording. ❍ When you do ...
OPTURA40 OPTURA30 Instruction Manual
Page 26
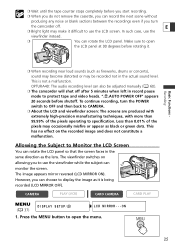
... select [OFF]. 5. Turn the SET dial to close the menu. Screen Displays during recording. t Recording reminder The camcorder counts from 1 to select [DISPLAY SETUP/ ] and press the SET dial. 3. When [LCD MIRROR] is set to [ON], only tape or card operation and self-timer displays appear on the LCD ...screen (all displays appear on the type of the tape, the indication may not...
... select [OFF]. 5. Turn the SET dial to close the menu. Screen Displays during recording. t Recording reminder The camcorder counts from 1 to select [DISPLAY SETUP/ ] and press the SET dial. 3. When [LCD MIRROR] is set to [ON], only tape or card operation and self-timer displays appear on the LCD ...screen (all displays appear on the type of the tape, the indication may not...

OPTURA40 OPTURA30 Instruction Manual
Page 36
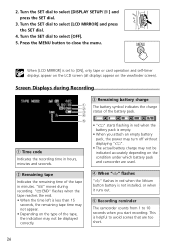
Press the MENU button to open the menu. 2. Press the MENU button to close the menu. CAMERA PLAY (VCR) CARD CAMERA CARD PLAY ( 37) AUDIO SETUP OUTPUT CH••••L/R 1. Turn the SET dial to select [OUTPUT CH] and ... the SET dial. 3. Selecting the Audio Output Channel You can select the output channels when playing back a tape with audio recorded on two channels. Turn the SET dial to the L/R setting when you turn the camcorder off. 36 The setting resets to select a setting option. • L/R: Stereo: L+R channels, Bilingual: Main+Sub. •...
Press the MENU button to open the menu. 2. Press the MENU button to close the menu. CAMERA PLAY (VCR) CARD CAMERA CARD PLAY ( 37) AUDIO SETUP OUTPUT CH••••L/R 1. Turn the SET dial to select [OUTPUT CH] and ... the SET dial. 3. Selecting the Audio Output Channel You can select the output channels when playing back a tape with audio recorded on two channels. Turn the SET dial to the L/R setting when you turn the camcorder off. 36 The setting resets to select a setting option. • L/R: Stereo: L+R channels, Bilingual: Main+Sub. •...

OPTURA40 OPTURA30 Instruction Manual
Page 59
... mode may be used for audio dubbing ( 89). ❍ Depending on the nature and usage condition of the tape, picture and sound recorded in both SP and LP modes on this camcorder, or vice versa, picture and sound may not be written correctly. ❍ If you play ). Advanced Functions ...Recording 59 Select [REC MODE], set it to LP mode, open the menu and select [VCR SETUP]. E CAMERA PLAY (VCR) CARD CAMERA CARD PLAY ( 37) VCR SETUP REC MODE SP To change to [LP] and close the menu. ❍ Tapes recorded in LP mode cannot be distorted. LP extends the...
... mode may be used for audio dubbing ( 89). ❍ Depending on the nature and usage condition of the tape, picture and sound recorded in both SP and LP modes on this camcorder, or vice versa, picture and sound may not be written correctly. ❍ If you play ). Advanced Functions ...Recording 59 Select [REC MODE], set it to LP mode, open the menu and select [VCR SETUP]. E CAMERA PLAY (VCR) CARD CAMERA CARD PLAY ( 37) VCR SETUP REC MODE SP To change to [LP] and close the menu. ❍ Tapes recorded in LP mode cannot be distorted. LP extends the...

OPTURA40 OPTURA30 Instruction Manual
Page 70
... in the following cases: - When the program selector is activated. When the 16:9 format is activated. ❍ In PLAY (VCR) mode: Pressing any tape operation button (such as play or pause), or performing date search cancels the multi-image screen. 70 Press the DIGITAL EFFECTS button to [. - During DV...multi-image screen: ❍ The multi-image screen cannot be used when Card Mix is set to open the menu. Select [D.EFFECT |] and press the DIGITAL EFFECTS button. ❍ The camcorder retains the setting even if you turn it off the digital effect when you do not use it. When ...
... in the following cases: - When the program selector is activated. When the 16:9 format is activated. ❍ In PLAY (VCR) mode: Pressing any tape operation button (such as play or pause), or performing date search cancels the multi-image screen. 70 Press the DIGITAL EFFECTS button to [. - During DV...multi-image screen: ❍ The multi-image screen cannot be used when Card Mix is set to open the menu. Select [D.EFFECT |] and press the DIGITAL EFFECTS button. ❍ The camcorder retains the setting even if you turn it off the digital effect when you do not use it. When ...

OPTURA40 OPTURA30 Instruction Manual
Page 72
...(VCR) CARD CAMERA CARD PLAY DISPLAY SETUP/ ( 37) D/TIME SEL.••DATE & TIME Open the menu and select [DISPLAY SETUP/ ]. Displaying the Data Code The camcorder maintains a data code containing recording date and time and other camera data such as shutter speed and exposure (f-stop...). Select [DATA CODE], set it to [CAMERA DATA] or [CAM. & D/T] and close the menu. When you play back a tape, you can display the ...
...(VCR) CARD CAMERA CARD PLAY DISPLAY SETUP/ ( 37) D/TIME SEL.••DATE & TIME Open the menu and select [DISPLAY SETUP/ ]. Displaying the Data Code The camcorder maintains a data code containing recording date and time and other camera data such as shutter speed and exposure (f-stop...). Select [DATA CODE], set it to [CAMERA DATA] or [CAM. & D/T] and close the menu. When you play back a tape, you can display the ...
OPTURA40 OPTURA30 Instruction Manual
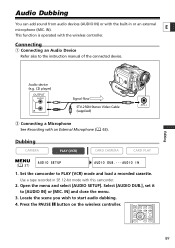
Page 89
Set the camcorder to start audio dubbing. 4. Press the PAUSE a button on the wireless controller. Editing Audio device ...63). CD player) OUTPUT AUDIO L R Signal flow STV-250N Stereo Video Cable (supplied) w Connecting a Microphone See Recording with this camcorder. 2. Locate the scene you wish to PLAY (VCR) mode and load a recorded cassette. ZERO SET MEMORY REW PLAY FF 12bit AUDIO... IN 1. Connecting q Connecting an Audio Device Refer also to [AUDIO IN] or [MIC. Open the menu and select [AUDIO SETUP]. Use a tape recorded in or an external microphone (MIC. IN).
Set the camcorder to start audio dubbing. 4. Press the PAUSE a button on the wireless controller. Editing Audio device ...63). CD player) OUTPUT AUDIO L R Signal flow STV-250N Stereo Video Cable (supplied) w Connecting a Microphone See Recording with this camcorder. 2. Locate the scene you wish to PLAY (VCR) mode and load a recorded cassette. ZERO SET MEMORY REW PLAY FF 12bit AUDIO... IN 1. Connecting q Connecting an Audio Device Refer also to [AUDIO IN] or [MIC. Open the menu and select [AUDIO SETUP]. Use a tape recorded in or an external microphone (MIC. IN).

OPTURA40 OPTURA30 Instruction Manual
Page 98
... PLAY (VCR) CARD CAMERA CARD PLAY ( 37) CAMERA SETUP STILL I . REC] is too bright, the ND filter turns on automatically ("ND" appears on a tape, you wish to [OFF]: No focusing frame appears. Recording a Still Image on a Memory Card While Recording Movies on a memory card when the 16:9 format is... switch to OFF and then back to a computer or PictBridge compliant printer will be recorded on a Tape When you are locked. ❍ The camcorder shuts off the ND filter: Open the menu and select [CAMERA SETUP]. Select [ND], set it is adjusted and the still image can record ...
... PLAY (VCR) CARD CAMERA CARD PLAY ( 37) CAMERA SETUP STILL I . REC] is too bright, the ND filter turns on automatically ("ND" appears on a tape, you wish to [OFF]: No focusing frame appears. Recording a Still Image on a Memory Card While Recording Movies on a memory card when the 16:9 format is... switch to OFF and then back to a computer or PictBridge compliant printer will be recorded on a Tape When you are locked. ❍ The camcorder shuts off the ND filter: Open the menu and select [CAMERA SETUP]. Select [ND], set it is adjusted and the still image can record ...

OPTURA40 OPTURA30 Instruction Manual
Page 125
...for details. - Do not detach the cable. - Select [OK] and press the SET dial. - Canon Bubble Jet Printer: Resolve the error. Turn the POWER switch of the TAPE/CARD switch. - Direct Printing 125 button. ❍ Observe the following precautions during printing, otherwise printing ...the paper is complete. Disconnect the cable. 2. Disconnect the cable from camcorder and printer and reconnect the camcorder to continue printing, select another still image with some error messages. The print setting menu disappears when printing is fed through. - Do not open the memory card...
...for details. - Do not detach the cable. - Select [OK] and press the SET dial. - Canon Bubble Jet Printer: Resolve the error. Turn the POWER switch of the TAPE/CARD switch. - Direct Printing 125 button. ❍ Observe the following precautions during printing, otherwise printing ...the paper is complete. Disconnect the cable. 2. Disconnect the cable from camcorder and printer and reconnect the camcorder to continue printing, select another still image with some error messages. The print setting menu disappears when printing is fed through. - Do not open the memory card...


