
Network Setup Guide
Page 43
The following ink tanks are compatible with this product. For information on product specifications, please visit our website at www.canon-asia.com canon.com.au www.canon.ca canon.co.nz www.usa.canon.com QT5-1156-V01 XXXXXXXX ©CANON INC.2008 PRINTED IN THAILAND
The following ink tanks are compatible with this product. For information on product specifications, please visit our website at www.canon-asia.com canon.com.au www.canon.ca canon.co.nz www.usa.canon.com QT5-1156-V01 XXXXXXXX ©CANON INC.2008 PRINTED IN THAILAND
Quick Start Guide
Page 4
... manual of your application program, operations may be transmitted or copied in the U.S. z "Macintosh" and "Mac" are not intended to your Canon PIXMA MX850 series Office All-In-One. About Consumables Consumables (ink tanks / FINE Cartridges) are in this product meets the ENERGY STAR guidelines for 5 years after production has stopped. has determined that...
... manual of your application program, operations may be transmitted or copied in the U.S. z "Macintosh" and "Mac" are not intended to your Canon PIXMA MX850 series Office All-In-One. About Consumables Consumables (ink tanks / FINE Cartridges) are in this product meets the ENERGY STAR guidelines for 5 years after production has stopped. has determined that...
Quick Start Guide
Page 5
...98 Document Stored in Memory 99 Summary of Reports and Lists 103 Routine Maintenance 107 Replacing an Ink Tank 107 Keeping the Best Printing Results 113 When Printing Becomes Faint or Colors Are Incorrect 114 Printing the Nozzle Check Pattern 115 Examining the Nozzle Check Pattern ......... 116 ...Properly ...... 140 Print Results Not Satisfactory 141 The Print Result Not Satisfactory When Copying 144 Printing Does Not Start 145 Machine Moves But Ink Is Not Ejected....... 146 Paper Does Not Feed Properly 146 Paper Does Not Feed from the Paper Source Specified in the Printer Driver ...
...98 Document Stored in Memory 99 Summary of Reports and Lists 103 Routine Maintenance 107 Replacing an Ink Tank 107 Keeping the Best Printing Results 113 When Printing Becomes Faint or Colors Are Incorrect 114 Printing the Nozzle Check Pattern 115 Examining the Nozzle Check Pattern ......... 116 ...Properly ...... 140 Print Results Not Satisfactory 141 The Print Result Not Satisfactory When Copying 144 Printing Does Not Start 145 Machine Moves But Ink Is Not Ejected....... 146 Paper Does Not Feed Properly 146 Paper Does Not Feed from the Paper Source Specified in the Printer Driver ...
Quick Start Guide
Page 9
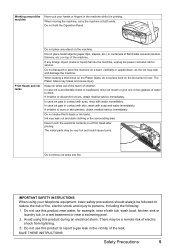
... immediately. Do not use this product near a swimming pool. 2. When moving the machine, carry the machine at both ends. Print Heads and ink tanks Do not place any foreign object (metal or liquid) fall into fire. Do not transport or store the machine on the machine. When loading... may be very hot and could cause burns. Avoid using your hands or fingers in contact with skin, wash with water immediately. In case ink is printing. If irritation to drink. Never touch the electrical contacts on the Document Cover. SAVE THESE INSTRUCTIONS Safety Precautions 5 The Platen Glass...
... immediately. Do not use this product near a swimming pool. 2. When moving the machine, carry the machine at both ends. Print Heads and ink tanks Do not place any foreign object (metal or liquid) fall into fire. Do not transport or store the machine on the machine. When loading... may be very hot and could cause burns. Avoid using your hands or fingers in contact with skin, wash with water immediately. In case ink is printing. If irritation to drink. Never touch the electrical contacts on the Document Cover. SAVE THESE INSTRUCTIONS Safety Precautions 5 The Platen Glass...
Quick Start Guide
Page 10
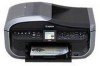
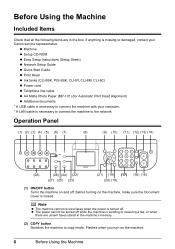
... your computer. * A LAN cable is necessary to connect the machine to connect the machine with your Canon service representative. z Machine z Setup CD-ROM z Easy Setup Instructions (Setup Sheet) z Network Setup Guide z Quick Start Guide z Print Head z Ink tanks (CLI-8BK, PGI-5BK, CLI-8Y, CLI-8M, CLI-8C) z Power cord z Telephone line...
... your computer. * A LAN cable is necessary to connect the machine to connect the machine with your Canon service representative. z Machine z Setup CD-ROM z Easy Setup Instructions (Setup Sheet) z Network Setup Guide z Quick Start Guide z Print Head z Ink tanks (CLI-8BK, PGI-5BK, CLI-8Y, CLI-8M, CLI-8C) z Power cord z Telephone line...
Quick Start Guide
Page 11
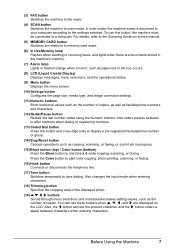
...or faxing, or a print job in the machine's memory. (7) Alarm lamp Lights or flashes orange when an error, such as paper-out or ink-out, occurs. (8) LCD (Liquid Crystal Display) Displays messages, menu selections, and the operational status. (9) Menu button Displays the menu screen. (10... 7 To use these buttons when {, }, [, and ] are documents stored in progress. (15) Black button (top) / Color button (bottom) Press the Black button to start color copying, photo printing, scanning, or faxing. (16) Hook button Connects or disconnects the telephone line. (17) Tone button Switches ...
...or faxing, or a print job in the machine's memory. (7) Alarm lamp Lights or flashes orange when an error, such as paper-out or ink-out, occurs. (8) LCD (Liquid Crystal Display) Displays messages, menu selections, and the operational status. (9) Menu button Displays the menu screen. (10... 7 To use these buttons when {, }, [, and ] are documents stored in progress. (15) Black button (top) / Color button (bottom) Press the Black button to start color copying, photo printing, scanning, or faxing. (16) Hook button Connects or disconnects the telephone line. (17) Tone button Switches ...
Quick Start Guide
Page 18
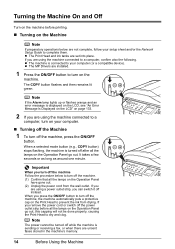
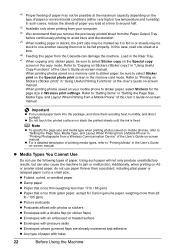
.... 2 If you press the ON/OFF button to turn off the machine, the machine automatically puts a protective cap on the Print Head to prevent the ink from the wall outlet. Important When you remove the power cord or switch off the machine. (1) Confirm that all the lamps on the Operation Panel... the Operation Panel go out. Note The power cannot be done properly, causing the Print Head to turn on the machine. z The Print Head and ink tanks are installed. 1 Press the ON/OFF button to dry and clog.
.... 2 If you press the ON/OFF button to turn off the machine, the machine automatically puts a protective cap on the Print Head to prevent the ink from the wall outlet. Important When you remove the power cord or switch off the machine. (1) Confirm that all the lamps on the Operation Panel... the Operation Panel go out. Note The power cannot be done properly, causing the Print Head to turn on the machine. z The Print Head and ink tanks are installed. 1 Press the ON/OFF button to dry and clog.
Quick Start Guide
Page 20
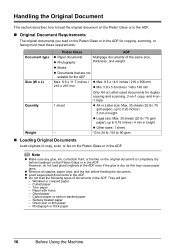
...-backed paper - z Load Legal-sized documents in the ADF even if the glue is completely dry before feeding the document. Note z Make sure any glue, ink, correction fluid, or the like on the original document is dry, as this may cause paper jams. z Remove all staples, paper clips, and the like...
...-backed paper - z Load Legal-sized documents in the ADF even if the glue is completely dry before feeding the document. Note z Make sure any glue, ink, correction fluid, or the like on the original document is dry, as this may cause paper jams. z Remove all staples, paper clips, and the like...
Quick Start Guide
Page 26
... store them not to be possible at a time to around half. *3 Available only when printing from your mobile phone to sticker paper, select Stickers for Canon genuine paper, weighing more than 28 lb / 105 gsm) z Picture postcards z Postcards affixed with photos or stickers z Envelopes with a double flap (or sticker flaps) z Envelopes... side may be marked as it is fed in the copy mode. z Do not touch the printed surface nor stack the printed sheets until the ink is too thick (plain paper, except for the page size in "Using Useful Copy Functions" of the User's Guide on the type of paper or...
... store them not to be possible at a time to around half. *3 Available only when printing from your mobile phone to sticker paper, select Stickers for Canon genuine paper, weighing more than 28 lb / 105 gsm) z Picture postcards z Postcards affixed with photos or stickers z Envelopes with a double flap (or sticker flaps) z Envelopes... side may be marked as it is fed in the copy mode. z Do not touch the printed surface nor stack the printed sheets until the ink is too thick (plain paper, except for the page size in "Using Useful Copy Functions" of the User's Guide on the type of paper or...
Quick Start Guide
Page 102
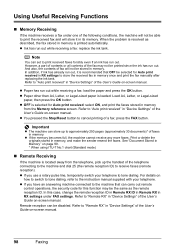
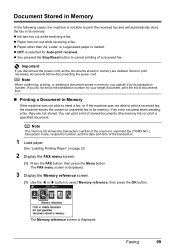
...printed automatically. z You pressed the Stop/Reset button to print received faxes forcibly even if an ink has run out, it in memory once and print the fax manually after replacing the ink tank. Refer to print the received fax and will store it is located away from the Memory... "Device Settings" of faxes in memory. Refer to approximately 250 pages (approximately 30 documents)* of the User's Guide on-screen manual. 98 Faxing z Ink has run out while receiving a fax: load the paper and press the OK button. z If the memory becomes full, the machine cannot receive any more...
...printed automatically. z You pressed the Stop/Reset button to print received faxes forcibly even if an ink has run out, it in memory once and print the fax manually after replacing the ink tank. Refer to print the received fax and will store it is located away from the Memory... "Device Settings" of faxes in memory. Refer to approximately 250 pages (approximately 30 documents)* of the User's Guide on-screen manual. 98 Faxing z Ink has run out while receiving a fax: load the paper and press the OK button. z If the memory becomes full, the machine cannot receive any more...
Quick Start Guide
Page 103
.... z Paper has run out while receiving a fax. z You pressed the Stop/Reset button to cancel printing of documents first. „ Printing a Document in its memory: z Ink has run out while receiving a fax. If you do not know the transaction number for Auto print received. See "Loading Printing Paper" on page 20...
.... z Paper has run out while receiving a fax. z You pressed the Stop/Reset button to cancel printing of documents first. „ Printing a Document in its memory: z Ink has run out while receiving a fax. If you do not know the transaction number for Auto print received. See "Loading Printing Paper" on page 20...
Quick Start Guide
Page 111
... label on page 114. „ Getting the Ink Status Information You can continue printing for a few seconds. (A) (A) Confirm whether any symbols are displayed here. z For information on the compatible ink tanks, see "When Printing Becomes Faint or Colors Are Incorrect" on the Print Head Holder. Note... z Be sure to handle it. The current ink level will not print if an ink tank is turned on your computer screen as ...
... label on page 114. „ Getting the Ink Status Information You can continue printing for a few seconds. (A) (A) Confirm whether any symbols are displayed here. z For information on the compatible ink tanks, see "When Printing Becomes Faint or Colors Are Incorrect" on the Print Head Holder. Note... z Be sure to handle it. The current ink level will not print if an ink tank is turned on your computer screen as ...

Quick Start Guide
Page 112
...134 and take appropriate action. (B) (B) Empty ink tank. z Ink lamp is enough ink remaining to print. If the ink tank is not set properly or the function for detecting the remaining ink level is in the wrong position or it with a new one . on the ink tank until the tank clicks into place, make...You can confirm the status of the machine to have a new ink tank available. If it is disabled, replace the ink tank with a new one . See ""The ink has run out. Open the Scanning Unit (Printer Cover) of each ink tank by the label on page 133. 108 Routine Maintenance If the...
...134 and take appropriate action. (B) (B) Empty ink tank. z Ink lamp is enough ink remaining to print. If the ink tank is not set properly or the function for detecting the remaining ink level is in the wrong position or it with a new one . on the ink tank until the tank clicks into place, make...You can confirm the status of the machine to have a new ink tank available. If it is disabled, replace the ink tank with a new one . See ""The ink has run out. Open the Scanning Unit (Printer Cover) of each ink tank by the label on page 133. 108 Routine Maintenance If the...
Quick Start Guide
Page 113
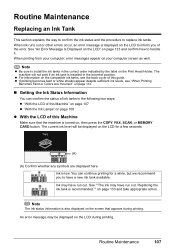
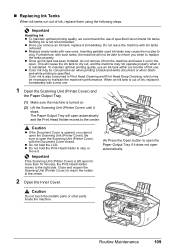
... the machine's performance. „ Replacing Ink Tanks When ink tanks run out of specified Canon brand ink tanks. Important Handling Ink z To maintain optimal printing quality, we recommend the use . z Replace empty tanks with ink tanks removed. This will open automatically.... z Once you cannot open for more than 10 minutes, the Print Head Holder moves to the center. z Color ink...
... the machine's performance. „ Replacing Ink Tanks When ink tanks run out of specified Canon brand ink tanks. Important Handling Ink z To maintain optimal printing quality, we recommend the use . z Replace empty tanks with ink tanks removed. This will open automatically.... z Once you cannot open for more than 10 minutes, the Print Head Holder moves to the center. z Color ink...
Quick Start Guide
Page 114
.... (3) Remove the film (D) completely. Important z Handle ink tanks carefully to prevent the ink from the ink tank in the direction of the ink tank. 3 Remove the ink tank whose lamp is removed. Note z Do not remove more than one ink tank. z For details on ink lamp flashing speed, see "Getting the Ink Status Information" on the air hole...
.... (3) Remove the film (D) completely. Important z Handle ink tanks carefully to prevent the ink from the ink tank in the direction of the ink tank. 3 Remove the ink tank whose lamp is removed. Note z Do not remove more than one ink tank. z For details on ink lamp flashing speed, see "Getting the Ink Status Information" on the air hole...

Quick Start Guide
Page 115
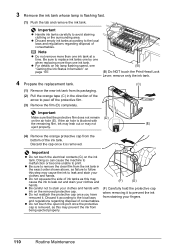
...paper cannot be used unless all the ink tanks to print. 5 Install the ink tank. (1) Insert the front end of the ink tank into the Print Head. (H) (1) (H) Make sure the position of the tank matches the label. (2) Press on the mark on the ink tank until the ink tank snaps firmly into place. (3) ...Make sure that the Inner Cover is closed. Important Install all the ink tanks are installed. 6 Close the Inner Cover. Note Make sure that the...
...paper cannot be used unless all the ink tanks to print. 5 Install the ink tank. (1) Insert the front end of the ink tank into the Print Head. (H) (1) (H) Make sure the position of the tank matches the label. (2) Press on the mark on the ink tank until the ink tank snaps firmly into place. (3) ...Make sure that the Inner Cover is closed. Important Install all the ink tanks are installed. 6 Close the Inner Cover. Note Make sure that the...
Quick Start Guide
Page 116
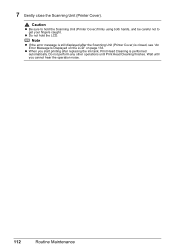
... hear the operation noise. 112 Routine Maintenance 7 Gently close the Scanning Unit (Printer Cover). Note z If the error message is still displayed after replacing the ink tank, Print Head Cleaning is closed, see "An Error Message Is Displayed on the LCD" on page 133. Wait until Print Head Cleaning finishes. z Do...
... hear the operation noise. 112 Routine Maintenance 7 Gently close the Scanning Unit (Printer Cover). Note z If the error message is still displayed after replacing the ink tank, Print Head Cleaning is closed, see "An Error Message Is Displayed on the LCD" on page 133. Wait until Print Head Cleaning finishes. z Do...
Quick Start Guide
Page 117
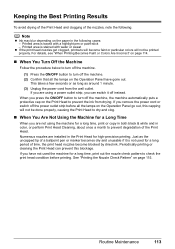
... machine automatically puts a protective cap on the Operation Panel have not used for a long period of time, the print head nozzles become faint or particular colors will not be done properly, causing the Print Head to dry and clog. „ When You Are Not Using the Machine for a long time,... on the paper in the Print Head for a long time, print or copy in both black & white and in color, or perform Print Head Cleaning, about once a month to prevent the ink from the wall outlet. Printed area is stained with a highlight pen or paint-stick - Periodically printing or cleaning the ...
... machine automatically puts a protective cap on the Operation Panel have not used for a long period of time, the print head nozzles become faint or particular colors will not be done properly, causing the Print Head to dry and clog. „ When You Are Not Using the Machine for a long time,... on the paper in the Print Head for a long time, print or copy in both black & white and in color, or perform Print Head Cleaning, about once a month to prevent the ink from the wall outlet. Printed area is stained with a highlight pen or paint-stick - Periodically printing or cleaning the ...
Quick Start Guide
Page 118
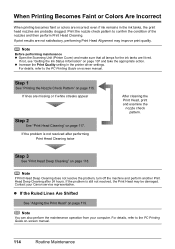
... can also perform the maintenance operation from your Canon service representative. When Printing Becomes Faint or Colors Are Incorrect When printing becomes faint or colors are incorrect even if ink remains in the printer driver settings. If not, see "Getting the Ink Status Information" on page 115. If the ... details, refer to confirm the condition of the nozzles and then perform Print Head Cleaning. z Increase the Print Quality setting in the ink tanks, the print head nozzles are lit red. For details, refer to the PC Printing Guide on page 118. If lines are ...
... can also perform the maintenance operation from your Canon service representative. When Printing Becomes Faint or Colors Are Incorrect When printing becomes faint or colors are incorrect even if ink remains in the printer driver settings. If not, see "Getting the Ink Status Information" on page 115. If the ... details, refer to confirm the condition of the nozzles and then perform Print Head Cleaning. z Increase the Print Quality setting in the ink tanks, the print head nozzles are lit red. For details, refer to the PC Printing Guide on page 118. If lines are ...
Quick Start Guide
Page 119
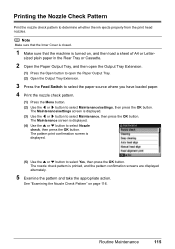
... the [ or ] button to select Maintenance, then press the OK button. The Maintenance/settings screen is displayed. (4) Use the { or } button to determine whether the ink ejects properly from the print head nozzles. The pattern print confirmation screen is displayed. (5) Use the { or } button to select Maintenance/settings, then press the...
... the [ or ] button to select Maintenance, then press the OK button. The Maintenance/settings screen is displayed. (4) Use the { or } button to determine whether the ink ejects properly from the print head nozzles. The pattern print confirmation screen is displayed. (5) Use the { or } button to select Maintenance/settings, then press the...


