MX310 series Quick Start Guide
Page 5
... of Contents Before Using the Machine 2 Operation Panel 2 Menu Items 4 Turning the Machine On and Off 6 Handling the Original Document 8 Loading Printing Paper 11 Copying 19 Making Copies 19 Changing the Copy Settings 19 Using Useful Copy Functions 21 Printing from Your Computer 22 Printing with Windows 22 Printing with Macintosh 23 Scanning Images 24 Scanning Methods 24 Printing Photographs Directly from a Compliant Device 25 Printing Photographs Directly from a Compliant Device 25 About PictBridge Print Settings 27 Faxing 30 Preparing the Machine for Fax 30 Registering...
... of Contents Before Using the Machine 2 Operation Panel 2 Menu Items 4 Turning the Machine On and Off 6 Handling the Original Document 8 Loading Printing Paper 11 Copying 19 Making Copies 19 Changing the Copy Settings 19 Using Useful Copy Functions 21 Printing from Your Computer 22 Printing with Windows 22 Printing with Macintosh 23 Scanning Images 24 Scanning Methods 24 Printing Photographs Directly from a Compliant Device 25 Printing Photographs Directly from a Compliant Device 25 About PictBridge Print Settings 27 Faxing 30 Preparing the Machine for Fax 30 Registering...
MX310 series Quick Start Guide
Page 6
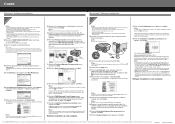
Before turning on the machine, make sure the Document Cover is closed. (2) COPY button Switches the machine to copy mode. (3) In Use/Memory lamp Flashes when the telephone line is in the machine's memory. (4) FAX button Switches the machine to fax mode. (5) Alarm lamp Lights or flashes orange when an error, such as paper-out or ink-out, occurs. (6) SCAN button Switches the machine to scan mode. Lights when there are documents stored in use this button, the machine must be connected to indicate the power status. For details, refer to...
Before turning on the machine, make sure the Document Cover is closed. (2) COPY button Switches the machine to copy mode. (3) In Use/Memory lamp Flashes when the telephone line is in the machine's memory. (4) FAX button Switches the machine to fax mode. (5) Alarm lamp Lights or flashes orange when an error, such as paper-out or ink-out, occurs. (6) SCAN button Switches the machine to scan mode. Lights when there are documents stored in use this button, the machine must be connected to indicate the power status. For details, refer to...
MX310 series Quick Start Guide
Page 8
... STICKER COPY BORDERLESS COPY IMAGE REPEAT 2-ON-1 4-ON-1 COLLATED COPY FAX SETTINGS See "FAX SETTINGS" in any mode. For details, refer to the machine. Note z You can select DEVICE SETTINGS and MAINTENANCE in FAX mode. You can specify the various print settings in copy mode, or page size and media type settings in fax mode by using these menu items. Press the Settings button to display the setting items in copy mode or fax mode. z Direct Printing mode is displayed only when a PictBridge compliant device is connected to the User's Guide on-screen manual. Menu...
... STICKER COPY BORDERLESS COPY IMAGE REPEAT 2-ON-1 4-ON-1 COLLATED COPY FAX SETTINGS See "FAX SETTINGS" in any mode. For details, refer to the machine. Note z You can select DEVICE SETTINGS and MAINTENANCE in FAX mode. You can specify the various print settings in copy mode, or page size and media type settings in fax mode by using these menu items. Press the Settings button to display the setting items in copy mode or fax mode. z Direct Printing mode is displayed only when a PictBridge compliant device is connected to the User's Guide on-screen manual. Menu...
MX310 series Quick Start Guide
Page 9
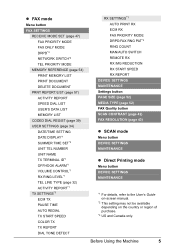
...FAX mode Menu button FAX SETTINGS RECEIVE MODE SET (page 47) FAX PRIORITY MODE FAX ONLY MODE DRPD*3 NETWORK SWITCH*2 TEL PRIORITY MODE MEMORY REFERENCE (page 54) PRINT MEMORY LIST PRINT DOCUMENT DELETE DOCUMENT PRNT REPORT/LIST (page 57) ACTIVITY REPORT SPEED DIAL LIST USER'S DATA LIST MEMORY LIST CODED DIAL REGIST (page 39) USER SETTINGS (page 34) DATE/TIME SETTING DATE DISPLAY*1 SUMMER TIME SET*2 UNIT TEL NUMBER UNIT NAME TX TERMINAL ID*1 OFFHOOK ALARM*1 VOLUME CONTROL*1 RX RING LEVEL*1 TEL LINE TYPE (page 32) ACTIVITY REPORT*1 TX SETTINGS*1 ECM TX PAUSE TIME AUTO REDIAL TX START SPEED COLOR...
...FAX mode Menu button FAX SETTINGS RECEIVE MODE SET (page 47) FAX PRIORITY MODE FAX ONLY MODE DRPD*3 NETWORK SWITCH*2 TEL PRIORITY MODE MEMORY REFERENCE (page 54) PRINT MEMORY LIST PRINT DOCUMENT DELETE DOCUMENT PRNT REPORT/LIST (page 57) ACTIVITY REPORT SPEED DIAL LIST USER'S DATA LIST MEMORY LIST CODED DIAL REGIST (page 39) USER SETTINGS (page 34) DATE/TIME SETTING DATE DISPLAY*1 SUMMER TIME SET*2 UNIT TEL NUMBER UNIT NAME TX TERMINAL ID*1 OFFHOOK ALARM*1 VOLUME CONTROL*1 RX RING LEVEL*1 TEL LINE TYPE (page 32) ACTIVITY REPORT*1 TX SETTINGS*1 ECM TX PAUSE TIME AUTO REDIAL TX START SPEED COLOR...
MX310 series Quick Start Guide
Page 21
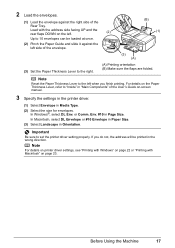
... the Paper Guide and slide it against the right side of the envelope. (B) (1) (3) (A) (3) Set the Paper Thickness Lever to set the printer driver setting properly. Load with Macintosh" on page 23. In Windows®, select DL Env. Note For details on printer driver settings, see "Printing with Windows" on page 22 or "Printing with the address side facing UP and the rear flaps DOWN on -screen manual. 3 Specify the settings in the printer driver. (1) Select Envelope in the...
... the Paper Guide and slide it against the right side of the envelope. (B) (1) (3) (A) (3) Set the Paper Thickness Lever to set the printer driver setting properly. Load with Macintosh" on page 23. In Windows®, select DL Env. Note For details on printer driver settings, see "Printing with Windows" on page 22 or "Printing with the address side facing UP and the rear flaps DOWN on -screen manual. 3 Specify the settings in the printer driver. (1) Select Envelope in the...
MX310 series Quick Start Guide
Page 48
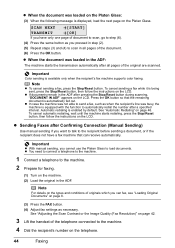
... Confirming Connection (Manual Sending) Use manual sending if you pressed in the ADF. To cancel automatic redialing, wait until the machine starts redialing, press the Stop/Reset button, then follow the instructions on the LCD. Note For details on the types and conditions of the original are scanned. z Sending Faxes after a specified interval. z When the document was loaded on the Platen Glass: (3) When the following message is available only when the recipient's fax machine supports color faxing...
... Confirming Connection (Manual Sending) Use manual sending if you pressed in the ADF. To cancel automatic redialing, wait until the machine starts redialing, press the Stop/Reset button, then follow the instructions on the LCD. Note For details on the types and conditions of the original are scanned. z Sending Faxes after a specified interval. z When the document was loaded on the Platen Glass: (3) When the following message is available only when the recipient's fax machine supports color faxing...
MX310 series Quick Start Guide
Page 63
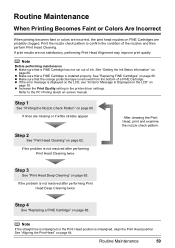
... Ink Status Information" on page 69. See "Replacing FINE Cartridges" on page 66. z Make sure that the orange protective tape is displayed on the LCD, see "An Error Message Is Displayed on the LCD" on page 78. z If the error message is removed from the bottom of a FINE Cartridge. z Increase the Print Quality setting in the printer driver settings. Step 1 See "Printing the Nozzle Check Pattern" on page 64. See "Aligning the Print Head" on page 60. z Make...
... Ink Status Information" on page 69. See "Replacing FINE Cartridges" on page 66. z Make sure that the orange protective tape is displayed on the LCD, see "An Error Message Is Displayed on the LCD" on page 78. z If the error message is removed from the bottom of a FINE Cartridge. z Increase the Print Quality setting in the printer driver settings. Step 1 See "Printing the Nozzle Check Pattern" on page 64. See "Aligning the Print Head" on page 60. z Make...
MX310 series Quick Start Guide
Page 73
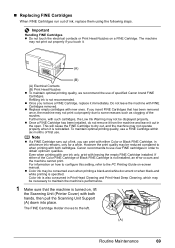
... printing quality, we recommend the use of the nozzles. The FINE Cartridge Holder moves to maintain the machine's performance. 1 Make sure that has been removed once, the machine may not operate properly when it out in whichever ink remains, only for a while. Color ink is turned on, lift the Scanning Unit (Printer Cover) with both hands, then pull the Scanning Unit Support (A) down into place. z Once you can print with new...
... printing quality, we recommend the use of the nozzles. The FINE Cartridge Holder moves to maintain the machine's performance. 1 Make sure that has been removed once, the machine may not operate properly when it out in whichever ink remains, only for a while. Color ink is turned on, lift the Scanning Unit (Printer Cover) with both hands, then pull the Scanning Unit Support (A) down into place. z Once you can print with new...
MX310 series Quick Start Guide
Page 81
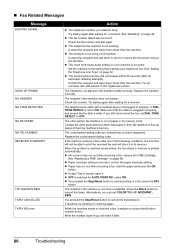
... Install the MP Drivers" on page 82 z "Cannot Connect to Computer Properly" on page 83 z "Print Results Not Satisfactory" on page 84 z "The Print Result Not Satisfactory When Copying" on page 88 z "Printing Does Not Start" on page 88 z "Paper Does Not Feed Properly" on page 89 z "Paper Jams" on page 90 z "Document Jams" on page 91 z "Error Message Appears on the Computer Screen" on page 94 z "Error Message Appears on a PictBridge Compliant Device" on page 96 z "Scanning Problems" on page 97 z "Problems Receiving Faxes" on page...
... Install the MP Drivers" on page 82 z "Cannot Connect to Computer Properly" on page 83 z "Print Results Not Satisfactory" on page 84 z "The Print Result Not Satisfactory When Copying" on page 88 z "Printing Does Not Start" on page 88 z "Paper Does Not Feed Properly" on page 89 z "Paper Jams" on page 90 z "Document Jams" on page 91 z "Error Message Appears on the Computer Screen" on page 94 z "Error Message Appears on a PictBridge Compliant Device" on page 96 z "Scanning Problems" on page 97 z "Problems Receiving Faxes" on page...
MX310 series Quick Start Guide
Page 82
... the machine. Replace the empty ink cartridge immediately after connecting the device to continue printing, press the Stop/Reset button for any malfunction or trouble caused by continuation of your device, you may also have run out. Open the Scanning Unit (Printer Cover) and install the FINE Cartridge properly. You may have to select a PictBridge compliant print mode on your device referring to use new genuine Canon cartridges in the correct position. Canon recommends to its instruction manual. Ink has...
... the machine. Replace the empty ink cartridge immediately after connecting the device to continue printing, press the Stop/Reset button for any malfunction or trouble caused by continuation of your device, you may also have run out. Open the Scanning Unit (Printer Cover) and install the FINE Cartridge properly. You may have to select a PictBridge compliant print mode on your device referring to use new genuine Canon cartridges in the correct position. Canon recommends to its instruction manual. Ink has...
MX310 series Quick Start Guide
Page 83
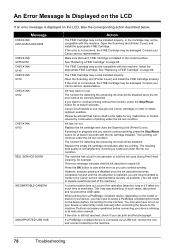
... COPY in SPECIAL COPY. You are loading meets the machine's requirements before printing out received data. See "Document Jams" on the machine. Message CHECK PRINTER SCANNER ERROR LOAD PAPER PAPER JAMMED CANNOT SCAN FROM ADF CHANGE PAPER TO CHECK DOCUMENT CLEAR DOC. [OK] STOP DOC CLR [STOP] COVER IS OPEN DEVICE IN USE CANNOT TURN OFF DOCUMENT IN ADF DOCUMENT TOO LONG MEMORY IS FULL Action Turn off the machine. After you tried to a size other than A4, Letter or Legal. Operate again after loading documents. Remove the document page jammed in the ADF. z The machine's memory...
... COPY in SPECIAL COPY. You are loading meets the machine's requirements before printing out received data. See "Document Jams" on the machine. Message CHECK PRINTER SCANNER ERROR LOAD PAPER PAPER JAMMED CANNOT SCAN FROM ADF CHANGE PAPER TO CHECK DOCUMENT CLEAR DOC. [OK] STOP DOC CLR [STOP] COVER IS OPEN DEVICE IN USE CANNOT TURN OFF DOCUMENT IN ADF DOCUMENT TOO LONG MEMORY IS FULL Action Turn off the machine. After you tried to a size other than A4, Letter or Legal. Operate again after loading documents. Remove the document page jammed in the ADF. z The machine's memory...
MX310 series Quick Start Guide
Page 84
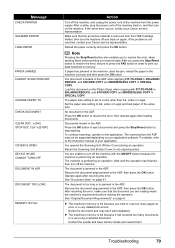
... coded speed dialing code you entered has not been registered. If the machine receives a fax under one of the following conditions, the machine will not be able to send or receive the document using a G3 machine. z Paper size/type setting is selected for AUTO PRINT RX: select ON. z OFF is incorrect: correct the paper size/type setting. Write the number down if you will store it assigns a unique identification number (nnnn). See "Setting the Telephone Line Type" on page 66. Replace...
... coded speed dialing code you entered has not been registered. If the machine receives a fax under one of the following conditions, the machine will not be able to send or receive the document using a G3 machine. z Paper size/type setting is selected for AUTO PRINT RX: select ON. z OFF is incorrect: correct the paper size/type setting. Write the number down if you will store it assigns a unique identification number (nnnn). See "Setting the Telephone Line Type" on page 66. Replace...
MX310 series Quick Start Guide
Page 86
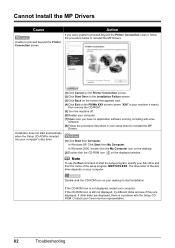
... and see if they are displayed, there is your machine's name), then remove the CD-ROM. (5)Turn the machine off. (6)Restart your computer. (7)Make sure you were unable to proceed beyond the Printer Connection screen, follow the procedure below to proceed beyond the Printer Connection screen. Cannot Install the MP Drivers Cause Unable to reinstall the MP Drivers. Installation does not start installation. In Windows 2000, double-click the My Computer icon...
... and see if they are displayed, there is your machine's name), then remove the CD-ROM. (5)Turn the machine off. (6)Restart your computer. (7)Make sure you were unable to proceed beyond the Printer Connection screen, follow the procedure below to proceed beyond the Printer Connection screen. Cannot Install the MP Drivers Cause Unable to reinstall the MP Drivers. Installation does not start installation. In Windows 2000, double-click the My Computer icon...
MX310 series Quick Start Guide
Page 88
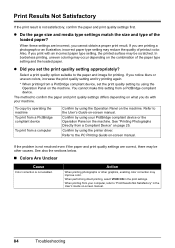
... compliant device, set the print quality setting appropriately? When these settings are printing a photograph or an illustration, incorrect paper type setting may be other graphics, enabling color correction may be scratched. The method to the paper and image for printing. To copy by operating the machine To print from a PictBridge compliant device To print from a Compliant Device" on the machine. See "Printing Photographs Directly from a computer Confirm by using your machine. Confirm by using the Operation Panel on page 25. Print Results...
... compliant device, set the print quality setting appropriately? When these settings are printing a photograph or an illustration, incorrect paper type setting may be other graphics, enabling color correction may be scratched. The method to the paper and image for printing. To copy by operating the machine To print from a PictBridge compliant device To print from a Compliant Device" on the machine. See "Printing Photographs Directly from a computer Confirm by using your machine. Confirm by using the Operation Panel on page 25. Print Results...
MX310 series Quick Start Guide
Page 91
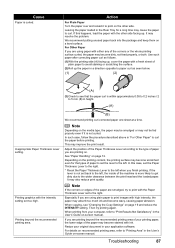
... paper you finish printing. In such case, follow the procedure described above in the Rear Tray for the types of the machine is within approximately 0.08 to 0.2 inches / 2 to 5 mm (B) in the User's Guide on the media type, the paper may be fed properly even if it to print on the printing content, the printing surface may cause the paper to see "Changing the Copy Settings...
... paper you finish printing. In such case, follow the procedure described above in the Rear Tray for the types of the machine is within approximately 0.08 to 0.2 inches / 2 to 5 mm (B) in the User's Guide on the media type, the paper may be fed properly even if it to print on the printing content, the printing surface may cause the paper to see "Changing the Copy Settings...
MX310 series Quick Start Guide
Page 100
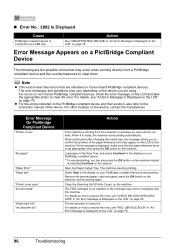
... error messages and operations may appear on the LCD on the device, contact the manufacturer. For details, see "An Error Message Is Displayed on the LCD" on the device you are using. Error Message On PictBridge Compliant Device "Printer in the display on the machine. Open the Paper Output Tray. Select Stop in use" "No paper" "Paper Error" "Paper jam" "Printer cover open" "No print head" "Waste tank full"/ "Ink absorber full" Action If the machine is ready, the machine starts printing automatically. Close the Scanning Unit (Printer Cover...
... error messages and operations may appear on the LCD on the device, contact the manufacturer. For details, see "An Error Message Is Displayed on the LCD" on the device you are using. Error Message On PictBridge Compliant Device "Printer in the display on the machine. Open the Paper Output Tray. Select Stop in use" "No paper" "Paper Error" "Paper jam" "Printer cover open" "No print head" "Waste tank full"/ "Ink absorber full" Action If the machine is ready, the machine starts printing automatically. Close the Scanning Unit (Printer Cover...
MX310 series Quick Start Guide
Page 103
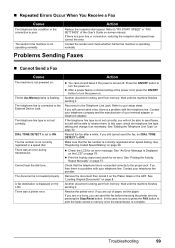
... set correctly, you can send the fax before resolving the printer error by pressing the Stop/Reset button. The telephone line is not correctly registered in "FAX SETTINGS" of your telephone line provider. The fax number is connected to turn the power on page 57. Remove the document then reload it . The telephone line type is set correctly. DIAL TONE DETECT is not set to "RX START SPEED" in a speed dial. There was an error during transmission. See "Printing the Activity Report Manually...
... set correctly, you can send the fax before resolving the printer error by pressing the Stop/Reset button. The telephone line is not correctly registered in "FAX SETTINGS" of your telephone line provider. The fax number is connected to turn the power on page 57. Remove the document then reload it . The telephone line type is set correctly. DIAL TONE DETECT is not set to "RX START SPEED" in a speed dial. There was an error during transmission. See "Printing the Activity Report Manually...
MX310 series Quick Start Guide
Page 118
... during the limited warranty period, Canon USA offers two hardware support options: Authorized Service Facility Carry-In / Mail-In Service Canon USA's Carry-In/Mail-In Service provides repair or exchange, at www.canontechsupport.com or by Canon USA. This limited warranty gives you specific legal rights, and you may be covered for the replacement Product (must be repaired or exchanged, as determined by...
... during the limited warranty period, Canon USA offers two hardware support options: Authorized Service Facility Carry-In / Mail-In Service Canon USA's Carry-In/Mail-In Service provides repair or exchange, at www.canontechsupport.com or by Canon USA. This limited warranty gives you specific legal rights, and you may be covered for the replacement Product (must be repaired or exchanged, as determined by...
MX310 series Easy Setup Instructions
Page 1
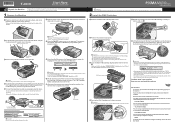
... Setup Instructions Unpack the Machine • Please confirm the included items against the illustration printed on the lid of the packing box. • A USB cable is necessary to wipe it gently. Scanning Unit (Printer Cover) Power Cord Important • Make sure that the message "COVER IS OPEN" is displayed on the LCD and the FINE Cartridge Holder has moved to the LANGUAGE SETTING screen. LANGUAGE SETTING [ ENGLISH ] Protective Material Caution Before turning...
... Setup Instructions Unpack the Machine • Please confirm the included items against the illustration printed on the lid of the packing box. • A USB cable is necessary to wipe it gently. Scanning Unit (Printer Cover) Power Cord Important • Make sure that the message "COVER IS OPEN" is displayed on the LCD and the FINE Cartridge Holder has moved to the LANGUAGE SETTING screen. LANGUAGE SETTING [ ENGLISH ] Protective Material Caution Before turning...
MX310 series Easy Setup Instructions
Page 2
... or print quality is located on -screen instructions to register your administrator name and password. g When the list of applications to display explanations of the machine. Note Move the cursor over items to "Troubleshooting" instructions in the User's Guide on -screen instructions and click OK. Screens may vary depending on the operating system you want to select particular items to install, click Custom Install and follow the on -screen manual. USB →...
... or print quality is located on -screen instructions to register your administrator name and password. g When the list of applications to display explanations of the machine. Note Move the cursor over items to "Troubleshooting" instructions in the User's Guide on -screen instructions and click OK. Screens may vary depending on the operating system you want to select particular items to install, click Custom Install and follow the on -screen manual. USB →...


