User's Guide
Page 16
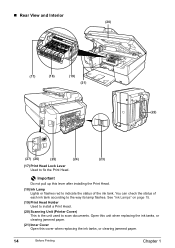
... according to the way its lamp flashes. You can check the status of the ink tank. See "Ink Lamps" on page 15. (19) Print Head Holder Used to install a Print Head. (20) Scanning Unit (Printer Cover) This is the unit used to fix the Print Head. „ Rear View and Interior (20) (17...) (18) (19) (21) (22) (27) (26) (25) (24) (23) (17) Print Head Lock Lever Used to scan documents. Important Do not pull up this cover when replacing the ink tanks, or...
... according to the way its lamp flashes. You can check the status of the ink tank. See "Ink Lamps" on page 15. (19) Print Head Holder Used to install a Print Head. (20) Scanning Unit (Printer Cover) This is the unit used to fix the Print Head. „ Rear View and Interior (20) (17...) (18) (19) (21) (22) (27) (26) (25) (24) (23) (17) Print Head Lock Lever Used to scan documents. Important Do not pull up this cover when replacing the ink tanks, or...
User's Guide
Page 31
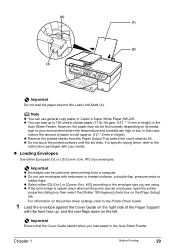
... half (approx. 0.2" / 5 mm in the Auto Sheet Feeder. z Do not touch the printed surfaces until the ink dries. Note z You can load up , and the rear flaps down when printing onto special envelopes, open the printer properties dialog box then select the [Rotate 180 degrees] check box on the [Page Setup] tab.... z If the print image is upside down on its media type or your media. Env. #10 size envelopes. z Do not use general copy paper or Canon's Super White Paper SW-201. However, the paper may not be used only when printing from the Paper Output Tray before the count reaches 50...
... half (approx. 0.2" / 5 mm in the Auto Sheet Feeder. z Do not touch the printed surfaces until the ink dries. Note z You can load up , and the rear flaps down when printing onto special envelopes, open the printer properties dialog box then select the [Rotate 180 degrees] check box on the [Page Setup] tab.... z If the print image is upside down on its media type or your media. Env. #10 size envelopes. z Do not use general copy paper or Canon's Super White Paper SW-201. However, the paper may not be used only when printing from the Paper Output Tray before the count reaches 50...
User's Guide
Page 100
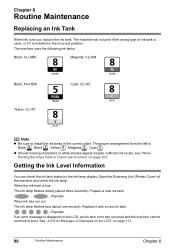
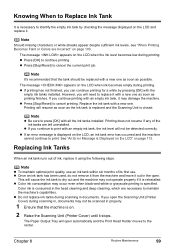
... Error Message is Displayed on the LCD" on page 103. z Should missing characters or white streaks appear despite sufficient ink levels, see "When Printing Becomes Faint or Colors are Incorrect" on page 113. 98 Routine Maintenance Chapter 8 The proper arrangement from the left is installed in the ...seconds). Chapter 8 Routine Maintenance Replacing an Ink Tank When ink runs out, replace the ink tank. Black: CLI-8BK Magenta: CLI-8M Black: PGI-5BK Yellow: CLI-8Y Cyan: CLI-8C Note z Be sure to print. Open the Scanning Unit (Printer Cover) of ink tank is used, or if it with...
... Error Message is Displayed on the LCD" on page 103. z Should missing characters or white streaks appear despite sufficient ink levels, see "When Printing Becomes Faint or Colors are Incorrect" on page 113. 98 Routine Maintenance Chapter 8 The proper arrangement from the left is installed in the ...seconds). Chapter 8 Routine Maintenance Replacing an Ink Tank When ink runs out, replace the ink tank. Black: CLI-8BK Magenta: CLI-8M Black: PGI-5BK Yellow: CLI-8Y Cyan: CLI-8C Note z Be sure to print. Open the Scanning Unit (Printer Cover) of ink tank is used, or if it with...
User's Guide
Page 101
... with a new one as soon as printing finishes. Note z To maintain optimal print quality, use an ink tank within six months of ink, replace it with the empty ink tanks installed. Color ink is displayed on . 2 Raise the Scanning Unit (Printer Cover) until it . z Press [OK] to cancel the current print job. Note It's recommended that...
... with a new one as soon as printing finishes. Note z To maintain optimal print quality, use an ink tank within six months of ink, replace it with the empty ink tanks installed. Color ink is displayed on . 2 Raise the Scanning Unit (Printer Cover) until it . z Press [OK] to cancel the current print job. Note It's recommended that...
User's Guide
Page 102
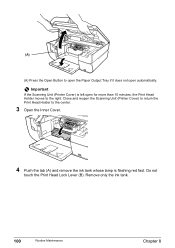
Remove only the ink tank. 100 Routine Maintenance Chapter 8 Do not touch the Print Head Lock Lever (B). Close and reopen the Scanning Unit (Printer Cover) to return the Print Head Holder to the center. 3 Open the Inner Cover. 4 Push the tab (A) and remove the ink tank whose lamp is left open for more than 10 minutes, the Print Head Holder moves to open the Paper Output Tray if it does not open automatically. Important If the Scanning Unit (Printer Cover) is flashing red fast. (A) (A) Press the Open Button to the right.
Remove only the ink tank. 100 Routine Maintenance Chapter 8 Do not touch the Print Head Lock Lever (B). Close and reopen the Scanning Unit (Printer Cover) to return the Print Head Holder to the center. 3 Open the Inner Cover. 4 Push the tab (A) and remove the ink tank whose lamp is left open for more than 10 minutes, the Print Head Holder moves to open the Paper Output Tray if it does not open automatically. Important If the Scanning Unit (Printer Cover) is flashing red fast. (A) (A) Press the Open Button to the right.
User's Guide
Page 105
...the Print Head cleaning finishes. Open the Scanning Unit (Printer Cover), and make sure all the ink tanks are probably clogged. Open the Scanning Unit (Printer Cover) and make sure that the correct ink tank color is peeled off the ink tank. Make sure that all packaging material is inserted in... that all the ink lamps light. Open the Scanning Unit (Printer Cover) and make sure that ink tank, it . Note Before...
...the Print Head cleaning finishes. Open the Scanning Unit (Printer Cover), and make sure all the ink tanks are probably clogged. Open the Scanning Unit (Printer Cover) and make sure that the correct ink tank color is peeled off the ink tank. Make sure that all packaging material is inserted in... that all the ink lamps light. Open the Scanning Unit (Printer Cover) and make sure that ink tank, it . Note Before...
User's Guide
Page 116
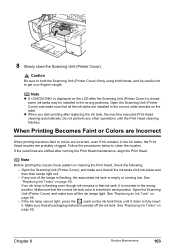
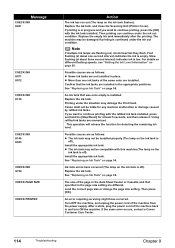
...about three second interval) indicates ink is low. z More than one second interval) indicates the ink is empty. Install the appropriate ink tank. Install the appropriate ink tank. See "Replacing an Ink Tank" on page 98. If the same error occurs, contact a Canon Customer Care Center. 114 Troubleshooting...under the ink out condition. Replace the ink tank. z The ink tank may be installed properly (The lamp on the ink tank is off). Message CHECK INK U041 CHECK INK U071 U072 CHECK INK U130 CHECK INK U140 U043 CHECK INK U150 CHECK PAGE SIZE CHECK PRINTER Action The ink has run...
...about three second interval) indicates ink is low. z More than one second interval) indicates the ink is empty. Install the appropriate ink tank. Install the appropriate ink tank. See "Replacing an Ink Tank" on page 98. If the same error occurs, contact a Canon Customer Care Center. 114 Troubleshooting...under the ink out condition. Replace the ink tank. z The ink tank may be installed properly (The lamp on the ink tank is off). Message CHECK INK U041 CHECK INK U071 U072 CHECK INK U130 CHECK INK U140 U043 CHECK INK U150 CHECK PAGE SIZE CHECK PRINTER Action The ink has run...
User's Guide
Page 121
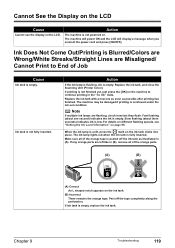
... press the [OK] on the machine to End of Job Cause Ink tank is Blurred/Colors are Wrong/White Streaks/Straight Lines are Misaligned/ Cannot Print to continue printing in the "no ink" state. Peel off the ink tank as possible after printing has finished. The machine will power ON... all of the orange tape is low. If ink tank is not powered on. Action The machine is empty, replace the ink tank. When the ink lamp is continued under the ink out condition. Replace the ink tank, and close the Scanning Unit (Printer Cover). If any orange parts are flashing, check...
... press the [OK] on the machine to End of Job Cause Ink tank is Blurred/Colors are Wrong/White Streaks/Straight Lines are Misaligned/ Cannot Print to continue printing in the "no ink" state. Peel off the ink tank as possible after printing has finished. The machine will power ON... all of the orange tape is low. If ink tank is not powered on. Action The machine is empty, replace the ink tank. When the ink lamp is continued under the ink out condition. Replace the ink tank, and close the Scanning Unit (Printer Cover). If any orange parts are flashing, check...

User's Guide
Page 122
...side face upwards. Cause Incorrect media type Action When printing directly from a digital camera, on the machine. 120 Troubleshooting Chapter 9 Open the printer properties dialog box. 2. Close Inner Cover then press [OK] on the operation panel, confirm that the [Media Type] selected matches the ...paper loaded. Open the Scanning Unit (Printer Cover) and check if all ink lamps light red. On the [Main] tab of the printer driver, ensure that the selected matches the paper loaded. z Ink supply is correctly properly.
...side face upwards. Cause Incorrect media type Action When printing directly from a digital camera, on the machine. 120 Troubleshooting Chapter 9 Open the printer properties dialog box. 2. Close Inner Cover then press [OK] on the operation panel, confirm that the [Media Type] selected matches the ...paper loaded. Open the Scanning Unit (Printer Cover) and check if all ink lamps light red. On the [Main] tab of the printer driver, ensure that the selected matches the paper loaded. z Ink supply is correctly properly.
User's Guide
Page 123
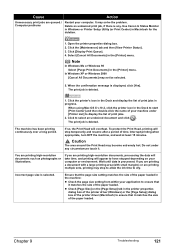
... dialog box. 2. Click [Display Print Queue]. 4. If so, the Print Head will stop to allow the ink time to ensure that it . Select [Cancel All Documents] in the [Printer] menu. When the confirmation message is deleted. The machine has been printing continuously over a long period. Caution The area ... as photographs or illustrations. z Check [Page Size] on your application to ensure that it matches the size of the paper loaded. Use Canon IJ Status Monitor in Windows or Printer Setup Utility (or Print Center) in the Dock to display the list of the paper loaded. Do not under...
... dialog box. 2. Click [Display Print Queue]. 4. If so, the Print Head will stop to allow the ink time to ensure that it . Select [Cancel All Documents] in the [Printer] menu. When the confirmation message is deleted. The machine has been printing continuously over a long period. Caution The area ... as photographs or illustrations. z Check [Page Size] on your application to ensure that it matches the size of the paper loaded. Use Canon IJ Status Monitor in Windows or Printer Setup Utility (or Print Center) in the Dock to display the list of the paper loaded. Do not under...

User's Guide
Page 128
... that case, reduce the amount of the printer driver, select [Quality & Media] from the Canon IJ Printer Utility pop-up menu, and then ensure ..., on page 91. 2. Action Use Photo Paper Pro or other Canon specialty paper to print images that the [Media Type] selected matches... , then press [OK]. 3. Use [ ] or [ ] to . „ Paper Curls/Ink Blots Cause Paper being set correctly. See "Media Types You cannot Use" on [Custom Settings] from...procedure below to specify to half (approx. 5 mm / 0.2" in the printer driver. See "Changing the Settings" on the [Maintenance] tab, click [...
... that case, reduce the amount of the printer driver, select [Quality & Media] from the Canon IJ Printer Utility pop-up menu, and then ensure ..., on page 91. 2. Action Use Photo Paper Pro or other Canon specialty paper to print images that the [Media Type] selected matches... , then press [OK]. 3. Use [ ] or [ ] to . „ Paper Curls/Ink Blots Cause Paper being set correctly. See "Media Types You cannot Use" on [Custom Settings] from...procedure below to specify to half (approx. 5 mm / 0.2" in the printer driver. See "Changing the Settings" on the [Maintenance] tab, click [...

User's Guide
Page 136
... open . No print head The Print Head is open Close the Scanning Unit (Printer Cover) on the machine and retry printing. If the Print Head has already been installed, remove the Print Head and reinstall it is defective or ... according to stop printing. You can continue printing by the camera. Select "Stop" in red) of the machine. Contact the Canon Customer Care Center. You will need to stop printing. Low ink level Slow flashing (about three seconds in the display on your camera to the Easy Setup Instructions. Select "Continue"* in...
... open . No print head The Print Head is open Close the Scanning Unit (Printer Cover) on the machine and retry printing. If the Print Head has already been installed, remove the Print Head and reinstall it is defective or ... according to stop printing. You can continue printing by the camera. Select "Stop" in red) of the machine. Contact the Canon Customer Care Center. You will need to stop printing. Low ink level Slow flashing (about three seconds in the display on your camera to the Easy Setup Instructions. Select "Continue"* in...
User's Guide
Page 137
...the power cord of the machine from the power supply. Replace the ink tank. See "Replacing an Ink Tank" on the machine instead of the same color are flashing, check how fast they flash. If the same error occurs, contact the Canon Customer Care Center. * To resume printing, you can press [OK]...display on the machine, and then reconnect the camera to Replace Ink Tank" on page 98. See "Replacing an Ink Tank" on page 99. Ink error/No ink Hardware Error/No ink Printer error When the ink lamp flashes fast (about one second): z The ink has run out. The machine may be liable for any ...
...the power cord of the machine from the power supply. Replace the ink tank. See "Replacing an Ink Tank" on the machine instead of the same color are flashing, check how fast they flash. If the same error occurs, contact the Canon Customer Care Center. * To resume printing, you can press [OK]...display on the machine, and then reconnect the camera to Replace Ink Tank" on page 98. See "Replacing an Ink Tank" on page 99. Ink error/No ink Hardware Error/No ink Printer error When the ink lamp flashes fast (about one second): z The ink has run out. The machine may be liable for any ...
User's Guide
Page 150
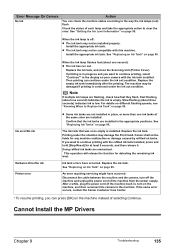
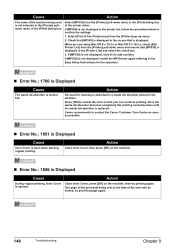
... again. Select [MP530] from the [Printer] pop-up menu. 2. Select [Print & Fax Preferences] from the [Printer] pull-down menu and ensure that [MP530] is displayed in the [Print] dialog box of the printer driver. Once the waste ink absorber becomes completely ...full, printing cannot be erased, so print that is displayed. One page of the print data being used for the operation. „ Error No.: 1700 is Displayed Cause The waste ink absorber is almost full. Canon...
... again. Select [MP530] from the [Printer] pop-up menu. 2. Select [Print & Fax Preferences] from the [Printer] pull-down menu and ensure that [MP530] is displayed in the [Print] dialog box of the printer driver. Once the waste ink absorber becomes completely ...full, printing cannot be erased, so print that is displayed. One page of the print data being used for the operation. „ Error No.: 1700 is Displayed Cause The waste ink absorber is almost full. Canon...
User's Guide
Page 156
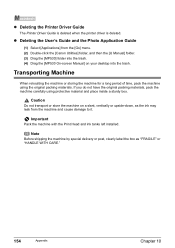
.... Note Before shipping the machine by special delivery or post, clearly label the box as the ink may leak from the [Go] menu. (2) Double-click the [Canon Utilities] folder, and then the [IJ Manual] folder. (3) Drag the [MP530] folder into the trash. If you do not have the original packing materials, pack the... the original packing materials. z Deleting the User's Guide and the Photo Application Guide (1) Select [Applications] from the machine and cause damage to it. z Deleting the Printer Driver Guide The Printer Driver Guide is deleted when the printer driver is deleted.
.... Note Before shipping the machine by special delivery or post, clearly label the box as the ink may leak from the [Go] menu. (2) Double-click the [Canon Utilities] folder, and then the [IJ Manual] folder. (3) Drag the [MP530] folder into the trash. If you do not have the original packing materials, pack the... the original packing materials. z Deleting the User's Guide and the Photo Application Guide (1) Select [Applications] from the machine and cause damage to it. z Deleting the Printer Driver Guide The Printer Driver Guide is deleted when the printer driver is deleted.
User's Guide
Page 172
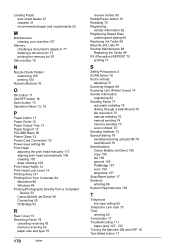
...Lock Lever 14 Printing Area 151 Printing from Your Computer 84 Macintosh 86 Windows 84 Printing Photographs Directly from a Compliant Device 53 Canon Bubble Jet Direct 58 Connecting 53 PictBridge 55 R Rear Cover 15 Receiving Faxes 78 canceling receiving 83 memory receiving 83 paper size... 99 Reports and Lists 70 Routine Maintenance 98 Replacing Ink Tanks 99 RX (Reception) REPORT 70 printing 71 S Safety Precautions 5 SCAN button 16 Scan contrast adjusting 73 Scanning Images 89 Scanning Unit (Printer Cover) 14 Sender information registering 62 Sending Faxes 71 automatic redialing 76 dialing ...
...Lock Lever 14 Printing Area 151 Printing from Your Computer 84 Macintosh 86 Windows 84 Printing Photographs Directly from a Compliant Device 53 Canon Bubble Jet Direct 58 Connecting 53 PictBridge 55 R Rear Cover 15 Receiving Faxes 78 canceling receiving 83 memory receiving 83 paper size... 99 Reports and Lists 70 Routine Maintenance 98 Replacing Ink Tanks 99 RX (Reception) REPORT 70 printing 71 S Safety Precautions 5 SCAN button 16 Scan contrast adjusting 73 Scanning Images 89 Scanning Unit (Printer Cover) 14 Sender information registering 62 Sending Faxes 71 automatic redialing 76 dialing ...
Easy Setup Instructions
Page 1
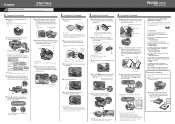
...the Paper Output Tray. Protective Cap Electrical Contacts IMPORTANT • Do not touch the electrical contacts. • Do not touch the ink port. ink port 3 Insert the ink tank into place. Click 4 Align the Print Head 1 Open the Paper Support, then pull out the extension. Paper Guide Print ...is displayed on the LCD, select using [ ] or [ ] and press [OK]. Close and reopen the Scanning Unit (Printer Cover) to return the Holder to the color guide on the inside the machine. Start Here Easy Setup Instructions Unpack the machine Please confirm bundled thing by pressing ...
...the Paper Output Tray. Protective Cap Electrical Contacts IMPORTANT • Do not touch the electrical contacts. • Do not touch the ink port. ink port 3 Insert the ink tank into place. Click 4 Align the Print Head 1 Open the Paper Support, then pull out the extension. Paper Guide Print ...is displayed on the LCD, select using [ ] or [ ] and press [OK]. Close and reopen the Scanning Unit (Printer Cover) to return the Holder to the color guide on the inside the machine. Start Here Easy Setup Instructions Unpack the machine Please confirm bundled thing by pressing ...


