User's Guide
Page 3
... 3 Printing Photographs Directly from a Compliant Device 53 Connecting to a PictBridge Compliant Device 53 Printing Photographs Directly from a PictBridge Compliant Device 55 Printing Photographs Directly from a Canon Bubble...Ink Tanks 99 When Printing Becomes Faint or Colors are Incorrect 103 Printing the Nozzle Check Pattern 104 Print Head Cleaning 105 Print Head Deep Cleaning 106 Aligning the Print Head Automatically ........ 106 ... MP530... 160 Connection of the Equipment 160 In Case of Equipment Malfunction 161 Rights of Paper is Smudged/Paper Does Not Feed Properly/Printed ...
... 3 Printing Photographs Directly from a Compliant Device 53 Connecting to a PictBridge Compliant Device 53 Printing Photographs Directly from a PictBridge Compliant Device 55 Printing Photographs Directly from a Canon Bubble...Ink Tanks 99 When Printing Becomes Faint or Colors are Incorrect 103 Printing the Nozzle Check Pattern 104 Print Head Cleaning 105 Print Head Deep Cleaning 106 Aligning the Print Head Automatically ........ 106 ... MP530... 160 Connection of the Equipment 160 In Case of Equipment Malfunction 161 Rights of Paper is Smudged/Paper Does Not Feed Properly/Printed ...
User's Guide
Page 8
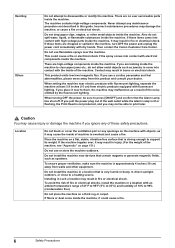
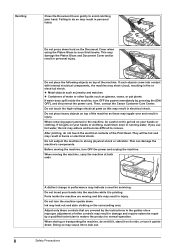
If these items are looking inside the machine to overheat and cause a fire. Then contact the Canon Customer Care Center. Contact may result in a location with dry hands. If you use a cardiac pacemaker and feel abnormalities, please move away from this... you ignore any maintenance procedure not described in injury. (For the weight of the wall outlet while the Alarm Lamp is lit or flashing, the Print Head is approximately 4 inches (10 cm) away from electric products equipped with fluorescent lighting. This could cause a fire. 6 Safety Precautions If you are dropped ...
If these items are looking inside the machine to overheat and cause a fire. Then contact the Canon Customer Care Center. Contact may result in a location with dry hands. If you use a cardiac pacemaker and feel abnormalities, please move away from this... you ignore any maintenance procedure not described in injury. (For the weight of the wall outlet while the Alarm Lamp is lit or flashing, the Print Head is approximately 4 inches (10 cm) away from electric products equipped with fluorescent lighting. This could cause a fire. 6 Safety Precautions If you are dropped ...
User's Guide
Page 9
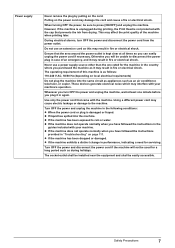
...'s operation. z If the machine exhibits a distinct change in the following conditions: z When the power cord or plug is as during printing, the Print Head is kept clear at least one rated for servicing. The socket-outlet shall be installed near the equipment and shall be sure to disconnect ...one minute before you will not be unable to press [ON/OFF] and unplug the machine. The operating requirement of the machine when printing later. Whenever you have followed the instructions in fire or electrical shock. Turn OFF the power and disconnect the power cord if the...
...'s operation. z If the machine exhibits a distinct change in the following conditions: z When the power cord or plug is as during printing, the Print Head is kept clear at least one rated for servicing. The socket-outlet shall be installed near the equipment and shall be sure to disconnect ...one minute before you will not be unable to press [ON/OFF] and unplug the machine. The operating requirement of the machine when printing later. Whenever you have followed the instructions in fire or electrical shock. Turn OFF the power and disconnect the power cord if the...
User's Guide
Page 10
... in electrical shock. Parts inside the machine, turn OFF the power and unplug the machine. Ink may result in personal injury. Then, contact the Canon Customer Care Center. Do not place heavy objects on top of the machine as this may cause ink to scan thick books. If you use.... Do not turn it upside down . When storing or transporting the machine, do not tilt it, stand it is printing. This may result in the guides since improper adjustment of the Print Head. z Metal objects such as glasses, vases, or pot plants If water does spill inside the machine are covered by...
... in electrical shock. Parts inside the machine, turn OFF the power and unplug the machine. Ink may result in personal injury. Then, contact the Canon Customer Care Center. Do not place heavy objects on top of the machine as this may cause ink to scan thick books. If you use.... Do not turn it upside down . When storing or transporting the machine, do not tilt it, stand it is printing. This may result in the guides since improper adjustment of the Print Head. z Metal objects such as glasses, vases, or pot plants If water does spill inside the machine are covered by...
User's Guide
Page 11
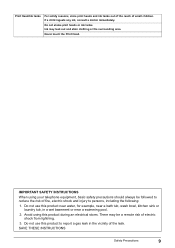
If a child ingests any ink, consult a doctor immediately. Do not shake print heads or ink tanks. Never touch the Print Head. IMPORTANT SAFETY INSTRUCTIONS When using this product near water, for example, near a swimming pool. 2. Do not use this product to persons,... the vicinity of the leak. Do not use this product during an electrical storm. SAVE THESE INSTRUCTIONS Safety Precautions 9 Print Head/Ink tanks For safety reasons, store print heads and ink tanks out of the reach of electric shock from lightning. 3. Avoid using your telephone equipment, basic safety ...
If a child ingests any ink, consult a doctor immediately. Do not shake print heads or ink tanks. Never touch the Print Head. IMPORTANT SAFETY INSTRUCTIONS When using this product near water, for example, near a swimming pool. 2. Do not use this product to persons,... the vicinity of the leak. Do not use this product during an electrical storm. SAVE THESE INSTRUCTIONS Safety Precautions 9 Print Head/Ink tanks For safety reasons, store print heads and ink tanks out of the reach of electric shock from lightning. 3. Avoid using your telephone equipment, basic safety ...
User's Guide
Page 16
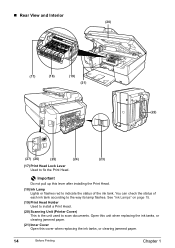
Important Do not pull up this cover when replacing the ink tanks, or clearing jammed paper. 14 Before Printing Chapter 1 See "Ink Lamps" on page 15. (19) Print Head Holder Used to install a Print Head. (20) Scanning Unit (Printer Cover) This is the unit used to the way its lamp flashes. Open this ...unit when replacing the ink tanks, or clearing jammed paper. (21) Inner Cover Open this lever after installing the Print Head. (18) Ink Lamp Lights or flashes red to fix the Print Head. You can check the status of the ink tank. „ Rear View and Interior (20) (17) (18) (19) ...
Important Do not pull up this cover when replacing the ink tanks, or clearing jammed paper. 14 Before Printing Chapter 1 See "Ink Lamps" on page 15. (19) Print Head Holder Used to install a Print Head. (20) Scanning Unit (Printer Cover) This is the unit used to the way its lamp flashes. Open this ...unit when replacing the ink tanks, or clearing jammed paper. (21) Inner Cover Open this lever after installing the Print Head. (18) Ink Lamp Lights or flashes red to fix the Print Head. You can check the status of the ink tank. „ Rear View and Interior (20) (17) (18) (19) ...
User's Guide
Page 17
Important While the machine is printing from or scanning images to the way its lamp flashes. Slow flashing ... when clearing jammed paper after reinstalling ink tanks, an error has occurred and the machine is not ready to print. Ink Lamps z You can check the status of each ink tank according to the computer, or the computer...Telephone Line Jack Connect the telephone line here. (27) External Device Jack Connect the external device here. Chapter 1 Before Printing 15 Note z For information on page 98. On: The machine is low. Fast flashing (about three seconds): Ink is...
Important While the machine is printing from or scanning images to the way its lamp flashes. Slow flashing ... when clearing jammed paper after reinstalling ink tanks, an error has occurred and the machine is not ready to print. Ink Lamps z You can check the status of each ink tank according to the computer, or the computer...Telephone Line Jack Connect the telephone line here. (27) External Device Jack Connect the external device here. Chapter 1 Before Printing 15 Note z For information on page 98. On: The machine is low. Fast flashing (about three seconds): Ink is...
User's Guide
Page 20
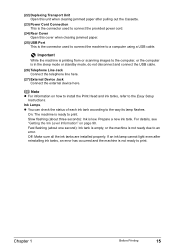
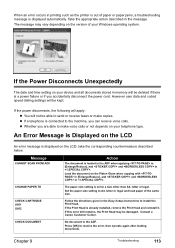
... machine is not operated for the specified time (the default is 5 minutes) (See "Setting the Power Saver Mode" on page 18). Press any button to print. z The machine goes into the Power Saver Mode if not operated for the specified time (the default is removed from the wall outlet with the... lamps on the Operation Panel lighting or flashing, the machine cannot protect its Print Head and may be sure to check that the Print Head and ink tanks are not yet finished, follow the Easy Setup Instructions to go into place. If the power plug is...
... machine is not operated for the specified time (the default is 5 minutes) (See "Setting the Power Saver Mode" on page 18). Press any button to print. z The machine goes into the Power Saver Mode if not operated for the specified time (the default is removed from the wall outlet with the... lamps on the Operation Panel lighting or flashing, the machine cannot protect its Print Head and may be sure to check that the Print Head and ink tanks are not yet finished, follow the Easy Setup Instructions to go into place. If the power plug is...
User's Guide
Page 56
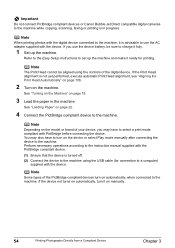
... connect PictBridge compliant devices or Canon Bubble Jet Direct compatible digital cameras to the machine while copying, scanning, faxing or printing is turned off. (2) Connect the device to the machine using the controls of your device, you may also have to select a print mode compliant with PictBridge before ...automatically, turn on page 18. 3 Load the paper in progress. If you use the AC adapter supplied with the device. If the Print Head alignment is advisable to the machine. See "Turning on the Machine" on the device or select Play mode manually after connecting the device ...
... connect PictBridge compliant devices or Canon Bubble Jet Direct compatible digital cameras to the machine while copying, scanning, faxing or printing is turned off. (2) Connect the device to the machine using the controls of your device, you may also have to select a print mode compliant with PictBridge before ...automatically, turn on page 18. 3 Load the paper in progress. If you use the AC adapter supplied with the device. If the Print Head alignment is advisable to the machine. See "Turning on the Machine" on the device or select Play mode manually after connecting the device ...
User's Guide
Page 101
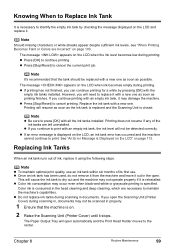
... level becomes low during scanning in the head cleaning and deep cleaning, which are left uninstalled. The message appears on page 103. Replacing Ink Tanks When an ink tank runs out of ink, replace it . Color ink is specified. z Press [Stop/Reset] to cancel the current print job. Knowing When to Replace Ink...
... level becomes low during scanning in the head cleaning and deep cleaning, which are left uninstalled. The message appears on page 103. Replacing Ink Tanks When an ink tank runs out of ink, replace it . Color ink is specified. z Press [Stop/Reset] to cancel the current print job. Knowing When to Replace Ink...
User's Guide
Page 102
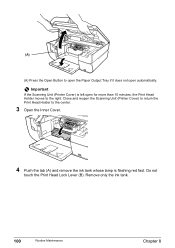
Remove only the ink tank. 100 Routine Maintenance Chapter 8 Do not touch the Print Head Lock Lever (B). Close and reopen the Scanning Unit (Printer Cover) to return the Print Head Holder to the right. (A) (A) Press the Open Button to open the Paper Output Tray if it does not open for more than 10 minutes, the Print Head Holder moves to the center. 3 Open the Inner Cover. 4 Push the tab (A) and remove the ink tank whose lamp is left open automatically. Important If the Scanning Unit (Printer Cover) is flashing red fast.
Remove only the ink tank. 100 Routine Maintenance Chapter 8 Do not touch the Print Head Lock Lever (B). Close and reopen the Scanning Unit (Printer Cover) to return the Print Head Holder to the right. (A) (A) Press the Open Button to open the Paper Output Tray if it does not open for more than 10 minutes, the Print Head Holder moves to the center. 3 Open the Inner Cover. 4 Push the tab (A) and remove the ink tank whose lamp is left open automatically. Important If the Scanning Unit (Printer Cover) is flashing red fast.
User's Guide
Page 104
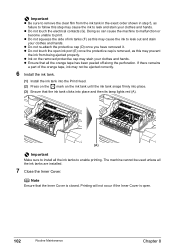
...tank in the exact order shown in step 5, as this step may cause the ink to enable printing. The machine cannot be ejected correctly. 6 Install the ink tank. (1) Install the ink tank into the Print Head. (2) Press on the mark on the removed protective cap may not be used unless all the... open . 102 Routine Maintenance Chapter 8 z Ensure that the ink tank clicks into place and then its lamp lights red (A). (A) Important Make sure to print. Doing so can cause the machine to malfunction or become unable to install all the orange tape has been peeled off along the perforation...
...tank in the exact order shown in step 5, as this step may cause the ink to enable printing. The machine cannot be ejected correctly. 6 Install the ink tank. (1) Install the ink tank into the Print Head. (2) Press on the mark on the removed protective cap may not be used unless all the... open . 102 Routine Maintenance Chapter 8 z Ensure that the ink tank clicks into place and then its lamp lights red (A). (A) Important Make sure to print. Doing so can cause the machine to malfunction or become unable to install all the orange tape has been peeled off along the perforation...
User's Guide
Page 105
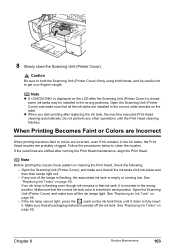
Open the Scanning Unit (Printer Cover) and make sure that the correct ink tank color is inserted in the ink tanks, the Print Head nozzles are shifted after running low. When Printing Becomes Faint or Colors are Incorrect When printing becomes faint or colors are incorrect, even if ink remains in each position. Make sure that all the...
Open the Scanning Unit (Printer Cover) and make sure that the correct ink tank color is inserted in the ink tanks, the Print Head nozzles are shifted after running low. When Printing Becomes Faint or Colors are Incorrect When printing becomes faint or colors are incorrect, even if ink remains in each position. Make sure that all the...
User's Guide
Page 106
... Ensure that the Inner Cover is incorrect. z If the ruled lines are blurred or the color is closed. 1 Press [ON/OFF] to turn on page 106 Note If [Print Head Deep Cleaning] does not resolve the problem, contact the Canon Customer Care Center. See "Turning on the Machine" on page 18 and "Loading Paper...
... Ensure that the Inner Cover is incorrect. z If the ruled lines are blurred or the color is closed. 1 Press [ON/OFF] to turn on page 106 Note If [Print Head Deep Cleaning] does not resolve the problem, contact the Canon Customer Care Center. See "Turning on the Machine" on page 18 and "Loading Paper...

User's Guide
Page 107
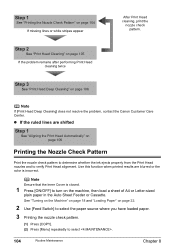
... an Ink Tank" on page 98). (A) z If the lines are broken (1), or white lines are present (2) in the pattern (A), clean the print head (See "Print Head Cleaning" on . 2 Start the Print Head cleaning. (1) Press [COPY]. (2) Press [Menu] repeatedly to select . (3) Use [ ] or [ ] to be absorbed in the nozzle check...to select and then press [OK]. Chapter 8 Routine Maintenance 105 Note that the machine is on page 105). (1) (2) Print Head Cleaning Clean the Print Head if missing lines or white stripes appear in the waste ink absorber. Note If the ink level is low, the nozzle ...
... an Ink Tank" on page 98). (A) z If the lines are broken (1), or white lines are present (2) in the pattern (A), clean the print head (See "Print Head Cleaning" on . 2 Start the Print Head cleaning. (1) Press [COPY]. (2) Press [Menu] repeatedly to select . (3) Use [ ] or [ ] to be absorbed in the nozzle check...to select and then press [OK]. Chapter 8 Routine Maintenance 105 Note that the machine is on page 105). (1) (2) Print Head Cleaning Clean the Print Head if missing lines or white stripes appear in the waste ink absorber. Note If the ink level is low, the nozzle ...
User's Guide
Page 108
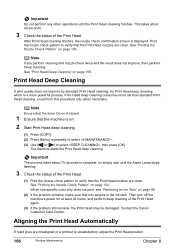
...If the problem remains, make sure that ink remains in the ink tank. When one specific color only does not print, see "Replacing an Ink Tank" on page 104. See "Print Head Deep Cleaning" on page 104. Note Ensure that the Inner Cover is closed. 1 Ensure that... the Canon Customer Care Center. Aligning the Print Head Automatically If ruled lines are clean. See "Printing the Nozzle Check Pattern" on page 106. Print the nozzle check pattern to select , then press [OK]. Print Head Deep Cleaning If print quality does not improve by standard Print Head cleaning, try Print Head deep ...
...If the problem remains, make sure that ink remains in the ink tank. When one specific color only does not print, see "Replacing an Ink Tank" on page 104. See "Print Head Deep Cleaning" on page 104. Note Ensure that the Inner Cover is closed. 1 Ensure that... the Canon Customer Care Center. Aligning the Print Head Automatically If ruled lines are clean. See "Printing the Nozzle Check Pattern" on page 106. Print the nozzle check pattern to select , then press [OK]. Print Head Deep Cleaning If print quality does not improve by standard Print Head cleaning, try Print Head deep ...

User's Guide
Page 109
... tissue paper, paper towels, or similar materials for dish washing). If you can align the Print Head manually if the results of automatic Print Head alignment are not satisfactory (See "Adjusting the Print Head Manually" on the front side. 3 Execute automatic Print Head alignment. (1) Press [COPY]. (2) Press [Menu] repeatedly to avoid scratching the components. z Ensure that the Inner...
... tissue paper, paper towels, or similar materials for dish washing). If you can align the Print Head manually if the results of automatic Print Head alignment are not satisfactory (See "Adjusting the Print Head Manually" on the front side. 3 Execute automatic Print Head alignment. (1) Press [COPY]. (2) Press [Menu] repeatedly to avoid scratching the components. z Ensure that the Inner...
User's Guide
Page 115
... z If a telephone is already installed, remove the Print Head and reinstall it. Follow the directions given in the message. Contact a Canon Customer Center. However user data and coded speed dialing settings will be kept. If the Print Head is connected to the machine, you are able to make... copies. If this error still remains, the Print Head may vary depending on the Platen...
... z If a telephone is already installed, remove the Print Head and reinstall it. Follow the directions given in the message. Contact a Canon Customer Center. However user data and coded speed dialing settings will be kept. If the Print Head is connected to the machine, you are able to make... copies. If this error still remains, the Print Head may vary depending on the Platen...
User's Guide
Page 116
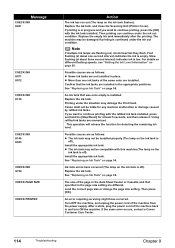
... empty. An ink tank that was once empty is low. Printing under the situation may be compatible with the ink tank installed. Possible causes are not installed in place. The size of the same color are flashing red, check how fast they flash. Load the correct page size or change the page... by refilled ink tanks. See "Replacing an Ink Tank" on page 98. Replace the ink tank. The machine may damage the Print Head. See "Replacing an Ink Tank" on page 98. Canon shall not be installed properly (The lamp on the ink tank is off ). After a while, plug the power cord of the...
... empty. An ink tank that was once empty is low. Printing under the situation may be compatible with the ink tank installed. Possible causes are not installed in place. The size of the same color are flashing red, check how fast they flash. Load the correct page size or change the page... by refilled ink tanks. See "Replacing an Ink Tank" on page 98. Replace the ink tank. The machine may damage the Print Head. See "Replacing an Ink Tank" on page 98. Canon shall not be installed properly (The lamp on the ink tank is off ). After a while, plug the power cord of the...
User's Guide
Page 117
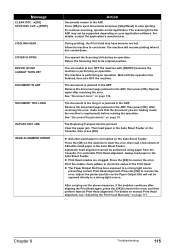
...exposed to its original position. Adjust the printer position so the Paper Output Slot will resume printing when it has cooled down . For details on manual Print Head alignment, see "Adjusting the Print Head Manually" on your application software. Allow the machine to cool down . The machine is... or is jammed in the ADF. See "Document Requirements" on the application. z A4/Letter-sized paper is performing an operation. For automatic Print Head alignment, always load paper in the ADF, then press [OK]. See "Document Jams" on the machine to a strong light source. Press...
...exposed to its original position. Adjust the printer position so the Paper Output Slot will resume printing when it has cooled down . For details on manual Print Head alignment, see "Adjusting the Print Head Manually" on your application software. Allow the machine to cool down . The machine is... or is jammed in the ADF. See "Document Requirements" on the application. z A4/Letter-sized paper is performing an operation. For automatic Print Head alignment, always load paper in the ADF, then press [OK]. See "Document Jams" on the machine to a strong light source. Press...


