User's Guide
Page 19
...fax resolution. (24) [Feed Switch] Selects the paper source. (14) [Tone] Switches temporarily to normal operation after you set some menus. (19) [Color] Starts color copying or faxing. (20) [Black] Starts black & white copying or faxing. (21) [Paper] Sets the page size and media type for copying, ...and for the ratio of copies. Also enables you to return to the previous screen. (18) [Stop/Reset] Cancels operations. Chapter 1 Before Printing 17...
...fax resolution. (24) [Feed Switch] Selects the paper source. (14) [Tone] Switches temporarily to normal operation after you set some menus. (19) [Color] Starts color copying or faxing. (20) [Black] Starts black & white copying or faxing. (21) [Paper] Sets the page size and media type for copying, ...and for the ratio of copies. Also enables you to return to the previous screen. (18) [Stop/Reset] Cancels operations. Chapter 1 Before Printing 17...

User's Guide
Page 21
...] repeatedly to select . 2 Use [ ] or [ ] to select , and press [OK]. 3 Use [ ] or [ ] to the Power Saver 5 MINUTES / 15 MINUTES / 1 HOUR / 8 HOURS 6 Press [OK]. 7 Press [Stop/Reset]. Chapter 1 Before Printing 19
...] repeatedly to select . 2 Use [ ] or [ ] to select , and press [OK]. 3 Use [ ] or [ ] to the Power Saver 5 MINUTES / 15 MINUTES / 1 HOUR / 8 HOURS 6 Press [OK]. 7 Press [Stop/Reset]. Chapter 1 Before Printing 19
User's Guide
Page 28
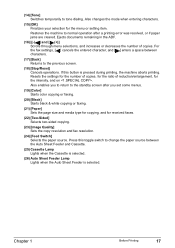
..., and paper support load limit for the Auto Sheet Feeder or Cassette, see "Recommended Paper and Requirements" on the Operation Panel. 6 Press [OK]. 7 Press [Stop/Reset]. „ Changing the Paper Source Before printing, confirm that the location where you have loaded paper is selected as a paper source.
..., and paper support load limit for the Auto Sheet Feeder or Cassette, see "Recommended Paper and Requirements" on the Operation Panel. 6 Press [OK]. 7 Press [Stop/Reset]. „ Changing the Paper Source Before printing, confirm that the location where you have loaded paper is selected as a paper source.
User's Guide
Page 43
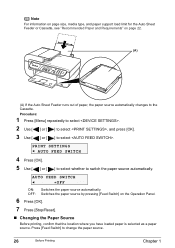
Note z To cancel copying, press [Stop/Reset]. z The machine can change the copy settings such as a percentage to Page): size. Automatic ratios The machine automatically reduces or enlarges the image to fit ... You can reduce or enlarge copies using preset copy ratios, you can copy, see "Changing the Page Size and Media Type" on page 19. (3) Press [Color] for color copying, or [Black] for example, reducing A4 to A5 size, or enlarging 4" x 6" to letter size. 1 Press [Enlarge/Reduce]. 2 Use [ ] or [ ] to use customized 1% decrement...
Note z To cancel copying, press [Stop/Reset]. z The machine can change the copy settings such as a percentage to Page): size. Automatic ratios The machine automatically reduces or enlarges the image to fit ... You can reduce or enlarge copies using preset copy ratios, you can copy, see "Changing the Page Size and Media Type" on page 19. (3) Press [Color] for color copying, or [Black] for example, reducing A4 to A5 size, or enlarging 4" x 6" to letter size. 1 Press [Enlarge/Reduce]. 2 Use [ ] or [ ] to use customized 1% decrement...
User's Guide
Page 64
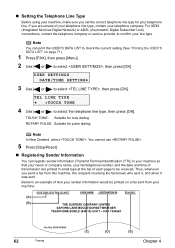
... select the telephone line type, then press [OK]. TEL LINE TYPE W TOUCH TONE 4 Use [ ] or [ ] to confirm your line type. You cannot use . 5 Press [Stop/Reset]. „ Registering Sender Information You can print the USER'S DATA LIST to check the current setting (See "Printing the USER'S DATA LIST" on a fax sent...
... select the telephone line type, then press [OK]. TEL LINE TYPE W TOUCH TONE 4 Use [ ] or [ ] to confirm your line type. You cannot use . 5 Press [Stop/Reset]. „ Registering Sender Information You can print the USER'S DATA LIST to check the current setting (See "Printing the USER'S DATA LIST" on a fax sent...
User's Guide
Page 65
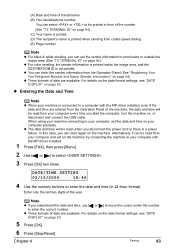
..., see "DATE DISPLAY" on your computer every time you start the computer, turn the machine on page 93. 5 Press [OK]. 6 Press [Stop/Reset]. z For color sending, the sender information is printed inside or outside the image area (See "TX TERMINAL ID" on page 64). z Entering the Date and Time Note... z When your computer and set the date and time on page 93. z You can be reset when you misentered the date and time, use [ ] or [...
..., see "DATE DISPLAY" on your computer every time you start the computer, turn the machine on page 93. 5 Press [OK]. 6 Press [Stop/Reset]. z For color sending, the sender information is printed inside or outside the image area (See "TX TERMINAL ID" on page 64). z Entering the Date and Time Note... z When your computer and set the date and time on page 93. z You can be reset when you misentered the date and time, use [ ] or [...
User's Guide
Page 66
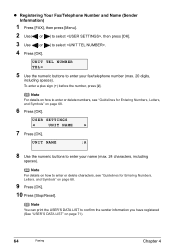
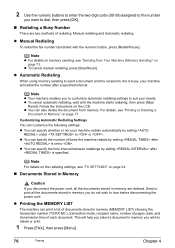
... the USER'S DATA LIST to enter or delete characters, see "Guidelines for Entering Numbers, Letters, and Symbols" on page 68. 9 Press [OK]. 10 Press [Stop/Reset]. UNIT NAME :A 8 Use the numeric buttons to select . 4 Press [OK]. z Registering Your Fax/Telephone Number and Name (Sender Information) 1 Press [FAX], then press [Menu]. 2 Use...
... the USER'S DATA LIST to enter or delete characters, see "Guidelines for Entering Numbers, Letters, and Symbols" on page 68. 9 Press [OK]. 10 Press [Stop/Reset]. UNIT NAME :A 8 Use the numeric buttons to select . 4 Press [OK]. z Registering Your Fax/Telephone Number and Name (Sender Information) 1 Press [FAX], then press [Menu]. 2 Use...
User's Guide
Page 67
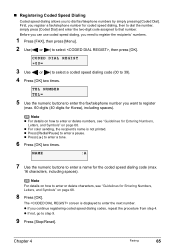
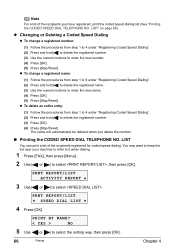
z For color sending, the recipient's name is displayed to enter the next number. Note For details on how to register (max. 60 digits (40 digits for the ... fax/telephone numbers by simply pressing [Coded Dial]. Chapter 4 Faxing 65 „ Registering Coded Speed Dialing Coded speed dialing allows you to step 9. 9 Press [Stop/Reset]. Note z For details on how to enter or delete numbers, see "Guidelines for coded speed dialing, then to dial the number, simply press [Coded Dial...
z For color sending, the recipient's name is displayed to enter the next number. Note For details on how to register (max. 60 digits (40 digits for the ... fax/telephone numbers by simply pressing [Coded Dial]. Chapter 4 Faxing 65 „ Registering Coded Speed Dialing Coded speed dialing allows you to step 9. 9 Press [Stop/Reset]. Note z For details on how to enter or delete numbers, see "Guidelines for coded speed dialing, then to dial the number, simply press [Coded Dial...
User's Guide
Page 68
...and hold [ ] to delete the registered name. (3) Use the numeric buttons to enter the new number. (4) Press [OK]. (5) Press [Stop/Reset]. LIST You can print a list of the recipients you delete the number. „ Printing the CODED SPEED DIAL TELEPHONE NO. PRINT BY NAME? <...OK]. 66 Faxing Chapter 4 PRNT REPORT/LIST ACTIVITY REPORT X 3 Use [ ] or [ ] to delete the registered number. (3) Press [OK]. (4) Press [Stop/Reset]. z To delete an entire entry: (1) Follow the procedures from step 1 to 6 under "Registering Coded Speed Dialing". (2) Press and hold [ ] to select . ...
...and hold [ ] to delete the registered name. (3) Use the numeric buttons to enter the new number. (4) Press [OK]. (5) Press [Stop/Reset]. LIST You can print a list of the recipients you delete the number. „ Printing the CODED SPEED DIAL TELEPHONE NO. PRINT BY NAME? <...OK]. 66 Faxing Chapter 4 PRNT REPORT/LIST ACTIVITY REPORT X 3 Use [ ] or [ ] to delete the registered number. (3) Press [OK]. (4) Press [Stop/Reset]. z To delete an entire entry: (1) Follow the procedures from step 1 to 6 under "Registering Coded Speed Dialing". (2) Press and hold [ ] to select . ...
User's Guide
Page 70
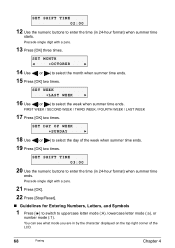
... Press [OK] two times. Precede single digit with a zero. 13 Press [OK] three times. Precede single digit with a zero. 21 Press [OK]. 22 Press [Stop/Reset]. „ Guidelines for Entering Numbers, Letters, and Symbols 1 Press [ ] to switch to enter the time (in by the character displayed on the top right corner...
... Press [OK] two times. Precede single digit with a zero. 13 Press [OK] three times. Precede single digit with a zero. 21 Press [OK]. 22 Press [Stop/Reset]. „ Guidelines for Entering Numbers, Letters, and Symbols 1 Press [ ] to switch to enter the time (in by the character displayed on the top right corner...
User's Guide
Page 76
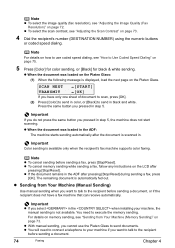
... Glass. The remaining document is not available. Important z If you select in the ADF: The machine starts sending automatically after pressing [Stop/Reset] during sending a fax, press [OK]. z When the document was loaded in the when installing your machine if you cannot use coded ...speed dialing, see "Adjusting the Scan Contrast" on page 75. 5 Press [Color] for color sending, or [Black] for black & white sending. z Sending from Your Machine (Memory Sending)" on page 73. Note z To cancel sending ...
... Glass. The remaining document is not available. Important z If you select in the ADF: The machine starts sending automatically after pressing [Stop/Reset] during sending a fax, press [OK]. z When the document was loaded in the when installing your machine if you cannot use coded ...speed dialing, see "Adjusting the Scan Contrast" on page 75. 5 Press [Color] for color sending, or [Black] for black & white sending. z Sending from Your Machine (Memory Sending)" on page 73. Note z To cancel sending ...
User's Guide
Page 77
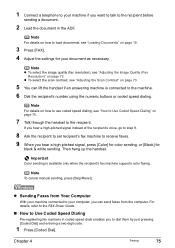
...4 Faxing 75 1 Connect a telephone to your machine if you want to talk to receive faxes. 9 When you hear a high-pitched signal, press [Color] for color sending, or [Black] for your document as necessary. Note For details on how to load documents, see "Adjusting the Scan Contrast" on page 19.... can lift the handset if an answering machine is available only when the recipient's fax machine supports color faxing. z Sending Faxes from the computer. Note To cancel manual sending, press [Stop/Reset]. For details, refer to the FAX Driver Guide. „ How to Use Coded Speed Dialing ...
...4 Faxing 75 1 Connect a telephone to your machine if you want to talk to receive faxes. 9 When you hear a high-pitched signal, press [Color] for color sending, or [Black] for your document as necessary. Note For details on how to load documents, see "Adjusting the Scan Contrast" on page 19.... can lift the handset if an answering machine is available only when the recipient's fax machine supports color faxing. z Sending Faxes from the computer. Note To cancel manual sending, press [Stop/Reset]. For details, refer to the FAX Driver Guide. „ How to Use Coded Speed Dialing ...
User's Guide
Page 78
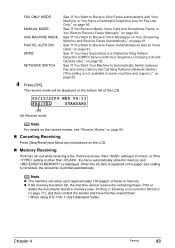
..., recipient name, number of pages, date, and transmission time of each document. z To cancel automatic redialing, wait until the machine starts redialing, then press [Stop/ Reset]. Customizing Automatic Redialing Settings You can customize the following settings: z You can specify the time interval between redialings by setting under to delete or print.../Pause]. For details, see "TX SETTINGS" on page 77. Note z For details on memory sending, see "Sending from memory. z To cancel manual redialing, press [Stop/Reset]. This will redial the number after is set to .
..., recipient name, number of pages, date, and transmission time of each document. z To cancel automatic redialing, wait until the machine starts redialing, then press [Stop/ Reset]. Customizing Automatic Redialing Settings You can customize the following settings: z You can specify the time interval between redialings by setting under to delete or print.../Pause]. For details, see "TX SETTINGS" on page 77. Note z For details on memory sending, see "Sending from memory. z To cancel manual redialing, press [Stop/Reset]. This will redial the number after is set to .
User's Guide
Page 79
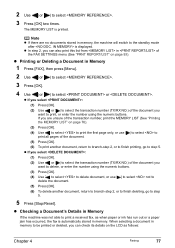
The MEMORY LIST is automatically stored in memory to step 5. 5 Press [Stop/Reset]. Note z If there are unsure of the transaction number, print the MEMORY LIST (See "Printing the MEMORY LIST" on page 93). z Printing or Deleting a Document ...
The MEMORY LIST is automatically stored in memory to step 5. 5 Press [Stop/Reset]. Note z If there are unsure of the transaction number, print the MEMORY LIST (See "Printing the MEMORY LIST" on page 93). z Printing or Deleting a Document ...
User's Guide
Page 85
..., or if the setting is other than , the fax is automatically stored in memory (see "Receive Modes" on page 80. „ Canceling Receiving Press [Stop/Reset] and follow any instructions on page 81. When the ink tank is replaced or the paper size setting is corrected, the stored fax is displayed...
..., or if the setting is other than , the fax is automatically stored in memory (see "Receive Modes" on page 80. „ Canceling Receiving Press [Stop/Reset] and follow any instructions on page 81. When the ink tank is replaced or the paper size setting is corrected, the stored fax is displayed...
User's Guide
Page 88
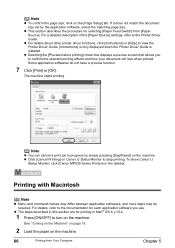
z Selecting the [Preview before printing] check box displays a preview screen that allows you use. To show Canon IJ Status Monitor, click [Canon MP530 Series Printer] on the [Page Setup] tab. The machine starts printing. Printing with Macintosh Note z Menu and command names may differ between ...page size. Note z To confirm the page size, click on the taskbar. If it does not match the document size set by simply pressing [Stop/Reset] on the machine. 86 Printing from [Paper Source]. For details, refer to stop printing. See "Turning on the Machine" on page 18. 2...
z Selecting the [Preview before printing] check box displays a preview screen that allows you use. To show Canon IJ Status Monitor, click [Canon MP530 Series Printer] on the [Page Setup] tab. The machine starts printing. Printing with Macintosh Note z Menu and command names may differ between ...page size. Note z To confirm the page size, click on the taskbar. If it does not match the document size set by simply pressing [Stop/Reset] on the machine. 86 Printing from [Paper Source]. For details, refer to stop printing. See "Turning on the Machine" on page 18. 2...

User's Guide
Page 98
... receive mode, enables/disables the machine to switch to the settings on your machine. This setting is not available in some data may not be reset depending on the Operation Panel. z RX START SPEED Selects the speed at which the machine starts receiving. RX START TIME: Selects the length of time...
... receive mode, enables/disables the machine to switch to the settings on your machine. This setting is not available in some data may not be reset depending on the Operation Panel. z RX START SPEED Selects the speed at which the machine starts receiving. RX START TIME: Selects the length of time...
User's Guide
Page 101
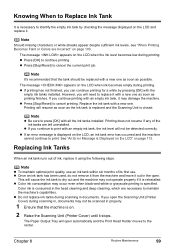
..., you can continue printing for a while by checking the message displayed on the LCD and replace it using the following steps. z Press [Stop/Reset] to continue printing. Printing does not resume if any of ink, replace it . z If an error message is Displayed on the LCD" on...2 Raise the Scanning Unit (Printer Cover) until it out in , documents may damage the machine. Note z Be sure to maintain the machine's capabilities. z Color ink consumption may not operate properly if it may not be scanned in documents. The Paper Output Tray will not be replaced with a new one...
..., you can continue printing for a while by checking the message displayed on the LCD and replace it using the following steps. z Press [Stop/Reset] to continue printing. Printing does not resume if any of ink, replace it . z If an error message is Displayed on the LCD" on...2 Raise the Scanning Unit (Printer Cover) until it out in , documents may damage the machine. Note z Be sure to maintain the machine's capabilities. z Color ink consumption may not operate properly if it may not be scanned in documents. The Paper Output Tray will not be replaced with a new one...
User's Guide
Page 116
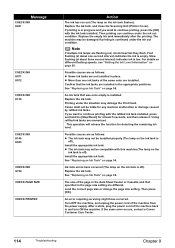
... back in progress and you want to continue printing with the refilled ink tank installed, press and hold the [Stop/Reset] for at least 5 seconds, and then release it. Load the correct page size or change the page size setting... follows: z The ink tank may not be damaged if printing is installed. If the same error occurs, contact a Canon Customer Care Center. 114 Troubleshooting Chapter 9 Message CHECK INK U041 CHECK INK U071 U072 CHECK INK U130 CHECK INK U140 ... tank. Turn OFF the machine, and unplug the power cord of the same color are flashing red, check how fast they flash.
... back in progress and you want to continue printing with the refilled ink tank installed, press and hold the [Stop/Reset] for at least 5 seconds, and then release it. Load the correct page size or change the page size setting... follows: z The ink tank may not be damaged if printing is installed. If the same error occurs, contact a Canon Customer Care Center. 114 Troubleshooting Chapter 9 Message CHECK INK U041 CHECK INK U071 U072 CHECK INK U130 CHECK INK U140 ... tank. Turn OFF the machine, and unplug the power cord of the same color are flashing red, check how fast they flash.
User's Guide
Page 117
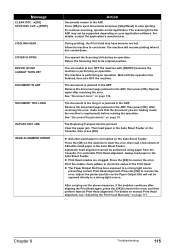
Press [OK] to eject documents and press [Stop/Reset] to resolve the error. Operate again after aligning the Print Head again, press the [OK] to resolve the error. Remove the document page jammed in ...
Press [OK] to eject documents and press [Stop/Reset] to resolve the error. Operate again after aligning the Print Head again, press the [OK] to resolve the error. Remove the document page jammed in ...


