User's Guide
Page 3
...When to Replace Ink Tank 99 Replacing Ink Tanks 99 When Printing Becomes Faint or Colors are Incorrect 103 Printing the Nozzle Check Pattern 104 Print Head Cleaning 105 Print Head Deep Cleaning 106 Aligning the Print Head Automatically ........ 106 Cleaning Your Machine 107 9 Troubleshooting 111 If the Power Disconnects ...153 Transporting Machine 154 Specifications 155 Users in Canada 166 Pre-Installation Requirements for MP530... 160 Connection of the Equipment 160 In Case of Equipment Malfunction 161 Rights of the Telephone Company 161 FCC Notice 161 Canon U.S.A., INC.
...When to Replace Ink Tank 99 Replacing Ink Tanks 99 When Printing Becomes Faint or Colors are Incorrect 103 Printing the Nozzle Check Pattern 104 Print Head Cleaning 105 Print Head Deep Cleaning 106 Aligning the Print Head Automatically ........ 106 Cleaning Your Machine 107 9 Troubleshooting 111 If the Power Disconnects ...153 Transporting Machine 154 Specifications 155 Users in Canada 166 Pre-Installation Requirements for MP530... 160 Connection of the Equipment 160 In Case of Equipment Malfunction 161 Rights of the Telephone Company 161 FCC Notice 161 Canon U.S.A., INC.
User's Guide
Page 101
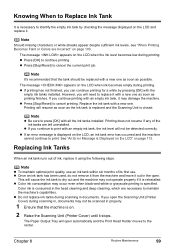
... if it may occur even when black-and-white or grayscale printing is specified. Color ink is consumed in documents. However, you open the Scanning Unit (Printer Cover) during scanning in the head cleaning and deep cleaning, which are necessary to maintain the machine's capabilities. Printing will not be detected correctly. Knowing When to Replace Ink...
... if it may occur even when black-and-white or grayscale printing is specified. Color ink is consumed in documents. However, you open the Scanning Unit (Printer Cover) during scanning in the head cleaning and deep cleaning, which are necessary to maintain the machine's capabilities. Printing will not be detected correctly. Knowing When to Replace Ink...
User's Guide
Page 105
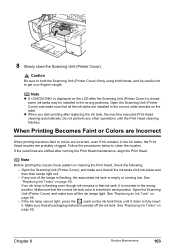
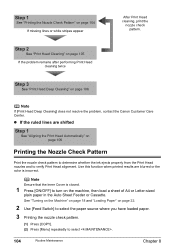
... that all the ink lamps light. z When you start printing after running low. When Printing Becomes Faint or Colors are Incorrect When printing becomes faint or colors are shifted after replacing the ink tank, the machine executes Print Head cleaning automatically. Note Before printing the nozzle check pattern or cleaning the Print Head, check the following; - Make sure that ink tank, it...
... that all the ink lamps light. z When you start printing after running low. When Printing Becomes Faint or Colors are Incorrect When printing becomes faint or colors are shifted after replacing the ink tank, the machine executes Print Head cleaning automatically. Note Before printing the nozzle check pattern or cleaning the Print Head, check the following; - Make sure that ink tank, it...
User's Guide
Page 106
... Cleaning] does not resolve the problem, contact the Canon Customer Care Center. Use this function when printed results are shifted Step 1 See "Aligning the Print Head Automatically" on the machine, then load a sheet of A4 or Letter-sized plain paper in the Auto Sheet Feeder or Cassette. z If the ruled lines are blurred or the color...
... Cleaning] does not resolve the problem, contact the Canon Customer Care Center. Use this function when printed results are shifted Step 1 See "Aligning the Print Head Automatically" on the machine, then load a sheet of A4 or Letter-sized plain paper in the Auto Sheet Feeder or Cassette. z If the ruled lines are blurred or the color...

User's Guide
Page 107
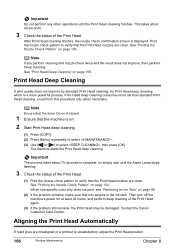
...] repeatedly to select . (3) Use [ ] or [ ] to be absorbed in the nozzle check pattern. (3) Use [ ] or [ ] to restore the Print Head condition. Perform cleaning if necessary. The machine starts the Print Head cleaning. Cleaning the Print Head consumes ink, so perform Print Head cleaning only when necessary. Chapter 8 Routine Maintenance 105 Replace the relevant ink tank (See "Replacing an Ink Tank" on page...
...] repeatedly to select . (3) Use [ ] or [ ] to be absorbed in the nozzle check pattern. (3) Use [ ] or [ ] to restore the Print Head condition. Perform cleaning if necessary. The machine starts the Print Head cleaning. Cleaning the Print Head consumes ink, so perform Print Head cleaning only when necessary. Chapter 8 Routine Maintenance 105 Replace the relevant ink tank (See "Replacing an Ink Tank" on page...
User's Guide
Page 108
... ink tank. Contact the Canon Customer Care Center. This takes about 75 seconds to complete, so simply wait until the Print Head cleaning finishes. Note Ensure that the Inner Cover is closed. 1 Ensure that the machine is unsatisfactory, adjust the Print Head position. 106 Routine Maintenance Chapter 8 When one specific color only does not print, see "Replacing an...
... ink tank. Contact the Canon Customer Care Center. This takes about 75 seconds to complete, so simply wait until the Print Head cleaning finishes. Note Ensure that the Inner Cover is closed. 1 Ensure that the machine is unsatisfactory, adjust the Print Head position. 106 Routine Maintenance Chapter 8 When one specific color only does not print, see "Replacing an...

User's Guide
Page 109
... "An Error Message is performed automatically. Caution z Be sure to turn on the front side. 3 Execute automatic Print Head alignment. (1) Press [COPY]. (2) Press [Menu] repeatedly to clean the machine; Chapter 8 Routine Maintenance 107 z You can print the current adjustment values by pressing down the hollow on the machine. However, you have trouble getting the...
... "An Error Message is performed automatically. Caution z Be sure to turn on the front side. 3 Execute automatic Print Head alignment. (1) Press [COPY]. (2) Press [Menu] repeatedly to clean the machine; Chapter 8 Routine Maintenance 107 z You can print the current adjustment values by pressing down the hollow on the machine. However, you have trouble getting the...

User's Guide
Page 122
...Output Tray is uneven. Close Inner Cover then press [OK] on page 104. In the [Print] dialog box of paper. See "Printing the Nozzle Check Pattern" on the machine. 120 Troubleshooting Chapter 9 See "Print Head Deep Cleaning" on page 26. Open the printer properties dialog box. 2. On the [Main] tab, click...which the paper is loaded is correctly properly. Open the Scanning Unit (Printer Cover) and check if all ink lamps light red. See "Print Head Cleaning" on page 22. Auto Sheet Feeder or Cassette. The media is some foreign matter in the Check and remove any foreign matter. Select ...
...Output Tray is uneven. Close Inner Cover then press [OK] on page 104. In the [Print] dialog box of paper. See "Printing the Nozzle Check Pattern" on the machine. 120 Troubleshooting Chapter 9 See "Print Head Deep Cleaning" on page 26. Open the printer properties dialog box. 2. On the [Main] tab, click...which the paper is loaded is correctly properly. Open the Scanning Unit (Printer Cover) and check if all ink lamps light red. See "Print Head Cleaning" on page 22. Auto Sheet Feeder or Cassette. The media is some foreign matter in the Check and remove any foreign matter. Select ...

User's Guide
Page 136
...in the display on your camera. Printer cover open . Contact the Canon Customer Care Center. Remove the jammed paper, load new paper, and press the [OK] on your camera to hold the ink used during Print Head cleaning, for example. z Open the Paper Output Tray to the Easy Setup... Instructions. Install a Print Head according to resume printing. Waste tank (ink absorber) full This error message indicates that ink in this machine....
...in the display on your camera. Printer cover open . Contact the Canon Customer Care Center. Remove the jammed paper, load new paper, and press the [OK] on your camera to hold the ink used during Print Head cleaning, for example. z Open the Paper Output Tray to the Easy Setup... Instructions. Install a Print Head according to resume printing. Waste tank (ink absorber) full This error message indicates that ink in this machine....
User's Guide
Page 172
...recommended paper and requirements 22 M Maintenance cleaning your machine 107 Memory checking a document's details in 77 deleting a document in 77 printing the memory list 76 Menu button 16 N Nozzle Check Pattern examining 105 printing 104 Numeric Buttons 16 O OK ... save setting 96 Print Head adjusting the print head manually 117 aligning print head automatically 106 cleaning 105 deep cleaning 106 Print Head Holder 14 Print Head Lock Lever 14 Printing Area 151 Printing from Your Computer 84 Macintosh 86 Windows 84 Printing Photographs Directly from a Compliant Device 53 Canon Bubble Jet Direct ...
...recommended paper and requirements 22 M Maintenance cleaning your machine 107 Memory checking a document's details in 77 deleting a document in 77 printing the memory list 76 Menu button 16 N Nozzle Check Pattern examining 105 printing 104 Numeric Buttons 16 O OK ... save setting 96 Print Head adjusting the print head manually 117 aligning print head automatically 106 cleaning 105 deep cleaning 106 Print Head Holder 14 Print Head Lock Lever 14 Printing Area 151 Printing from Your Computer 84 Macintosh 86 Windows 84 Printing Photographs Directly from a Compliant Device 53 Canon Bubble Jet Direct ...


