imageCLASS MF8180c Basic Guide
Page 7
... 5-7 Adjusting the Saturation 5-8 Removing the Background Color 5-10 Special Features 5-11 Collate Copy 5-11 When Loading Documents in the ADF 5-11 When Placing a Document on...8-3 Replacing the Cartridges 8-5 Replacing the Toner Cartridges 8-5 Precautions for Handling Toner Cartridges 8-13 Storing Toner Cartridges 8-14 Recycling Used Cartridges 8-15 The Clean Earth Campaign 8-16 THE Canon CARTRIDGE RECYCLING PROGRAM 8-16 U.S.A. PROGRAM 8-17 Packaging 8-17 Shipping 8-19 CANADA PROGRAM-CANADA PROGRAMME 8-20 Replacing the Drum Cartridge 8-22 Replacing the Drum Cartridge 8-22 vi
... 5-7 Adjusting the Saturation 5-8 Removing the Background Color 5-10 Special Features 5-11 Collate Copy 5-11 When Loading Documents in the ADF 5-11 When Placing a Document on...8-3 Replacing the Cartridges 8-5 Replacing the Toner Cartridges 8-5 Precautions for Handling Toner Cartridges 8-13 Storing Toner Cartridges 8-14 Recycling Used Cartridges 8-15 The Clean Earth Campaign 8-16 THE Canon CARTRIDGE RECYCLING PROGRAM 8-16 U.S.A. PROGRAM 8-17 Packaging 8-17 Shipping 8-19 CANADA PROGRAM-CANADA PROGRAMME 8-20 Replacing the Drum Cartridge 8-22 Replacing the Drum Cartridge 8-22 vi
imageCLASS MF8180c Basic Guide
Page 8
... Carrying the Machine by the Sides 8-34 Chapter 9 Troubleshooting Clearing Jams 9-1 Paper Jam Inside the Machine 9-2 Paper Jam Behind the Machine 9-9 Paper Jam in the Drum Cartridge 9-21 Removing Jammed Paper from the ADF 9-22 LCD Messages 9-24 Paper Feeding Problems 9-29 Copying Problems 9-32 Print Quality Problems 9-33 Printing Problems 9-37...
... Carrying the Machine by the Sides 8-34 Chapter 9 Troubleshooting Clearing Jams 9-1 Paper Jam Inside the Machine 9-2 Paper Jam Behind the Machine 9-9 Paper Jam in the Drum Cartridge 9-21 Removing Jammed Paper from the ADF 9-22 LCD Messages 9-24 Paper Feeding Problems 9-29 Copying Problems 9-32 Print Quality Problems 9-33 Printing Problems 9-37...
imageCLASS MF8180c Basic Guide
Page 106
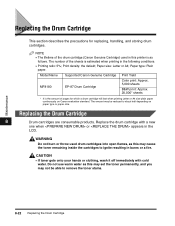
... in the LCD. Paper type: Plain paper. Model Name Supported Canon Genuine Cartridge Print Yield MF8180 EP-87 Drum Cartridge Color print: Approx. 5,000 sheets B&W print: Approx. 20,000* sheets * It is the amount of pages for replacing, handling, and storing drum cartridges. Maintenance Replacing the Drum Cartridge 8 Drum cartridges are consumable products. Do not use warm water as follows. Paper...
... in the LCD. Paper type: Plain paper. Model Name Supported Canon Genuine Cartridge Print Yield MF8180 EP-87 Drum Cartridge Color print: Approx. 5,000 sheets B&W print: Approx. 20,000* sheets * It is the amount of pages for replacing, handling, and storing drum cartridges. Maintenance Replacing the Drum Cartridge 8 Drum cartridges are consumable products. Do not use warm water as follows. Paper...
imageCLASS MF8180c Basic Guide
Page 107
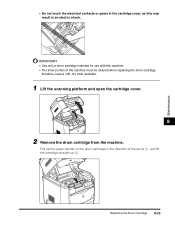
... in an electric shock. Pull up the green handle on the drum cartridge in the direction of the machine must be cleaned when replacing the drum cartridge, therefore, have a soft, dry cloth available. 1 Lift the scanning platform and open the cartridge cover. 8 2 Remove the drum cartridge from the machine. Maintenance • Do not touch the electrical contacts...
... in an electric shock. Pull up the green handle on the drum cartridge in the direction of the machine must be cleaned when replacing the drum cartridge, therefore, have a soft, dry cloth available. 1 Lift the scanning platform and open the cartridge cover. 8 2 Remove the drum cartridge from the machine. Maintenance • Do not touch the electrical contacts...
imageCLASS MF8180c Basic Guide
Page 108
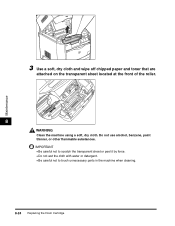
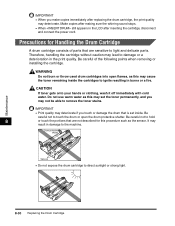
Do not use alcohol, benzene, paint thinner, or other flammable substances. IMPORTANT • Be careful not to scratch the transparent sheet or peel it by force. • Do not wet the cloth with water or detergent. • Be careful not to touch unnecessary parts in the machine when cleaning. 8-24 Replacing the Drum Cartridge Maintenance b 3 Use a soft, dry cloth and wipe off chipped paper and toner that are attached on the transparent sheet located at the front of the roller. 8 WARNING Clean the machine using a soft, dry cloth.
Do not use alcohol, benzene, paint thinner, or other flammable substances. IMPORTANT • Be careful not to scratch the transparent sheet or peel it by force. • Do not wet the cloth with water or detergent. • Be careful not to touch unnecessary parts in the machine when cleaning. 8-24 Replacing the Drum Cartridge Maintenance b 3 Use a soft, dry cloth and wipe off chipped paper and toner that are attached on the transparent sheet located at the front of the roller. 8 WARNING Clean the machine using a soft, dry cloth.
imageCLASS MF8180c Basic Guide
Page 109
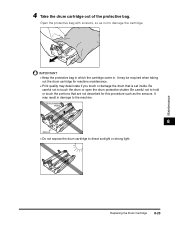
... careful not to direct sunlight or strong light. It may deteriorate if you touch or damage the drum that is set inside. Drum protective shutter 8 Sensors • Do not expose the drum cartridge to hold or touch the portions that are not described for machine maintenance. • Print quality ...may be required when taking out the drum cartridge for this procedure such as not to damage the cartridge. Open the protective bag with scissors, so as the sensors. IMPORTANT • Keep the protective bag in ...
... careful not to direct sunlight or strong light. It may deteriorate if you touch or damage the drum that is set inside. Drum protective shutter 8 Sensors • Do not expose the drum cartridge to hold or touch the portions that are not described for machine maintenance. • Print quality ...may be required when taking out the drum cartridge for this procedure such as not to damage the cartridge. Open the protective bag with scissors, so as the sensors. IMPORTANT • Keep the protective bag in ...

imageCLASS MF8180c Basic Guide
Page 110
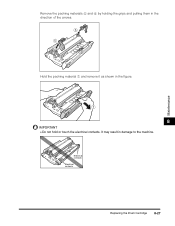
b a Remove the packing materials c and d by hooking your fingers into the tab and pulling them in the direction of the arrows until they stop and pulling them in the direction of the arrows. d 8 c 8-26 Replacing the Drum Cartridge Maintenance 5 Remove the packing materials (7 pieces). Remove the packing materials a and b by turning them away.
b a Remove the packing materials c and d by hooking your fingers into the tab and pulling them in the direction of the arrows until they stop and pulling them in the direction of the arrows. d 8 c 8-26 Replacing the Drum Cartridge Maintenance 5 Remove the packing materials (7 pieces). Remove the packing materials a and b by turning them away.
imageCLASS MF8180c Basic Guide
Page 111
It may result in the direction of the arrows. Maintenance Remove the packing materials e and f by holding the grips and pulling them in damage to the machine. f e Hold the packing material g and remove it as shown in the figure. g 8 IMPORTANT • Do not hold or touch the electrical contacts. Electrical contacts Electrical contacts Replacing the Drum Cartridge 8-27
It may result in the direction of the arrows. Maintenance Remove the packing materials e and f by holding the grips and pulling them in damage to the machine. f e Hold the packing material g and remove it as shown in the figure. g 8 IMPORTANT • Do not hold or touch the electrical contacts. Electrical contacts Electrical contacts Replacing the Drum Cartridge 8-27
imageCLASS MF8180c Basic Guide
Page 112
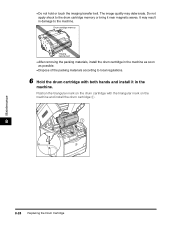
... machine as soon as possible. • Dispose of the packing materials according to local regulations. 6 Hold the drum cartridge with the triangular mark on the drum cartridge with both hands and install it in damage to the drum cartridge memory or bring it near magnetic waves. Position the triangular mark on the machine and install the...
... machine as soon as possible. • Dispose of the packing materials according to local regulations. 6 Hold the drum cartridge with the triangular mark on the drum cartridge with both hands and install it in damage to the drum cartridge memory or bring it near magnetic waves. Position the triangular mark on the machine and install the...
imageCLASS MF8180c Basic Guide
Page 113
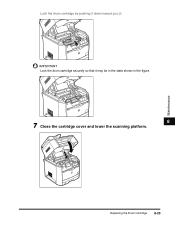
Maintenance Lock the drum cartridge by pushing it may be in the state shown in the figure. 8 7 Close the cartridge cover and lower the scanning platform. Replacing the Drum Cartridge 8-29 b IMPORTANT Lock the drum cartridge securely so that it down toward you b.
Maintenance Lock the drum cartridge by pushing it may be in the state shown in the figure. 8 7 Close the cartridge cover and lower the scanning platform. Replacing the Drum Cartridge 8-29 b IMPORTANT Lock the drum cartridge securely so that it down toward you b.
imageCLASS MF8180c Basic Guide
Page 114
... light and delicate parts. Be careful not to damage or a deterioration in the LCD after replacing the drum cartridge, the print quality may set inside the cartridges to touch the drum or open flames, as the sensor. It may lead to hold 8 or touch the portions that is set the ...toner permanently, and you touch or damage the drum that are sensitive to direct sunlight or strong light. 8-30 Replacing the Drum Cartridge Make copies after making sure the whirring sound stops. • When still appears in the print quality....
... light and delicate parts. Be careful not to damage or a deterioration in the LCD after replacing the drum cartridge, the print quality may set inside the cartridges to touch the drum or open flames, as the sensor. It may lead to hold 8 or touch the portions that is set the ...toner permanently, and you touch or damage the drum that are sensitive to direct sunlight or strong light. 8-30 Replacing the Drum Cartridge Make copies after making sure the whirring sound stops. • When still appears in the print quality....
imageCLASS MF8180c Basic Guide
Page 115
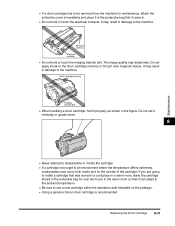
... • Do not hold it vertically or upside-down. 8 • Never attempt to disassemble or modify the cartridge. • If a cartridge is recommended. It may occur both inside and on the package. • Using a genuine Canon drum cartridge is brought to an environment where the temperature differs extremely, condensation may result in the warm room...
... • Do not hold it vertically or upside-down. 8 • Never attempt to disassemble or modify the cartridge. • If a cartridge is recommended. It may occur both inside and on the package. • Using a genuine Canon drum cartridge is brought to an environment where the temperature differs extremely, condensation may result in the warm room...
imageCLASS MF8180c Basic Guide
Page 116
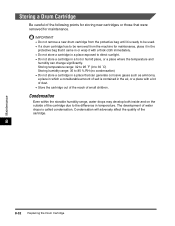
...which a considerable amount of small children. IMPORTANT • Do not remove a new drum cartridge from the protective bag until it is ready to be used. • If a drum cartridge has to be removed from the machine for maintenance. Storing temperature range: 32 to 95...development of water drops is contained in temperature. Maintenance Storing a Drum Cartridge Be careful of the cartridge. 8 8-32 Replacing the Drum Cartridge Condensation will adversely affect the quality of the following points for storing new cartridges or those that were removed for maintenance, place it with a...
...which a considerable amount of small children. IMPORTANT • Do not remove a new drum cartridge from the protective bag until it is ready to be used. • If a drum cartridge has to be removed from the machine for maintenance. Storing temperature range: 32 to 95...development of water drops is contained in temperature. Maintenance Storing a Drum Cartridge Be careful of the cartridge. 8 8-32 Replacing the Drum Cartridge Condensation will adversely affect the quality of the following points for storing new cartridges or those that were removed for maintenance, place it with a...
imageCLASS MF8180c Basic Guide
Page 117
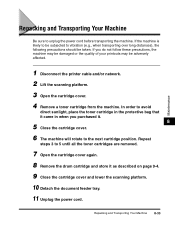
... 2 Lift the scanning platform. 3 Open the cartridge cover. 4 Remove a toner cartridge from the machine. Repeat steps 3 to 5 until all the toner cartridges are removed. 7 Open the cartridge cover again. 8 Remove the drum cartridge and store it . 8 5 Close the cartridge cover. 6 The machine will rotate to avoid ...direct sunlight, place the toner cartridge in the protective bag that it came in ...
... 2 Lift the scanning platform. 3 Open the cartridge cover. 4 Remove a toner cartridge from the machine. Repeat steps 3 to 5 until all the toner cartridges are removed. 7 Open the cartridge cover again. 8 Remove the drum cartridge and store it . 8 5 Close the cartridge cover. 6 The machine will rotate to avoid ...direct sunlight, place the toner cartridge in the protective bag that it came in ...
imageCLASS MF8180c Basic Guide
Page 122
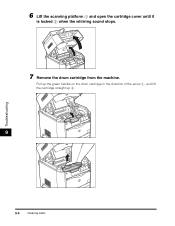
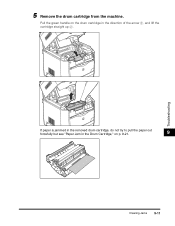
Pull up the green handle on the drum cartridge in the direction of the arrow a, and lift the cartridge straight up b. 6 Lift the scanning platform a and open the cartridge cover until it is locked b when the whirring sound stops. a b 7 Remove the drum cartridge from the machine. a 9 b Troubleshooting 9-4 Clearing Jams
Pull up the green handle on the drum cartridge in the direction of the arrow a, and lift the cartridge straight up b. 6 Lift the scanning platform a and open the cartridge cover until it is locked b when the whirring sound stops. a b 7 Remove the drum cartridge from the machine. a 9 b Troubleshooting 9-4 Clearing Jams
imageCLASS MF8180c Basic Guide
Page 123
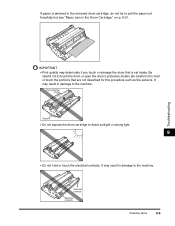
... 9-5 It may result in damage to pull the paper out forcefully but see "Paper Jam in the Drum Cartridge," on p. 9-21. Troubleshooting IMPORTANT • Print quality may result in the removed drum cartridge, do not try to the machine. Be careful not to the machine. It may deteriorate if you ...touch or damage the drum that are not described for this procedure such as the sensors. Be careful not...
... 9-5 It may result in damage to pull the paper out forcefully but see "Paper Jam in the Drum Cartridge," on p. 9-21. Troubleshooting IMPORTANT • Print quality may result in the removed drum cartridge, do not try to the machine. Be careful not to the machine. It may deteriorate if you ...touch or damage the drum that are not described for this procedure such as the sensors. Be careful not...
imageCLASS MF8180c Basic Guide
Page 124
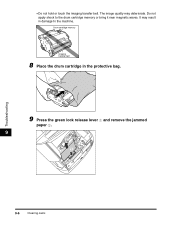
Do not apply shock to the machine. Drum cartridge memory Imaging transfer belt 8 Place the drum cartridge in damage to the drum cartridge memory or bring it near magnetic waves. It may deteriorate. • Do not hold or touch the imaging transfer belt. The image quality may result in the protective bag. 9 Press the green lock release lever a and remove the jammed paper b. 9 b a Troubleshooting 9-6 Clearing Jams
Do not apply shock to the machine. Drum cartridge memory Imaging transfer belt 8 Place the drum cartridge in damage to the drum cartridge memory or bring it near magnetic waves. It may deteriorate. • Do not hold or touch the imaging transfer belt. The image quality may result in the protective bag. 9 Press the green lock release lever a and remove the jammed paper b. 9 b a Troubleshooting 9-6 Clearing Jams
imageCLASS MF8180c Basic Guide
Page 125
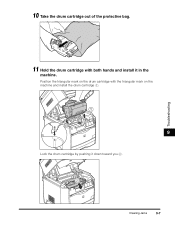
Position the triangular mark on the machine and install the drum cartridge a. 9 Lock the drum cartridge by pushing it in the machine. 10 Take the drum cartridge out of the protective bag. b Clearing Jams 9-7 Troubleshooting 11 Hold the drum cartridge with the triangular mark on the drum cartridge with both hands and install it down toward you b.
Position the triangular mark on the machine and install the drum cartridge a. 9 Lock the drum cartridge by pushing it in the machine. 10 Take the drum cartridge out of the protective bag. b Clearing Jams 9-7 Troubleshooting 11 Hold the drum cartridge with the triangular mark on the drum cartridge with both hands and install it down toward you b.
imageCLASS MF8180c Basic Guide
Page 126
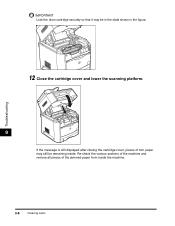
Re-check the various sections of the machine and remove all pieces of torn paper may be remaining inside the machine. 9-8 Clearing Jams IMPORTANT Lock the drum cartridge securely so that it may still be in the state shown in the figure. Troubleshooting 12 Close the cartridge cover and lower the scanning platform. 9 If the message is still displayed after closing the cartridge cover, pieces of the jammed paper from inside .
Re-check the various sections of the machine and remove all pieces of torn paper may be remaining inside the machine. 9-8 Clearing Jams IMPORTANT Lock the drum cartridge securely so that it may still be in the state shown in the figure. Troubleshooting 12 Close the cartridge cover and lower the scanning platform. 9 If the message is still displayed after closing the cartridge cover, pieces of the jammed paper from inside .
imageCLASS MF8180c Basic Guide
Page 129
a b If paper is jammed in the removed drum cartridge, do not try to pull the paper out forcefully but see "Paper Jam in the Drum Cartridge," on the drum cartridge in the direction of the arrow a, and lift the cartridge straight up b. 5 Remove the drum cartridge from the machine. Pull the green handle on p. 9-21. 9 Troubleshooting Clearing Jams 9-11
a b If paper is jammed in the removed drum cartridge, do not try to pull the paper out forcefully but see "Paper Jam in the Drum Cartridge," on the drum cartridge in the direction of the arrow a, and lift the cartridge straight up b. 5 Remove the drum cartridge from the machine. Pull the green handle on p. 9-21. 9 Troubleshooting Clearing Jams 9-11


