LV-X1 Brochure
Page 2
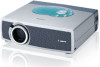
... (Some workstations are not supported.) Scanning Frequency: 15 to 100kHz for horizontal sync, 50 to change without notice. Canon is a trademark of the LV-X1 is designed to operate some PC functions with mouse and laser functions • PR-200S Presentation Assistant • Mouse... q DVD or VCR q HDTV LV-X1 Kit Contents: • LV-X1 projector • Power cable • VGA computer cable • Wireless remote control • Lithium Battery (CR2025) • Lens cap • Soft carrying case • Warranty card • User manual Flexible Image Settings The Image Select ...
... (Some workstations are not supported.) Scanning Frequency: 15 to 100kHz for horizontal sync, 50 to change without notice. Canon is a trademark of the LV-X1 is designed to operate some PC functions with mouse and laser functions • PR-200S Presentation Assistant • Mouse... q DVD or VCR q HDTV LV-X1 Kit Contents: • LV-X1 projector • Power cable • VGA computer cable • Wireless remote control • Lithium Battery (CR2025) • Lens cap • Soft carrying case • Warranty card • User manual Flexible Image Settings The Image Select ...

Owners Manual
Page 2
... PARTS INSIDE EXCEPT LAMP REPLACEMENT. Eye damage could result. q Take appropriate space on the projector. READ AND KEEP THIS OWNER'S MANUAL FOR LATER USE. THIS SYMBOL INDICATES THAT DANGEROUS VOLTAGE CONSTITUTING A RISK OF ELECTRIC SHOCK IS PRESENT WITHIN THIS UNIT. REFER SERVICING TO... booklet. THIS SYMBOL INDICATES THAT THERE ARE IMPORTANT OPERATING AND MAINTENANCE INSTRUCTIONS IN THE OWNER'S MANUAL WITH THIS UNIT. 2 TO THE OWNER Before operating this projector, read this manual again, check operations and cable connections and try the solutions in the "Trouble-shooting" section...
... PARTS INSIDE EXCEPT LAMP REPLACEMENT. Eye damage could result. q Take appropriate space on the projector. READ AND KEEP THIS OWNER'S MANUAL FOR LATER USE. THIS SYMBOL INDICATES THAT DANGEROUS VOLTAGE CONSTITUTING A RISK OF ELECTRIC SHOCK IS PRESENT WITHIN THIS UNIT. REFER SERVICING TO... booklet. THIS SYMBOL INDICATES THAT THERE ARE IMPORTANT OPERATING AND MAINTENANCE INSTRUCTIONS IN THE OWNER'S MANUAL WITH THIS UNIT. 2 TO THE OWNER Before operating this projector, read this manual again, check operations and cable connections and try the solutions in the "Trouble-shooting" section...
Owners Manual
Page 5
.... q Windows and PowerPoint are trademarks or registered trademarks of Microsoft Corporation. q Each name of corporations or products in the owner's manual is a trademark or a registered trademark of International Business Machines, Inc. q IBM and PS/2 are trademarks or registered trademarks of its... COMPUTER SPECIFICATIONS 22 23 PC ADJUSTMENT 24 NAME OF EACH PART OF PROJECTOR 7 AUTO PC ADJUSTMENT 24 SETTING-UP PROJECTOR 8 MANUAL PC ADJUSTMENT 25 CONNECTING AC POWER CORD 8 PICTURE IMAGE ADJUSTMENT 27 POSITIONING PROJECTOR 9 IMAGE LEVEL SELECT 27 ADJUSTABLE FEET 9 ...
.... q Windows and PowerPoint are trademarks or registered trademarks of Microsoft Corporation. q Each name of corporations or products in the owner's manual is a trademark or a registered trademark of International Business Machines, Inc. q IBM and PS/2 are trademarks or registered trademarks of its... COMPUTER SPECIFICATIONS 22 23 PC ADJUSTMENT 24 NAME OF EACH PART OF PROJECTOR 7 AUTO PC ADJUSTMENT 24 SETTING-UP PROJECTOR 8 MANUAL PC ADJUSTMENT 25 CONNECTING AC POWER CORD 8 PICTURE IMAGE ADJUSTMENT 27 POSITIONING PROJECTOR 9 IMAGE LEVEL SELECT 27 ADJUSTABLE FEET 9 ...
Owners Manual
Page 6
... Computer) Digital Zoom function expands (to turn Projection Lamp off when a projector detects signal interruption and any operation button is pressed. x Digital Zoom (for troublesome manual adjustment of a projector may result in distorted image being displayed in ; x Power Management Power Management function is provided to reduce power consumption while a projector is...
... Computer) Digital Zoom function expands (to turn Projection Lamp off when a projector detects signal interruption and any operation button is pressed. x Digital Zoom (for troublesome manual adjustment of a projector may result in distorted image being displayed in ; x Power Management Power Management function is provided to reduce power consumption while a projector is...

Owners Manual
Page 22
...adjust projector and the message "Auto" is displayed on SYSTEM Menu icon. (Refer to P24.) When image is not provided properly, manual adjustment is set correctly. (Refer to TROUBLESHOOTING on this projector automatically tunes to incoming signal and projects proper image without any special ...setting. (Some computers need setting manually.) Note : Projector may display one of computers based on VGA, SVGA, XGA or SXGA (refer to Computer and press SET button. ...
...adjust projector and the message "Auto" is displayed on SYSTEM Menu icon. (Refer to P24.) When image is not provided properly, manual adjustment is set correctly. (Refer to TROUBLESHOOTING on this projector automatically tunes to incoming signal and projects proper image without any special ...setting. (Some computers need setting manually.) Note : Projector may display one of computers based on VGA, SVGA, XGA or SXGA (refer to Computer and press SET button. ...

Owners Manual
Page 24
... frame pointer to AUTO PC Adj. button on PC SYSTEM Menu (P22). Store adjustment parameters. NOTE q Fine sync, Total dots and Picture Position of MANUAL PC ADJUSTMENT section (P26). PC ADJUST MENU PC ADJUST Menu icon Move a red frame pointer to AUTO PC Adj. Auto PC Adj. 1 Press MENU...and press SET button. 24 COMPUTER INPUT PC ADJUSTMENT AUTO PC ADJUSTMENT Auto PC Adjustment function is not provided properly through this function, manual adjustments are memorized, setting can be operated when "RGB," "720p (HDTV)," "1035i (HDTV)" or "1080i (HDTV)" is selected on Remote Control ...
... frame pointer to AUTO PC Adj. button on PC SYSTEM Menu (P22). Store adjustment parameters. NOTE q Fine sync, Total dots and Picture Position of MANUAL PC ADJUSTMENT section (P26). PC ADJUST MENU PC ADJUST Menu icon Move a red frame pointer to AUTO PC Adj. Auto PC Adj. 1 Press MENU...and press SET button. 24 COMPUTER INPUT PC ADJUSTMENT AUTO PC ADJUSTMENT Auto PC Adjustment function is not provided properly through this function, manual adjustments are memorized, setting can be operated when "RGB," "720p (HDTV)," "1035i (HDTV)" or "1080i (HDTV)" is selected on Remote Control ...
Owners Manual
Page 25
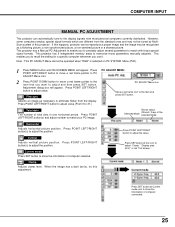
... SET button to eliminate flicker from most personal computers currently distributed. Press SET button at Current mode icon to match with those parameters manually adjusted. Press POINT LEFT/RIGHT button(s) to adjust the position. Current mode Press SET button at this adjustment. This projector has... a Manual PC Adjustment to enable you want to match your PC image. Adjustment dialog box will appear. Press POINT LEFT/RIGHT button to adjust ...
... SET button to eliminate flicker from most personal computers currently distributed. Press SET button at Current mode icon to match with those parameters manually adjusted. Press POINT LEFT/RIGHT button(s) to adjust the position. Current mode Press SET button at this adjustment. This projector has... a Manual PC Adjustment to enable you want to match your PC image. Adjustment dialog box will appear. Press POINT LEFT/RIGHT button to adjust ...

Owners Manual
Page 29
... 768). will appear. SCREEN MENU 2 Press POINT DOWN button and move a red frame pointer to compress image size. Normal Provides image to store manual adjustment. Select [Yes] to fit screen size. message Move a red arrow pointer to Store icon and press SET button. Digital zoom + When ... image can work only when the image is larger than XGA (1024 x 768) is higher than 1280 X 1024. COMPUTER INPUT 3 Store To store manually preset image level, move a red frame pointer to [Yes] and then press SET button. q Wide cannot be also expanded by pressing D.ZOOM T ...
... 768). will appear. SCREEN MENU 2 Press POINT DOWN button and move a red frame pointer to compress image size. Normal Provides image to store manual adjustment. Select [Yes] to fit screen size. message Move a red arrow pointer to Store icon and press SET button. Digital zoom + When ... image can work only when the image is larger than XGA (1024 x 768) is higher than 1280 X 1024. COMPUTER INPUT 3 Store To store manually preset image level, move a red frame pointer to [Yes] and then press SET button. q Wide cannot be also expanded by pressing D.ZOOM T ...
Owners Manual
Page 31
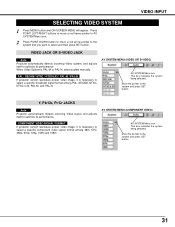
... then press SET button. PAL / SECAM / NTSC / NTSC4.43 / PAL-M / PAL-N If projector cannot reproduce proper video image, it is PAL-M or PAL-N, select system manually. Press POINT LEFT/RIGHT buttons to move a red frame pointer to AV SYSTEM Menu icon. 2 Press POINT DOWN button to move a red arrow pointer to...
... then press SET button. PAL / SECAM / NTSC / NTSC4.43 / PAL-M / PAL-N If projector cannot reproduce proper video image, it is PAL-M or PAL-N, select system manually. Press POINT LEFT/RIGHT buttons to move a red frame pointer to AV SYSTEM Menu icon. 2 Press POINT DOWN button to move a red arrow pointer to...

Owners Manual
Page 34
To set this manual adjustment, select Custom by pressing IMAGE button or through IMAGE SELECT MENU (refer to the function and press SET ...720p," "1035i," or "1080i" is selected on AV SYSTEM Menu (P31). 34 Other icons operate as follows. VIDEO INPUT 3 Store To store manually preset image level, move a red frame pointer to SCREEN Menu icon. will appear. Select [Yes] to select and then press SET button. SCREEN ... "OK?" "OK?" Store icon PICTURE SCREEN ADJUSTMENT This projector has a picture screen resize function, which enables you want to store manual adjustment.
To set this manual adjustment, select Custom by pressing IMAGE button or through IMAGE SELECT MENU (refer to the function and press SET ...720p," "1035i," or "1080i" is selected on AV SYSTEM Menu (P31). 34 Other icons operate as follows. VIDEO INPUT 3 Store To store manually preset image level, move a red frame pointer to SCREEN Menu icon. will appear. Select [Yes] to select and then press SET button. SCREEN ... "OK?" "OK?" Store icon PICTURE SCREEN ADJUSTMENT This projector has a picture screen resize function, which enables you want to store manual adjustment.
Owners Manual
Page 41
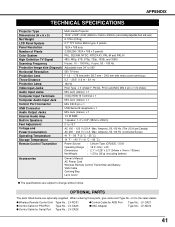
... / 3.0V) : 16.4' (5m) / ±30˚ : 2.1" x 0.28" x 5.3" (54mm x 7mm x 135mm) : 1.27oz (36 g) (including battery) Accessories Owner's Manual AC Power Cord Wireless Remote Control Transmitter and Battery VGA Cable Carrying Bag Lens Cover q The specifications are optionally supplied. OPTIONAL PARTS The parts listed...~ 240 V (1.4 A Max. When ordering those parts, give name and Type No. q Wireless Remote Control Unit Type No. : LV-RC01 q Control Cable for PS/2Port Type No. : LV-CA25 q Control Cable for Serial Port Type No.: LV-CA26 q Control Cable for ADB Port q MAC Adapter Type No...
... / 3.0V) : 16.4' (5m) / ±30˚ : 2.1" x 0.28" x 5.3" (54mm x 7mm x 135mm) : 1.27oz (36 g) (including battery) Accessories Owner's Manual AC Power Cord Wireless Remote Control Transmitter and Battery VGA Cable Carrying Bag Lens Cover q The specifications are optionally supplied. OPTIONAL PARTS The parts listed...~ 240 V (1.4 A Max. When ordering those parts, give name and Type No. q Wireless Remote Control Unit Type No. : LV-RC01 q Control Cable for PS/2Port Type No. : LV-CA25 q Control Cable for Serial Port Type No.: LV-CA26 q Control Cable for ADB Port q MAC Adapter Type No...


