
User Manual
Page 3
.... Cooling notes Air outlet Make sure the air outlet is 50cm clear of any way other than the desktop and ceiling mount, otherwise lamp life could decrease dramatically, and may lead to other ports like BNC, RCA; In the meantime, the delayed heat radiating will lead to mute ... should not be in front of the lens of other projector to avoid causing illusions. Keep the outlet at least 100cm away from fluorescent lamps to avoid malfunction caused by IR interference. The VGA IN connector should be connected to the VGA IN port. Verify Installation Location ...
.... Cooling notes Air outlet Make sure the air outlet is 50cm clear of any way other than the desktop and ceiling mount, otherwise lamp life could decrease dramatically, and may lead to other ports like BNC, RCA; In the meantime, the delayed heat radiating will lead to mute ... should not be in front of the lens of other projector to avoid causing illusions. Keep the outlet at least 100cm away from fluorescent lamps to avoid malfunction caused by IR interference. The VGA IN connector should be connected to the VGA IN port. Verify Installation Location ...
User Manual
Page 4
...kept on page 52 for clear and safe instructions for this happens, immediately open the lamp cover or while you are relevant to the side of foot traffic. Remove the batteries from the Canon Customer Support Center. It is both for about one page. Place the power cord where... it will not be hazardous if done incorrectly. See Replacing the Projection Lamp on one hour. If this procedure. If the lamp ruptures and you only print sections that ...
...kept on page 52 for clear and safe instructions for this happens, immediately open the lamp cover or while you are relevant to the side of foot traffic. Remove the batteries from the Canon Customer Support Center. It is both for about one page. Place the power cord where... it will not be hazardous if done incorrectly. See Replacing the Projection Lamp on one hour. If this procedure. If the lamp ruptures and you only print sections that ...
User Manual
Page 5
... Audio ...35 INSTALLATION I MENU ...36 Advanced Feature ...37 INSTALLATION II MENU...38 Advanced Feature ...39 OSD Menu Setting ...40 Peripheral Test ...40 Reset Lamp Time ...41 3D ...41 Network Setting ...42 Factory Reset...51 Status ...51 MAINTENANCE AND SECURITY ...52 REPLACING THE PROJECTION... LAMP...52 Resetting the Lamp Time ...54 CLEANING THE PROJECTOR...55 Cleaning the Projector Mirror:...55 USING THE PHYSICAL LOCK ...56 Using the Kensington® Lock ...56 Using ...
... Audio ...35 INSTALLATION I MENU ...36 Advanced Feature ...37 INSTALLATION II MENU...38 Advanced Feature ...39 OSD Menu Setting ...40 Peripheral Test ...40 Reset Lamp Time ...41 3D ...41 Network Setting ...42 Factory Reset...51 Status ...51 MAINTENANCE AND SECURITY ...52 REPLACING THE PROJECTION... LAMP...52 Resetting the Lamp Time ...54 CLEANING THE PROJECTOR...55 Cleaning the Projector Mirror:...55 USING THE PHYSICAL LOCK ...56 Using the Kensington® Lock ...56 Using ...

User Manual
Page 10
...Should you purchased it. Ground THE SOCKET-OUTLET SHOULD BE INSTALLED NEAR THE EQUIPMENT AND EASILY ACCESSIBLE. For lamp recycling and disposal information please call 1-800-OK-CANON for details. For more information about the recycling of this product is a safety feature to potentially hazardous ... office, waste authority, approved scheme or your household waste disposal service or visit http://www.canon-europe.com/weee, or http://www.canon-europe.com/battery. For the U.S. and Canada, LAMP(S) INSIDE THIS PRODUCT CONTAIN MERCURY AND MUST BE RECYCLED OR DISPOSED OF ACCORDING TO LOCAL,...
...Should you purchased it. Ground THE SOCKET-OUTLET SHOULD BE INSTALLED NEAR THE EQUIPMENT AND EASILY ACCESSIBLE. For lamp recycling and disposal information please call 1-800-OK-CANON for details. For more information about the recycling of this product is a safety feature to potentially hazardous ... office, waste authority, approved scheme or your household waste disposal service or visit http://www.canon-europe.com/weee, or http://www.canon-europe.com/battery. For the U.S. and Canada, LAMP(S) INSIDE THIS PRODUCT CONTAIN MERCURY AND MUST BE RECYCLED OR DISPOSED OF ACCORDING TO LOCAL,...

User Manual
Page 14
... as possible. • Useful life of lamps varies widely from the projector lens etc., do not place any objects in front of the lens while the projector is used for cleaning and inspection of maintenance costs, contact the Canon Customer Support Center. Touching these areas. Pay... attention to lamp and depending on it could ignite, causing a fire. • If the projector is operating. Doing so could...
... as possible. • Useful life of lamps varies widely from the projector lens etc., do not place any objects in front of the lens while the projector is used for cleaning and inspection of maintenance costs, contact the Canon Customer Support Center. Touching these areas. Pay... attention to lamp and depending on it could ignite, causing a fire. • If the projector is operating. Doing so could...
User Manual
Page 15
...eye fatigue. Additionally, with the screen. - 9- Viewing 3D content for an extended period of time or viewing them from the Canon Customer Support Center. Always request service from an oblique angle can cause eye strain. • Parents should accompany and monitor their children... as children cannot properly express discomfort with water Caution for a while, the lamp may have been drinking alcohol. • Stop watching 3D content if you experience the following symptoms. If you experience such symptom, immediately...
...eye fatigue. Additionally, with the screen. - 9- Viewing 3D content for an extended period of time or viewing them from the Canon Customer Support Center. Always request service from an oblique angle can cause eye strain. • Parents should accompany and monitor their children... as children cannot properly express discomfort with water Caution for a while, the lamp may have been drinking alcohol. • Stop watching 3D content if you experience the following symptoms. If you experience such symptom, immediately...

User Manual
Page 18
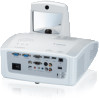
Aspheric mirror 5 67 DESCRIPTION SEE PAGE: Removes cover to replace lamp module / unit ---> lamp Receives IR signal from remote control Projection Lens Focuses the projected image See Top view-On-screen Display (OSD) buttons and LEDs. 13 Interactive function use *Not Available in LV-WX300UST Reflects images - 12- LABEL Lamp cover IR receiver Lens Focus ring Function keys 6. Interactive Camera 7. Views of Projector Parts Front-right View 12 34 ITEM 1. 2. 3. 4. 5.
Aspheric mirror 5 67 DESCRIPTION SEE PAGE: Removes cover to replace lamp module / unit ---> lamp Receives IR signal from remote control Projection Lens Focuses the projected image See Top view-On-screen Display (OSD) buttons and LEDs. 13 Interactive function use *Not Available in LV-WX300UST Reflects images - 12- LABEL Lamp cover IR receiver Lens Focus ring Function keys 6. Interactive Camera 7. Views of Projector Parts Front-right View 12 34 ITEM 1. 2. 3. 4. 5.

User Manual
Page 19
... LED 12. TEMP LED 6 7 8 9 10 11 DESCRIPTION Opens and exits OSD menus Navigates in the OSD Quick Menu - LAMP LED 11. For Keystone Turns the projector On or Off Amber Flashing Green Flashing Lamp error Error code Power on, Power off Cooling, Error code Red Over Temperature SEE PAGE: 25 25 25...
... LED 12. TEMP LED 6 7 8 9 10 11 DESCRIPTION Opens and exits OSD menus Navigates in the OSD Quick Menu - LAMP LED 11. For Keystone Turns the projector On or Off Amber Flashing Green Flashing Lamp error Error code Power on, Power off Cooling, Error code Red Over Temperature SEE PAGE: 25 25 25...

User Manual
Page 35
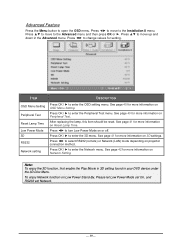
... SETTINGS Installation II Auto Search Auto Power Off (min.) Direct Power On Fan Mode Lamp Mode Advanced OSD Menu Setting Peripheral Test Reset Lamp Time Low Power Mode 3D RS232 Network Setting Factory Reset Status Active Source Video Information Lamp Time (Power Saver, Full power) Firmware Version Menu Position Translucent Menu Menu Display...
... SETTINGS Installation II Auto Search Auto Power Off (min.) Direct Power On Fan Mode Lamp Mode Advanced OSD Menu Setting Peripheral Test Reset Lamp Time Low Power Mode 3D RS232 Network Setting Factory Reset Status Active Source Video Information Lamp Time (Power Saver, Full power) Firmware Version Menu Position Translucent Menu Menu Display...

User Manual
Page 44
...► to enable or disable automatic power On when AC power is higher than 1500m ( 4921ft ) Press the cursor ◄► button to select the lamp mode for more information on page 39. See page 51 for higher brightness or lower brightness to move up and down in the Installation II... II Menu Press the MENU button to enable or disable automatic source detection. ITEM Auto Search Auto Power Off (min.) Direct Power On Fan Mode Lamp Mode Advanced Factory Reset Status DESCRIPTION Press the cursor ◄► button to open the OSD menu. Press OK / ► to toggle between ...
...► to enable or disable automatic power On when AC power is higher than 1500m ( 4921ft ) Press the cursor ◄► button to select the lamp mode for more information on page 39. See page 51 for higher brightness or lower brightness to move up and down in the Installation II... II Menu Press the MENU button to enable or disable automatic source detection. ITEM Auto Search Auto Power Off (min.) Direct Power On Fan Mode Lamp Mode Advanced Factory Reset Status DESCRIPTION Press the cursor ◄► button to open the OSD menu. Press OK / ► to toggle between ...
User Manual
Page 45
... to enter the Network menu. Press ▲▼ to move to select RS232 (remote) or Network (LAN) mode depending on Reset Lamp Time. ITEM DESCRIPTION OSD Menu Setting Peripheral Test Reset Lamp Time Low Power Mode 3D RS232 Network setting Press OK / ► to enter the Peripheral Test menu. Press OK / ►... page 40 for more information on Low Power Stand-By, Please let Low Power Mode set On, and RS232 set Network. - 39- After replacing the lamp, this item should be reset. See page 41 for setting.
... to enter the Network menu. Press ▲▼ to move to select RS232 (remote) or Network (LAN) mode depending on Reset Lamp Time. ITEM DESCRIPTION OSD Menu Setting Peripheral Test Reset Lamp Time Low Power Mode 3D RS232 Network setting Press OK / ► to enter the Peripheral Test menu. Press OK / ►... page 40 for more information on Low Power Stand-By, Please let Low Power Mode set On, and RS232 set Network. - 39- After replacing the lamp, this item should be reset. See page 41 for setting.

User Manual
Page 47
Reset Lamp Time Please refer to Resetting the Lamp on page 54 to reset the lamp hour counter. 3D ITEM 3D 3D Sync Invert 3D Format DESCRIPTION Press ◄► to turn 3D Sync Invert On or Off. Press ◄► to select Off, DLP-Link or IR. Press ◄► to enable or disable 3D Format. - 41-
Reset Lamp Time Please refer to Resetting the Lamp on page 54 to reset the lamp hour counter. 3D ITEM 3D 3D Sync Invert 3D Format DESCRIPTION Press ◄► to turn 3D Sync Invert On or Off. Press ◄► to select Off, DLP-Link or IR. Press ◄► to enable or disable 3D Format. - 41-

User Manual
Page 57
...Status sub menu and press OK / ► to the factory default values (except Language and Security Lock). ITEM DESCRIPTION Active Source Video Information Lamp Time (Power Saver, Full power) Firmware Version Display the activated source. Factory Reset Press the cursor ▲▼ button to move up and ...down in the Installation II menu. Displays resolution/video information for RGB source and color standard for Video source. Lamp Time used information is displayed. Select the Factory Reset sub menu and press OK / ► to reset all the menu items to...
...Status sub menu and press OK / ► to the factory default values (except Language and Security Lock). ITEM DESCRIPTION Active Source Video Information Lamp Time (Power Saver, Full power) Firmware Version Display the activated source. Factory Reset Press the cursor ▲▼ button to move up and ...down in the Installation II menu. Displays resolution/video information for RGB source and color standard for Video source. Lamp Time used information is displayed. Select the Factory Reset sub menu and press OK / ► to reset all the menu items to...
User Manual
Page 58
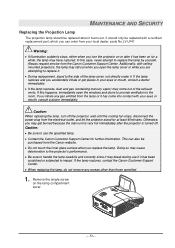
..., contact the Canon Customer Support Center. When replacing the lamp, do not remove any gas emitted from the electrical outlet, and let the projector stand for at least 45minutes. If the lamp ruptures and you open the windows and doors to provide ventilation to replace the lamp by yourself. parts No.LV-LP41 Warning...
..., contact the Canon Customer Support Center. When replacing the lamp, do not remove any gas emitted from the electrical outlet, and let the projector stand for at least 45minutes. If the lamp ruptures and you open the windows and doors to provide ventilation to replace the lamp by yourself. parts No.LV-LP41 Warning...

User Manual
Page 59
Remove the lamp compartment cover. 3. Lift the module handle up. 5. While installing, align the lamp module with the connector and ensure it is level to install the new lamp. Reverse steps 1 to 5 to avoid damage. Note: The lamp must sit securely in place and the lamp connector must be connected properly before tightening the screws. - 53- Loosen the two screws securing the lamp. 4. Pull firmly on the module handle to remove the lamp. 6. 2.
Remove the lamp compartment cover. 3. Lift the module handle up. 5. While installing, align the lamp module with the connector and ensure it is level to install the new lamp. Reverse steps 1 to 5 to avoid damage. Note: The lamp must sit securely in place and the lamp connector must be connected properly before tightening the screws. - 53- Loosen the two screws securing the lamp. 4. Pull firmly on the module handle to remove the lamp. 6. 2.

User Manual
Page 60
Resetting the Lamp Time After replacing the lamp, you should reset the lamp hour counter to open the OSD menu. 2. Press the MENU button to zero. Press buttons to Installation II. - 54- A message screen appears. 5. Press the cursor ► or Enter button. Press the MENU button to get back to reset the lamp hour. 6. Press the cursor ▼▲ button to move down to Advanced. 3. Press the cursor button to move down to Reset Lamp Time. 4. Press the cursor ◄► button to move to the following: 1. Refer to the Installation II menu.
Resetting the Lamp Time After replacing the lamp, you should reset the lamp hour counter to open the OSD menu. 2. Press the MENU button to zero. Press buttons to Installation II. - 54- A message screen appears. 5. Press the cursor ► or Enter button. Press the MENU button to get back to reset the lamp hour. 6. Press the cursor ▼▲ button to move down to Advanced. 3. Press the cursor button to move down to Reset Lamp Time. 4. Press the cursor ◄► button to move to the following: 1. Refer to the Installation II menu.
User Manual
Page 64
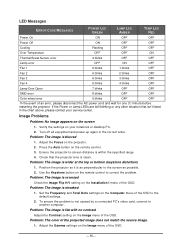
... listed in the correct order. Problem: The image is wider at the top or bottom (keystone distortion) 1. LED Messages ERROR CODE MESSAGES POWER LED GREEN LAMP LED AMBER TEMP LED RED Power On ON OFF OFF Power Off ON OFF OFF Cooling Flashing OFF OFF Over Temperature OFF OFF ON Thermal... projected image does not match the source image. 1. Adjust the Gamma settings on the Image menu of the OSD. - 58- If the Power or Lamp LEDs are still blinking or any other situation that the projector lens is clean. Problem: The image is flat with no contrast Adjust the Contrast...
... listed in the correct order. Problem: The image is wider at the top or bottom (keystone distortion) 1. LED Messages ERROR CODE MESSAGES POWER LED GREEN LAMP LED AMBER TEMP LED RED Power On ON OFF OFF Power Off ON OFF OFF Cooling Flashing OFF OFF Over Temperature OFF OFF ON Thermal... projected image does not match the source image. 1. Adjust the Gamma settings on the Image menu of the OSD. - 58- If the Power or Lamp LEDs are still blinking or any other situation that the projector lens is clean. Problem: The image is flat with no contrast Adjust the Contrast...
User Manual
Page 65
...sensor is distorted 1. Have the remote control serviced. Adjust the volume of the steps you should have replaced the lamp recently, try resetting the lamp connections. 5. Test the source audio output with another electrical device. 3. Adjust the volume on the Image->Advanced ... If you have the projector serviced. 2. Restart the projector in the vicinity. 7. If you are unable to turn off 1. Replace the lamp. 6. Direct the remote control towards remote sensor on , press the power button. 2. Turn off any fluorescent lights in the original carton...
...sensor is distorted 1. Have the remote control serviced. Adjust the volume of the steps you should have replaced the lamp recently, try resetting the lamp connections. 5. Test the source audio output with another electrical device. 3. Adjust the volume on the Image->Advanced ... If you have the projector serviced. 2. Restart the projector in the vicinity. 7. If you are unable to turn off 1. Replace the lamp. 6. Direct the remote control towards remote sensor on , press the power button. 2. Turn off any fluorescent lights in the original carton...
User Manual
Page 66
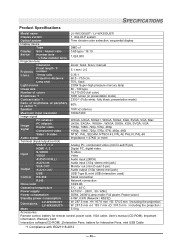
SPECIFICATIONS Product Specifications Model name Display system Optical system Display device Type Display Size / Aspect ratio LV-WX300UST / LV-WX300USTi 1 chip DLP system Time division color extraction, sequential display DMD x1 0.65 type / 16:10 device... temperature 5°C - 40°C Power supply AC100V - 240V, 50 / 60Hz Power consumption 300W, 240W (Lamp mode: Full power, Power savor) Standby power consumption 6.0W, 0.5W (Network / RS232) Dimensions LV-WX300UST LV-WX300USTi W: 287.5 mm ×H: 167.6 mm ×D: 374.5 mm (including the projection) W: 287...
SPECIFICATIONS Product Specifications Model name Display system Optical system Display device Type Display Size / Aspect ratio LV-WX300UST / LV-WX300USTi 1 chip DLP system Time division color extraction, sequential display DMD x1 0.65 type / 16:10 device... temperature 5°C - 40°C Power supply AC100V - 240V, 50 / 60Hz Power consumption 300W, 240W (Lamp mode: Full power, Power savor) Standby power consumption 6.0W, 0.5W (Network / RS232) Dimensions LV-WX300UST LV-WX300USTi W: 287.5 mm ×H: 167.6 mm ×D: 374.5 mm (including the projection) W: 287...

User Manual
Page 72
... some for the compatibility issue with other projectors. Most of this projector. Operation ASCII Power On ※ ~ P N CR ※ Power Off ~ P F CR Auto Image ~ A I CR Lamp Hour Reset ~ R L CR Input Select RGB ~ S R CR Input Select RGB2 ~ S G CR Input Select DVI ~ S D CR Input Select Video ~ S V CR Input Select S-Video ~ S S CR Input Select...
... some for the compatibility issue with other projectors. Most of this projector. Operation ASCII Power On ※ ~ P N CR ※ Power Off ~ P F CR Auto Image ~ A I CR Lamp Hour Reset ~ R L CR Input Select RGB ~ S R CR Input Select RGB2 ~ S G CR Input Select DVI ~ S D CR Input Select Video ~ S V CR Input Select S-Video ~ S S CR Input Select...


