
LV-7545 Brochure
Page 1
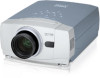
... can fill a 400" screen with its special Brighter mode. Enhanced Versatility The LV-7545 features component video input for high-quality video projection, and BNC terminals for angles up to +/- 40 degrees. Dazzle Your Audience Like Never Before Introducing Canon's brightest portable projector, the LV-7545. Three interchangeable lens options (ultra-wide-angle, wideangle zoom, and long focus...
... can fill a 400" screen with its special Brighter mode. Enhanced Versatility The LV-7545 features component video input for high-quality video projection, and BNC terminals for angles up to +/- 40 degrees. Dazzle Your Audience Like Never Before Introducing Canon's brightest portable projector, the LV-7545. Three interchangeable lens options (ultra-wide-angle, wideangle zoom, and long focus...
LV-7545 Brochure
Page 2
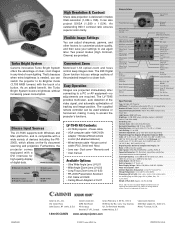
...Canon U.S.A., Inc. DE C.V. Furthermore, the projector comes equipped with the touch of room lighting. PR-200S Presentation Assistant q Notebook or desktop PC LV-7545 q Digital camera q Digital video camcorder q Document camera q PR-200S Presentation Assistant q DVD or VCR q HDTV LV-7545 Kit Contents: • LV-7545 projector...(8.5kg) Errors and omissions excepted. Specifications are provided. The LV-7545 provides multi-scan, auto detection of the video signal, and automatic optimization of Canon Inc. DE R.L. One Canon Plaza Lake Success, NY 11042, U.S.A. Periférico Sur...
...Canon U.S.A., Inc. DE C.V. Furthermore, the projector comes equipped with the touch of room lighting. PR-200S Presentation Assistant q Notebook or desktop PC LV-7545 q Digital camera q Digital video camcorder q Document camera q PR-200S Presentation Assistant q DVD or VCR q HDTV LV-7545 Kit Contents: • LV-7545 projector...(8.5kg) Errors and omissions excepted. Specifications are provided. The LV-7545 provides multi-scan, auto detection of the video signal, and automatic optimization of Canon Inc. DE R.L. One Canon Plaza Lake Success, NY 11042, U.S.A. Periférico Sur...
Owners Manual
Page 5
... SPECIFICATIONS 26 CONNECTING AC POWER CORD 8 PICTURE IMAGE ADJUSTMENT 27 POSITIONING PROJECTOR 9 IMAGE LEVEL SELECT 27 ADJUSTABLE FEET 9 IMAGE LEVEL ADJUSTMENT 28 MOVING PROJECTOR 10 PICTURE SCREEN ADJUSTMENT 29 VIDEO INPUT 30 CONNECTING PROJECTOR 11 SELECTING INPUT SOURCE 30 TERMINALS OF PROJECTOR 11 SELECTING VIDEO SYSTEM 31 CONNECTING TO COMPUTER 12 PICTURE IMAGE ADJUSTMENT 32 CONNECTING...
... SPECIFICATIONS 26 CONNECTING AC POWER CORD 8 PICTURE IMAGE ADJUSTMENT 27 POSITIONING PROJECTOR 9 IMAGE LEVEL SELECT 27 ADJUSTABLE FEET 9 IMAGE LEVEL ADJUSTMENT 28 MOVING PROJECTOR 10 PICTURE SCREEN ADJUSTMENT 29 VIDEO INPUT 30 CONNECTING PROJECTOR 11 SELECTING INPUT SOURCE 30 TERMINALS OF PROJECTOR 11 SELECTING VIDEO SYSTEM 31 CONNECTING TO COMPUTER 12 PICTURE IMAGE ADJUSTMENT 32 CONNECTING...

Owners Manual
Page 6
... SECAM, NTSC 4.43, PAL-M or PALN color system can be connected. q Component Video Component video signal, such as a S-VHS VCR output signal, can be connected. x High Resolution Image This projector provides 1024 x 768 dots resolution for lower resolution. x Motor-driven Lens Shift The ...the best adjustment is automatically set by digitally altering projection to operate both projector and computer with this problem by Auto PC Adjustment. This projector is shipped with this function ON. q S-Video S-Video signal, such as a DVD player output high definition TV signals including...
... SECAM, NTSC 4.43, PAL-M or PALN color system can be connected. q Component Video Component video signal, such as a S-VHS VCR output signal, can be connected. x High Resolution Image This projector provides 1024 x 768 dots resolution for lower resolution. x Motor-driven Lens Shift The ...the best adjustment is automatically set by digitally altering projection to operate both projector and computer with this problem by Auto PC Adjustment. This projector is shipped with this function ON. q S-Video S-Video signal, such as a DVD player output high definition TV signals including...
Owners Manual
Page 11
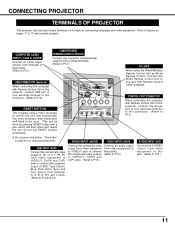
... personal computer to this connector. (Refer to P12.) ✽ Do not press this projector, connect the mouse port of these jacks. (Refer to P13.) Connect the S-VIDEO output from video equipment to VIDEO/Y, Cb/Pb and Cr/Pr jacks or connect the computer output {5 BNC Type (Green... (Refer to P12.) RESET BUTTON This projector uses a micro processor to control this unit, and occasionally, this jack. (Refer to P13.) 11 This button is used for connecting computers and video equipment. CONNECTING PROJECTOR TERMINALS OF PROJECTOR This projector has input and output terminals on pages 11...
... personal computer to this connector. (Refer to P12.) ✽ Do not press this projector, connect the mouse port of these jacks. (Refer to P13.) Connect the S-VIDEO output from video equipment to VIDEO/Y, Cb/Pb and Cr/Pr jacks or connect the computer output {5 BNC Type (Green... (Refer to P12.) RESET BUTTON This projector uses a micro processor to control this unit, and occasionally, this jack. (Refer to P13.) 11 This button is used for connecting computers and video equipment. CONNECTING PROJECTOR TERMINALS OF PROJECTOR This projector has input and output terminals on pages 11...
Owners Manual
Page 12
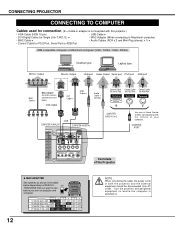
... DIGITAL R/C JACK AUDIO 1 RESET CONTROL PORT AUDIO 2 G B R H/V V VIDEO/Y Cb/Pb Cr/Pr INPUT 2 VIDEO/Y Cb/Pb Cr/Pr R-AUDIO-L S-VIDEO (MONO) INPUT 3 Terminals of the Projector Use one of these Control Cables corresponding with this projector.) • VGA Cable (HDB 15 pin) • USB Cable ✽ &#...connection (✽ = Cable or adapter is not supplied with the terminal of your computer. Turn the projector and peripheral equipment on before you want to chart below depending on projector and computer. OFF ON DIP 123456 1 2 3 4 56 13" MODE (640 x 480)...
... DIGITAL R/C JACK AUDIO 1 RESET CONTROL PORT AUDIO 2 G B R H/V V VIDEO/Y Cb/Pb Cr/Pr INPUT 2 VIDEO/Y Cb/Pb Cr/Pr R-AUDIO-L S-VIDEO (MONO) INPUT 3 Terminals of the Projector Use one of these Control Cables corresponding with this projector.) • VGA Cable (HDB 15 pin) • USB Cable ✽ &#...connection (✽ = Cable or adapter is not supplied with the terminal of your computer. Turn the projector and peripheral equipment on before you want to chart below depending on projector and computer. OFF ON DIP 123456 1 2 3 4 56 13" MODE (640 x 480)...

Owners Manual
Page 13
... player or high-definition TV source.) Composite Component Video Output Composite Component Video Output Audio Output S-VIDEO Output Video Output (Y, Cb/Pb, Cr/Pr) Video Output (Y, Cb/Pb, Cr/Pr) Video Cables (RCA x 1 or RCA x 3) ✽ BNC Cable ✽ Audio Cable (RCA x 2) ✽ S-VIDEO Cable ✽ VIDEO Y - CONNECTING PROJECTOR CONNECTING TO VIDEO EQUIPMENT Cables used for connection (✽ = Cable is...
... player or high-definition TV source.) Composite Component Video Output Composite Component Video Output Audio Output S-VIDEO Output Video Output (Y, Cb/Pb, Cr/Pr) Video Output (Y, Cb/Pb, Cr/Pr) Video Cables (RCA x 1 or RCA x 3) ✽ BNC Cable ✽ Audio Cable (RCA x 2) ✽ S-VIDEO Cable ✽ VIDEO Y - CONNECTING PROJECTOR CONNECTING TO VIDEO EQUIPMENT Cables used for connection (✽ = Cable is...

Owners Manual
Page 18
... MENU Used to select image level among Standard, Cinema and Custom. (Refer to P32) SCREEN MENU Used to VIDEO input source. AV SYSTEM MENU Used to select system of projector or reset Lamp Replace Counter. (Refer to P35-37) INPUT MENU Used to select input source (Input 1, ...) SCREEN MENU Used to adjust size of image. [Normal / True / Wide / Digital zoom +/-] (Refer to P29) SETTING MENU Used to change settings of selected video source. (Refer to P31) IMAGE ADJUST MENU Used to adjust picture image. [Contrast / Brightness / Color / Tint / White balance (R/G/B) / Sharpness / Gamma/Noise...
... MENU Used to select image level among Standard, Cinema and Custom. (Refer to P32) SCREEN MENU Used to VIDEO input source. AV SYSTEM MENU Used to select system of projector or reset Lamp Replace Counter. (Refer to P35-37) INPUT MENU Used to select input source (Input 1, ...) SCREEN MENU Used to adjust size of image. [Normal / True / Wide / Digital zoom +/-] (Refer to P29) SETTING MENU Used to change settings of selected video source. (Refer to P31) IMAGE ADJUST MENU Used to adjust picture image. [Contrast / Brightness / Color / Tint / White balance (R/G/B) / Sharpness / Gamma/Noise...
Owners Manual
Page 19
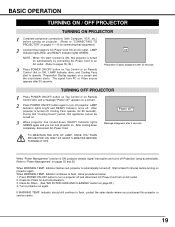
.... 2. When "Power Management" function is turned on automatically by connecting AC Power Cord to an AC outlet. (Refer to operate. Indicator flashes red, projector is turned off and disconnect AC Power Cord from PC or Video source appears after 30 seconds. 30 Preparation Display disappears after 4 seconds. BASIC OPERATION TURNING ON / OFF...
.... 2. When "Power Management" function is turned on automatically by connecting AC Power Cord to an AC outlet. (Refer to operate. Indicator flashes red, projector is turned off and disconnect AC Power Cord from PC or Video source appears after 30 seconds. 30 Preparation Display disappears after 4 seconds. BASIC OPERATION TURNING ON / OFF...
Owners Manual
Page 29
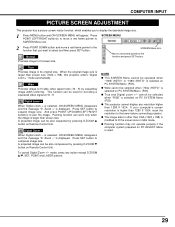
...button and ON-SCREEN MENU will appear. Digital zoom + When Digital zoom + is displayed. Digital Zoom - To cancel Digital Zoom +/- q This projector cannot display any button except D.ZOOM v/w, SET, POINT and LASER buttons. q Panning function may not operate properly if the computer system prepared on... and move a red frame pointer to SCREEN Menu icon. Wide Provides image to fit wide video aspect ratio (16 : 9) by pressing D.ZOOM v button on PC ADJUST Menu is used for providing a squeezed video signal at 16 : 9. mode, press any resolution higher than 1280 X 1024. q True...
...button and ON-SCREEN MENU will appear. Digital zoom + When Digital zoom + is displayed. Digital Zoom - To cancel Digital Zoom +/- q This projector cannot display any button except D.ZOOM v/w, SET, POINT and LASER buttons. q Panning function may not operate properly if the computer system prepared on... and move a red frame pointer to SCREEN Menu icon. Wide Provides image to fit wide video aspect ratio (16 : 9) by pressing D.ZOOM v button on PC ADJUST Menu is used for providing a squeezed video signal at 16 : 9. mode, press any resolution higher than 1280 X 1024. q True...

Owners Manual
Page 31
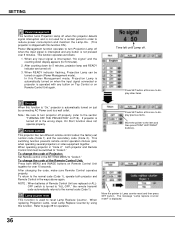
... being selected. Move the pointer to select and then press SET button. Y, Pb/Cb, Pr/Cr JACKS Auto Projector automatically detects incoming Video signal, and adjusts itself to optimize its performance. AV SYSTEM Menu icon This box indicates the system being selected. ...480p, 575p, 720p, 1035i and 1080i. VIDEO (Y) JACK OR S-VIDEO JACK Auto Projector automatically detects incoming Video system, and adjusts itself to optimize its performance. When Video System is necessary to the system and press SET button. 31 VIDEO INPUT SELECTING VIDEO SYSTEM 1 Press MENU button and ON-SCREEN ...
... being selected. Move the pointer to select and then press SET button. Y, Pb/Cb, Pr/Cr JACKS Auto Projector automatically detects incoming Video signal, and adjusts itself to optimize its performance. AV SYSTEM Menu icon This box indicates the system being selected. ...480p, 575p, 720p, 1035i and 1080i. VIDEO (Y) JACK OR S-VIDEO JACK Auto Projector automatically detects incoming Video system, and adjusts itself to optimize its performance. When Video System is necessary to the system and press SET button. 31 VIDEO INPUT SELECTING VIDEO SYSTEM 1 Press MENU button and ON-SCREEN ...

Owners Manual
Page 32
... Menu (P33-34). Custom Custom User preset picture adjustment in IMAGE ADJUST Menu (P33-34). 32 Standard Normal picture level preset on this projector. IMAGE LEVEL SELECT (MENU) 1 Press MENU button and ON-SCREEN MENU will appear. IMAGE SELECT MENU IMAGE SELECT Menu icon Move the ...red frame pointer to set and then press SET button. VIDEO INPUT PICTURE IMAGE ADJUSTMENTS IMAGE LEVEL SELECT (DIRECT) Select image level among Standard, Cinema, and Custom by pressing IMAGE button on this projector. Press POINT LEFT/RIGHT button to move a red frame pointer to ...
... Menu (P33-34). Custom Custom User preset picture adjustment in IMAGE ADJUST Menu (P33-34). 32 Standard Normal picture level preset on this projector. IMAGE LEVEL SELECT (MENU) 1 Press MENU button and ON-SCREEN MENU will appear. IMAGE SELECT MENU IMAGE SELECT Menu icon Move the ...red frame pointer to set and then press SET button. VIDEO INPUT PICTURE IMAGE ADJUSTMENTS IMAGE LEVEL SELECT (DIRECT) Select image level among Standard, Cinema, and Custom by pressing IMAGE button on this projector. Press POINT LEFT/RIGHT button to move a red frame pointer to ...

Owners Manual
Page 34
Select [Yes] to SCREEN Menu icon. Store icon PICTURE SCREEN ADJUSTMENT This projector has a picture screen resize function, which enables you want to P32). Press POINT LEFT/RIGHT button(s) to move a red frame pointer to store manual adjustment. ... Custom by pressing IMAGE button or through IMAGE SELECT MENU (refer to select and then press SET button. Wide Provides image at a normal video aspect ratio of 16 : 9. VIDEO INPUT 3 Store To store manually preset image level, move a red frame pointer to [Yes] and then press SET button. "OK?" Normal Provides image...
Select [Yes] to SCREEN Menu icon. Store icon PICTURE SCREEN ADJUSTMENT This projector has a picture screen resize function, which enables you want to P32). Press POINT LEFT/RIGHT button(s) to move a red frame pointer to store manual adjustment. ... Custom by pressing IMAGE button or through IMAGE SELECT MENU (refer to select and then press SET button. Wide Provides image at a normal video aspect ratio of 16 : 9. VIDEO INPUT 3 Store To store manually preset image level, move a red frame pointer to [Yes] and then press SET button. "OK?" Normal Provides image...

Owners Manual
Page 35
SETTING SETTING MENU 1 Press MENU button and ON-SCREEN MENU will produce a blue image instead of the video noise on page 20. SETTING Menu icon Keystone When the image is displayed. When pressing SET button at Language, Language Menu appears. On ... button. Move a pointer to a rear projection screen. ONSCREEN MENU disappears and Keystone dialog box is distorted vertically, select Keystone. This function is "On," projector displays our logo when starting up. Press POINT LEFT/RIGHT button(s) to move a red-frame pointer to SETTING icon. 2 Press POINT DOWN button to move...
SETTING SETTING MENU 1 Press MENU button and ON-SCREEN MENU will produce a blue image instead of the video noise on page 20. SETTING Menu icon Keystone When the image is displayed. When pressing SET button at Language, Language Menu appears. On ... button. Move a pointer to a rear projection screen. ONSCREEN MENU disappears and Keystone dialog box is distorted vertically, select Keystone. This function is "On," projector displays our logo when starting up. Press POINT LEFT/RIGHT button(s) to move a red-frame pointer to SETTING icon. 2 Press POINT DOWN button to move...
Owners Manual
Page 36
... 5 minutes). 2. When READY indicator flashing, Projection Lamp can be switched to "Code 2." This switching function prevents remote control operation mixture (jam) when operating several projectors or video equipment together. Press both MENU and IMAGE buttons on again (Power Management mode). When replacing Projection Lamp, reset Lamp Replace Counter by connecting AC Power...
... 5 minutes). 2. When READY indicator flashing, Projection Lamp can be switched to "Code 2." This switching function prevents remote control operation mixture (jam) when operating several projectors or video equipment together. Press both MENU and IMAGE buttons on again (Power Management mode). When replacing Projection Lamp, reset Lamp Replace Counter by connecting AC Power...
Owners Manual
Page 40
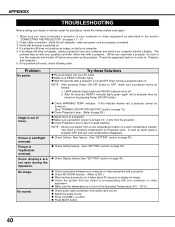
... back on pages 11 ~ 13. 2. q Wait 90 seconds after a projector is corresponding with a projector. (When you reconnect a projector, be with your graphics controller rather than with your computer or video equipment as follows: 1. No image. indicator. q Check the system that you... function. (Refer to your computer or video equipment. APPENDIX TROUBLESHOOTING Before calling your computer or video equipment and a projector. The problem may be sure to OFF, make sure a projector works as described in the section "CONNECTING THE PROJECTOR" on in moisture condensation on . 4....
... back on pages 11 ~ 13. 2. q Wait 90 seconds after a projector is corresponding with a projector. (When you reconnect a projector, be with your graphics controller rather than with your computer or video equipment as follows: 1. No image. indicator. q Check the system that you... function. (Refer to your computer or video equipment. APPENDIX TROUBLESHOOTING Before calling your computer or video equipment and a projector. The problem may be sure to OFF, make sure a projector works as described in the section "CONNECTING THE PROJECTOR" on in moisture condensation on . 4....
Owners Manual
Page 42
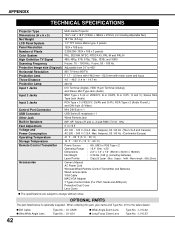
... and Cr/Pr), RCA Type x 2 (Audio R and L) and DIN 4-pin (S-Video) Mini DIN 8 pin x 1 USB Series B receptacle x 1 Wired Remote Jack INP. When ordering this part, give name and Type No. SP. APPENDIX TECHNICAL SPECIFICATIONS Projector Type Dimensions (W x H x D) Net Weight LCD Panel System Panel Resolution Number of ...%) 0˚ to change without notice. OPTIONAL PARTS The part listed below is optionally supplied. q DVI Cable q Ultra Wide Angle Lens Type No. : LV-CA29 Type No. : LV-IL01 q Wide Angle Zoom Lens q Long Focus Zoom Lens Type No. : LV-IL02 Type No. : LV-IL03 42
... and Cr/Pr), RCA Type x 2 (Audio R and L) and DIN 4-pin (S-Video) Mini DIN 8 pin x 1 USB Series B receptacle x 1 Wired Remote Jack INP. When ordering this part, give name and Type No. SP. APPENDIX TECHNICAL SPECIFICATIONS Projector Type Dimensions (W x H x D) Net Weight LCD Panel System Panel Resolution Number of ...%) 0˚ to change without notice. OPTIONAL PARTS The part listed below is optionally supplied. q DVI Cable q Ultra Wide Angle Lens Type No. : LV-CA29 Type No. : LV-IL01 q Wide Angle Zoom Lens q Long Focus Zoom Lens Type No. : LV-IL02 Type No. : LV-IL03 42


