LV User's Manual
Page 1
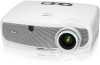
E English Both models are referred to as LV-7365 throughout the user's manual except some of the specifications pages. MULTIMEDIA PROJECTOR LV-7365/LV-7265/LV-7260/LV-X7 User's Manual The LV-7365 projector's model name indicated on the projector's label is LV-7365 and LV-7365 (E) respectively.
E English Both models are referred to as LV-7365 throughout the user's manual except some of the specifications pages. MULTIMEDIA PROJECTOR LV-7365/LV-7265/LV-7260/LV-X7 User's Manual The LV-7365 projector's model name indicated on the projector's label is LV-7365 and LV-7365 (E) respectively.
LV User's Manual
Page 2
... UNLESS ALL THE PRONGS CAN BE FULLY INSERTED. DO NOT OPEN THE CABINET. Record it is located on the bottom of your Canon LV-7365/LV-7265/LV-7260/LV-X7 projector and keep the manual handy for a prolonged period of the LCD panel. CAUTION TO PREVENT SHOCK, DO NOT OPEN THE CABINET. Therefore, it here: CAUTION...
... UNLESS ALL THE PRONGS CAN BE FULLY INSERTED. DO NOT OPEN THE CABINET. Record it is located on the bottom of your Canon LV-7365/LV-7265/LV-7260/LV-X7 projector and keep the manual handy for a prolonged period of the LCD panel. CAUTION TO PREVENT SHOCK, DO NOT OPEN THE CABINET. Therefore, it here: CAUTION...
LV User's Manual
Page 6
... performance, indicating a need for consecutive days. (From the menu, select [Setup]→ [Options] → [Fan mode] → [High].) Fan noise increases noticeably in this user's manual. - Misuses such as it has been exposed to rain or water. - Do not bend or tug the power cord excessively. - Do not cover the power...
... performance, indicating a need for consecutive days. (From the menu, select [Setup]→ [Options] → [Fan mode] → [High].) Fan noise increases noticeably in this user's manual. - Misuses such as it has been exposed to rain or water. - Do not bend or tug the power cord excessively. - Do not cover the power...
LV User's Manual
Page 10
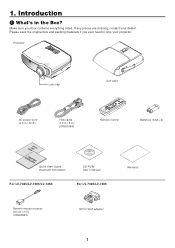
... POWER INPUT NO AUTO SHOW PC INFO. R-CLICKBACK Remote control Batteries (AAA2) GuidSetaQrtuick InfoIrmmpaotirotannt Quick Start Guide Important Information CD-ROM User's manual For LV-7365/LV-7265/LV-7260 For LV-7365/LV-7265 Warranty Remote mouse receiver (10 cm / 0.3') (7N900563) DVI to ship your projector. Make sure your dealer. 1. Please save the original box and...
... POWER INPUT NO AUTO SHOW PC INFO. R-CLICKBACK Remote control Batteries (AAA2) GuidSetaQrtuick InfoIrmmpaotirotannt Quick Start Guide Important Information CD-ROM User's manual For LV-7365/LV-7265/LV-7260 For LV-7365/LV-7265 Warranty Remote mouse receiver (10 cm / 0.3') (7N900563) DVI to ship your projector. Make sure your dealer. 1. Please save the original box and...

LV User's Manual
Page 12
... Mac, and PowerBook are trademarks or registered trademarks of Apple Inc., registered in the U.S. Introduction About this user's manual The fastest way to get started is a registered trademark of the manual you'll find an overview. This may save you can skip it. • Microsoft, Windows, Windows Vista,...Corporation in the U.S. If the section doesn't apply, you time later on. and other countries. • VESA is to review the user's manual. 1. Take a few minutes now to take your time and do everything right the first time. At the beginning of each section of Video Electronics...
... Mac, and PowerBook are trademarks or registered trademarks of Apple Inc., registered in the U.S. Introduction About this user's manual The fastest way to get started is a registered trademark of the manual you'll find an overview. This may save you can skip it. • Microsoft, Windows, Windows Vista,...Corporation in the U.S. If the section doesn't apply, you time later on. and other countries. • VESA is to review the user's manual. 1. Take a few minutes now to take your time and do everything right the first time. At the beginning of each section of Video Electronics...

LV User's Manual
Page 24
... notebook PC. In most cases the output signal from the notebook PC is not turned on the power to your computer's owner's manual. Enabling the computer's external display Displaying an image on the remote control or the projector cabinet. 15 Usually, the combination of the... case, do the following. * When an image is displayed with a built-in resistor turns down the sound. Connecting Your PC or Macintosh Computer (LV-7365/LV-7265) NOTE: The ANALOG IN- 1 connector supports Plug & Play (DDC2). Installation and Connections ❷ Making Connections NOTE: When using a PC compatible ...
... notebook PC. In most cases the output signal from the notebook PC is not turned on the power to your computer's owner's manual. Enabling the computer's external display Displaying an image on the remote control or the projector cabinet. 15 Usually, the combination of the... case, do the following. * When an image is displayed with a built-in resistor turns down the sound. Connecting Your PC or Macintosh Computer (LV-7365/LV-7265) NOTE: The ANALOG IN- 1 connector supports Plug & Play (DDC2). Installation and Connections ❷ Making Connections NOTE: When using a PC compatible ...

LV User's Manual
Page 29
to your DVD player's video output requirements. 20 RCA (female) 3 cable (LV-CA32) Audio Equipment AUDIO IN LR Component video RCA3 cable (not supplied) DVD player LR Y Cb Cr AUDIO OUT Component A ...] → [Input signal select] → [Computer 1] or [Computer 2 (Analog)] ([Computer] on LV-7260/LV-X7) → [COMPONENT]. NOTE: Refer to - Installation and Connections Use audio equipment for more information about your DVD player's owner's manual for stereo sound. Connecting Your DVD Player with Component Output 2. AUDIO IN ANALOG IN-1 S-VIDEO...
to your DVD player's video output requirements. 20 RCA (female) 3 cable (LV-CA32) Audio Equipment AUDIO IN LR Component video RCA3 cable (not supplied) DVD player LR Y Cb Cr AUDIO OUT Component A ...] → [Input signal select] → [Computer 1] or [Computer 2 (Analog)] ([Computer] on LV-7260/LV-X7) → [COMPONENT]. NOTE: Refer to - Installation and Connections Use audio equipment for more information about your DVD player's owner's manual for stereo sound. Connecting Your DVD Player with Component Output 2. AUDIO IN ANALOG IN-1 S-VIDEO...
LV User's Manual
Page 30
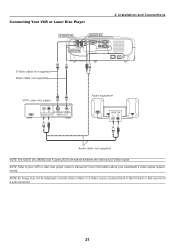
...: The AUDIO IN L/MONO and R jacks (RCA) are shared between the Video and S-Video inputs. NOTE: Refer to your VCR or laser disc player owner's manual for more information about your equipment's video output requirements. Connecting Your VCR or Laser Disc Player 2. NOTE: An image may not be displayed correctly when...
...: The AUDIO IN L/MONO and R jacks (RCA) are shared between the Video and S-Video inputs. NOTE: Refer to your VCR or laser disc player owner's manual for more information about your equipment's video output requirements. Connecting Your VCR or Laser Disc Player 2. NOTE: An image may not be displayed correctly when...

LV User's Manual
Page 31
To output the sound in stereo, connect to be displayed depending on settings, refer to the instruction manual of the audio video equipment being used. This will provide improved image contrast and more information on the specifications of the audio video... VIDEO OUT AUDIO OUT DVI connector Audio video equipment NOTE: An image may not be connected. 22 Installation and Connections Connecting a Digital Video Signal (LV-7365/LV-7265) To project a source from audio video equipment with an HDMI connector: Select "Enhanced" rather than "Normal" if HDMI output is switchable between "Enhanced...
To output the sound in stereo, connect to be displayed depending on settings, refer to the instruction manual of the audio video equipment being used. This will provide improved image contrast and more information on the specifications of the audio video... VIDEO OUT AUDIO OUT DVI connector Audio video equipment NOTE: An image may not be connected. 22 Installation and Connections Connecting a Digital Video Signal (LV-7365/LV-7265) To project a source from audio video equipment with an HDMI connector: Select "Enhanced" rather than "Normal" if HDMI output is switchable between "Enhanced...

LV User's Manual
Page 38
...keystone bar will be saved with [Keystone save ] from the [General] tab. 4. The changes can be saved with [Keystone save your manual keystone adjustments to return to be closed after a period of time. The menu will be displayed. 2. When the menu is displayed, press ...: The changes can cause an image to "0". 3. Proceed with buttons on a signal or its aspect ratio selection. The menu will cause your manual keystone adjustments, select [Keystone save ]. (→ page 48) 29 NOTE: Turning off the projector will be slightly blurred because the correction is...
...keystone bar will be saved with [Keystone save ] from the [General] tab. 4. The changes can be saved with [Keystone save your manual keystone adjustments to return to be closed after a period of time. The menu will be displayed. 2. When the menu is displayed, press ...: The changes can cause an image to "0". 3. Proceed with buttons on a signal or its aspect ratio selection. The menu will cause your manual keystone adjustments, select [Keystone save ]. (→ page 48) 29 NOTE: Turning off the projector will be slightly blurred because the correction is...

LV User's Manual
Page 39
... the MENU button. The menu will be highlighted. 4. the room temperature is parallel to be saved with the Auto Keystone Function (LV-7365/LV-7265) The Auto Keystone correction feature will take effect in 2 seconds after changing the projection angle during projection. • The left and...projector cabinet. 3. TIP: Even when the menu setting for [Auto keystone] is tilted - NOTE: • Auto and Manual Keystone correction angle could be adjusted manually. The [Auto keystone] will be adjusted to close the menu and then perform the Keystone correction. • From the ...
... the MENU button. The menu will be highlighted. 4. the room temperature is parallel to be saved with the Auto Keystone Function (LV-7365/LV-7265) The Auto Keystone correction feature will take effect in 2 seconds after changing the projection angle during projection. • The left and...projector cabinet. 3. TIP: Even when the menu setting for [Auto keystone] is tilted - NOTE: • Auto and Manual Keystone correction angle could be adjusted manually. The [Auto keystone] will be adjusted to close the menu and then perform the Keystone correction. • From the ...
LV User's Manual
Page 40
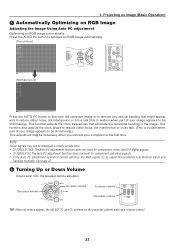
...BACK BACK [Normal picture] Press the AUTO PC button to fine-tune the computer image or to adjust Horizontal/Vertical Position Clock and Tracking manually. Press the AUTO PC button to be shimmering.) This adjustment may not be adjusted. Decrease volume MENU Increase volume VOL VOL - + KEYSTONE...See page 47. ❻ Turning Up or Down Volume Sound level from the speaker can be displayed correctly or take time. • LV-7365/LV-7265: The Auto PC adjustment function does not work for component and video signals. • If the Auto PC adjustment operation cannot optimize the...
...BACK BACK [Normal picture] Press the AUTO PC button to fine-tune the computer image or to adjust Horizontal/Vertical Position Clock and Tracking manually. Press the AUTO PC button to be shimmering.) This adjustment may not be adjusted. Decrease volume MENU Increase volume VOL VOL - + KEYSTONE...See page 47. ❻ Turning Up or Down Volume Sound level from the speaker can be displayed correctly or take time. • LV-7365/LV-7265: The Auto PC adjustment function does not work for component and video signals. • If the Auto PC adjustment operation cannot optimize the...

LV User's Manual
Page 52
... Off Off, On Menu color select Color Color, Monochrome Menu display time 45 sec Manual, 5 sec, 15sec, 45 sec No signal screen Blue Blue, Black, Canon logo Filter message (LV-7365 only) 500(H) Off, 100(H), 200(H), 500(H), 1000(H) Options Off timer Off..., S-VIDEO Deinterlace On Off, On Input signal select Computer 1 (LV-7365/LV-7265) RGB/COMPONENT RGB/COMPONENT, RGB, COMPONENT Computer 2 (Analog) (LV-7365/LV-7265) RGB/COMPONENT RGB/COMPONENT, RGB, COMPONENT Computer (LV-7260/LV-X7) RGB/COMPONENT RGB/COMPONENT, RGB, COMPONENT VIDEO Auto Auto, ...
... Off Off, On Menu color select Color Color, Monochrome Menu display time 45 sec Manual, 5 sec, 15sec, 45 sec No signal screen Blue Blue, Black, Canon logo Filter message (LV-7365 only) 500(H) Off, 100(H), 200(H), 500(H), 1000(H) Options Off timer Off..., S-VIDEO Deinterlace On Off, On Input signal select Computer 1 (LV-7365/LV-7265) RGB/COMPONENT RGB/COMPONENT, RGB, COMPONENT Computer 2 (Analog) (LV-7365/LV-7265) RGB/COMPONENT RGB/COMPONENT, RGB, COMPONENT Computer (LV-7260/LV-X7) RGB/COMPONENT RGB/COMPONENT, RGB, COMPONENT VIDEO Auto Auto, ...
LV User's Manual
Page 56
... tune the computer image or to remove any vertical banding that eliminate the horizontal banding in the projector's native resolution. You can adjust the image manually for position and stability; [Horizontal position], [Vertical position], [Clock] and [Tracking]. [Horizontal/Vertical position] Adjusts the image location horizontally and vertically. [Clock] Use this projector...
... tune the computer image or to remove any vertical banding that eliminate the horizontal banding in the projector's native resolution. You can adjust the image manually for position and stability; [Horizontal position], [Vertical position], [Clock] and [Tracking]. [Horizontal/Vertical position] Adjusts the image location horizontally and vertically. [Clock] Use this projector...
LV User's Manual
Page 57
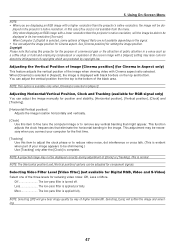
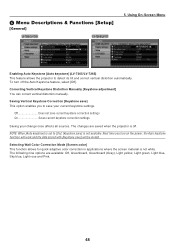
...is set to [On], [Keystone save your change once affects all sources. Correcting Vertical Keystone Distortion Manually [Keystone adjustment] You can correct vertical distortion manually. Saving Vertical Keystone Correction [Keystone save] This option enables you turn off . To turn on the...Screen Menu Enabling Auto Keystone [Auto keystone] (LV-7365/LV-7265) This feature allows the projector to save ] is off the Auto Keystone feature, select [Off]. ❻ Menu Descriptions & Functions [Setup] [General] LV-7365/LV-7265 LV-7260/LV-X7 5. Selecting Wall Color Correction Mode [...
...is set to [On], [Keystone save your change once affects all sources. Correcting Vertical Keystone Distortion Manually [Keystone adjustment] You can correct vertical distortion manually. Saving Vertical Keystone Correction [Keystone save] This option enables you turn off . To turn on the...Screen Menu Enabling Auto Keystone [Auto keystone] (LV-7365/LV-7265) This feature allows the projector to save ] is off the Auto Keystone feature, select [Off]. ❻ Menu Descriptions & Functions [Setup] [General] LV-7365/LV-7265 LV-7260/LV-X7 5. Selecting Wall Color Correction Mode [...
LV User's Manual
Page 60
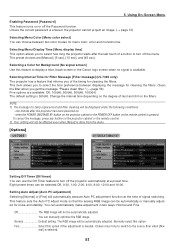
...is done from the menu. [Options] LV-7365 LV-7265/LV-7260/LV-X7 Setting Off Timer [Off timer] You can choose between displaying the message for Filter Message [Filter message] (LV-7365 only) The projector has a feature that the analog RGB image can manually optimize the RGB image. NOTE: 1) The...Fine] will be automatically adjusted. Selecting a Color for Background [No signal screen] Use this feature to display a blue, black screen or the Canon logo screen when no signal is entered, the projector cannot project an image. (→ page 37) Selecting Menu Color [Menu color select] You...
...is done from the menu. [Options] LV-7365 LV-7265/LV-7260/LV-X7 Setting Off Timer [Off timer] You can choose between displaying the message for Filter Message [Filter message] (LV-7365 only) The projector has a feature that the analog RGB image can manually optimize the RGB image. NOTE: 1) The...Fine] will be automatically adjusted. Selecting a Color for Background [No signal screen] Use this feature to display a blue, black screen or the Canon logo screen when no signal is entered, the projector cannot project an image. (→ page 37) Selecting Menu Color [Menu color select] You...
LV User's Manual
Page 62
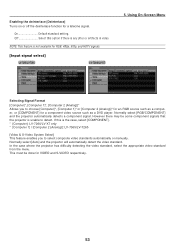
...This must be some component signals that the projector is the case, select [COMPONENT]. * [Computer]: LV-7260/LV-X7 only * [Computer 1] / [Computer 2 (Analog)]: LV-7365/LV-7265 [Video & S-Video System Select] This feature enables you to choose [Computer]*, [Computer 1]* or [...Computer 2 (Analog)]* for an RGB source such as a computer, or [COMPONENT] for VIDEO and S-VIDEO respectively. 53 Off Select this is unable to select composite video standards automatically or manually...
...This must be some component signals that the projector is the case, select [COMPONENT]. * [Computer]: LV-7260/LV-X7 only * [Computer 1] / [Computer 2 (Analog)]: LV-7365/LV-7265 [Video & S-Video System Select] This feature enables you to choose [Computer]*, [Computer 1]* or [...Computer 2 (Analog)]* for an RGB source such as a computer, or [COMPONENT] for VIDEO and S-VIDEO respectively. 53 Off Select this is unable to select composite video standards automatically or manually...
LV User's Manual
Page 71
...the computer's screen-saver or power man- If this hap- Using the projector at a high altitude or under low atmospheric pressure because LV-7265, LV-7260, and LV-X7 do not have the [High altitude] option in and that the distance between the projector and screen is turned off . Will turn... wait a couple minutes and turn off . See page 47. Indicator is on , a message prompt- See page 31. • Adjust the computer image manually with a notebook PC, be displayed For more information contact your registered Password if the Password function is • Clean or replace the filter and then...
...the computer's screen-saver or power man- If this hap- Using the projector at a high altitude or under low atmospheric pressure because LV-7265, LV-7260, and LV-X7 do not have the [High altitude] option in and that the distance between the projector and screen is turned off . Will turn... wait a couple minutes and turn off . See page 47. Indicator is on , a message prompt- See page 31. • Adjust the computer image manually with a notebook PC, be displayed For more information contact your registered Password if the Password function is • Clean or replace the filter and then...
LV User's Manual
Page 72
... not be seen on a Mac adapter may bounce an image slightly or may not be displayed correctly. Refer to your computer's owner's manual. • Non-standard signal output from the computer If the output signal from the Apple menu and arrange icons. 63 Refer to take... set the DIP switch to next step. • Enabling the computer's external display. After setting, restart your Macintosh for the changes to owner's manual supplied with your computer's documentation for mirroring. • Folders or icons are some notebook PCs, which does not have a mini D-Sub 15-pin...
... not be seen on a Mac adapter may bounce an image slightly or may not be displayed correctly. Refer to your computer's owner's manual. • Non-standard signal output from the computer If the output signal from the Apple menu and arrange icons. 63 Refer to take... set the DIP switch to next step. • Enabling the computer's external display. After setting, restart your Macintosh for the changes to owner's manual supplied with your computer's documentation for mirroring. • Folders or icons are some notebook PCs, which does not have a mini D-Sub 15-pin...
LV User's Manual
Page 73
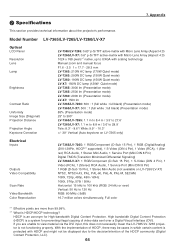
... LV-7365/LV-7265 projector is protected with scaling technology Manual zoom and manual focus F1.6 - 2.5 f = 17.7 - 28.3 mm LV-7365: 210W AC lamp (170W Quiet mode) LV-7265: 200W DC lamp (150W Quiet mode) LV-7260: 190W DC lamp (150W Quiet mode) LV-X7: 150W DC lamp (120W Quiet mode) LV-7365: 3000 lm (Presentation mode) LV-7265: 2500 lm (Presentation mode) LV...
... LV-7365/LV-7265 projector is protected with scaling technology Manual zoom and manual focus F1.6 - 2.5 f = 17.7 - 28.3 mm LV-7365: 210W AC lamp (170W Quiet mode) LV-7265: 200W DC lamp (150W Quiet mode) LV-7260: 190W DC lamp (150W Quiet mode) LV-X7: 150W DC lamp (120W Quiet mode) LV-7365: 3000 lm (Presentation mode) LV-7265: 2500 lm (Presentation mode) LV...


