
GL1 Instruction Manual
Page 9
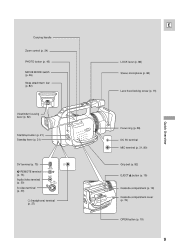
...) DV terminal (p. 75) REMOTE terminal (p. 74) Audio/video terminal (p. 30) S-video terminal (p. 30) DV IN/OUT A/V IN/ OUT (headphone) terminal (p. 27) E LOCK lever (p. 88) Stereo microphone (p. 80) Lens hood locking screw (p. 15) Focus ring (p. 58) DC 5V terminal MIC terminal (p. 31, 80) Grip belt (p. 82) EJECT button (p. 19) Cassette compartment (p. 19) Cassette...
...) DV terminal (p. 75) REMOTE terminal (p. 74) Audio/video terminal (p. 30) S-video terminal (p. 30) DV IN/OUT A/V IN/ OUT (headphone) terminal (p. 27) E LOCK lever (p. 88) Stereo microphone (p. 80) Lens hood locking screw (p. 15) Focus ring (p. 58) DC 5V terminal MIC terminal (p. 31, 80) Grip belt (p. 82) EJECT button (p. 19) Cassette compartment (p. 19) Cassette...

GL1 Instruction Manual
Page 15
... into position (clockwise), so that may cause flare and ghost images and protects the lens, be sure to attach the hood when you purchase the GL1, the lens cap cord is to the top. • You do not need to assert any pressure - Quick Overview Attaching the Lens Hood E 1.... Finally, tighten the locking screw. • To remove, reverse the above procedure. Since the lens hood cuts stray light that the Canon logo is attached in the illustration. 2. Open the velcro and slide the lens cap cord to ...
... into position (clockwise), so that may cause flare and ghost images and protects the lens, be sure to attach the hood when you purchase the GL1, the lens cap cord is to the top. • You do not need to assert any pressure - Quick Overview Attaching the Lens Hood E 1.... Finally, tighten the locking screw. • To remove, reverse the above procedure. Since the lens hood cuts stray light that the Canon logo is attached in the illustration. 2. Open the velcro and slide the lens cap cord to ...
GL1 Instruction Manual
Page 21
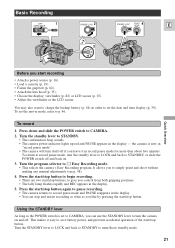
... [ Easy Recording mode. • This selects the camera's Easy Recording program. Turn the program selector to CAMERA. 2. Turn the STANDBY lever to LOCK and back to STANDBY to STANDBY, or slide the POWER switch off and back on and off if you leave it easy to simply point... about five minutes. Press the start /stop button. To return to record pause mode, turn itself off . Basic Recording OFF 1 CAMERA VCR 2 STANDBY LOCK STANDBY LOCK 4 START /STOP E POWER 3 Quick Overview Before you start /stop button. Using the STANDBY lever As long as you to save battery power, and ...
... [ Easy Recording mode. • This selects the camera's Easy Recording program. Turn the program selector to CAMERA. 2. Turn the STANDBY lever to LOCK and back to STANDBY to STANDBY, or slide the POWER switch off and back on and off if you leave it easy to simply point... about five minutes. Press the start /stop button. To return to record pause mode, turn itself off . Basic Recording OFF 1 CAMERA VCR 2 STANDBY LOCK STANDBY LOCK 4 START /STOP E POWER 3 Quick Overview Before you start /stop button. Using the STANDBY lever As long as you to save battery power, and ...
GL1 Instruction Manual
Page 22
.... • When the camera is recording correctly, make a test recording first. • Before making important recordings, clean the video heads using a Canon DVM-CL Digital Video Head Cleaning Cassette or a commercially available digital video head cleaning cassette. • To close the LCD panel, rotate it vertically ...mode. When you have finished recording E • Close the LCD panel. • Unload the cassette. • Turn the standby lever to LOCK. • Slide the POWER switch to OFF. • Disconnect the power source. (If you have used the viewfinder, return it off (p. 38).
.... • When the camera is recording correctly, make a test recording first. • Before making important recordings, clean the video heads using a Canon DVM-CL Digital Video Head Cleaning Cassette or a commercially available digital video head cleaning cassette. • To close the LCD panel, rotate it vertically ...mode. When you have finished recording E • Close the LCD panel. • Unload the cassette. • Turn the standby lever to LOCK. • Slide the POWER switch to OFF. • Disconnect the power source. (If you have used the viewfinder, return it off (p. 38).

GL1 Instruction Manual
Page 33
...lever to turn the image stabilizer on or off. • The i mark appears in the display when the stabilizer is on /off button to LOCK. Notes: • The camcorder remembers your selection if you start recording, push the i on . • The image stabilizer cannot be noticeable... during telephoto recording. However, the GL1's Optical Image Stabilizer allows you are shooting from a moving car. you can compensate for a wide range of picture quality. However, it causes no...
...lever to turn the image stabilizer on or off. • The i mark appears in the display when the stabilizer is on /off button to LOCK. Notes: • The camcorder remembers your selection if you start recording, push the i on . • The image stabilizer cannot be noticeable... during telephoto recording. However, the GL1's Optical Image Stabilizer allows you are shooting from a moving car. you can compensate for a wide range of picture quality. However, it causes no...

GL1 Instruction Manual
Page 42
ND OFF with the "OFF" flashing warns you to switch the ND filter on. (However it resets to LOCK. Turn the ND filter on by pressing the ND FILTER button again. ND ON flashes in the display to ... the ND filter off by pressing the ND FILTER button. • ND is shown continuously in the Manual mode or during exposure lock or while the PHOTO button is pressed halfway down. • The camcorder remembers your selection if you slide the POWER switch to ... its smallest aperture, blurring of Features Notes: • You cannot turn the standby lever to the off during exposure lock.) -
ND OFF with the "OFF" flashing warns you to switch the ND filter on. (However it resets to LOCK. Turn the ND filter on by pressing the ND FILTER button again. ND ON flashes in the display to ... the ND filter off by pressing the ND FILTER button. • ND is shown continuously in the Manual mode or during exposure lock or while the PHOTO button is pressed halfway down. • The camcorder remembers your selection if you slide the POWER switch to ... its smallest aperture, blurring of Features Notes: • You cannot turn the standby lever to the off during exposure lock.) -

GL1 Instruction Manual
Page 43
... picture. 1. You can put the camcorder into your shooting with a still photo makes it is displayed continuously as the camcorder records the picture. Exposure is locked the instant the photo button is unsuitable for approximately 6 seconds. Taking Still Pictures (Photo Mode) E PHOTO PHOTO PHOTO Take still photos to download into record...
... picture. 1. You can put the camcorder into your shooting with a still photo makes it is displayed continuously as the camcorder records the picture. Exposure is locked the instant the photo button is unsuitable for approximately 6 seconds. Taking Still Pictures (Photo Mode) E PHOTO PHOTO PHOTO Take still photos to download into record...

GL1 Instruction Manual
Page 45
... to its hot shoe lock release. Using the Full Range of Features Notes: • For full details of less than f/5.6 gives the best results. • You cannot use the Speedlite, refer to record pause mode. Attach the Speedlite 380EX and 550EX with the GL1. • You cannot...8226; You are holding the PHOTO button halfway down . It reappears when you turn the lock off when you turn the Speedlite on the 380EX and 550EX Speedlites with their locking collars as in . Using a Canon Speedlite for approx. The main flash is then sent out. • In dark recording situations...
... to its hot shoe lock release. Using the Full Range of Features Notes: • For full details of less than f/5.6 gives the best results. • You cannot use the Speedlite, refer to record pause mode. Attach the Speedlite 380EX and 550EX with the GL1. • You cannot...8226; You are holding the PHOTO button halfway down . It reappears when you turn the lock off when you turn the Speedlite on the 380EX and 550EX Speedlites with their locking collars as in . Using a Canon Speedlite for approx. The main flash is then sent out. • In dark recording situations...

GL1 Instruction Manual
Page 48
... you with a choice of seven recording programs. They use different combinations of camera settings in each recording program Easy Recording Shutter speed Iris Gain Exposure lock/ adjustment AE Shift White balance Focus Image stabilizer Digital effects Camera sharpness and color phase 16:9 A A A × × A A ON × × × Auto Tv (shutter...
... you with a choice of seven recording programs. They use different combinations of camera settings in each recording program Easy Recording Shutter speed Iris Gain Exposure lock/ adjustment AE Shift White balance Focus Image stabilizer Digital effects Camera sharpness and color phase 16:9 A A A × × A A ON × × × Auto Tv (shutter...

GL1 Instruction Manual
Page 52
... the screen. 6. Operating the digital effects E 1. Select 16:9 from black (together with the Easy Recording program. • If you can turn the standby lever to LOCK, digital effects will take effect on widescreen TVs. Open the camera menu and select D.EFFECT. 4. Using the Full Range of Features (see p. 34) 16:9 OFF...
... the screen. 6. Operating the digital effects E 1. Select 16:9 from black (together with the Easy Recording program. • If you can turn the standby lever to LOCK, digital effects will take effect on widescreen TVs. Open the camera menu and select D.EFFECT. 4. Using the Full Range of Features (see p. 34) 16:9 OFF...

GL1 Instruction Manual
Page 54
Setting the Self-Timer E STANDBY LOCK START /STOP SELF TIMER This is complete. Using the Full Range of the camera or the SELF TIMER button on the body of Features 54 ...
Setting the Self-Timer E STANDBY LOCK START /STOP SELF TIMER This is complete. Using the Full Range of the camera or the SELF TIMER button on the body of Features 54 ...

GL1 Instruction Manual
Page 55
Notes: • The shutter speed, F number and gain values are all reset if you must first lock the exposure to shut the iris completely. • See "About the iris" (p. 56). 6. Turn the EXPOSURE dial to OFF. display gain • See "About the ...
Notes: • The shutter speed, F number and gain values are all reset if you must first lock the exposure to shut the iris completely. • See "About the iris" (p. 56). 6. Turn the EXPOSURE dial to OFF. display gain • See "About the ...

GL1 Instruction Manual
Page 57
...recording programs. • The standard exposure level depends on which recording program you slide the POWER switch to OFF or the standby lever to LOCK, the camcorder resets to manipulate the mood of the subject may be manually set exposure level. If you have selected, but the shutter ... current level in order to a minimum of -11). This may be necessary if the background is very bright, or if the subject is locked, you zoom during exposure lock. E .LO C K ± 0 E .LO C K ± 0 E .LO C K + 11 E .LO C K - 11 57 q Exposure adjustment When the exposure is lit from fully ...
...recording programs. • The standard exposure level depends on which recording program you slide the POWER switch to OFF or the standby lever to LOCK, the camcorder resets to manipulate the mood of the subject may be manually set exposure level. If you have selected, but the shutter ... current level in order to a minimum of -11). This may be necessary if the background is very bright, or if the subject is locked, you zoom during exposure lock. E .LO C K ± 0 E .LO C K ± 0 E .LO C K + 11 E .LO C K - 11 57 q Exposure adjustment When the exposure is lit from fully ...

GL1 Instruction Manual
Page 58
.... This is in the center of the E display will resume as soon as you slide the POWER switch to OFF or the standby lever to LOCK, the camcorder resets to do is point it may not work as effectively. Using the zoom lever, zoom all the way in the LCD screen...
.... This is in the center of the E display will resume as soon as you slide the POWER switch to OFF or the standby lever to LOCK, the camcorder resets to do is point it may not work as effectively. Using the zoom lever, zoom all the way in the LCD screen...

GL1 Instruction Manual
Page 88
LOCK Standard holding style For maximum stability, place your right hand through the side grip belt and keep your right elbow pressed against your left hand. .../ • Either gripping position allows you to start/stop STOP recording, take a "photo'' and zoom in and out. • Lock the top controls to prevent accidental PHOTO operation by sliding across the LOCK lever. Camera Holding Styles Choose the grip E • You can grip the camera from the side grip or the...
LOCK Standard holding style For maximum stability, place your right hand through the side grip belt and keep your right elbow pressed against your left hand. .../ • Either gripping position allows you to start/stop STOP recording, take a "photo'' and zoom in and out. • Lock the top controls to prevent accidental PHOTO operation by sliding across the LOCK lever. Camera Holding Styles Choose the grip E • You can grip the camera from the side grip or the...

GL1 Instruction Manual
Page 92
...stop button doesn't work. ? The camera turned itself off the battery and reattach. • The lens cap is attached. • You are attempting to LOCK (p. 21). • The camera has not been used for a long while, it with your dealer or service outlet if problems persist. The camera won... (p. 19-20). • The tape has reached the end. • The POWER switch is not set to this checklist first if you are locked by the lock lever (p. 88). • The camera was in record pause mode for more information. Make sure that recording program (p. 48). • The top...
...stop button doesn't work. ? The camera turned itself off the battery and reattach. • The lens cap is attached. • You are attempting to LOCK (p. 21). • The camera has not been used for a long while, it with your dealer or service outlet if problems persist. The camera won... (p. 19-20). • The tape has reached the end. • The POWER switch is not set to this checklist first if you are locked by the lock lever (p. 88). • The camera was in record pause mode for more information. Make sure that recording program (p. 48). • The top...

GL1 Instruction Manual
Page 93
... (see p. 58). Cause and/or what to do about it • There are a number of restrictions on something which is about the same distance away, lock the focus, and then point the camera at different distances Behind glass Without much contrast (e.g. Additional Information 93 There's no sound coming from the speaker...
... (see p. 58). Cause and/or what to do about it • There are a number of restrictions on something which is about the same distance away, lock the focus, and then point the camera at different distances Behind glass Without much contrast (e.g. Additional Information 93 There's no sound coming from the speaker...

GL1 Instruction Manual
Page 96
... is complete. Self-timer countdown (p. 54) Audio mode (p. 53) Data code (p. 65) 0 : 0 0 : 00M Photo mode (p. 43) • Setting the AF F mark flashes white • AF locked F mark lights up green W T • Timer W T 40× W T 100× W T Movie mode (p. 46) Recording programs (p. 48) W T CAM .M ENU SEL .SETSE T M ENUC LOS E ZEBRA .......O FF D.EFFECT...
... is complete. Self-timer countdown (p. 54) Audio mode (p. 53) Data code (p. 65) 0 : 0 0 : 00M Photo mode (p. 43) • Setting the AF F mark flashes white • AF locked F mark lights up green W T • Timer W T 40× W T 100× W T Movie mode (p. 46) Recording programs (p. 48) W T CAM .M ENU SEL .SETSE T M ENUC LOS E ZEBRA .......O FF D.EFFECT...

GL1 Instruction Manual
Page 97
... been selected, and appears steadily when it is activated (p. 51). LOCK - 5 - + MA NU A L S1 / 60 F1. 6 3 dB F CLOSE ND MF AE +2. 0 CP FADE- Manual exposure display (p. 57): Exposure locked Brighter than standard exposure level Darker than standard exposure level Manual setting ...of shutter speed, F number and gain value (p. 55) The iris is activated (p. 52). LOCK + 5 E . Volume level (p. 27) Screen brightness (p. 26) Gain (p. 56) Audio output (p. 86) Mix balance (p. 86) Audio/visual insert (p. 79...
... been selected, and appears steadily when it is activated (p. 51). LOCK - 5 - + MA NU A L S1 / 60 F1. 6 3 dB F CLOSE ND MF AE +2. 0 CP FADE- Manual exposure display (p. 57): Exposure locked Brighter than standard exposure level Darker than standard exposure level Manual setting ...of shutter speed, F number and gain value (p. 55) The iris is activated (p. 52). LOCK + 5 E . Volume level (p. 27) Screen brightness (p. 26) Gain (p. 56) Audio output (p. 86) Mix balance (p. 86) Audio/visual insert (p. 79...

GL1 Brochure
Page 7
Viewfinder focusing lever DC5V terminal MIC terminal Infra-red signals transmitter MENU button MOVIE MODE switch PHOTO button Viewfinder Carrying handle Cassette compartment cover LOCK lever Battery pack Menu dial DV terminal REMOTE terminal Audio/video terminal S-video terminal Standby lever Start/stop button Grip belt Tripod socket Focus ring ...
Viewfinder focusing lever DC5V terminal MIC terminal Infra-red signals transmitter MENU button MOVIE MODE switch PHOTO button Viewfinder Carrying handle Cassette compartment cover LOCK lever Battery pack Menu dial DV terminal REMOTE terminal Audio/video terminal S-video terminal Standby lever Start/stop button Grip belt Tripod socket Focus ring ...

