
FAXPHONE L80 User's Guide
Page 134
You may find polling sending convenient in the machine so that other departments can retrieve the document (see the instructions that follow). A company department might store a document in the following : • You can set an ITU-T-standard password for other fax machines can be... box so that other fax machines to retrieve it. Do not set a password if the other party to bear the transmission cost of your password. SETUP FILE FILE NAME _ :A 9-12 Special Features Chapter 9 Make sure you want the other party to inform them of receiving a document from your machine...
You may find polling sending convenient in the machine so that other departments can retrieve the document (see the instructions that follow). A company department might store a document in the following : • You can set an ITU-T-standard password for other fax machines can be... box so that other fax machines to retrieve it. Do not set a password if the other party to bear the transmission cost of your password. SETUP FILE FILE NAME _ :A 9-12 Special Features Chapter 9 Make sure you want the other party to inform them of receiving a document from your machine...
FAXPHONE L80 User's Guide
Page 198
... D Data modem, connecting 2-8 Registration button 2-12, 14-3 Date, entering 3-6 DATE & TIME setting 3-6, 14-4 DATE SETUP setting 14-10 Daylight Saving Time 3-9, 14-10 Default, definition 1-5 DEFAULT ACTION setting 8-4, 8-5 Delayed sending deleting document set... 4-2 requirements 4-2 scanned area 4-2 size 4-2 support 2-3, 2-6, 2-11 thickness 4-2 weight 4-2 Documentation 2-3 Basic Guide 1-4 FAXPHONE L80 User's Guide 1-4 Printer Driver Software User's Guide 1-4 Set-Up Instructions 1-4 using 1-4, 1-5 DOUBLE RING setting 8-11 DRPD description 8-2 receiving with 8-10, 8-11 ring patterns 8-11 setting ...
... D Data modem, connecting 2-8 Registration button 2-12, 14-3 Date, entering 3-6 DATE & TIME setting 3-6, 14-4 DATE SETUP setting 14-10 Daylight Saving Time 3-9, 14-10 Default, definition 1-5 DEFAULT ACTION setting 8-4, 8-5 Delayed sending deleting document set... 4-2 requirements 4-2 scanned area 4-2 size 4-2 support 2-3, 2-6, 2-11 thickness 4-2 weight 4-2 Documentation 2-3 Basic Guide 1-4 FAXPHONE L80 User's Guide 1-4 Printer Driver Software User's Guide 1-4 Set-Up Instructions 1-4 using 1-4, 1-5 DOUBLE RING setting 8-11 DRPD description 8-2 receiving with 8-10, 8-11 ring patterns 8-11 setting ...
FAXPHONE L80 User's Guide
Page 202
...13-15, 13-16 same document to several fax numbers 7-12 to 7-7 polling. See also individual setting names printing list of 14-2 SETUP FILE setting 9-12, 14-9 Shipping materials, removing 2-5 SHORT-LONG-SHORT setting 8-11 SHORT-SHORT-LONG setting 8-11 Size document 4-2 envelopes...function buttons 2-12. See RX (Reception) SETTINGS menu RX START SPEED setting 14-10 RX TO MEMORY setting 14-8 S S Cartridge 2-3, 2-13 Safety instructions 1-7 to 1-9 Saving, toner consumption 5-11 SCAN CONTRAST setting 7-3, 14-4 Scanner components, cleaning 12-5, 12-6 Scanning contrast, copying 7-3 contrast, sending ...
...13-15, 13-16 same document to several fax numbers 7-12 to 7-7 polling. See also individual setting names printing list of 14-2 SETUP FILE setting 9-12, 14-9 Shipping materials, removing 2-5 SHORT-LONG-SHORT setting 8-11 SHORT-SHORT-LONG setting 8-11 Size document 4-2 envelopes...function buttons 2-12. See RX (Reception) SETTINGS menu RX START SPEED setting 14-10 RX TO MEMORY setting 14-8 S S Cartridge 2-3, 2-13 Safety instructions 1-7 to 1-9 Saving, toner consumption 5-11 SCAN CONTRAST setting 7-3, 14-4 Scanner components, cleaning 12-5, 12-6 Scanning contrast, copying 7-3 contrast, sending ...
FAXPHONE L80 Set-Up Instructions
Page 7
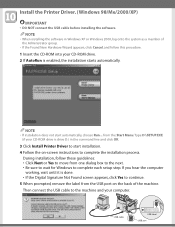
...; If the Digital Signature Not Found screen appears, click Yes to continue. 5 When prompted, remove the label from the USB port on -screen instructions to complete each setup step. If you hear the computer working, wait until it is drive D:) in Windows XP or Windows 2000, log onto the system as a member...
...; If the Digital Signature Not Found screen appears, click Yes to continue. 5 When prompted, remove the label from the USB port on -screen instructions to complete each setup step. If you hear the computer working, wait until it is drive D:) in Windows XP or Windows 2000, log onto the system as a member...


