Instruction Manual
Page 2
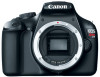
... shooting, and offers many functions fitted for private enjoyment. This manual will refer to a computer, Canon cannot be recorded or downloaded to all these cards as just "card." * The camera does not come out. Introduction The EOS REBEL T3/1100D is a high-performance, digital single-lens reflex camera featuring a fine-detail CMOS sensor with a card for anything but...
... shooting, and offers many functions fitted for private enjoyment. This manual will refer to a computer, Canon cannot be recorded or downloaded to all these cards as just "card." * The camera does not come out. Introduction The EOS REBEL T3/1100D is a high-performance, digital single-lens reflex camera featuring a fine-detail CMOS sensor with a card for anything but...
Instruction Manual
Page 3
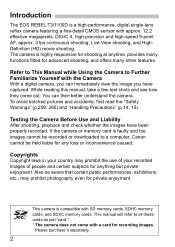
...with protective cover) Battery Charger LC-E10/LC-E10E* Wide Strap EW-200D Interface Cable Camera Instruction Manual (CD-ROM) EOS DIGITAL Solution Disk (Software CD-ROM) Software Instruction Manual (CD-ROM) Camera Basic Instruction Manual * Battery Charger LC-E10 or LC-E10E is provided. (The LC-E10E comes with... your dealer. Be careful not to look up manuals in the CD-ROM as PDF files. ...
...with protective cover) Battery Charger LC-E10/LC-E10E* Wide Strap EW-200D Interface Cable Camera Instruction Manual (CD-ROM) EOS DIGITAL Solution Disk (Software CD-ROM) Software Instruction Manual (CD-ROM) Camera Basic Instruction Manual * Battery Charger LC-E10 or LC-E10E is provided. (The LC-E10E comes with... your dealer. Be careful not to look up manuals in the CD-ROM as PDF files. ...
Instruction Manual
Page 4
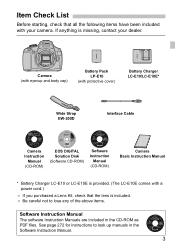
... that the function is assumed that the power switch has already been set to prevent shooting problems. : Supplemental information. Basic Assumptions All operations explained in this manual assume that all the menu settings and Custom Functions are set to (p.31). For explanatory purposes, the instructions show the camera attached with an EF-S18-55mm f/3.5-5.6 IS II lens. 4
... that the function is assumed that the power switch has already been set to prevent shooting problems. : Supplemental information. Basic Assumptions All operations explained in this manual assume that all the menu settings and Custom Functions are set to (p.31). For explanatory purposes, the instructions show the camera attached with an EF-S18-55mm f/3.5-5.6 IS II lens. 4

Instruction Manual
Page 12
...Setting the Image Review Time 154 Setting the Auto Power-off Time 155 Adjusting the LCD Monitor Brightness 155 Creating and Selecting a Folder 156 File Numbering Methods 158 Setting Copyright Information 160 Auto Rotation of Vertical Images 162 B Checking Camera Settings 163 Reverting the Camera to the Default Settings... 164 Turning the LCD monitor Off/On 166 Changing the Shooting Settings Screen Color 166 Setting the Flash 167 Appending Dust Delete Data 171 Manual Sensor Cleaning 173 ...
...Setting the Image Review Time 154 Setting the Auto Power-off Time 155 Adjusting the LCD Monitor Brightness 155 Creating and Selecting a Folder 156 File Numbering Methods 158 Setting Copyright Information 160 Auto Rotation of Vertical Images 162 B Checking Camera Settings 163 Reverting the Camera to the Default Settings... 164 Turning the LCD monitor Off/On 166 Changing the Shooting Settings Screen Color 166 Setting the Flash 167 Appending Dust Delete Data 171 Manual Sensor Cleaning 173 ...
Instruction Manual
Page 13
... Print 202 wPrinting...204 Trimming the Image 209 W Digital Print Order Format (DPOF 211 W Direct Printing with DPOF 214 10 Customizing the Camera 215 Setting Custom Functions 216 Custom Function Settings 218 Registering My Menu 224 11 Reference 225 External ... Table According to Shooting Modes 232 Menu Settings 234 System Map 240 Troubleshooting Guide 242 Error Codes...250 Specifications 251 Safety Warnings 259 12 Software Start Guide 269 Software Start Guide 270 13 Quick Reference Guide and Instruction Manual Index 273 Quick Reference Guide 274 Index ...286 13
... Print 202 wPrinting...204 Trimming the Image 209 W Digital Print Order Format (DPOF 211 W Direct Printing with DPOF 214 10 Customizing the Camera 215 Setting Custom Functions 216 Custom Function Settings 218 Registering My Menu 224 11 Reference 225 External ... Table According to Shooting Modes 232 Menu Settings 234 System Map 240 Troubleshooting Guide 242 Error Codes...250 Specifications 251 Safety Warnings 259 12 Software Start Guide 269 Software Start Guide 270 13 Quick Reference Guide and Instruction Manual Index 273 Quick Reference Guide 274 Index ...286 13

Instruction Manual
Page 16
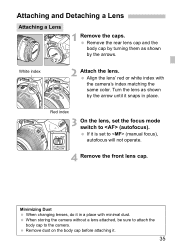
Quick Start Guide 1 Insert the battery. (p.28) To charge the battery, see page 26. 2 Insert the card. (p.28) With the card's label facing toward the camera back, insert it into the slot. 3 White index Red index Attach the lens. (p.35) Align the lens' white or red index with the camera's index in the matching color. 4 Set the lens focus mode switch to . (p.35) 5 16 Set the power switch to . (p.31) When the LCD monitor displays the Date/Time setting screen, see page 33.
Quick Start Guide 1 Insert the battery. (p.28) To charge the battery, see page 26. 2 Insert the card. (p.28) With the card's label facing toward the camera back, insert it into the slot. 3 White index Red index Attach the lens. (p.35) Align the lens' white or red index with the camera's index in the matching color. 4 Set the lens focus mode switch to . (p.35) 5 16 Set the power switch to . (p.31) When the LCD monitor displays the Date/Time setting screen, see page 33.
Instruction Manual
Page 35
... 3 On the lens, set to (manual focus), autofocus will not operate. 4 Remove the front lens cap. Remove dust on the body cap before attaching it snaps in a place with the camera's index matching the same color. Minimizing Dust When changing lenses, do it is set the focus mode switch to... the camera. If it in place. When storing the camera without a lens attached, be sure to attach the body cap...
... 3 On the lens, set to (manual focus), autofocus will not operate. 4 Remove the front lens cap. Remove dust on the body cap before attaching it snaps in a place with the camera's index matching the same color. Minimizing Dust When changing lenses, do it is set the focus mode switch to... the camera. If it in place. When storing the camera without a lens attached, be sure to attach the body cap...

Instruction Manual
Page 77
...Guide ISO Speed Shooting Situation (No flash) Flash Range 100 - 400 400 - 1600 1600 - 6400 Sunny outdoors The higher the ISO speed, Overcast skies or evening time the farther the flash range will Dark indoors or night extend (p.88). * High ISO speeds will appear. 2 Set the ISO speed. Long exposures can set..., the ISO speed will be selected (p.220). When you can also cause irregular colors in images that look grainier. Shooting in grainier images. In Basic Zone modes, the ISO speed is set to select the desired ISO speed, then press . X [ISO speed] will result...
...Guide ISO Speed Shooting Situation (No flash) Flash Range 100 - 400 400 - 1600 1600 - 6400 Sunny outdoors The higher the ISO speed, Overcast skies or evening time the farther the flash range will Dark indoors or night extend (p.88). * High ISO speeds will appear. 2 Set the ISO speed. Long exposures can set..., the ISO speed will be selected (p.220). When you can also cause irregular colors in images that look grainier. Shooting in grainier images. In Basic Zone modes, the ISO speed is set to select the desired ISO speed, then press . X [ISO speed] will result...
Instruction Manual
Page 97
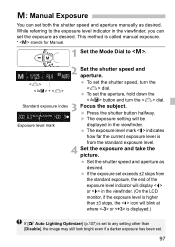
... Optimizer] (p.107) is called manual exposure. * stands for Manual. 1 Set the Mode Dial to the exposure level indicator in the viewfinder, you can set both the shutter speed and aperture manually as desired. Press the shutter button halfway. This method is set to any setting other than ±3 stops, the...from the standard exposure, the end of the exposure level indicator will display or in the viewfinder. a: Manual Exposure You can set the exposure as desired. To set . 97 The exposure level mark indicates how far the current exposure level is higher than [Disable], the...
... Optimizer] (p.107) is called manual exposure. * stands for Manual. 1 Set the Mode Dial to the exposure level indicator in the viewfinder, you can set both the shutter speed and aperture manually as desired. Press the shutter button halfway. This method is set to any setting other than ±3 stops, the...from the standard exposure, the end of the exposure level indicator will display or in the viewfinder. a: Manual Exposure You can set the exposure as desired. To set . 97 The exposure level mark indicates how far the current exposure level is higher than [Disable], the...

Instruction Manual
Page 109
...Instruction Manual (CD-ROM) for unregistered lenses. When using a non-Canon lens, setting the correction to [Disable] is recommended, even if [Correction data available] is set to the camera..., the result will be lower. If the lens does not have their correction data registered in the camera. With EOS... will be slightly lower than the maximum correction amount settable with Digital Photo Professional (provided software). Lens peripheral light correction is also ...
...Instruction Manual (CD-ROM) for unregistered lenses. When using a non-Canon lens, setting the correction to [Disable] is recommended, even if [Correction data available] is set to the camera..., the result will be lower. If the lens does not have their correction data registered in the camera. With EOS... will be slightly lower than the maximum correction amount settable with Digital Photo Professional (provided software). Lens peripheral light correction is also ...

Instruction Manual
Page 174
.../battery compartment cover. Clean the sensor with a blower remains, having the sensor cleaned by a Canon Service Center is turned off , the shutter will close and the shutter curtains or reflex mirror might ...get damaged. Do not insert the blower tip inside the camera beyond the lens mount. A brush can freeze on the sensor. If the power is ...might get damaged. • Setting the power switch to clean the sensor. The surface of the following. If a smudge that cannot be removed with care. 3 Manual Sensor CleaningN While cleaning the ...
.../battery compartment cover. Clean the sensor with a blower remains, having the sensor cleaned by a Canon Service Center is turned off , the shutter will close and the shutter curtains or reflex mirror might ...get damaged. Do not insert the blower tip inside the camera beyond the lens mount. A brush can freeze on the sensor. If the power is ...might get damaged. • Setting the power switch to clean the sensor. The surface of the following. If a smudge that cannot be removed with care. 3 Manual Sensor CleaningN While cleaning the ...

Instruction Manual
Page 205
...will appear. When using a Canon printer and Canon paper, read the printer's instruction manual to print 2, 4, 8, 9, 16, or 20 images on 9x13cm and larger prints. X The page layout screen will appear. X The print setting screen will have white borders along the edges. U Setting the Page Layout Select the ... what paper types can be imprinted. 205 Twenty or 35 images will be printed as thumbnails on the printer model or its settings. *1: After ordering the prints with "Digital Print Order Format (DPOF)" (p.211), you should print by following "Direct Printing with DPOF" (p.214). ...
...will appear. When using a Canon printer and Canon paper, read the printer's instruction manual to print 2, 4, 8, 9, 16, or 20 images on 9x13cm and larger prints. X The page layout screen will appear. X The print setting screen will have white borders along the edges. U Setting the Page Layout Select the ... what paper types can be imprinted. 205 Twenty or 35 images will be printed as thumbnails on the printer model or its settings. *1: After ordering the prints with "Digital Print Order Format (DPOF)" (p.211), you should print by following "Direct Printing with DPOF" (p.214). ...

Instruction Manual
Page 210
... not be printed as you resolve a printer error (no ink, no paper, etc.) and select [Continue] to resume printing. Error Messages If a problem occurs during printing, an error message will look at the camera's LCD monitor. Ink Error Check the printer's ink level, and check ... Error Check for any printer problems other than paper and ink problems. File Error The selected image cannot be printable. 210 Images taken with a different camera or images edited with a computer might not be displayed accurately. For details on resuming the printing, see the printer's instruction manual...
... not be printed as you resolve a printer error (no ink, no paper, etc.) and select [Continue] to resume printing. Error Messages If a problem occurs during printing, an error message will look at the camera's LCD monitor. Ink Error Check the printer's ink level, and check ... Error Check for any printer problems other than paper and ink problems. File Error The selected image cannot be printable. 210 Images taken with a different camera or images edited with a computer might not be displayed accurately. For details on resuming the printing, see the printer's instruction manual...

Instruction Manual
Page 212
.... W Digital Print Order Format (DPOF) Print type K Standard L Index K L Both Prints one image on one sheet. Date File number On [On] imprints the recorded date on the print. Next, select [Sel.Image], [Byn], or [All image] to order the images to the printer's instruction manual. If ... be imprinted depending on one sheet. RAW images and movies cannot be set . Even if [Date] and [File No.] are printed on the print type setting and printer model. Do not insert into the camera a card whose print order specifications have been set to print the images as you specified.
.... W Digital Print Order Format (DPOF) Print type K Standard L Index K L Both Prints one image on one sheet. Date File number On [On] imprints the recorded date on the print. Next, select [Sel.Image], [Byn], or [All image] to order the images to the printer's instruction manual. If ... be imprinted depending on one sheet. RAW images and movies cannot be set . Even if [Date] and [File No.] are printed on the print type setting and printer model. Do not insert into the camera a card whose print order specifications have been set to print the images as you specified.

Instruction Manual
Page 230
... and use the Eye-Fi card or to troubleshoot any image transfer problems, refer to the Eye-Fi card's instruction manual or inquire the card's manufacturer. In case of the Eye-Fi card. For instructions on how to set up , you set [Eye-Fi trans.] to support Eye-Fi card functions (including wireless transfer). This...will not occur even with the card manufacturer. 1 Insert an Eye-Fi card. (p.28) 2 Select [Eye-Fi settings]. If it is not guaranteed to [Enable], then press . The camera is unclear whether the card has been approved for use of the card is displayed only when an Eye-Fi card...
... and use the Eye-Fi card or to troubleshoot any image transfer problems, refer to the Eye-Fi card's instruction manual or inquire the card's manufacturer. In case of the Eye-Fi card. For instructions on how to set up , you set [Eye-Fi trans.] to support Eye-Fi card functions (including wireless transfer). This...will not occur even with the card manufacturer. 1 Insert an Eye-Fi card. (p.28) 2 Select [Eye-Fi settings]. If it is not guaranteed to [Enable], then press . The camera is unclear whether the card has been approved for use of the card is displayed only when an Eye-Fi card...

Instruction Manual
Page 243
...will decrease. Shooting-Related Problems No images can be used. The card is displayed, see page 30 or 250. 243 Slide the card's write-protect switch to focus, or focus manually (p.39, 85). Press the button to [Off] (p.155). Auto power off after the camera is full, replace the card or delete ...if [5 Auto power off] has been set [5 Auto power off by itself. If you hold down the shutter button for a long time or often use Live View shooting or shoot movies for 30 min. If you try to make room (p.28, 196). Troubleshooting Guide If you use only the AF without taking...
...will decrease. Shooting-Related Problems No images can be used. The card is displayed, see page 30 or 250. 243 Slide the card's write-protect switch to focus, or focus manually (p.39, 85). Press the button to [Off] (p.155). Auto power off after the camera is full, replace the card or delete ...if [5 Auto power off] has been set [5 Auto power off by itself. If you hold down the shutter button for a long time or often use Live View shooting or shoot movies for 30 min. If you try to make room (p.28, 196). Troubleshooting Guide If you use only the AF without taking...

Instruction Manual
Page 251
Specifications • Type Type: Recording media: Image sensor size: Compatible lenses: Lens mount: Digital, single-lens reflex, AF/AE camera with built-in flash SD memory card, SDHC memory card, SDXC memory card Approx. 22.0 x 14.7mm Canon EF lenses (including EF-S lenses) (35mm-equivalent focal length is approx. 1.6 times the lens focal length) Canon... EF mount • Image Sensor Type: Effective pixels: Aspect ratio: Dust delete function: CMOS sensor Approx. 12.20 megapixels 3:2 Manual..., Portrait, Landscape, Neutral, Faithful, Monochrome, User Def. 1 - 3 Shoot by ambience selection...
Specifications • Type Type: Recording media: Image sensor size: Compatible lenses: Lens mount: Digital, single-lens reflex, AF/AE camera with built-in flash SD memory card, SDHC memory card, SDXC memory card Approx. 22.0 x 14.7mm Canon EF lenses (including EF-S lenses) (35mm-equivalent focal length is approx. 1.6 times the lens focal length) Canon... EF mount • Image Sensor Type: Effective pixels: Aspect ratio: Dust delete function: CMOS sensor Approx. 12.20 megapixels 3:2 Manual..., Portrait, Landscape, Neutral, Faithful, Monochrome, User Def. 1 - 3 Shoot by ambience selection...

Instruction Manual
Page 269
EOS DIGITAL Solution Disk (Software) Software Instruction Manual 269 It also explains how to install the software in the Software Instruction Manual CD-ROM. Software Start Guide This chapter gives an overview of the software in the EOS DIGITAL Solution Disk (CD-ROM) provided with the camera and explains how to view the pdf files in a personal computer.
EOS DIGITAL Solution Disk (Software) Software Instruction Manual 269 It also explains how to install the software in the Software Instruction Manual CD-ROM. Software Start Guide This chapter gives an overview of the software in the EOS DIGITAL Solution Disk (CD-ROM) provided with the camera and explains how to view the pdf files in a personal computer.

Instruction Manual
Page 271
... [Canon EOS Digital Installer]. 2 Click [Easy Installation] and follow the on-screen instructions to your computer before you install the software. For Macintosh, click [Install]. 3 Click [Restart] and remove the CD-ROM after the computer restarts. The software will overwrite the previous version). 1 Insert EOS DIGITAL Solution Disk (CD-ROM). Software Start Guide Installing the Software Do not connect the camera to install. Even...
... [Canon EOS Digital Installer]. 2 Click [Easy Installation] and follow the on-screen instructions to your computer before you install the software. For Macintosh, click [Install]. 3 Click [Restart] and remove the CD-ROM after the computer restarts. The software will overwrite the previous version). 1 Insert EOS DIGITAL Solution Disk (CD-ROM). Software Start Guide Installing the Software Do not connect the camera to install. Even...

Instruction Manual
Page 286
... Camera Clear camera settings 164 Holding the camera 38 Settings display 163 Camera shake 37, 38 Card 15, 28, 44 Card reminder 154 Eye-Fi 230 Format 44 Problem 30, 45 SD speed class 139 SDHC/SDXC 28 Write-protect 28 Center-weighted average metering 100 Charger 24, 26 Cleaning 173 Clear camera settings 164 Close-ups 60 Color space...
... Camera Clear camera settings 164 Holding the camera 38 Settings display 163 Camera shake 37, 38 Card 15, 28, 44 Card reminder 154 Eye-Fi 230 Format 44 Problem 30, 45 SD speed class 139 SDHC/SDXC 28 Write-protect 28 Center-weighted average metering 100 Charger 24, 26 Cleaning 173 Clear camera settings 164 Close-ups 60 Color space...
