
User Manual
Page 2
...please visit www.canon-europe.com/environment. (EEA: Norway, Iceland and Liechtenstein) Model Names The following names may be the trademarks of the Document Scanner. For more information... the same time, your household waste disposal service. DR-6010C: Model M11072 Trademarks • Canon and the Canon logo are registered trademarks of products with your household ...trademarks or registered trademarks in other countries. • imageFORMULA is a trademark of CANON ELECTRONICS INC. • Microsoft, Windows and Windows Vista are either registered trademarks or trademarks of Microsoft...
...please visit www.canon-europe.com/environment. (EEA: Norway, Iceland and Liechtenstein) Model Names The following names may be the trademarks of the Document Scanner. For more information... the same time, your household waste disposal service. DR-6010C: Model M11072 Trademarks • Canon and the Canon logo are registered trademarks of products with your household ...trademarks or registered trademarks in other countries. • imageFORMULA is a trademark of CANON ELECTRONICS INC. • Microsoft, Windows and Windows Vista are either registered trademarks or trademarks of Microsoft...

User Manual
Page 16
.... • If you connect the scanner to the computer before installing the software, a wizard screen such as shown below . In such a case, click the [Cancel] button to close the wizard screen and then turn power to the scanner OFF. Wizard Screen (Windows Vista) 2-1 Chapter 2 Setup 2-1 ...Setup Procedure In order to prepare the scanner for use, read and follow the instructions in each section below will appear when you turn ...
.... • If you connect the scanner to the computer before installing the software, a wizard screen such as shown below . In such a case, click the [Cancel] button to close the wizard screen and then turn power to the scanner OFF. Wizard Screen (Windows Vista) 2-1 Chapter 2 Setup 2-1 ...Setup Procedure In order to prepare the scanner for use, read and follow the instructions in each section below will appear when you turn ...

User Manual
Page 17
... contact the store where you are using for more - Refer to USB 1.1.) In this case, using the USB interface that you can use the DR-6010C scanner, your computer. - Hard disk: 1 GB or more information. • Do not connect both a USB interface and a SCSI card at the ... (Hi-Speed USB 2.0) or SCSI expansion card - For details, consult your local authorized Canon dealer. - Microsoft Windows Vista Home basic, Home Premium, Business, Ultimate or Enterprise SP1 or later Note Microsoft Windows Vista has 32- REX-CB31 (Ratoc Systems) • An ISIS-compatible application or a...
... contact the store where you are using for more - Refer to USB 1.1.) In this case, using the USB interface that you can use the DR-6010C scanner, your computer. - Hard disk: 1 GB or more information. • Do not connect both a USB interface and a SCSI card at the ... (Hi-Speed USB 2.0) or SCSI expansion card - For details, consult your local authorized Canon dealer. - Microsoft Windows Vista Home basic, Home Premium, Business, Ultimate or Enterprise SP1 or later Note Microsoft Windows Vista has 32- REX-CB31 (Ratoc Systems) • An ISIS-compatible application or a...

User Manual
Page 20
...Typical Installation], all other applications before connecting the scanner to the computer. 1 Log onto Windows with an account that you have previously uninstalled, select [Custom Installation] and specify the software. • The DR-6010C driver installation comprises the Scanner Driver and Job Tool installation. 2-5 If the ... Screen 3 Click [Typical Installation]. Chapter 2 Setup Software Installation Install the software before installing the software. 2 Insert the DR-6010C Setup disc into the CD-ROM drive. Note • When you insert the CD-ROM into the PC's CD-ROM drive.
...Typical Installation], all other applications before connecting the scanner to the computer. 1 Log onto Windows with an account that you have previously uninstalled, select [Custom Installation] and specify the software. • The DR-6010C driver installation comprises the Scanner Driver and Job Tool installation. 2-5 If the ... Screen 3 Click [Typical Installation]. Chapter 2 Setup Software Installation Install the software before installing the software. 2 Insert the DR-6010C Setup disc into the CD-ROM drive. Note • When you insert the CD-ROM into the PC's CD-ROM drive.

User Manual
Page 28
Power switch OFF position ON position 3 Plug the supplied power cord into an AC outlet. If the power switch is OFF. a 120 V Type 220-240 V Type 4 Connect the power cord into the power connector on the rear of the scanner is in the ON position, push the switch to set it to the computer. 2-13 Chapter 2 Setup 1 Shut down Windows and turn the computer OFF. 2 Verify that the power switch of the unit. b 5 Use the SCSI cable to connect the scanner to OFF.
Power switch OFF position ON position 3 Plug the supplied power cord into an AC outlet. If the power switch is OFF. a 120 V Type 220-240 V Type 4 Connect the power cord into the power connector on the rear of the scanner is in the ON position, push the switch to set it to the computer. 2-13 Chapter 2 Setup 1 Shut down Windows and turn the computer OFF. 2 Verify that the power switch of the unit. b 5 Use the SCSI cable to connect the scanner to OFF.

User Manual
Page 29
... it is connected to the computer. 1 Make sure that has Administrator privileges. 5 Windows recognizes the DR-6010C automatically, and installation of Windows recognizes the scanner and automatically installs the required device driver. If you turn power to the computer ON first, the scanner may not be properly recognized by the computer. • If you turn the...
... it is connected to the computer. 1 Make sure that has Administrator privileges. 5 Windows recognizes the DR-6010C automatically, and installation of Windows recognizes the scanner and automatically installs the required device driver. If you turn power to the computer ON first, the scanner may not be properly recognized by the computer. • If you turn the...

User Manual
Page 30
Chapter 2 Setup Note • In Windows Vista and Windows XP, a message appears when installation is complete. • In Windows 2000, no message appears when installation is complete. • The DR-6010C is installed in Device Manager under [Imaging Devices] as [CANON DR- 6010C USB] or [CANON DR-6010C SCSI]. 2-15
Chapter 2 Setup Note • In Windows Vista and Windows XP, a message appears when installation is complete. • In Windows 2000, no message appears when installation is complete. • The DR-6010C is installed in Device Manager under [Imaging Devices] as [CANON DR- 6010C USB] or [CANON DR-6010C SCSI]. 2-15

User Manual
Page 39
... that you to print on the scanner. The Job Function enables you specify using the Job Registration tool. (See "Job Registration Tool," on p. 310.) The follwing functions can be programmed in a job button in a specified folder. (Network) Job Buttons DR-6010C Attach to E-mail Start up a...new e-mail message. The Job Function enables you must first change the Windows event settings. (See "About Launcher," on the computer. Note To use the Launcher function, you to program the job buttons to scan documents without having to perform scanning, the DR6010C is the Job Function ?...
... that you to print on the scanner. The Job Function enables you specify using the Job Registration tool. (See "Job Registration Tool," on p. 310.) The follwing functions can be programmed in a job button in a specified folder. (Network) Job Buttons DR-6010C Attach to E-mail Start up a...new e-mail message. The Job Function enables you must first change the Windows event settings. (See "About Launcher," on the computer. Note To use the Launcher function, you to program the job buttons to scan documents without having to perform scanning, the DR6010C is the Job Function ?...

User Manual
Page 42
...Operation About Launcher To use the Launcher feature of the DR-6010C. • Some applications may not work correctly if started using the Launcher feature. If you do not change the Windows event settings as described below will appear. Note Under Windows 2000, click the [Start] button and select [... Control Panel, then proceed to change the event settings. • Only applications that support the Windows event function can be started using the Launcher feature of the DR-6010C, the dialog box shown below , and specify an application for each job button. Select an ...
...Operation About Launcher To use the Launcher feature of the DR-6010C. • Some applications may not work correctly if started using the Launcher feature. If you do not change the Windows event settings as described below will appear. Note Under Windows 2000, click the [Start] button and select [... Control Panel, then proceed to change the event settings. • Only applications that support the Windows event function can be started using the Launcher feature of the DR-6010C, the dialog box shown below , and specify an application for each job button. Select an ...
User Manual
Page 43
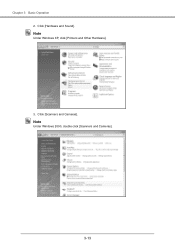
Chapter 3 Basic Operation 2. Click [Scanners and Cameras]. Note Under Windows XP, click [Printers and Other Hardware]. 3. Note Under Windows 2000, double click [Scanners and Cameras]. 3-13 Click [Hardware and Sound].
Chapter 3 Basic Operation 2. Click [Scanners and Cameras]. Note Under Windows XP, click [Printers and Other Hardware]. 3. Note Under Windows 2000, double click [Scanners and Cameras]. 3-13 Click [Hardware and Sound].

User Manual
Page 44
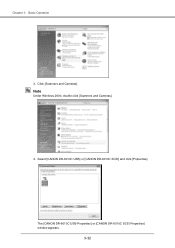
The [CANON DR-6010C USB Properties] or [CANON DR-6010C SCSI Properties] window appears. 5. Click the [Events] tab. 2 Under [Scanner events], select the button whose setting you want to change (Button No. 1, Button No. 2, Button No. 3.) 3-14 Select [CANON DR-6010C USB] or [CANON DR-6010C SCSI] and click [Properties]. Chapter 3 Basic Operation 4.
The [CANON DR-6010C USB Properties] or [CANON DR-6010C SCSI Properties] window appears. 5. Click the [Events] tab. 2 Under [Scanner events], select the button whose setting you want to change (Button No. 1, Button No. 2, Button No. 3.) 3-14 Select [CANON DR-6010C USB] or [CANON DR-6010C SCSI] and click [Properties]. Chapter 3 Basic Operation 4.

User Manual
Page 45
IMPORTANT If the [Disable device events] check box is not selected. 4 Click [OK] to close [CANON DR-6010C USB Properties]. 5 Restart Windows to this check box is selected, the Job Function cannot be used. Select only one application (deselect the check boxes for all applications listed under [Send to enable the new event settings. 3-15 Make sure that this application] are selected. Chapter 3 Basic Operation 3 By default, all other applications.) Then click [Apply].
IMPORTANT If the [Disable device events] check box is not selected. 4 Click [OK] to close [CANON DR-6010C USB Properties]. 5 Restart Windows to this check box is selected, the Job Function cannot be used. Select only one application (deselect the check boxes for all applications listed under [Send to enable the new event settings. 3-15 Make sure that this application] are selected. Chapter 3 Basic Operation 3 By default, all other applications.) Then click [Apply].

User Manual
Page 48
... [Programs] ([All Programs] for Windows XP) Æ [CapturePerfect 3.0] Æ [CapturePerfect 3.0]. On the [Scan] menu, click [Select Scanner]. 3-18 CapturePerfect 3.0 starts up CapturePerfect 3.0, select the scanner, and scan documents. The Scan Batch to File function is used here as the scanner to start up . 2 Follow the procedure below to select the Canon DR-6010C Document Scanner as an example. Chapter 3 Basic...
... [Programs] ([All Programs] for Windows XP) Æ [CapturePerfect 3.0] Æ [CapturePerfect 3.0]. On the [Scan] menu, click [Select Scanner]. 3-18 CapturePerfect 3.0 starts up CapturePerfect 3.0, select the scanner, and scan documents. The Scan Batch to File function is used here as the scanner to start up . 2 Follow the procedure below to select the Canon DR-6010C Document Scanner as an example. Chapter 3 Basic...

User Manual
Page 53
... of the next document. Chapter 3 Basic Operation 3-6 Using Patchcode Sheets The DR-6010C ISIS driver and CapturePerfect 3.0 both support the automatic file separation function with the scanner, or an application, which supports PDF format files. Note To open [Programs] Æ [Canon DR-6010C] Æ ...[PATCH X (XX)]. IMPORTANT Patchcode sheets must be used when the MultiStream function (See "MultiStream Function," on the Windows start button, open...
... of the next document. Chapter 3 Basic Operation 3-6 Using Patchcode Sheets The DR-6010C ISIS driver and CapturePerfect 3.0 both support the automatic file separation function with the scanner, or an application, which supports PDF format files. Note To open [Programs] Æ [Canon DR-6010C] Æ ...[PATCH X (XX)]. IMPORTANT Patchcode sheets must be used when the MultiStream function (See "MultiStream Function," on the Windows start button, open...

User Manual
Page 61
... procedure to place the document so that it is placed on the scanner in a skewed position, it may react slowly, resulting in the Long Document mode, if the document is not skewed. • When scanning with the bypass mode. Be careful to open the [CANON DR-6010C USB Properties] (or [CANON DR-6010C SCSI Properties].) 1. Note Under Windows XP, click [Printers...
... procedure to place the document so that it is placed on the scanner in a skewed position, it may react slowly, resulting in the Long Document mode, if the document is not skewed. • When scanning with the bypass mode. Be careful to open the [CANON DR-6010C USB Properties] (or [CANON DR-6010C SCSI Properties].) 1. Note Under Windows XP, click [Printers...
User Manual
Page 62
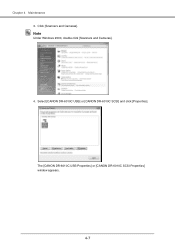
Select [CANON DR-6010C USB] or [CANON DR-6010C SCSI] and click [Properties]. Click [Scanners and Cameras]. Chapter 3 Basic Operation 3. The [CANON DR-6010C USB Properties] or [CANON DR-6010C SCSI Properties] window appears. 3-32 Note Under Windows 2000, double click [Scanners and Cameras]. 4.
Select [CANON DR-6010C USB] or [CANON DR-6010C SCSI] and click [Properties]. Click [Scanners and Cameras]. Chapter 3 Basic Operation 3. The [CANON DR-6010C USB Properties] or [CANON DR-6010C SCSI Properties] window appears. 3-32 Note Under Windows 2000, double click [Scanners and Cameras]. 4.

User Manual
Page 70
Chapter 4 Maintenance Resetting the Counter After replacing the feed rollers, open the Control Panel. Click [Start] - [Control Panel] to step 3. 2. Click [Hardware and Sound]. Note Under Windows XP, click [Printers and Other Hardware]. 4-6 Note Under Windows 2000, click the [Start] button and select [Settings] - [Control Panel] to open the Control Panel, then proceed to open the [Counter setup] dialog box and reset the counter. 1 Open the [Event settings] dialog box. 1.
Chapter 4 Maintenance Resetting the Counter After replacing the feed rollers, open the Control Panel. Click [Start] - [Control Panel] to step 3. 2. Click [Hardware and Sound]. Note Under Windows XP, click [Printers and Other Hardware]. 4-6 Note Under Windows 2000, click the [Start] button and select [Settings] - [Control Panel] to open the Control Panel, then proceed to open the [Counter setup] dialog box and reset the counter. 1 Open the [Event settings] dialog box. 1.
User Manual
Page 71
Chapter 4 Maintenance 3. The [CANON DR-6010C USB Properties] or [CANON DR-6010C SCSI Properties] window appears. 4-7 Select [CANON DR-6010C USB] or [CANON DR-6010C SCSI] and click [Properties]. Note Under Windows 2000, double click [Scanners and Cameras]. 4. Click [Scanners and Cameras].
Chapter 4 Maintenance 3. The [CANON DR-6010C USB Properties] or [CANON DR-6010C SCSI Properties] window appears. 4-7 Select [CANON DR-6010C USB] or [CANON DR-6010C SCSI] and click [Properties]. Note Under Windows 2000, double click [Scanners and Cameras]. 4. Click [Scanners and Cameras].

User Manual
Page 84
Chapter 5 Troubleshooting 5-2 Uninstalling Software If the ISIS/TWAIN driver, and "CapturePerfect 3.0" are using Windows 2000 Professional or Windows XP. 1 Click the [Start] button Æ [Control Panel]. Note For Windows XP, click the [Start] button Æ click [Control Panel]. Note If you are not ...below to log on p. 2-4.) IMPORTANT Be sure to uninstall them. The [Control Panel] window appears. 2 Click [Programs] Æ [Programs and Features]. Then, re-install the software from the DR-6010C setup disc. (See "2-3 Installing the Software," on as an administrator when using...
Chapter 5 Troubleshooting 5-2 Uninstalling Software If the ISIS/TWAIN driver, and "CapturePerfect 3.0" are using Windows 2000 Professional or Windows XP. 1 Click the [Start] button Æ [Control Panel]. Note For Windows XP, click the [Start] button Æ click [Control Panel]. Note If you are not ...below to log on p. 2-4.) IMPORTANT Be sure to uninstall them. The [Control Panel] window appears. 2 Click [Programs] Æ [Programs and Features]. Then, re-install the software from the DR-6010C setup disc. (See "2-3 Installing the Software," on as an administrator when using...

User Manual
Page 85
... box, select the application you want to delete Æ click [Uninstall]. Chapter 5 Troubleshooting The [Uninstall or change a program] dialog box appears. Note For Windows XP, the [Add or Remove Programs] dialog box appears. 3 From the list in the dialog box, select [Canon DR-6010C Driver] Æ click [Uninstall]. 2 The confirm file deletion screen appears.
... box, select the application you want to delete Æ click [Uninstall]. Chapter 5 Troubleshooting The [Uninstall or change a program] dialog box appears. Note For Windows XP, the [Add or Remove Programs] dialog box appears. 3 From the list in the dialog box, select [Canon DR-6010C Driver] Æ click [Uninstall]. 2 The confirm file deletion screen appears.

