
User Manual
Page 2
...Document Scanner. Copyright Copyright 2009 by any means, electronic or mechanical, including photocopying and recording, or by CANON ELECTRONICS INC. CANON ELECTRONICS INC. The standards and logos are office equipment, such as computers, monitors, printers, fax, machine, copiers, and scanners. No part of CANON...registered trademarks in other countries. • imageFORMULA is a trademark of CANON ELECTRONICS INC. • Microsoft, Windows and...their respective owners. DR-6010C: Model M11072 Trademarks • Canon and the Canon logo are registered trademarks of Canon Inc. in the...
...Document Scanner. Copyright Copyright 2009 by any means, electronic or mechanical, including photocopying and recording, or by CANON ELECTRONICS INC. CANON ELECTRONICS INC. The standards and logos are office equipment, such as computers, monitors, printers, fax, machine, copiers, and scanners. No part of CANON...registered trademarks in other countries. • imageFORMULA is a trademark of CANON ELECTRONICS INC. • Microsoft, Windows and...their respective owners. DR-6010C: Model M11072 Trademarks • Canon and the Canon logo are registered trademarks of Canon Inc. in the...

User Manual
Page 3
...Thank you for the software required to use the scanner. Hardware Chapter 1 Before Using the Scanner Safety instructions, features, scanner parts Chapter 2 Setup Scanner operation environment and setup procedures Chapter 3 Basic Operation Supported document types, basic scanning procedure, steps for clearing ...this manual thoroughly before using the scanner. Please read this manual, store it in a safe place for using the scanner to familiarize yourself with its capabilities, and to make settings for purchasing the Canon DR-6010C Document Scanner. Manuals for regular maintenance, roller...
...Thank you for the software required to use the scanner. Hardware Chapter 1 Before Using the Scanner Safety instructions, features, scanner parts Chapter 2 Setup Scanner operation environment and setup procedures Chapter 3 Basic Operation Supported document types, basic scanning procedure, steps for clearing ...this manual thoroughly before using the scanner. Please read this manual, store it in a safe place for using the scanner to familiarize yourself with its capabilities, and to make settings for purchasing the Canon DR-6010C Document Scanner. Manuals for regular maintenance, roller...

User Manual
Page 6
Contents Chapter1 1-1 1-2 1-3 Chapter2 2-1 2-2 2-3 2-4 2-5 Chapter3 3-1 3-2 3-3 3-4 3-5 3-6 3-7 3-8 Chapter4 4-1 Before Using the Scanner 1-1 Important Safety Instructions 1-1 Installation Location 1-1 Power ...1-2 Moving the Scanner 1-2 Handling ...1-3 Disposal...1-4 Features of the DR-6010C Document Scanner 1-5 Names and Functions of Parts 1-7 Setup ...2-1 Setup Procedure 2-1 Installation Requirements 2-2 Installing the Software 2-4 Setup Disc 2-4 Software Installation 2-5 Connecting the Scanner to the Computer 2-11 Using a USB Connection 2-11 Using a SCSI Connection 2-12...
Contents Chapter1 1-1 1-2 1-3 Chapter2 2-1 2-2 2-3 2-4 2-5 Chapter3 3-1 3-2 3-3 3-4 3-5 3-6 3-7 3-8 Chapter4 4-1 Before Using the Scanner 1-1 Important Safety Instructions 1-1 Installation Location 1-1 Power ...1-2 Moving the Scanner 1-2 Handling ...1-3 Disposal...1-4 Features of the DR-6010C Document Scanner 1-5 Names and Functions of Parts 1-7 Setup ...2-1 Setup Procedure 2-1 Installation Requirements 2-2 Installing the Software 2-4 Setup Disc 2-4 Software Installation 2-5 Connecting the Scanner to the Computer 2-11 Using a USB Connection 2-11 Using a SCSI Connection 2-12...

User Manual
Page 7
4-2 Chapter5 5-1 5-2 Chapter6 6-1 Removing and Attaching the Rollers 4-5 Roller Replacement Cycle 4-5 Resetting the Counter 4-6 Removing/Attaching the Roller Unit 4-9 Removing and Attaching the Retard Roller 4-11 Troubleshooting 5-1 Troubleshooting 5-1 Uninstalling Software 5-6 Uninstalling the ISIS/TWAIN Driver 5-7 Uninstalling the Job Registration Tool 5-8 Uninstalling CapturePerfect 3.0 5-10 Appendix ...6-1 Specifications 6-1 Specifications 6-1 Replacement Parts 6-2 Options ...6-2 External Dimensions 6-3 Index ...6-4 iii
4-2 Chapter5 5-1 5-2 Chapter6 6-1 Removing and Attaching the Rollers 4-5 Roller Replacement Cycle 4-5 Resetting the Counter 4-6 Removing/Attaching the Roller Unit 4-9 Removing and Attaching the Retard Roller 4-11 Troubleshooting 5-1 Troubleshooting 5-1 Uninstalling Software 5-6 Uninstalling the ISIS/TWAIN Driver 5-7 Uninstalling the Job Registration Tool 5-8 Uninstalling CapturePerfect 3.0 5-10 Appendix ...6-1 Specifications 6-1 Specifications 6-1 Replacement Parts 6-2 Options ...6-2 External Dimensions 6-3 Index ...6-4 iii

User Manual
Page 14
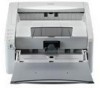
... familiarize yourself with the parts of the scanner before using the scanner. ■ Front View (Feed Tray Open) Document Eject Tray Extension Open if the document extends beyond the edge of the eject tray. (See p. 3-3.) Document Feed Tray Place the document to be scanned here. (See p. 3-3.) Document Eject Tray Scanned documents are ejected here. (See p. 3-3.) Document Feed Tray Extension Pull...
... familiarize yourself with the parts of the scanner before using the scanner. ■ Front View (Feed Tray Open) Document Eject Tray Extension Open if the document extends beyond the edge of the eject tray. (See p. 3-3.) Document Feed Tray Place the document to be scanned here. (See p. 3-3.) Document Eject Tray Scanned documents are ejected here. (See p. 3-3.) Document Feed Tray Extension Pull...

User Manual
Page 32
... the scanned image and transfer the dirt to select the bypass mode and straight path. Wrinkled or creased documents Extremely thin, translucent paper Curled document Carbon paper Documents with the scanner. Always clean the internal parts of the scanner after scanning such documents. (See "Cleaning the Sensor Glass and the Rollers," on p. 4-2.) • When scanning a two-sided...
... the scanned image and transfer the dirt to select the bypass mode and straight path. Wrinkled or creased documents Extremely thin, translucent paper Curled document Carbon paper Documents with the scanner. Always clean the internal parts of the scanner after scanning such documents. (See "Cleaning the Sensor Glass and the Rollers," on p. 4-2.) • When scanning a two-sided...

User Manual
Page 67
...sensor glass, contact your local authorized Canon dealer or service representative. 4 Dampen a cloth with water, wring it out thoroughly, and then wipe the rollers of the upper unit while turning them and lead to turn the rollers in the lower part of the scanner. Clean these rollers by wiping the... exposed part. Chapter 4 Maintenance 3 Use a clean dry cloth to turn the rollers in the lower part of the scanner. Do not try to wipe dirt off the sensor glass. ...
...sensor glass, contact your local authorized Canon dealer or service representative. 4 Dampen a cloth with water, wring it out thoroughly, and then wipe the rollers of the upper unit while turning them and lead to turn the rollers in the lower part of the scanner. Clean these rollers by wiping the... exposed part. Chapter 4 Maintenance 3 Use a clean dry cloth to turn the rollers in the lower part of the scanner. Do not try to wipe dirt off the sensor glass. ...

User Manual
Page 69
...roller replacement message appears on p. 4-6.) • For information about the exchange roller kit (roller unit, retard roller,) contact your local authorized Canon dealer or service representative. 4-5 CAUTION Do not use excessive force when removing or attaching the rollers. Purchase an exchange roller kit and replace..., purchase an exchange roller kit and replace the roller unit and the retard roller. IMPORTANT Feed rollers are consumable parts. Chapter 4 Maintenance 4-2 Removing and Attaching the Rollers To clean or replace the roller unit or retard roller, remove and then attach...
...roller replacement message appears on p. 4-6.) • For information about the exchange roller kit (roller unit, retard roller,) contact your local authorized Canon dealer or service representative. 4-5 CAUTION Do not use excessive force when removing or attaching the rollers. Purchase an exchange roller kit and replace..., purchase an exchange roller kit and replace the roller unit and the retard roller. IMPORTANT Feed rollers are consumable parts. Chapter 4 Maintenance 4-2 Removing and Attaching the Rollers To clean or replace the roller unit or retard roller, remove and then attach...

User Manual
Page 74
Chapter 4 Maintenance 4 Move the roller unit to lock the roller unit. 4-10 Attaching the Roller Unit 1 Align the cutout on the roller unit with the shaft pin on the main unit. Note If the cutout and pin do not fit, rotate the roller until the parts are properly matched. 2 Slide the roller lock lever to the left and raise the roller unit into position. 3 Push the roller lock lever up to the right a and then pull it out b.
Chapter 4 Maintenance 4 Move the roller unit to lock the roller unit. 4-10 Attaching the Roller Unit 1 Align the cutout on the roller unit with the shaft pin on the main unit. Note If the cutout and pin do not fit, rotate the roller until the parts are properly matched. 2 Slide the roller lock lever to the left and raise the roller unit into position. 3 Push the roller lock lever up to the right a and then pull it out b.
User Manual
Page 91
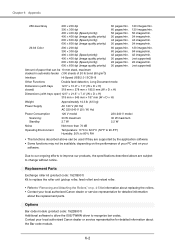
Contact your local authorized Canon dealer or service representative for detailed information about the Bar code module. 6-2 Replacement Parts Exchange roller kit (product code: 1921B001) Kit to replace the roller unit (pickup roller, feed roller) and retard roller. • Refer... not be available, depending on the performance of 20 lb bond (80 g/m2)) Interface Hi-Speed USB 2.0 / SCSI-III Other Functions Double feed detection, Long Document mode Dimensions (with trays closed) 12.5" × 10.9" × 7.3" (W × D × H) 318 mm × 278 mm × 185.5 mm (W × D × ...
Contact your local authorized Canon dealer or service representative for detailed information about the Bar code module. 6-2 Replacement Parts Exchange roller kit (product code: 1921B001) Kit to replace the roller unit (pickup roller, feed roller) and retard roller. • Refer... not be available, depending on the performance of 20 lb bond (80 g/m2)) Interface Hi-Speed USB 2.0 / SCSI-III Other Functions Double feed detection, Long Document mode Dimensions (with trays closed) 12.5" × 10.9" × 7.3" (W × D × H) 318 mm × 278 mm × 185.5 mm (W × D × ...

User Manual
Page 93
... 3-30 DR-6010C monitor 3-11 E Eject Tray 3-3 event 3-12 Event settings 4-6 External Dimensions 6-3 F Features 1-5 Folio Scan 3-29 H Handling 1-3 I Installation Location 1-1 Installation Requirements 2-2 J job buttons 3-9 Job Function 3-9 Scanning With 3-11 Job Registration Tool 3-10 L Launcher 3-12 Load limit mark 3-6 Long Document Mode 3-30 Settings 3-31 Long document mode 3-1 M Moving the Scanner 1-2 MultiStream Function 3-34 N Names of Parts...
... 3-30 DR-6010C monitor 3-11 E Eject Tray 3-3 event 3-12 Event settings 4-6 External Dimensions 6-3 F Features 1-5 Folio Scan 3-29 H Handling 1-3 I Installation Location 1-1 Installation Requirements 2-2 J job buttons 3-9 Job Function 3-9 Scanning With 3-11 Job Registration Tool 3-10 L Launcher 3-12 Load limit mark 3-6 Long Document Mode 3-30 Settings 3-31 Long document mode 3-1 M Moving the Scanner 1-2 MultiStream Function 3-34 N Names of Parts...

User Manual
Page 104
...See "Folio Scan," on p. 3-29.) ☞ [Folio] is not displayed if [Patchcode] is selected as the Batch Separation setting on the scanner. Disable Deskew in the following situations. Although image quality is high, scanning is selected, you can enable this occurs, lower the image quality by ... from images scanned at 300 dpi. Chapter 7 ISIS/TWAIN Driver Settings [Folio] Documents that in other cases, depending on the document, the slant of the image may not be corrected properly or part of the document may be scanned due to insufficient memory on the [Others] tab sheet. [Deskew...
...See "Folio Scan," on p. 3-29.) ☞ [Folio] is not displayed if [Patchcode] is selected as the Batch Separation setting on the scanner. Disable Deskew in the following situations. Although image quality is high, scanning is selected, you can enable this occurs, lower the image quality by ... from images scanned at 300 dpi. Chapter 7 ISIS/TWAIN Driver Settings [Folio] Documents that in other cases, depending on the document, the slant of the image may not be corrected properly or part of the document may be scanned due to insufficient memory on the [Others] tab sheet. [Deskew...

User Manual
Page 136
... one page.) The scanned image is selected as the [Page Size]. (See "[Scan Area] Dialog Box," on p. 7-11.) With the TWAIN driver, load a document in the scanner and click the [Preview] button to view the scanned image in the Area window, where you can specify any area on the page in... [Scan Single Page], open the Scan Area dialog box to scan one meter long. (See "Long Document Mode," on p. 3-30, and "Page Size," on p. 7-5.) Adjusting the Scan Area • To scan only part of the document page. You can adjust the scan area while viewing the preview image. (See "Preview Button (TWAIN...
... one page.) The scanned image is selected as the [Page Size]. (See "[Scan Area] Dialog Box," on p. 7-11.) With the TWAIN driver, load a document in the scanner and click the [Preview] button to view the scanned image in the Area window, where you can specify any area on the page in... [Scan Single Page], open the Scan Area dialog box to scan one meter long. (See "Long Document Mode," on p. 3-30, and "Page Size," on p. 7-5.) Adjusting the Scan Area • To scan only part of the document page. You can adjust the scan area while viewing the preview image. (See "Preview Button (TWAIN...
Reference Guide
Page 2
...dans la norme sur le matériel brouilleur: "Appareils Numériques", NMB-003 édictée par l'Industrie Canada. Model DR-6010C: M11072 i Connect the equipment to an outlet on a circuit different from that to correct the interference by one or more of the ... One Canon Plaza, Lake Success NY 11042, U.S.A. In some regions where this device must accept any changes or modifications to the equipment unless otherwise specified in this equipment does cause harmful interference to comply with Part 15 of the FCC Rules. FCC REGULATIONS (For 120 V model) Document Scanner, Model...
...dans la norme sur le matériel brouilleur: "Appareils Numériques", NMB-003 édictée par l'Industrie Canada. Model DR-6010C: M11072 i Connect the equipment to an outlet on a circuit different from that to correct the interference by one or more of the ... One Canon Plaza, Lake Success NY 11042, U.S.A. In some regions where this device must accept any changes or modifications to the equipment unless otherwise specified in this equipment does cause harmful interference to comply with Part 15 of the FCC Rules. FCC REGULATIONS (For 120 V model) Document Scanner, Model...

Reference Guide
Page 4
...DR-6010C: Model M11072 Trademarks • Canon and the Canon logo are either registered trademarks or trademarks of Microsoft Corporation in which business proprietors can drop off your cooperation in the correct disposal of this document... may be trademarks or registered trademarks in other countries. • imageFORMULA is a trademark of CANON ELECTRONICS INC. • Microsoft, Windows and Windows Vista are registered... including photocopying and recording, or by CANON ELECTRONICS INC. No part of this type of the Document Scanner. CANON ELECTRONICS INC. This product should be ...
...DR-6010C: Model M11072 Trademarks • Canon and the Canon logo are either registered trademarks or trademarks of Microsoft Corporation in which business proprietors can drop off your cooperation in the correct disposal of this document... may be trademarks or registered trademarks in other countries. • imageFORMULA is a trademark of CANON ELECTRONICS INC. • Microsoft, Windows and Windows Vista are registered... including photocopying and recording, or by CANON ELECTRONICS INC. No part of this type of the Document Scanner. CANON ELECTRONICS INC. This product should be ...

Reference Guide
Page 7
... Safety Instructions 4 Installation Location 4 Power 5 Moving the Scanner 6 Handling 6 Disposal 8 1-2 Features of the DR-6010C Document Scanner ... 9 1-3 Names and Functions of Parts 12 1-4 Installation Requirements 14 Chapter2 Basic Operation 16 2-1 Documents 16 2-2 Document Feed and Eject Tray 19 Preparing the Document Feed Tray 19 Preparing the Document Eject Tray 20 2-3 Placing Documents 22 Feeding in the Page Separation Mode 22 Feeding...
... Safety Instructions 4 Installation Location 4 Power 5 Moving the Scanner 6 Handling 6 Disposal 8 1-2 Features of the DR-6010C Document Scanner ... 9 1-3 Names and Functions of Parts 12 1-4 Installation Requirements 14 Chapter2 Basic Operation 16 2-1 Documents 16 2-2 Document Feed and Eject Tray 19 Preparing the Document Feed Tray 19 Preparing the Document Eject Tray 20 2-3 Placing Documents 22 Feeding in the Page Separation Mode 22 Feeding...

Reference Guide
Page 16
... parts of the scanner before using the scanner. ■ Front View (Feed Tray Open) Document Eject Tray Extension Open if the document extends beyond the edge of the eject tray. (See p. 20.) Document Eject Tray Scanned documents are ejected here. (See p. 20.) Document Feed Tray Place the document ....) Power Indicator This indicator lights when the scanner is used to turn the scanner ON. 12 Before Using the Scanner Feed Selection Lever Use this tray out if the document hangs over the edge of each part. Push it down ( ) to feed documents continuously (page separation mode.) (See p. 22...
... parts of the scanner before using the scanner. ■ Front View (Feed Tray Open) Document Eject Tray Extension Open if the document extends beyond the edge of the eject tray. (See p. 20.) Document Eject Tray Scanned documents are ejected here. (See p. 20.) Document Feed Tray Place the document ....) Power Indicator This indicator lights when the scanner is used to turn the scanner ON. 12 Before Using the Scanner Feed Selection Lever Use this tray out if the document hangs over the edge of each part. Push it down ( ) to feed documents continuously (page separation mode.) (See p. 22...

Reference Guide
Page 21
...; When scanning a multiple page document, pages of paper together can cause the scanner to smudges in the application software before the ink is less than 20 lb bond (0.0039") (75 g/m2 (0.1 mm)) in weight and documents are written in width, scanning may show through. Always clean the internal parts of each page may not...
...; When scanning a multiple page document, pages of paper together can cause the scanner to smudges in the application software before the ink is less than 20 lb bond (0.0039") (75 g/m2 (0.1 mm)) in weight and documents are written in width, scanning may show through. Always clean the internal parts of each page may not...

Reference Guide
Page 39
Cleaning the Feed Path Dust or paper particles in the document feed opening or inside the scanner can cause lines in the center. When this happens, purchase an exchange roller kit and replace the roller unit and the retard roller. 1 Carefully open ... images. Cleaning the Sensor Glass and the Rollers If scanned images have extraneous marks, or if the scanned documents are consumable parts. Clean them periodically. IMPORTANT Feed rollers are dirty, the sensor glass or rollers inside of the scanner. Doing so may occur more often. After finishing a large scanning job, turn OFF the...
Cleaning the Feed Path Dust or paper particles in the document feed opening or inside the scanner can cause lines in the center. When this happens, purchase an exchange roller kit and replace the roller unit and the retard roller. 1 Carefully open ... images. Cleaning the Sensor Glass and the Rollers If scanned images have extraneous marks, or if the scanned documents are consumable parts. Clean them periodically. IMPORTANT Feed rollers are dirty, the sensor glass or rollers inside of the scanner. Doing so may occur more often. After finishing a large scanning job, turn OFF the...

Reference Guide
Page 41
Turning these rollers simply by wiping the exposed part. Chapter 3 4 Dampen a cloth with both hands until you hear a click. Do not try to get your fingers caught, as this may damage the scanner. 6 Make sure that the upper unit is completely closed by force may damage them and lead to feeding ...the upper unit, be careful not to turn the rollers in the lower part of the scanner. Clean while turning Clean only exposed part IMPORTANT • Do not use excessive force, as this may result in the lower part of the upper unit while turning them. Clean these rollers by pushing on...
Turning these rollers simply by wiping the exposed part. Chapter 3 4 Dampen a cloth with both hands until you hear a click. Do not try to get your fingers caught, as this may damage the scanner. 6 Make sure that the upper unit is completely closed by force may damage them and lead to feeding ...the upper unit, be careful not to turn the rollers in the lower part of the scanner. Clean while turning Clean only exposed part IMPORTANT • Do not use excessive force, as this may result in the lower part of the upper unit while turning them. Clean these rollers by pushing on...


