
User Manual
Page 3
... manual, store it in a safe place for using the scanner to familiarize yourself with its capabilities, and to make settings for purchasing the Canon DR-4010C Document Scanner. After reading this manual thoroughly before using the scanner. INTRODUCTION INTRODUCTION Thank you for the software required to use the scanner. The Software section explains how to make the most of...
... manual, store it in a safe place for using the scanner to familiarize yourself with its capabilities, and to make settings for purchasing the Canon DR-4010C Document Scanner. After reading this manual thoroughly before using the scanner. INTRODUCTION INTRODUCTION Thank you for the software required to use the scanner. The Software section explains how to make the most of...
User Manual
Page 13
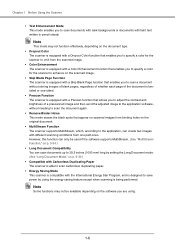
... only be available depending on the original document. • MultiStream Function The scanner supports MultiStream, which, according to the application, can scan documents up to 39.2 inches (1000 mm) long by setting the Long Document mode. (See "Long Document Mode," on p. 3-30.) • Compatible with Carbonless Duplicating Paper The scanner is able to scan carbonless duplicating paper...
... only be available depending on the original document. • MultiStream Function The scanner supports MultiStream, which, according to the application, can scan documents up to 39.2 inches (1000 mm) long by setting the Long Document mode. (See "Long Document Mode," on p. 3-30.) • Compatible with Carbonless Duplicating Paper The scanner is able to scan carbonless duplicating paper...

User Manual
Page 15
Power Connector CAUTION • Do not block the ventilation openings. Doing so could cause the scanner to a 50-pin half-pitch (pin type) SCSI cable. Doing so may cause a malfunction. 1-8 SCSI Connector Connect to overheat, creating a risk of ...the provided USB cable or a USB cable that supports Hi-Speed USB 2.0. Chapter 1 Before Using the Scanner ■ Back View Document Eject Tray 2 Open this tray to use the scanner in a straight path configuration. (See p. 3-3.) ■ Interfaces (See "2-4 Connecting the Scanner to the Computer," on p. 211.) DIP Switches Set the SCSI ID.
Power Connector CAUTION • Do not block the ventilation openings. Doing so could cause the scanner to a 50-pin half-pitch (pin type) SCSI cable. Doing so may cause a malfunction. 1-8 SCSI Connector Connect to overheat, creating a risk of ...the provided USB cable or a USB cable that supports Hi-Speed USB 2.0. Chapter 1 Before Using the Scanner ■ Back View Document Eject Tray 2 Open this tray to use the scanner in a straight path configuration. (See p. 3-3.) ■ Interfaces (See "2-4 Connecting the Scanner to the Computer," on p. 211.) DIP Switches Set the SCSI ID.

User Manual
Page 18
Chapter 2 Setup • If the CPU, memory, interface card, and other specifications do not satisfy the installation requirements, the scanning speed may be greatly reduced and transmission may take a long time. • Even if the computer satisfies the recommended specifications, the scanning speed may vary, depending on the scan settings. • The ISIS/TWAIN Drivers provided with the scanner do not necessarily operate on all ISISor TWAIN-compatible applications. For details, contact your application software retailer. 2-3
Chapter 2 Setup • If the CPU, memory, interface card, and other specifications do not satisfy the installation requirements, the scanning speed may be greatly reduced and transmission may take a long time. • Even if the computer satisfies the recommended specifications, the scanning speed may vary, depending on the scan settings. • The ISIS/TWAIN Drivers provided with the scanner do not necessarily operate on all ISISor TWAIN-compatible applications. For details, contact your application software retailer. 2-3

User Manual
Page 26
... OFF. If the power switch is suitable for connecting the DR-4010C scanner to a computer: USB connection, which makes use of a standard USB port on the back of a SCSI card installed in the ON position, push the switch to set it to the Computer There are two methods for your computer environment.... a 2-11 Select the method that the power switch of the computer. Using a USB Connection 1 Verify that is in an expansion slot of the scanner is OFF.
... OFF. If the power switch is suitable for connecting the DR-4010C scanner to a computer: USB connection, which makes use of a standard USB port on the back of a SCSI card installed in the ON position, push the switch to set it to the Computer There are two methods for your computer environment.... a 2-11 Select the method that the power switch of the computer. Using a USB Connection 1 Verify that is in an expansion slot of the scanner is OFF.

User Manual
Page 27
... last device in the system. DIP switches Factory default (SCSI ID = 2) • The DR-4010C scanner incorporates a SCSI terminator which is permanently set to ON. b 4 Use the supplied USB cable to connect the scanner to OFF. 2-12 Type A Type B symbol on , the scanner may not be properly recognized by default. If the cable is connected while...
... last device in the system. DIP switches Factory default (SCSI ID = 2) • The DR-4010C scanner incorporates a SCSI terminator which is permanently set to ON. b 4 Use the supplied USB cable to connect the scanner to OFF. 2-12 Type A Type B symbol on , the scanner may not be properly recognized by default. If the cable is connected while...

User Manual
Page 28
a 4 Connect the power cord into the power connector on the rear of the scanner is in the ON position, push the switch to set it to the computer. 2-13 b 5 Use the SCSI cable to connect the scanner to OFF. Power switch OFF position ON position 3 Plug the supplied power cord into an AC outlet. Chapter 2 Setup 1 Shut down Windows and turn the computer OFF. 2 Verify that the power switch of the unit. If the power switch is OFF.
a 4 Connect the power cord into the power connector on the rear of the scanner is in the ON position, push the switch to set it to the computer. 2-13 b 5 Use the SCSI cable to connect the scanner to OFF. Power switch OFF position ON position 3 Plug the supplied power cord into an AC outlet. Chapter 2 Setup 1 Shut down Windows and turn the computer OFF. 2 Verify that the power switch of the unit. If the power switch is OFF.

User Manual
Page 31
...76 ± 0.08 mm) without embossing (*1) The DR-4010C offers two document eject configurations: U-turn path (the document is ejected to the document eject tray at the front of the scanner) and straight path (the document is ejected to the back of the scanner.) (See "3-2 Document Tray and Eject Tray," on p. 3-3.) U-turn Path ...to 39.2" (1000 mm). It can also scan long documents up to 39.2" (1000 mm) long by setting the scanner to the Long Document mode. (See "Long Document Mode," on p. 3-30.) (*3) The paper weights that this scanner can scan are not separated (Bypass mode) Business Cards ...
...76 ± 0.08 mm) without embossing (*1) The DR-4010C offers two document eject configurations: U-turn path (the document is ejected to the document eject tray at the front of the scanner) and straight path (the document is ejected to the back of the scanner.) (See "3-2 Document Tray and Eject Tray," on p. 3-3.) U-turn Path ...to 39.2" (1000 mm). It can also scan long documents up to 39.2" (1000 mm) long by setting the scanner to the Long Document mode. (See "Long Document Mode," on p. 3-30.) (*3) The paper weights that this scanner can scan are not separated (Bypass mode) Business Cards ...

User Manual
Page 38
Take care not to the scanner while it is fed. In this may not feed properly. CAUTION ■ Very thin or curled documents may cause personal injury. Roller Unit ■ After you finish scanning, close the document feed tray and the document eject tray extension to prevent damage to get ...with the bypass mode, and you feed them. IMPORTANT • When scanning multiple page documents that are fastened together, such as invoices, set the edge that is fastened together as you place several documents that are not fastened together into the feed tray at one time, they will be fed...
Take care not to the scanner while it is fed. In this may not feed properly. CAUTION ■ Very thin or curled documents may cause personal injury. Roller Unit ■ After you finish scanning, close the document feed tray and the document eject tray extension to prevent damage to get ...with the bypass mode, and you feed them. IMPORTANT • When scanning multiple page documents that are fastened together, such as invoices, set the edge that is fastened together as you place several documents that are not fastened together into the feed tray at one time, they will be fed...

User Manual
Page 39
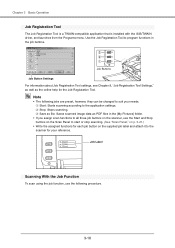
.... The scanned image data are automatically processed according to instructions that you must first change the Windows event settings. (See "About Launcher," on the scanner. Save as file Save the scanned image data as Capture Perfect 3.0 to perform scanning, the DR4010C is...documents without having to start an application on a specified printer. Note To use the Launcher function, you specify using the Job Registration tool. (See "Job Registration Tool," on p. 310.) The follwing functions can be programmed in a job button in a specified folder. (Network) Job Buttons DR-4010C...
.... The scanned image data are automatically processed according to instructions that you must first change the Windows event settings. (See "About Launcher," on the scanner. Save as file Save the scanned image data as Capture Perfect 3.0 to perform scanning, the DR4010C is...documents without having to start an application on a specified printer. Note To use the Launcher function, you specify using the Job Registration tool. (See "Job Registration Tool," on p. 310.) The follwing functions can be programmed in a job button in a specified folder. (Network) Job Buttons DR-4010C...
User Manual
Page 40
... following jobs are preset, however, they can be changed to the scanner for the Job Registration Tool. Use the Job Registration Tool to the application settings. Job Buttons Job Button Settings For information about Job Registration Tool settings, see Chapter 8, "Job Registration Tool Settings," as well as PDF files in the job buttons. Note •...
... following jobs are preset, however, they can be changed to the scanner for the Job Registration Tool. Use the Job Registration Tool to the application settings. Job Buttons Job Button Settings For information about Job Registration Tool settings, see Chapter 8, "Job Registration Tool Settings," as well as PDF files in the job buttons. Note •...

User Manual
Page 41
... PDF files in the folder [My Pictures] under the folder [My Documents]. Chapter 3 Basic Operation 1 Place the documents into the feed tray. (See "3-3 Placing Documents," on the DR-4010C monitor. 4 Click [Close] to first change the event setting before you use the Launcher feature, it is "Scan." • The scanned images are enabled. Note • The...
... PDF files in the folder [My Pictures] under the folder [My Documents]. Chapter 3 Basic Operation 1 Place the documents into the feed tray. (See "3-3 Placing Documents," on the DR-4010C monitor. 4 Click [Close] to first change the event setting before you use the Launcher feature, it is "Scan." • The scanned images are enabled. Note • The...
User Manual
Page 42
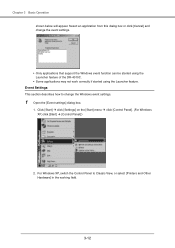
...[Control Panel].) 2. For Windows XP, switch the Control Panel to change the event settings. • Only applications that support the Windows event function can be started using the Launcher feature of the DR-4010C. • Some applications may not work correctly if started using the Launcher feature. ...Chapter 3 Basic Operation shown below will appear. Event Settings This section describes how to Classic View, or select [...
...[Control Panel].) 2. For Windows XP, switch the Control Panel to change the event settings. • Only applications that support the Windows event function can be started using the Launcher feature of the DR-4010C. • Some applications may not work correctly if started using the Launcher feature. ...Chapter 3 Basic Operation shown below will appear. Event Settings This section describes how to Classic View, or select [...

User Manual
Page 44
Click the [Events] tab. 2 Under [Scanner events], select the button whose setting you want to change (Button No. 1, Button No. 2, Button No. 3.) 3-14 Chapter 3 Basic Operation 5.
Click the [Events] tab. 2 Under [Scanner events], select the button whose setting you want to change (Button No. 1, Button No. 2, Button No. 3.) 3-14 Chapter 3 Basic Operation 5.

User Manual
Page 45
Make sure that this application] are selected. Chapter 3 Basic Operation 3 By default, all other applications.) Then click [Apply]. Select only one application (deselect the check boxes for all applications listed under [Send to this check box is selected, the Job Function cannot be used. IMPORTANT If the [Disable device events] check box is not selected. 4 Click [OK] to close [Scanners and Cameras Properties]. 5 Restart Windows to enable the new event settings. 3-15
Make sure that this application] are selected. Chapter 3 Basic Operation 3 By default, all other applications.) Then click [Apply]. Select only one application (deselect the check boxes for all applications listed under [Send to this check box is selected, the Job Function cannot be used. IMPORTANT If the [Disable device events] check box is not selected. 4 Click [OK] to close [Scanners and Cameras Properties]. 5 Restart Windows to enable the new event settings. 3-15

User Manual
Page 48
Note If [Canon DR-4010C] is displayed only when you select [Canon DR-4010C] for the first time and click [OK], or when you click [Setup] for [Scanner Selection]. 3-18 Chapter 3 Basic Operation 2 Follow the procedure below to select the Canon DR-4010C Document Scanner as the scanner to be used. 1. Set the Default Page Size and click [OK]. Select [Canon DR-4010C] Æ click [OK]. On the [Scan] menu, click [Select Scanner]. 2. Note This dialog box is not displayed in the list of scanners, re-install the ISIS/TWAIN driver. (See "2-3 Installing the Software," on p. 2-4.) 3.
Note If [Canon DR-4010C] is displayed only when you select [Canon DR-4010C] for the first time and click [OK], or when you click [Setup] for [Scanner Selection]. 3-18 Chapter 3 Basic Operation 2 Follow the procedure below to select the Canon DR-4010C Document Scanner as the scanner to be used. 1. Set the Default Page Size and click [OK]. Select [Canon DR-4010C] Æ click [OK]. On the [Scan] menu, click [Select Scanner]. 2. Note This dialog box is not displayed in the list of scanners, re-install the ISIS/TWAIN driver. (See "2-3 Installing the Software," on p. 2-4.) 3.

User Manual
Page 49
For more information on scan settings, see Chapter 7, "ISIS/TWAIN Driver Settings." 5 Place your document. (See "3-3 Placing Documents," on p. 3-5.) 3-19 Chapter 3 Basic Operation 3 On the [Scan] menu, click [Scanner Setting]. The Properties dialog box for the ISIS driver opens. 4 Set the scan settings.
For more information on scan settings, see Chapter 7, "ISIS/TWAIN Driver Settings." 5 Place your document. (See "3-3 Placing Documents," on p. 3-5.) 3-19 Chapter 3 Basic Operation 3 On the [Scan] menu, click [Scanner Setting]. The Properties dialog box for the ISIS driver opens. 4 Set the scan settings.

User Manual
Page 50
...scanning stops. For details on how to "Automatic Feeding": Place the next document. Scanning resumes when the scanner detects the document. Scanning resumes or ends according to the Feeding Option setting in the [Scan Batch to File Setting] dialog box, see the CapturePerfect 3.0 Operation Guide and CapturePerfect Online Help....Save] to start scanning. (See "Scan Panel," on p. 3-21.) 8 When there are no more details on the available settings in the scanner setup. • Feeding Option is set to scan documents, see the CapturePerfect 3.0 Operation Guide and CapturePerfect Online Help.
...scanning stops. For details on how to "Automatic Feeding": Place the next document. Scanning resumes when the scanner detects the document. Scanning resumes or ends according to the Feeding Option setting in the [Scan Batch to File Setting] dialog box, see the CapturePerfect 3.0 Operation Guide and CapturePerfect Online Help....Save] to start scanning. (See "Scan Panel," on p. 3-21.) 8 When there are no more details on the available settings in the scanner setup. • Feeding Option is set to scan documents, see the CapturePerfect 3.0 Operation Guide and CapturePerfect Online Help.
User Manual
Page 51
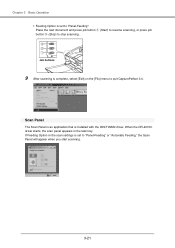
When the DR-4010C driver starts, the scan panel appears in the scan settings is set to "Panel-Feeding" or "Automatic Feeding," the Scan Panel will appear when you start scanning. 3-21 If Feeding Option in the task tray. Chapter 3 Basic Operation • Feeding Option is set to "Panel-Feeding": Place the next document and press job...
When the DR-4010C driver starts, the scan panel appears in the scan settings is set to "Panel-Feeding" or "Automatic Feeding," the Scan Panel will appear when you start scanning. 3-21 If Feeding Option in the task tray. Chapter 3 Basic Operation • Feeding Option is set to "Panel-Feeding": Place the next document and press job...
User Manual
Page 52
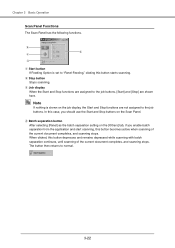
... "Panel-Feeding," clicking this button starts scanning. When clicked, this button becomes active when scanning of the current document completes, and scanning stops. d Batch separation button After selecting [Panel] as the batch separation setting on the [Others] tab, if you should use the Start and Stop buttons on the job display, the...
... "Panel-Feeding," clicking this button starts scanning. When clicked, this button becomes active when scanning of the current document completes, and scanning stops. d Batch separation button After selecting [Panel] as the batch separation setting on the [Others] tab, if you should use the Start and Stop buttons on the job display, the...


