
User Manual
Page 6
Contents Contents Chapter 1 1-1 1-2 1-3 Chapter 2 2-1 2-2 2-3 2-4 2-5 Chapter 3 3-1 3-2 3-3 3-4 3-5 3-6 3-7 3-8 Chapter 4 4-1 4-2 Before Using the Scanner 1-1 Important Safety Instructions 1-1 Installation Location 1-1 Power ...1-2 Moving the Scanner 1-2 Handling ...1-3 Disposal...1-4 Features of the DR-4010C Document Scanner 1-5 Names and Functions of Parts 1-7 Setup ...2-1 Setup Procedure 2-1 Installation Requirements 2-2 Installing the Software 2-4 Setup Disc 2-4 Software Installation 2-5 Connecting the Scanner to the Computer 2-11 Using a USB Connection 2-11 Using a SCSI ...
Contents Contents Chapter 1 1-1 1-2 1-3 Chapter 2 2-1 2-2 2-3 2-4 2-5 Chapter 3 3-1 3-2 3-3 3-4 3-5 3-6 3-7 3-8 Chapter 4 4-1 4-2 Before Using the Scanner 1-1 Important Safety Instructions 1-1 Installation Location 1-1 Power ...1-2 Moving the Scanner 1-2 Handling ...1-3 Disposal...1-4 Features of the DR-4010C Document Scanner 1-5 Names and Functions of Parts 1-7 Setup ...2-1 Setup Procedure 2-1 Installation Requirements 2-2 Installing the Software 2-4 Setup Disc 2-4 Software Installation 2-5 Connecting the Scanner to the Computer 2-11 Using a USB Connection 2-11 Using a SCSI ...

User Manual
Page 8
...; Avoid locations that the location where the scanner is installed meets the following environmental requirements. • Provide adequate space around the scanner for documents ejected after being scanned. (See "Preparing the Document Eject Tray," on p. 3-3.) • Avoid installing the machine in which it is installed. Installation Location The performance of this scanner, be sure to the back tray of...
...; Avoid locations that the location where the scanner is installed meets the following environmental requirements. • Provide adequate space around the scanner for documents ejected after being scanned. (See "Preparing the Document Eject Tray," on p. 3-3.) • Avoid installing the machine in which it is installed. Installation Location The performance of this scanner, be sure to the back tray of...

User Manual
Page 9
...power outlet of the rated voltage and power supply frequency. (120 V, 60 Hz or 220-240 V, 50/60 Hz depending on your local authorized Canon dealer or service representative for optimal scanning quality: Room temperature: 10 °C to 32.5 °C (50 °F to 90.5 °F) ... hold it with these items plugged in scanning quality. If the room in which the scanner is connected. Chapter 1 Before Using the Scanner • Avoid exposing the scanner to which the scanner is installed is cold but rapidly heated, water droplets (condensation) may result in a noticeable degradation in ...
...power outlet of the rated voltage and power supply frequency. (120 V, 60 Hz or 220-240 V, 50/60 Hz depending on your local authorized Canon dealer or service representative for optimal scanning quality: Room temperature: 10 °C to 32.5 °C (50 °F to 90.5 °F) ... hold it with these items plugged in scanning quality. If the room in which the scanner is connected. Chapter 1 Before Using the Scanner • Avoid exposing the scanner to which the scanner is installed is cold but rapidly heated, water droplets (condensation) may result in a noticeable degradation in ...

User Manual
Page 10
... power plug from the power outlet. Then, contact your local authorized Canon dealer or service representative to have the unit serviced. ■ Before moving the scanner, be sure to have the unit serviced. ■ Do not install the scanner in any other than the power cord provided with this is securely... become damaged, immediately turn the power switch OFF and disconnect the power cord from the power outlet. CAUTION ■ Do not install the scanner on the power cord, and do so may fall into the power outlet. ■ Do not use the machine, immediately turn the ...
... power plug from the power outlet. Then, contact your local authorized Canon dealer or service representative to have the unit serviced. ■ Before moving the scanner, be sure to have the unit serviced. ■ Do not install the scanner in any other than the power cord provided with this is securely... become damaged, immediately turn the power switch OFF and disconnect the power cord from the power outlet. CAUTION ■ Do not install the scanner on the power cord, and do so may fall into the power outlet. ■ Do not use the machine, immediately turn the ...

User Manual
Page 12
.../double-sided mode - Chapter 1 Before Using the Scanner 1-2 Features of the DR-4010C Document Scanner The main features of the DR-4010C document scanner are described below. • Fast Document Feeding The scanner can scan business or ID cards. Note that a document was provided as standard on your computer and SCSI extension cards are supported. (See "2-2 Installation Requirements," on p. 2-2.) • Color/Grayscale Support...
.../double-sided mode - Chapter 1 Before Using the Scanner 1-2 Features of the DR-4010C Document Scanner The main features of the DR-4010C document scanner are described below. • Fast Document Feeding The scanner can scan business or ID cards. Note that a document was provided as standard on your computer and SCSI extension cards are supported. (See "2-2 Installation Requirements," on p. 2-2.) • Color/Grayscale Support...

User Manual
Page 16
... the Computer Turning the Power ON IMPORTANT • Be sure to install the software before connecting the scanner to the computer. • If you connect the scanner to the computer before installing the software, a wizard screen such as shown below . In such a case, click the [Cancel] button to close the wizard screen and then...
... the Computer Turning the Power ON IMPORTANT • Be sure to install the software before connecting the scanner to the computer. • If you connect the scanner to the computer before installing the software, a wizard screen such as shown below . In such a case, click the [Cancel] button to close the wizard screen and then...

User Manual
Page 17
... of the SCSI cable you are using a SCSI card. - Chapter 2 Setup 2-2 Installation Requirements To use is recommended. - Microsoft Windows 2000 Professional SP4 or later - Hard ...USB interface should be a Hi-Speed USB 2.0 interface. - For details, consult your local authorized Canon dealer. - Refer to the manual for the SCSI card you are using for more information. 2-2 ...aware of the following specifications: - The USB cable you can use the DR-4010C scanner, your computer must satisfy the following system requirements. • One of the following recommended models. ...
... of the SCSI cable you are using a SCSI card. - Chapter 2 Setup 2-2 Installation Requirements To use is recommended. - Microsoft Windows 2000 Professional SP4 or later - Hard ...USB interface should be a Hi-Speed USB 2.0 interface. - For details, consult your local authorized Canon dealer. - Refer to the manual for the SCSI card you are using for more information. 2-2 ...aware of the following specifications: - The USB cable you can use the DR-4010C scanner, your computer must satisfy the following system requirements. • One of the following recommended models. ...

User Manual
Page 18
For details, contact your application software retailer. 2-3 Chapter 2 Setup • If the CPU, memory, interface card, and other specifications do not satisfy the installation requirements, the scanning speed may be greatly reduced and transmission may take a long time. • Even if the computer satisfies the recommended specifications, the scanning speed may vary, depending on the scan settings. • The ISIS/TWAIN Drivers provided with the scanner do not necessarily operate on all ISISor TWAIN-compatible applications.
For details, contact your application software retailer. 2-3 Chapter 2 Setup • If the CPU, memory, interface card, and other specifications do not satisfy the installation requirements, the scanning speed may be greatly reduced and transmission may take a long time. • Even if the computer satisfies the recommended specifications, the scanning speed may vary, depending on the scan settings. • The ISIS/TWAIN Drivers provided with the scanner do not necessarily operate on all ISISor TWAIN-compatible applications.

User Manual
Page 19
... Manual and CapturePerfect 3.0 Operation Guide electronic manuals for the scanner are installed on the computer with a selected check box is installed. 2-4 Only the software with the rest of your computer, the menu shown below should appear. Menu screen Typical Installation Read Manuals All of the DR-4010C is installed. If this menu does not appear, use Explorer...
... Manual and CapturePerfect 3.0 Operation Guide electronic manuals for the scanner are installed on the computer with a selected check box is installed. 2-4 Only the software with the rest of your computer, the menu shown below should appear. Menu screen Typical Installation Read Manuals All of the DR-4010C is installed. If this menu does not appear, use Explorer...

User Manual
Page 20
..., execute setup.exe in the CD-ROM. The menu screen appears automatically when you have previously uninstalled, select [Custom Installation] and specify the software. • The DR-4010C driver installation comprises the Scanner Driver and Job Tool installation. 2-5 IMPORTANT • Be sure to log on as an Administrator. • Close all of the displayed software and...
..., execute setup.exe in the CD-ROM. The menu screen appears automatically when you have previously uninstalled, select [Custom Installation] and specify the software. • The DR-4010C driver installation comprises the Scanner Driver and Job Tool installation. 2-5 IMPORTANT • Be sure to log on as an Administrator. • Close all of the displayed software and...
User Manual
Page 21
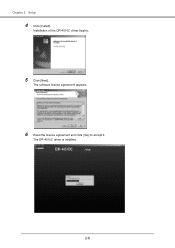
The DR-4010C driver is installed. 2-6 Installation of the DR-4010C driver begins. 5 Click [Next]. Chapter 2 Setup 4 Click [Install]. The software license agreement appears. 6 Read the license agreement and click [Yes] to accept it.
The DR-4010C driver is installed. 2-6 Installation of the DR-4010C driver begins. 5 Click [Next]. Chapter 2 Setup 4 Click [Install]. The software license agreement appears. 6 Read the license agreement and click [Yes] to accept it.
User Manual
Page 22
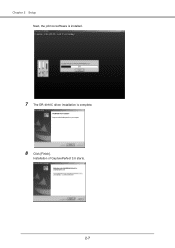
Chapter 2 Setup Next, the job tool software is installed. 7 The DR-4010C driver installation is complete. 8 Click [Finish]. Installation of CapturePerfect 3.0 starts. 2-7
Chapter 2 Setup Next, the job tool software is installed. 7 The DR-4010C driver installation is complete. 8 Click [Finish]. Installation of CapturePerfect 3.0 starts. 2-7

User Manual
Page 23
The installation location screen appears. 11 Click [Next]. Chapter 2 Setup 9 Click [Next]. CapturePerfect is installed. 12 The CapturePerfect installation is complete. 2-8 The software license agreement appears. 10 Read the license agreement and click [Yes] to accept it.
The installation location screen appears. 11 Click [Next]. Chapter 2 Setup 9 Click [Next]. CapturePerfect is installed. 12 The CapturePerfect installation is complete. 2-8 The software license agreement appears. 10 Read the license agreement and click [Yes] to accept it.

User Manual
Page 24
Chapter 2 Setup 13 Click [Finish]. Installation of the User Manual starts. 14 Click [Next]. The User Manual is installed. 15 The User Manual installation is complete. 16 Click [Finish]. The installation completion screen appears. 2-9
Chapter 2 Setup 13 Click [Finish]. Installation of the User Manual starts. 14 Click [Next]. The User Manual is installed. 15 The User Manual installation is complete. 16 Click [Finish]. The installation completion screen appears. 2-9

User Manual
Page 25
Chapter 2 Setup 17 Click [Exit]. Click [Back] to return to the menu screen. 18 After the software installation is complete, you can connect the scanner to the computer. (See "2-4 Connecting the Scanner to the Computer," on p. 2-11.) 2-10
Chapter 2 Setup 17 Click [Exit]. Click [Back] to return to the menu screen. 18 After the software installation is complete, you can connect the scanner to the computer. (See "2-4 Connecting the Scanner to the Computer," on p. 2-11.) 2-10

User Manual
Page 26
...pin, pin-type) CAUTION Do not connect a USB cable and SCSI cable at the same time. If the power switch is suitable for connecting the DR-4010C scanner to a computer: USB connection, which makes use of a standard USB port on the back of the computer. Chapter 2 Setup 2-4 Connecting the...a USB Connection 1 Verify that is in an expansion slot of the scanner. Power switch OFF position ON position 2 Plug the supplied power cord into the power connector on the computer, and SCSI connection, which makes use of a SCSI card installed in the ON position, push the switch to set it to OFF.
...pin, pin-type) CAUTION Do not connect a USB cable and SCSI cable at the same time. If the power switch is suitable for connecting the DR-4010C scanner to a computer: USB connection, which makes use of a standard USB port on the back of the computer. Chapter 2 Setup 2-4 Connecting the...a USB Connection 1 Verify that is in an expansion slot of the scanner. Power switch OFF position ON position 2 Plug the supplied power cord into the power connector on the computer, and SCSI connection, which makes use of a SCSI card installed in the ON position, push the switch to set it to OFF.
User Manual
Page 29
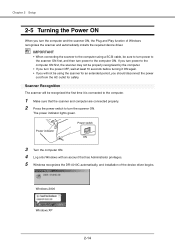
... is connected to the computer. 1 Make sure that has Administrator privileges. 5 Windows recognizes the DR-4010C automatically, and installation of Windows recognizes the scanner and automatically installs the required device driver. IMPORTANT • When connecting the scanner to the computer using the scanner for an extended period, you will be sure to turn power to turn the...
... is connected to the computer. 1 Make sure that has Administrator privileges. 5 Windows recognizes the DR-4010C automatically, and installation of Windows recognizes the scanner and automatically installs the required device driver. IMPORTANT • When connecting the scanner to the computer using the scanner for an extended period, you will be sure to turn power to turn the...

User Manual
Page 30
Chapter 2 Setup Note • In Windows XP, a message appears when installation is complete. • In Windows 2000, no message appears when installation is complete. • The DR-4010C is installed in Device Manager under [Imaging Devices] as [CANON DR- 4010C USB] or [CANON DR-4010C SCSI]. 2-15
Chapter 2 Setup Note • In Windows XP, a message appears when installation is complete. • In Windows 2000, no message appears when installation is complete. • The DR-4010C is installed in Device Manager under [Imaging Devices] as [CANON DR- 4010C USB] or [CANON DR-4010C SCSI]. 2-15
User Manual
Page 40
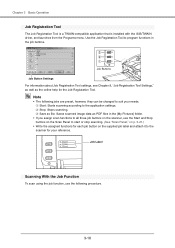
...Registration Tool to program functions in the [My Pictures] folder. • If you assign scan functions to all three job buttons on the scanner, use the following jobs are preset, however, they can be changed to suit your reference. Note • The following procedure. 3-10... it to the application settings. Chapter 3 Basic Operation Job Registration Tool The Job Registration Tool is a TWAIN-compatible application that is installed with the ISIS/TWAIN driver, and launches from the Programs menu. Job Buttons Job Button Settings For information about Job Registration Tool settings...
...Registration Tool to program functions in the [My Pictures] folder. • If you assign scan functions to all three job buttons on the scanner, use the following jobs are preset, however, they can be changed to suit your reference. Note • The following procedure. 3-10... it to the application settings. Chapter 3 Basic Operation Job Registration Tool The Job Registration Tool is a TWAIN-compatible application that is installed with the ISIS/TWAIN driver, and launches from the Programs menu. Job Buttons Job Button Settings For information about Job Registration Tool settings...

User Manual
Page 48
Note If [Canon DR-4010C] is displayed only when you select [Canon DR-4010C] for the first time and click [OK], or when you click [Setup] for [Scanner Selection]. 3-18 Set the Default Page Size and click [OK]. On the [Scan] menu, click [Select Scanner]. 2. Note This dialog box is not displayed in the list of scanners, re-install the ISIS/TWAIN driver. (See "2-3 Installing the Software," on p. 2-4.) 3. Chapter 3 Basic Operation 2 Follow the procedure below to select the Canon DR-4010C Document Scanner as the scanner to be used. 1. Select [Canon DR-4010C] Æ click [OK].
Note If [Canon DR-4010C] is displayed only when you select [Canon DR-4010C] for the first time and click [OK], or when you click [Setup] for [Scanner Selection]. 3-18 Set the Default Page Size and click [OK]. On the [Scan] menu, click [Select Scanner]. 2. Note This dialog box is not displayed in the list of scanners, re-install the ISIS/TWAIN driver. (See "2-3 Installing the Software," on p. 2-4.) 3. Chapter 3 Basic Operation 2 Follow the procedure below to select the Canon DR-4010C Document Scanner as the scanner to be used. 1. Select [Canon DR-4010C] Æ click [OK].


