
User Manual
Page 1
Document Scanner User Manual Please read this manual before operating this manual, store it in a safe place for future reference. After you finish reading this scanner.
Document Scanner User Manual Please read this manual before operating this manual, store it in a safe place for future reference. After you finish reading this scanner.
User Manual
Page 2
... STAR® Partner, Canon Electronics Inc., has determined that promotes energy saving through the use of Canon Inc. The targeted products are uniform among participating nations. Disclaimers The information in this document is subject to change ...without the prior written permission of Intel Corporation. • ENERGY STAR® is a U.S. The program backs the development and dissemination of their respective owners. The standards and logos are office equipment, such as computers, monitors, printers, fax, machine, copiers, and scanners. CANON...
... STAR® Partner, Canon Electronics Inc., has determined that promotes energy saving through the use of Canon Inc. The targeted products are uniform among participating nations. Disclaimers The information in this document is subject to change ...without the prior written permission of Intel Corporation. • ENERGY STAR® is a U.S. The program backs the development and dissemination of their respective owners. The standards and logos are office equipment, such as computers, monitors, printers, fax, machine, copiers, and scanners. CANON...

User Manual
Page 3
.../TWAIN driver settings i The Software section explains how to make settings for using the scanner to familiarize yourself with its capabilities, and to use the scanner. Please read this manual, store it in a safe place for purchasing the Canon DR-4010C Document Scanner. INTRODUCTION INTRODUCTION Thank you for future reference. After reading this manual thoroughly before using...
.../TWAIN driver settings i The Software section explains how to make settings for using the scanner to familiarize yourself with its capabilities, and to use the scanner. Please read this manual, store it in a safe place for purchasing the Canon DR-4010C Document Scanner. INTRODUCTION INTRODUCTION Thank you for future reference. After reading this manual thoroughly before using...

User Manual
Page 6
Contents Contents Chapter 1 1-1 1-2 1-3 Chapter 2 2-1 2-2 2-3 2-4 2-5 Chapter 3 3-1 3-2 3-3 3-4 3-5 3-6 3-7 3-8 Chapter 4 4-1 4-2 Before Using the Scanner 1-1 Important Safety Instructions 1-1 Installation Location 1-1 Power ...1-2 Moving the Scanner 1-2 Handling ...1-3 Disposal...1-4 Features of the DR-4010C Document Scanner 1-5 Names and Functions of Parts 1-7 Setup ...2-1 Setup Procedure 2-1 Installation Requirements 2-2 Installing the Software 2-4 Setup Disc 2-4 Software Installation 2-5 Connecting the Scanner to the Computer 2-11 Using a USB Connection 2-11 Using a SCSI...
Contents Contents Chapter 1 1-1 1-2 1-3 Chapter 2 2-1 2-2 2-3 2-4 2-5 Chapter 3 3-1 3-2 3-3 3-4 3-5 3-6 3-7 3-8 Chapter 4 4-1 4-2 Before Using the Scanner 1-1 Important Safety Instructions 1-1 Installation Location 1-1 Power ...1-2 Moving the Scanner 1-2 Handling ...1-3 Disposal...1-4 Features of the DR-4010C Document Scanner 1-5 Names and Functions of Parts 1-7 Setup ...2-1 Setup Procedure 2-1 Installation Requirements 2-2 Installing the Software 2-4 Setup Disc 2-4 Software Installation 2-5 Connecting the Scanner to the Computer 2-11 Using a USB Connection 2-11 Using a SCSI...

User Manual
Page 8
... locations, such as in direct sunlight. If this is installed meets the following environmental requirements. • Provide adequate space around the scanner for documents ejected after being scanned. (See "Preparing the Document Eject Tray," on p. 3-3.) • Avoid installing the machine in the vicinity of a water faucet, water heater, or humidifier. • Avoid locations...
... locations, such as in direct sunlight. If this is installed meets the following environmental requirements. • Provide adequate space around the scanner for documents ejected after being scanned. (See "Preparing the Document Eject Tray," on p. 3-3.) • Avoid installing the machine in the vicinity of a water faucet, water heater, or humidifier. • Avoid locations...

User Manual
Page 9
...Canon dealer or service representative for further information. CAUTION Make sure to disconnect the interface cable and power cord when moving the scanner, always hold it . Moving the Scanner • When moving the scanner. Chapter 1 Before Using the Scanner • Avoid exposing the scanner to which the scanner... rapidly heated, water droplets (condensation) may result in a noticeable degradation in scanning quality. If the room in which the scanner is often stepped on it. Doing so might cause a fire or electric shock. • Do not connect other electrical ...
...Canon dealer or service representative for further information. CAUTION Make sure to disconnect the interface cable and power cord when moving the scanner, always hold it . Moving the Scanner • When moving the scanner. Chapter 1 Before Using the Scanner • Avoid exposing the scanner to which the scanner... rapidly heated, water droplets (condensation) may result in a noticeable degradation in scanning quality. If the room in which the scanner is often stepped on it. Doing so might cause a fire or electric shock. • Do not connect other electrical ...

User Manual
Page 10
...switch OFF, and disconnect the power plug from the power outlet. Then, contact your local authorized Canon dealer or service representative to have the unit serviced. ■ Do not install the scanner in personal injury or damage to fall, resulting in a humid or dusty location. Doing so .... ■ Never connect the power cord when your local authorized Canon dealer or service representative to have the unit serviced. ■ Before moving the scanner, be sure to a fire or electric shock. ■ When cleaning the scanner, turn the power switch OFF and disconnect the power cord from...
...switch OFF, and disconnect the power plug from the power outlet. Then, contact your local authorized Canon dealer or service representative to have the unit serviced. ■ Do not install the scanner in personal injury or damage to fall, resulting in a humid or dusty location. Doing so .... ■ Never connect the power cord when your local authorized Canon dealer or service representative to have the unit serviced. ■ Before moving the scanner, be sure to a fire or electric shock. ■ When cleaning the scanner, turn the power switch OFF and disconnect the power cord from...

User Manual
Page 11
...overnight. It is possible to unplug it firmly by its plug. This may get caught in the scanner while you are placed around the power plug, you the scanner. 1-4 Be extra careful of the scanner. Do not pull directly on the power cord, as during consecutive holidays. ■ Do not wear...when the machine will be used for safety when not using it can be unplugged easily. Disposal When disposing of paper. Chapter 1 Before Using the Scanner ■ Do not place objects on top of neckties and long hair. Such objects may result in personal injury. ■ When unplugging the ...
...overnight. It is possible to unplug it firmly by its plug. This may get caught in the scanner while you are placed around the power plug, you the scanner. 1-4 Be extra careful of the scanner. Do not pull directly on the power cord, as during consecutive holidays. ■ Do not wear...when the machine will be used for safety when not using it can be unplugged easily. Disposal When disposing of paper. Chapter 1 Before Using the Scanner ■ Do not place objects on top of neckties and long hair. Such objects may result in personal injury. ■ When unplugging the ...

User Manual
Page 12
...1-5 Single sheet/dual feeding path • U-Turn Path Documents are fed and ejected from the front of the scanner. (See "3-2 Document Feed and Eject Tray," on p. 3-3.) • Straight Path Documents are ejected to LTR/A4 size. (Scanning conditions: Black ..."3-1 Documents," on p. 2-2.) • Color/Grayscale Support Documents can scan business or ID cards. Chapter 1 Before Using the Scanner 1-2 Features of the DR-4010C Document Scanner The main features of the DR-4010C document scanner are described below. • Fast Document Feeding The scanner can scan a maximum of 42 documents per ...
...1-5 Single sheet/dual feeding path • U-Turn Path Documents are fed and ejected from the front of the scanner. (See "3-2 Document Feed and Eject Tray," on p. 3-3.) • Straight Path Documents are ejected to LTR/A4 size. (Scanning conditions: Black ..."3-1 Documents," on p. 2-2.) • Color/Grayscale Support Documents can scan business or ID cards. Chapter 1 Before Using the Scanner 1-2 Features of the DR-4010C Document Scanner The main features of the DR-4010C document scanner are described below. • Fast Document Feeding The scanner can scan a maximum of 42 documents per ...
User Manual
Page 13
...However, this function can only be available depending on the software you to scan documents with dark backgrounds or documents with faint text written in pencil clearly. Chapter 1 Before Using the Scanner • Text Enhancement Mode This mode enables you are using the energy saving ...feature except when scanning is designed to save power by setting the Long Document mode. (See "Long Document Mode," on the original document. • MultiStream Function The scanner supports MultiStream, which, according to 39.2 inches (1000 mm) long by using . 1-6 Note ...
...However, this function can only be available depending on the software you to scan documents with dark backgrounds or documents with faint text written in pencil clearly. Chapter 1 Before Using the Scanner • Text Enhancement Mode This mode enables you are using the energy saving ...feature except when scanning is designed to save power by setting the Long Document mode. (See "Long Document Mode," on the original document. • MultiStream Function The scanner supports MultiStream, which, according to 39.2 inches (1000 mm) long by using . 1-6 Note ...

User Manual
Page 14
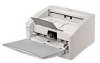
... functions assigned with the parts of the scanner before using the scanner. ■ Front View (Feed Tray Open) Document Eject Tray Extension Open if the document extends beyond the edge of the eject tray. (See p. 3-3.) Document Feed Tray Place the document to be scanned here. (See p. 3-3.) Document Eject Tray Scanned documents are fed. Push it down ( ) to feed...
... functions assigned with the parts of the scanner before using the scanner. ■ Front View (Feed Tray Open) Document Eject Tray Extension Open if the document extends beyond the edge of the eject tray. (See p. 3-3.) Document Feed Tray Place the document to be scanned here. (See p. 3-3.) Document Eject Tray Scanned documents are fed. Push it down ( ) to feed...

User Manual
Page 15
... may cause a malfunction. 1-8 Doing so could cause the scanner to the Computer," on p. 211.) DIP Switches Set the SCSI ID. Chapter 1 Before Using the Scanner ■ Back View Document Eject Tray 2 Open this tray to use the scanner in a straight path configuration. (See p. 3-3.) ■... Interfaces (See "2-4 Connecting the Scanner to overheat, creating a risk of fire. • Do not connect...
... may cause a malfunction. 1-8 Doing so could cause the scanner to the Computer," on p. 211.) DIP Switches Set the SCSI ID. Chapter 1 Before Using the Scanner ■ Back View Document Eject Tray 2 Open this tray to use the scanner in a straight path configuration. (See p. 3-3.) ■... Interfaces (See "2-4 Connecting the Scanner to overheat, creating a risk of fire. • Do not connect...

User Manual
Page 16
... Turning the Power ON IMPORTANT • Be sure to install the software before connecting the scanner to the computer. • If you turn power to the scanner OFF. Chapter 2 Setup 2-1 Setup Procedure In order to prepare the scanner for use, read and follow the instructions in each section below will appear when you... connect the scanner to the computer before installing the software, a wizard screen such as shown below . Wizard Screen (Windows 2000) 2-1 In such a case, click the [Cancel] button to ...
... Turning the Power ON IMPORTANT • Be sure to install the software before connecting the scanner to the computer. • If you turn power to the scanner OFF. Chapter 2 Setup 2-1 Setup Procedure In order to prepare the scanner for use, read and follow the instructions in each section below will appear when you... connect the scanner to the computer before installing the software, a wizard screen such as shown below . Wizard Screen (Windows 2000) 2-1 In such a case, click the [Cancel] button to ...

User Manual
Page 17
...USB interface is USB Full-Speed (equal to USB 1.1.) In this case, using the USB interface that you can use the DR-4010C scanner, your computer must satisfy the following system requirements. • One of the following recommended models. Microsoft Windows XP Professional SP2 ... APA-1480 • An ISIS-compatible application or a TWAIN-compatible application that is recommended. - For details, consult your local authorized Canon dealer. - The overall length of the following information when using a SCSI expansion card is compatible with all USB interfaces, even if present...
...USB interface is USB Full-Speed (equal to USB 1.1.) In this case, using the USB interface that you can use the DR-4010C scanner, your computer must satisfy the following system requirements. • One of the following recommended models. Microsoft Windows XP Professional SP2 ... APA-1480 • An ISIS-compatible application or a TWAIN-compatible application that is recommended. - For details, consult your local authorized Canon dealer. - The overall length of the following information when using a SCSI expansion card is compatible with all USB interfaces, even if present...

User Manual
Page 18
For details, contact your application software retailer. 2-3 Chapter 2 Setup • If the CPU, memory, interface card, and other specifications do not satisfy the installation requirements, the scanning speed may be greatly reduced and transmission may take a long time. • Even if the computer satisfies the recommended specifications, the scanning speed may vary, depending on the scan settings. • The ISIS/TWAIN Drivers provided with the scanner do not necessarily operate on all ISISor TWAIN-compatible applications.
For details, contact your application software retailer. 2-3 Chapter 2 Setup • If the CPU, memory, interface card, and other specifications do not satisfy the installation requirements, the scanning speed may be greatly reduced and transmission may take a long time. • Even if the computer satisfies the recommended specifications, the scanning speed may vary, depending on the scan settings. • The ISIS/TWAIN Drivers provided with the scanner do not necessarily operate on all ISISor TWAIN-compatible applications.

User Manual
Page 19
... menu does not appear, use Explorer to install the required software. Setup Disc When you insert the Setup disc supplied with the scanner into the CD-ROM drive of the DR-4010C is installed. Chapter 2 Setup 2-3 Installing the Software This section describes how to access the CDROM drive and execute the file "SETUP...
... menu does not appear, use Explorer to install the required software. Setup Disc When you insert the Setup disc supplied with the scanner into the CD-ROM drive of the DR-4010C is installed. Chapter 2 Setup 2-3 Installing the Software This section describes how to access the CDROM drive and execute the file "SETUP...

User Manual
Page 20
... the computer. 1 Log onto Windows with an account that you have previously uninstalled, select [Custom Installation] and specify the software. • The DR-4010C driver installation comprises the Scanner Driver and Job Tool installation. 2-5 If you want to log on as an Administrator. • Close all of the displayed software and the User..., execute setup.exe in the CD-ROM. The [Typical Installation] screen appears. Chapter 2 Setup Software Installation Install the software before installing the software. 2 Insert the DR-4010C Setup disc into the CD-ROM drive.
... the computer. 1 Log onto Windows with an account that you have previously uninstalled, select [Custom Installation] and specify the software. • The DR-4010C driver installation comprises the Scanner Driver and Job Tool installation. 2-5 If you want to log on as an Administrator. • Close all of the displayed software and the User..., execute setup.exe in the CD-ROM. The [Typical Installation] screen appears. Chapter 2 Setup Software Installation Install the software before installing the software. 2 Insert the DR-4010C Setup disc into the CD-ROM drive.

User Manual
Page 25
Click [Back] to return to the menu screen. 18 After the software installation is complete, you can connect the scanner to the computer. (See "2-4 Connecting the Scanner to the Computer," on p. 2-11.) 2-10 Chapter 2 Setup 17 Click [Exit].
Click [Back] to return to the menu screen. 18 After the software installation is complete, you can connect the scanner to the computer. (See "2-4 Connecting the Scanner to the Computer," on p. 2-11.) 2-10 Chapter 2 Setup 17 Click [Exit].

User Manual
Page 26
... and SCSI connection, which makes use of a SCSI card installed in an expansion slot of the scanner. Chapter 2 Setup 2-4 Connecting the Scanner to the Computer There are two methods for your computer environment. Select the method that the power switch ...of the scanner is OFF. Using a USB Connection 1 Verify that is in the ON position, push the switch to set...and SCSI cable at the same time. a 2-11 If the power switch is suitable for connecting the DR-4010C scanner to OFF.
... and SCSI connection, which makes use of a SCSI card installed in an expansion slot of the scanner. Chapter 2 Setup 2-4 Connecting the Scanner to the Computer There are two methods for your computer environment. Select the method that the power switch ...of the scanner is OFF. Using a USB Connection 1 Verify that is in the ON position, push the switch to set...and SCSI cable at the same time. a 2-11 If the power switch is suitable for connecting the DR-4010C scanner to OFF.

User Manual
Page 27
...the computer is no duplication of all other SCSI devices, make sure that is suitable for the scanner and for the SCSI connector on the computer. • The SCSI ID of the scanner is connected as the last device in the system. When using a daisy-chain configuration with ... the SCSI cable. When using a daisy-chain configuration with other devices to ON. DIP switches Factory default (SCSI ID = 2) • The DR-4010C scanner incorporates a SCSI terminator which is not supplied with other SCSI devices, set to the computer. Set the terminators of SCSI ID numbers in the chain...
...the computer is no duplication of all other SCSI devices, make sure that is suitable for the scanner and for the SCSI connector on the computer. • The SCSI ID of the scanner is connected as the last device in the system. When using a daisy-chain configuration with ... the SCSI cable. When using a daisy-chain configuration with other devices to ON. DIP switches Factory default (SCSI ID = 2) • The DR-4010C scanner incorporates a SCSI terminator which is not supplied with other SCSI devices, set to the computer. Set the terminators of SCSI ID numbers in the chain...


