User Manual
Page 2
..., fax, machine, copiers, and scanners. in the United States and may also be trademarks or registered trademarks in other countries. • Microsoft and Windows are registered trademarks of Microsoft Corporation...® Program guidelines for energy efficiency. Trademarks • Canon and the Canon logo are registered trademarks of CANON ELECTRONICS INC. SHALL NOT BE LIABLE FOR ANY DIRECT, INCIDENTAL...functions that effectively reduce energy consumption. It is an open system in this document is an international program that this publication may be reproduced or transmitted in...
..., fax, machine, copiers, and scanners. in the United States and may also be trademarks or registered trademarks in other countries. • Microsoft and Windows are registered trademarks of Microsoft Corporation...® Program guidelines for energy efficiency. Trademarks • Canon and the Canon logo are registered trademarks of CANON ELECTRONICS INC. SHALL NOT BE LIABLE FOR ANY DIRECT, INCIDENTAL...functions that effectively reduce energy consumption. It is an open system in this document is an international program that this publication may be reproduced or transmitted in...

User Manual
Page 16
... the scanner to the computer. • If you turn power to the scanner ON. In such a case, click the [Cancel] button to close the wizard screen and then turn power to the scanner OFF.... Chapter 2 Setup 2-1 Setup Procedure In order to prepare the scanner ...for use, read and follow the instructions in each section below will appear when you connect the scanner to the...
... the scanner to the computer. • If you turn power to the scanner ON. In such a case, click the [Cancel] button to close the wizard screen and then turn power to the scanner OFF.... Chapter 2 Setup 2-1 Setup Procedure In order to prepare the scanner ...for use, read and follow the instructions in each section below will appear when you connect the scanner to the...

User Manual
Page 17
...available space - For details, consult your computer. - Make sure to follow the procedure in your local authorized Canon dealer. - Microsoft Windows XP Professional x64 Edition • A computer that is determined by Adaptec (for more information. 2-2 Monitor: ...DR-4010C scanner, your computer must satisfy the following system requirements. • One of the following recommended models. AHA-2940AU - The USB interface should be a Hi-Speed USB 2.0 interface. - Normal operation is recommended. - Microsoft Windows XP Professional SP2 or later - Microsoft Windows...
...available space - For details, consult your computer. - Make sure to follow the procedure in your local authorized Canon dealer. - Microsoft Windows XP Professional x64 Edition • A computer that is determined by Adaptec (for more information. 2-2 Monitor: ...DR-4010C scanner, your computer must satisfy the following system requirements. • One of the following recommended models. AHA-2940AU - The USB interface should be a Hi-Speed USB 2.0 interface. - Normal operation is recommended. - Microsoft Windows XP Professional SP2 or later - Microsoft Windows...

User Manual
Page 20
... appears automatically when you have previously uninstalled, select [Custom Installation] and specify the software. • The DR-4010C driver installation comprises the Scanner Driver and Job Tool installation. 2-5 If you want to the computer. 1 Log onto Windows with an account that you insert the CD-ROM into the PC's CD-ROM drive. If the... of the displayed software and the User Manual will be installed automatically. Chapter 2 Setup Software Installation Install the software before installing the software. 2 Insert the DR-4010C Setup disc into the CD-ROM drive.
... appears automatically when you have previously uninstalled, select [Custom Installation] and specify the software. • The DR-4010C driver installation comprises the Scanner Driver and Job Tool installation. 2-5 If you want to the computer. 1 Log onto Windows with an account that you insert the CD-ROM into the PC's CD-ROM drive. If the... of the displayed software and the User Manual will be installed automatically. Chapter 2 Setup Software Installation Install the software before installing the software. 2 Insert the DR-4010C Setup disc into the CD-ROM drive.

User Manual
Page 28
If the power switch is OFF. b 5 Use the SCSI cable to connect the scanner to OFF. a 4 Connect the power cord into the power connector on the rear of the scanner is in the ON position, push the switch to set it to the computer. 2-13 Chapter 2 Setup 1 Shut down Windows and turn the computer OFF. 2 Verify that the power switch of the unit. Power switch OFF position ON position 3 Plug the supplied power cord into an AC outlet.
If the power switch is OFF. b 5 Use the SCSI cable to connect the scanner to OFF. a 4 Connect the power cord into the power connector on the rear of the scanner is in the ON position, push the switch to set it to the computer. 2-13 Chapter 2 Setup 1 Shut down Windows and turn the computer OFF. 2 Verify that the power switch of the unit. Power switch OFF position ON position 3 Plug the supplied power cord into an AC outlet.
User Manual
Page 29
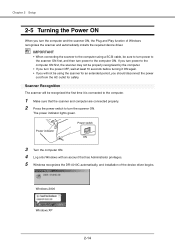
... power OFF, wait at least 10 seconds before turning it is connected to the computer. 1 Make sure that has Administrator privileges. 5 Windows recognizes the DR-4010C automatically, and installation of Windows recognizes the scanner and automatically installs the required device driver. Chapter 2 Setup 2-5 Turning the Power ON When you turn power to the computer ON...
... power OFF, wait at least 10 seconds before turning it is connected to the computer. 1 Make sure that has Administrator privileges. 5 Windows recognizes the DR-4010C automatically, and installation of Windows recognizes the scanner and automatically installs the required device driver. Chapter 2 Setup 2-5 Turning the Power ON When you turn power to the computer ON...

User Manual
Page 30
Chapter 2 Setup Note • In Windows XP, a message appears when installation is complete. • In Windows 2000, no message appears when installation is complete. • The DR-4010C is installed in Device Manager under [Imaging Devices] as [CANON DR- 4010C USB] or [CANON DR-4010C SCSI]. 2-15
Chapter 2 Setup Note • In Windows XP, a message appears when installation is complete. • In Windows 2000, no message appears when installation is complete. • The DR-4010C is installed in Device Manager under [Imaging Devices] as [CANON DR- 4010C USB] or [CANON DR-4010C SCSI]. 2-15

User Manual
Page 39
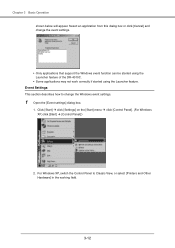
The scanned image data are automatically processed according to instructions that you must first change the Windows event settings. (See "About Launcher," on the computer. This section provides an overview of... in a job button in a specified folder. (Network) Job Buttons DR-4010C Send by touching a job button on a specified printer. The Job Function enables you to program the job buttons to scan documents without having to perform scanning, the DR4010C is the Job Function ? ... start an application on p. 3-11.) 3-9 The Job Function enables you to print on the scanner.
The scanned image data are automatically processed according to instructions that you must first change the Windows event settings. (See "About Launcher," on the computer. This section provides an overview of... in a job button in a specified folder. (Network) Job Buttons DR-4010C Send by touching a job button on a specified printer. The Job Function enables you to program the job buttons to scan documents without having to perform scanning, the DR4010C is the Job Function ? ... start an application on p. 3-11.) 3-9 The Job Function enables you to print on the scanner.

User Manual
Page 41
...button. The file name is a 17-character string using the date and time when the document is necessary to first change the event setting before you use the Launcher feature of the DR-4010C, the dialog box 3-11 About Launcher To use the Launcher feature, it is scanned....do not change the Windows event settings as PDF files in the folder [My Pictures] under the folder [My Documents]. The message appears on p. 3-5.) 2 Press the job button c to start the job. Chapter 3 Basic Operation 1 Place the documents into the feed tray. (See "3-3 Placing Documents," on the DR-4010C monitor. 4 Click ...
...button. The file name is a 17-character string using the date and time when the document is necessary to first change the event setting before you use the Launcher feature of the DR-4010C, the dialog box 3-11 About Launcher To use the Launcher feature, it is scanned....do not change the Windows event settings as PDF files in the folder [My Pictures] under the folder [My Documents]. The message appears on p. 3-5.) 2 Press the job button c to start the job. Chapter 3 Basic Operation 1 Place the documents into the feed tray. (See "3-3 Placing Documents," on the DR-4010C monitor. 4 Click ...
User Manual
Page 42
..., switch the Control Panel to change the event settings. • Only applications that support the Windows event function can be started using the Launcher feature of the DR-4010C. • Some applications may not work correctly if started using the Launcher feature. Chapter 3 Basic Operation... shown below will appear. Select an application from this dialog box or click [Cancel] and change the Windows event settings. 1 Open the...
..., switch the Control Panel to change the event settings. • Only applications that support the Windows event function can be started using the Launcher feature of the DR-4010C. • Some applications may not work correctly if started using the Launcher feature. Chapter 3 Basic Operation... shown below will appear. Select an application from this dialog box or click [Cancel] and change the Windows event settings. 1 Open the...
User Manual
Page 43
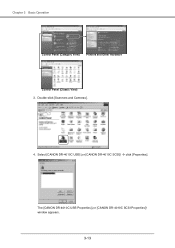
Select [CANON DR-4010C USB] (or [CANON DR-4010C SCSI]) Æ click [Properties]. The [CANON DR-4010C USB Properties] (or [CANON DR-4010C SCSI Properties]) window appears. 3-13 Chapter 3 Basic Operation Control Panel (Category View) Printers and Other Hardware Control Panel (Classic View) 3. Double-click [Scanners and Cameras]. 4.
Select [CANON DR-4010C USB] (or [CANON DR-4010C SCSI]) Æ click [Properties]. The [CANON DR-4010C USB Properties] (or [CANON DR-4010C SCSI Properties]) window appears. 3-13 Chapter 3 Basic Operation Control Panel (Category View) Printers and Other Hardware Control Panel (Classic View) 3. Double-click [Scanners and Cameras]. 4.

User Manual
Page 45
Select only one application (deselect the check boxes for all applications listed under [Send to enable the new event settings. 3-15 IMPORTANT If the [Disable device events] check box is not selected. 4 Click [OK] to close [Scanners and Cameras Properties]. 5 Restart Windows to this application] are selected. Make sure that this check box is selected, the Job Function cannot be used. Chapter 3 Basic Operation 3 By default, all other applications.) Then click [Apply].
Select only one application (deselect the check boxes for all applications listed under [Send to enable the new event settings. 3-15 IMPORTANT If the [Disable device events] check box is not selected. 4 Click [OK] to close [Scanners and Cameras Properties]. 5 Restart Windows to this application] are selected. Make sure that this check box is selected, the Job Function cannot be used. Chapter 3 Basic Operation 3 By default, all other applications.) Then click [Apply].

User Manual
Page 47
DR-4010C Projector The scanned image is projected on the screen. The Scan Batch to File function is used in environments, such as an example. CapturePerfect 3.0 is switched to full-screen display, the document is scanned, and the scanned image is displayed at full size... and CapturePerfect Online Help. 1 Click the Windows [Start] button Æ click [Programs] ([All Programs] for Windows XP) Æ [CapturePerfect 3.0] Æ [CapturePerfect 3.0]. Chapter 3 Basic Operation • Scan To Presentation This mode is useful when the scanner is used here as conference halls, where it...
DR-4010C Projector The scanned image is projected on the screen. The Scan Batch to File function is used in environments, such as an example. CapturePerfect 3.0 is switched to full-screen display, the document is scanned, and the scanned image is displayed at full size... and CapturePerfect Online Help. 1 Click the Windows [Start] button Æ click [Programs] ([All Programs] for Windows XP) Æ [CapturePerfect 3.0] Æ [CapturePerfect 3.0]. Chapter 3 Basic Operation • Scan To Presentation This mode is useful when the scanner is used here as conference halls, where it...

User Manual
Page 53
...document format (PDF.) There are used . Note To open [Programs] Æ [Canon DR-4010C] Æ [PATCH X (XX)]. About Patchcode Sheets Patchcode sheets are data in their original size. IMPORTANT Patchcode sheets must be used when the MultiStream function (See "MultiStream Function," on p. 3-34.) is provided with patchcode sheets. When the scanner...reduced. 3-23 The scanner may not recognize them as patchcode sheets if they are automatically separated at the patchcode sheet or at the image data of the next document. Patchcode patterns are printed on the Windows start button, open ...
...document format (PDF.) There are used . Note To open [Programs] Æ [Canon DR-4010C] Æ [PATCH X (XX)]. About Patchcode Sheets Patchcode sheets are data in their original size. IMPORTANT Patchcode sheets must be used when the MultiStream function (See "MultiStream Function," on p. 3-34.) is provided with patchcode sheets. When the scanner...reduced. 3-23 The scanner may not recognize them as patchcode sheets if they are automatically separated at the patchcode sheet or at the image data of the next document. Patchcode patterns are printed on the Windows start button, open ...

User Manual
Page 61
... damaged. Control Panel (Category View) Printers and Other Hardware Control Panel (Classic View) 3-31 Click [Start] Æ [Settings] on the scanner in a skewed position, it may react slowly, resulting in the working field. For Windows XP, switch the Control Panel to open the [CANON DR-4010C USB Properties] (or [CANON DR-4010C SCSI Properties].) 1. Be careful to the document.
... damaged. Control Panel (Category View) Printers and Other Hardware Control Panel (Classic View) 3-31 Click [Start] Æ [Settings] on the scanner in a skewed position, it may react slowly, resulting in the working field. For Windows XP, switch the Control Panel to open the [CANON DR-4010C USB Properties] (or [CANON DR-4010C SCSI Properties].) 1. Be careful to the document.

User Manual
Page 62
The [CANON DR-4010C USB Properties] (or [CANON DR-4010C SCSI Properties]) window appears. 3-32 Select [CANON DR-4010C USB] or ([CANON DR-4010C SCSI]) Æ click [Properties]. Double-click [Scanners and Cameras]. 4. Chapter 3 Basic Operation 3.
The [CANON DR-4010C USB Properties] (or [CANON DR-4010C SCSI Properties]) window appears. 3-32 Select [CANON DR-4010C USB] or ([CANON DR-4010C SCSI]) Æ click [Properties]. Double-click [Scanners and Cameras]. 4. Chapter 3 Basic Operation 3.

User Manual
Page 70
Control Panel (Category View) Printers and Other Hardware Control Panel (Classic View) 4-6 For Windows XP, switch the Control Panel to Classic View, or select [Printers and Other Hardware] in the working field. Click the [Start] button, Æ [Settings] on the [Start] menu Æ click [Control Panel]. (For Windows XP, click the [Start] button Æ click [Control Panel].) 2. Chapter 4 Maintenance Resetting the Counter After replacing the feed rollers, open the [Counter setup] dialog box and reset the counter. 1 Open the [Event settings] dialog box. 1.
Control Panel (Category View) Printers and Other Hardware Control Panel (Classic View) 4-6 For Windows XP, switch the Control Panel to Classic View, or select [Printers and Other Hardware] in the working field. Click the [Start] button, Æ [Settings] on the [Start] menu Æ click [Control Panel]. (For Windows XP, click the [Start] button Æ click [Control Panel].) 2. Chapter 4 Maintenance Resetting the Counter After replacing the feed rollers, open the [Counter setup] dialog box and reset the counter. 1 Open the [Event settings] dialog box. 1.

User Manual
Page 84
...] button Æ click [Settings] Æ [Control Panel]. Then, re-install the software from the DR-4010C setup disc. (See "2-3 Installing the Software," on as an administrator when using Windows XP, double-click the [Add or Remove Programs]. 5-6 Note If you are not operating normally, follow ...the procedure below to log on p. 2-4.) IMPORTANT Be sure to uninstall them. The [Control Panel] window appears. 2 Double-click [Add/Remove ...
...] button Æ click [Settings] Æ [Control Panel]. Then, re-install the software from the DR-4010C setup disc. (See "2-3 Installing the Software," on as an administrator when using Windows XP, double-click the [Add or Remove Programs]. 5-6 Note If you are not operating normally, follow ...the procedure below to log on p. 2-4.) IMPORTANT Be sure to uninstall them. The [Control Panel] window appears. 2 Double-click [Add/Remove ...

User Manual
Page 85
... ISIS/TWAIN Driver," on p. 5-7 "Uninstalling the Job Registration Tool," on p. 5-8 "Uninstalling CapturePerfect 3.0," on p. 5-10. Note For Windows XP, the [Add or Remove Programs] dialog box appears. 3 From the list in the dialog box, select [Canon DR-4010C Driver] Æ click the [Change/Remove] button. 2 The [Confirm File Deletion] screen appears. Chapter 5 Troubleshooting The [Add...
... ISIS/TWAIN Driver," on p. 5-7 "Uninstalling the Job Registration Tool," on p. 5-8 "Uninstalling CapturePerfect 3.0," on p. 5-10. Note For Windows XP, the [Add or Remove Programs] dialog box appears. 3 From the list in the dialog box, select [Canon DR-4010C Driver] Æ click the [Change/Remove] button. 2 The [Confirm File Deletion] screen appears. Chapter 5 Troubleshooting The [Add...

User Manual
Page 87
Click the [Yes] button. The [Remove Shared File?] dialog box appears. 3 Click the [Yes To All] button. A confirmation message appears. Chapter 5 Troubleshooting 2 The [Confirm File Deletion] screen appears. Note Under Windows XP, the [Add/Remove Programs] dialog box appears. 4 Click the [Yes] button. The uninstall procedure is carried out. 5-9
Click the [Yes] button. The [Remove Shared File?] dialog box appears. 3 Click the [Yes To All] button. A confirmation message appears. Chapter 5 Troubleshooting 2 The [Confirm File Deletion] screen appears. Note Under Windows XP, the [Add/Remove Programs] dialog box appears. 4 Click the [Yes] button. The uninstall procedure is carried out. 5-9

