
User Manual
Page 6
... the DR-4010C Document Scanner 1-5 Names and Functions of Parts 1-7 Setup ...2-1 Setup Procedure 2-1 Installation Requirements 2-2 Installing the Software 2-4 Setup Disc 2-4 Software Installation 2-5 Connecting the Scanner to the Computer 2-11 Using a USB Connection 2-11 Using a SCSI Connection 2-12 Turning the Power ON 2-14 Scanner Recognition 2-14 Basic Operation 3-1 Documents 3-1 Document Feed and Eject Tray 3-3 Preparing the Document Feed Tray 3-3 Preparing the Document Eject Tray 3-3 Placing Documents 3-5 Feeding...
... the DR-4010C Document Scanner 1-5 Names and Functions of Parts 1-7 Setup ...2-1 Setup Procedure 2-1 Installation Requirements 2-2 Installing the Software 2-4 Setup Disc 2-4 Software Installation 2-5 Connecting the Scanner to the Computer 2-11 Using a USB Connection 2-11 Using a SCSI Connection 2-12 Turning the Power ON 2-14 Scanner Recognition 2-14 Basic Operation 3-1 Documents 3-1 Document Feed and Eject Tray 3-3 Preparing the Document Feed Tray 3-3 Preparing the Document Eject Tray 3-3 Placing Documents 3-5 Feeding...

User Manual
Page 8
... affected by the environment in which it is installed meets the following environmental requirements. • Provide adequate space around the scanner for documents ejected after being scanned. (See "Preparing the Document Eject Tray," on p. 3-3.) • Avoid installing the machine in the vicinity of dust accumulates. • Avoid warm or humid locations, such as in direct sunlight...
... affected by the environment in which it is installed meets the following environmental requirements. • Provide adequate space around the scanner for documents ejected after being scanned. (See "Preparing the Document Eject Tray," on p. 3-3.) • Avoid installing the machine in the vicinity of dust accumulates. • Avoid warm or humid locations, such as in direct sunlight...

User Manual
Page 12
.../dual feeding path • U-Turn Path Documents are fed and ejected from the front of the scanner. (See "3-2 Document Feed and Eject Tray," on the document type: - Chapter 1 Before Using the Scanner 1-2 Features of the DR-4010C Document Scanner The main features of the DR-4010C document scanner are described below. • Fast Document Feeding The scanner can scan a maximum of 42 documents per minute in a range of sizes...
.../dual feeding path • U-Turn Path Documents are fed and ejected from the front of the scanner. (See "3-2 Document Feed and Eject Tray," on the document type: - Chapter 1 Before Using the Scanner 1-2 Features of the DR-4010C Document Scanner The main features of the DR-4010C document scanner are described below. • Fast Document Feeding The scanner can scan a maximum of 42 documents per minute in a range of sizes...

User Manual
Page 14
.... (See p. 3-9.) Power Indicator This indicator lights when the scanner is used to be scanned here. (See p. 3-3.) Document Eject Tray Scanned documents are fed. Chapter 1 Before Using the Scanner 1-3 Names and Functions of Parts This section describes the name and function of the eject tray. (See p. 3-3.) Document Feed Tray Place the document to turn the scanner ON. (See p. 2-13.) 1-7 Make sure to read...
.... (See p. 3-9.) Power Indicator This indicator lights when the scanner is used to be scanned here. (See p. 3-3.) Document Eject Tray Scanned documents are fed. Chapter 1 Before Using the Scanner 1-3 Names and Functions of Parts This section describes the name and function of the eject tray. (See p. 3-3.) Document Feed Tray Place the document to turn the scanner ON. (See p. 2-13.) 1-7 Make sure to read...

User Manual
Page 15
... the Computer," on p. 211.) DIP Switches Set the SCSI ID. Chapter 1 Before Using the Scanner ■ Back View Document Eject Tray 2 Open this tray to use the scanner in a straight path configuration. (See p. 3-3.) ■ Interfaces (See "2-4 Connecting the Scanner to overheat, creating a risk of fire. • Do not connect both a USB cable and a SCSI cable at the...
... the Computer," on p. 211.) DIP Switches Set the SCSI ID. Chapter 1 Before Using the Scanner ■ Back View Document Eject Tray 2 Open this tray to use the scanner in a straight path configuration. (See p. 3-3.) ■ Interfaces (See "2-4 Connecting the Scanner to overheat, creating a risk of fire. • Do not connect both a USB cable and a SCSI cable at the...

User Manual
Page 31
...; 0.003" (0.76 ± 0.08 mm) without embossing (*1) The DR-4010C offers two document eject configurations: U-turn path (the document is ejected to the document eject tray at the front of the scanner) and straight path (the document is ejected to the back of the scanner.) (See "3-2 Document Tray and Eject Tray," on p. 3-3.) U-turn Path Straight Path Document Eject Tray 2 (*2) You can scan documents up to 39.2" (1000 mm). Chapter 3 Basic Operation...
...; 0.003" (0.76 ± 0.08 mm) without embossing (*1) The DR-4010C offers two document eject configurations: U-turn path (the document is ejected to the document eject tray at the front of the scanner) and straight path (the document is ejected to the back of the scanner.) (See "3-2 Document Tray and Eject Tray," on p. 3-3.) U-turn Path Straight Path Document Eject Tray 2 (*2) You can scan documents up to 39.2" (1000 mm). Chapter 3 Basic Operation...

User Manual
Page 33
... the tray, pull out the document feed tray extension. Preparing the Document Feed Tray 1 Grasp the middle of the scanner in personal injury or damage to the paper size and feed/eject method. If the documents slide off , resulting in a straight path. Chapter 3 Basic Operation 3-2 Document Tray and Eject Tray Prepare the document feed tray and document eject tray according to the scanner. Document Flow U-turn Path Document Eject tray Straight Path Document Eject Tray 2 3-3
... the tray, pull out the document feed tray extension. Preparing the Document Feed Tray 1 Grasp the middle of the scanner in personal injury or damage to the paper size and feed/eject method. If the documents slide off , resulting in a straight path. Chapter 3 Basic Operation 3-2 Document Tray and Eject Tray Prepare the document feed tray and document eject tray according to the scanner. Document Flow U-turn Path Document Eject tray Straight Path Document Eject Tray 2 3-3

User Manual
Page 34
... used to scan documents. Document Eject Tray 2 U-turn path is not opened, documents may occur. • Open or close the document eject tray 2 before starting to scan documents on paper of the scanner when using the straight path. Document Eject Tray Extension Document Eject Tray 2 Note • The U-turn Path Close document eject tray 2, and open . • When using the U-turn path. Opening or closing the document eject tray 2 while scanning may...
... used to scan documents. Document Eject Tray 2 U-turn path is not opened, documents may occur. • Open or close the document eject tray 2 before starting to scan documents on paper of the scanner when using the straight path. Document Eject Tray Extension Document Eject Tray 2 Note • The U-turn Path Close document eject tray 2, and open . • When using the U-turn path. Opening or closing the document eject tray 2 while scanning may...

User Manual
Page 37
... jam. 6 Start scanning. Feeding in the feed tray correctly. Chapter 3 Basic Operation 5 Adjust the document guides to fit the width of the document eject tray. • After you finish scanning, close the document feed tray and the document eject tray extension to prevent damage to a system error or paper jam while the scanner is scanning, resolve the problem, make sure that...
... jam. 6 Start scanning. Feeding in the feed tray correctly. Chapter 3 Basic Operation 5 Adjust the document guides to fit the width of the document eject tray. • After you finish scanning, close the document feed tray and the document eject tray extension to prevent damage to a system error or paper jam while the scanner is scanning, resolve the problem, make sure that...

User Manual
Page 38
... the document feed tray and the document eject tray extension to prevent damage to get your hand caught under the roller unit, as this case, lightly press on p. 3-5. 3 Start scanning. 4 The document is fastened together as you feed them. Roller Unit ■ After you place several documents that is fed. Take care not to the scanner while it...
... the document feed tray and the document eject tray extension to prevent damage to get your hand caught under the roller unit, as this case, lightly press on p. 3-5. 3 Start scanning. 4 The document is fastened together as you feed them. Roller Unit ■ After you place several documents that is fed. Take care not to the scanner while it...

User Manual
Page 56
...do not grasp the roller unit in the eject tray, remove the document before closing the document eject tray extension. Chapter 3 Basic Operation 3-7 Clearing a Paper Jam When paper jams occur during scanning, use the following procedure to force the document eject tray extension closed may distort the rollers and lead ...to cut your hands on the edges of the paper. 1 Remove any documents that have been left in the eject tray, and close the eject tray guide. Attempting to clear them. IMPORTANT If a document stops in the center. CAUTION When removing jammed paper, take care not to...
...do not grasp the roller unit in the eject tray, remove the document before closing the document eject tray extension. Chapter 3 Basic Operation 3-7 Clearing a Paper Jam When paper jams occur during scanning, use the following procedure to force the document eject tray extension closed may distort the rollers and lead ...to cut your hands on the edges of the paper. 1 Remove any documents that have been left in the eject tray, and close the eject tray guide. Attempting to clear them. IMPORTANT If a document stops in the center. CAUTION When removing jammed paper, take care not to...

User Manual
Page 92
Chapter 6 Appendix External Dimensions 12.5" (318 mm) 10.9" (278 mm) 21.4" (544 mm) (Document Feed Tray Extension is open) 19.3" (491 mm) (Document Feed Tray is open) 12.9" (330 mm) (Document Eject Guide is open) 2.0" (51 mm) (Document Eject Tray 2 is open) 8.9" (225 mm) 5.2" (131 mm) 4.7" (119 mm) 2.9" (76 mm) 7.3" (185.5 mm) 6-3
Chapter 6 Appendix External Dimensions 12.5" (318 mm) 10.9" (278 mm) 21.4" (544 mm) (Document Feed Tray Extension is open) 19.3" (491 mm) (Document Feed Tray is open) 12.9" (330 mm) (Document Eject Guide is open) 2.0" (51 mm) (Document Eject Tray 2 is open) 8.9" (225 mm) 5.2" (131 mm) 4.7" (119 mm) 2.9" (76 mm) 7.3" (185.5 mm) 6-3

User Manual
Page 93
... Operation Procedure 3-17 Cleaning Feed Path 4-1 Rollers 4-2 Scanner 4-1 Sensor Glass 4-2 Clearing a Paper Jam 3-26 Connection SCSI Connection 2-12 USB Connection 2-11 Connection to the Computer 2-11 D daisy-chain configuration 2-12 DIP switches 2-12 Disposal 1-4 document eject configurations 3-1 document feed tray 3-7 document guides 3-6 Documents 3-1 Double Feed Detection Function 3-30 DR-4010C monitor 3-11 E Eject Tray 3-3 event 3-11 Event settings 4-6 External Dimensions 6-3 F Features...
... Operation Procedure 3-17 Cleaning Feed Path 4-1 Rollers 4-2 Scanner 4-1 Sensor Glass 4-2 Clearing a Paper Jam 3-26 Connection SCSI Connection 2-12 USB Connection 2-11 Connection to the Computer 2-11 D daisy-chain configuration 2-12 DIP switches 2-12 Disposal 1-4 document eject configurations 3-1 document feed tray 3-7 document guides 3-6 Documents 3-1 Double Feed Detection Function 3-30 DR-4010C monitor 3-11 E Eject Tray 3-3 event 3-11 Event settings 4-6 External Dimensions 6-3 F Features...

Reference Guide
Page 7
... Safety Instructions 4 Installation Location 4 Power 5 Moving the Scanner 6 Handling 6 Disposal 8 1-2 Features of the DR-4010C Document Scanner9 1-3 Names and Functions of Parts 12 1- 4 Installation Requirements 14 Chapter 2 Basic Operation 16 2-1 Documents 16 2-2 Document Feed and Eject Tray 19 Preparing the Document Feed Tray 19 Preparing the Document Eject Tray 20 2-3 Placing Documents 22 Feeding in the Page Separation Mode 22 Feeding in the Bypass...
... Safety Instructions 4 Installation Location 4 Power 5 Moving the Scanner 6 Handling 6 Disposal 8 1-2 Features of the DR-4010C Document Scanner9 1-3 Names and Functions of Parts 12 1- 4 Installation Requirements 14 Chapter 2 Basic Operation 16 2-1 Documents 16 2-2 Document Feed and Eject Tray 19 Preparing the Document Feed Tray 19 Preparing the Document Eject Tray 20 2-3 Placing Documents 22 Feeding in the Page Separation Mode 22 Feeding in the Bypass...

Reference Guide
Page 8
... precautions described below. Installation Location The performance of this scanner is affected by the environment in direct sunlight. At least 3.9" (100 mm) when eject tray is installed meets the following environmental requirements. • Provide adequate space around the scanner for documents ejected after being scanned. (See "Preparing the Document Eject Tray," on p. 20.) • Avoid installing the machine in...
... precautions described below. Installation Location The performance of this scanner is affected by the environment in direct sunlight. At least 3.9" (100 mm) when eject tray is installed meets the following environmental requirements. • Provide adequate space around the scanner for documents ejected after being scanned. (See "Preparing the Document Eject Tray," on p. 20.) • Avoid installing the machine in...

Reference Guide
Page 13
... Path Documents are ejected to LTR/A4 size. (Scanning conditions: Black and white, LTR/A4 size portrait, 200 dpi.) Scanning speed is the same for both color and grayscale scanning. • USB/SCSI Interface Supported The USB interface that was placed askew. Single-sided/double-sided mode - Chapter 1 1-2 Features of the DR-4010C Document Scanner The...
... Path Documents are ejected to LTR/A4 size. (Scanning conditions: Black and white, LTR/A4 size portrait, 200 dpi.) Scanning speed is the same for both color and grayscale scanning. • USB/SCSI Interface Supported The USB interface that was placed askew. Single-sided/double-sided mode - Chapter 1 1-2 Features of the DR-4010C Document Scanner The...

Reference Guide
Page 16
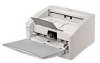
... Job Buttons These buttons can perform user-specified functions assigned with the parts of the scanner before using the scanner. ■ Front View (Feed Tray Open) Document Eject Tray Extension Open if the document extends beyond the edge of the eject tray. (See p. 20.) Document Eject Tray Scanned documents are fed. Make sure to read this section and familiarize yourself with the Job...
... Job Buttons These buttons can perform user-specified functions assigned with the parts of the scanner before using the scanner. ■ Front View (Feed Tray Open) Document Eject Tray Extension Open if the document extends beyond the edge of the eject tray. (See p. 20.) Document Eject Tray Scanned documents are fed. Make sure to read this section and familiarize yourself with the Job...

Reference Guide
Page 17
... Doing so could cause the scanner to a 50-pin half-pitch (pin type) SCSI cable. Doing so may cause a malfunction. Power Connector CAUTION • Do not block the ventilation openings. SCSI ... overheat, creating a risk of fire. • Do not connect both a USB cable and a SCSI cable at the same time. Chapter 1 ■ Back View Document Eject Tray 2 Open this tray to use the scanner in a straight path configuration. (See p. 20.) ■ Interfaces DIP Switches Set the SCSI ID. ON 2 1 (Ventilation Holes) USB Connector Connect the provided...
... Doing so could cause the scanner to a 50-pin half-pitch (pin type) SCSI cable. Doing so may cause a malfunction. Power Connector CAUTION • Do not block the ventilation openings. SCSI ... overheat, creating a risk of fire. • Do not connect both a USB cable and a SCSI cable at the same time. Chapter 1 ■ Back View Document Eject Tray 2 Open this tray to use the scanner in a straight path configuration. (See p. 20.) ■ Interfaces DIP Switches Set the SCSI ID. ON 2 1 (Ventilation Holes) USB Connector Connect the provided...

Reference Guide
Page 20
... mm) without embossing (*1) The DR-4010C offers two document eject configurations: U-turn path (the document is ejected to the document eject tray at the front of the scanner) and straight path (the document is ejected to the back of the scanner.) (See "Document Feed and Eject Tray," on p. 19.) U-turn path Straight path 16 Basic Operation Document eject tray 2 Eject Direction (*1) Width Length (*2) Weight (*3) Feeding documents are separated (Page separation mode...
... mm) without embossing (*1) The DR-4010C offers two document eject configurations: U-turn path (the document is ejected to the document eject tray at the front of the scanner) and straight path (the document is ejected to the back of the scanner.) (See "Document Feed and Eject Tray," on p. 19.) U-turn path Straight path 16 Basic Operation Document eject tray 2 Eject Direction (*1) Width Length (*2) Weight (*3) Feeding documents are separated (Page separation mode...

Reference Guide
Page 23
... Doing so may damage the scanner, reduce scanning quality, or cause the tray to fall off the tray, pull out the document feed tray extension. Document Feed Tray Document Feed Tray Extension CAUTION Do not place anything other than documents on the document feed tray. Chapter 2 2-2 Document Feed and Eject Tray Prepare the document feed tray and document eject tray according to the scanner. If the documents slide off , resulting in personal...
... Doing so may damage the scanner, reduce scanning quality, or cause the tray to fall off the tray, pull out the document feed tray extension. Document Feed Tray Document Feed Tray Extension CAUTION Do not place anything other than documents on the document feed tray. Chapter 2 2-2 Document Feed and Eject Tray Prepare the document feed tray and document eject tray according to the scanner. If the documents slide off , resulting in personal...
