
User Manual
Page 2
... equipment generates, uses, and can participate voluntarily. Connect the equipment into an outlet on , the user is connected. - One Canon Plaza, Lake Success NY 11042, U.S.A. The program backs the development and dissemination of the Industry Canada. Operation is identical to Part...you could be determined by one or more of the FCC Rules. Tel. MODEL NAMES Model DR-3080CII is subject to the equipment unless otherwise specified in a particular installation. These limits are uniform among the participating nations. Do not make any interference received, including...
... equipment generates, uses, and can participate voluntarily. Connect the equipment into an outlet on , the user is connected. - One Canon Plaza, Lake Success NY 11042, U.S.A. The program backs the development and dissemination of the Industry Canada. Operation is identical to Part...you could be determined by one or more of the FCC Rules. Tel. MODEL NAMES Model DR-3080CII is subject to the equipment unless otherwise specified in a particular installation. These limits are uniform among the participating nations. Do not make any interference received, including...

User Manual
Page 6
... of Contents 4 Before Using the Scanner 5 To Ensure Safe Operation 5 Installation Location 5 Power ...6 Moving the Scanner 6 Notes on Normal Handling 7 Notes Concerning Disposal 8 Features of the DR-3080CII 9 Checking the Packing List 11 Removing the Protective Tape and Protective Sheet ...12 Names and Functions of Parts 13 Installing the Scanner 15 Installation Requirements 15 Installation Procedure 17 Interface Boards 18 SCSI Boards ...18...
... of Contents 4 Before Using the Scanner 5 To Ensure Safe Operation 5 Installation Location 5 Power ...6 Moving the Scanner 6 Notes on Normal Handling 7 Notes Concerning Disposal 8 Features of the DR-3080CII 9 Checking the Packing List 11 Removing the Protective Tape and Protective Sheet ...12 Names and Functions of Parts 13 Installing the Scanner 15 Installation Requirements 15 Installation Procedure 17 Interface Boards 18 SCSI Boards ...18...

User Manual
Page 7
... ● Avoid unstable surfaces and locations subject to direct sunlight. Before Using the Scanner 5 Make sure that the location where the scanner is installed. Dust can get inside of a water faucet, water heater, humidifier, etc., and avoid locations where the fumes from ammonia, paint thinner, ...paper feed tray and paper feed tray extension are open The performance of this scanner is affected by the environment in which it is installed meets the following environmental requirements. ● Provide adequate space around the scanner (as in the vicinity of the scanner and cause ...
... ● Avoid unstable surfaces and locations subject to direct sunlight. Before Using the Scanner 5 Make sure that the location where the scanner is installed. Dust can get inside of a water faucet, water heater, humidifier, etc., and avoid locations where the fumes from ammonia, paint thinner, ...paper feed tray and paper feed tray extension are open The performance of this scanner is affected by the environment in which it is installed meets the following environmental requirements. ● Provide adequate space around the scanner (as in the vicinity of the scanner and cause ...
User Manual
Page 17
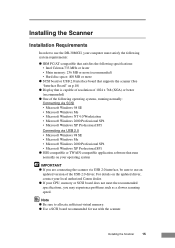
Installing the Scanner Installation Requirements In order to use the DR-3080CII, your computer must satisfy the following system requirements: ● IBM PC/AT-compatible that satisfies the following operating systems, running normally: Connecting via SCSI •..." on p.18) ● Display that runs normally on the updated driver, contact your local authorized Canon dealer. ● If your operating system IMPORTANT ● If you may experience problems such as a slower scanning speed. Installing the Scanner 15 Note ● Be sure to use with the scanner. For details on your...
Installing the Scanner Installation Requirements In order to use the DR-3080CII, your computer must satisfy the following system requirements: ● IBM PC/AT-compatible that satisfies the following operating systems, running normally: Connecting via SCSI •..." on p.18) ● Display that runs normally on the updated driver, contact your local authorized Canon dealer. ● If your operating system IMPORTANT ● If you may experience problems such as a slower scanning speed. Installing the Scanner 15 Note ● Be sure to use with the scanner. For details on your...

User Manual
Page 18
..., contact your PC, the system configuration, and the type of SCSI board that you will be using are compatible with your application software dealer. 16 Installing the Scanner
..., contact your PC, the system configuration, and the type of SCSI board that you will be using are compatible with your application software dealer. 16 Installing the Scanner

User Manual
Page 19
... PC" at the end of this section.) 1. Turn the scanner off. (See "Turning the Power Off" on p.23) ↓ 5. Installation Procedure The procedure for installing the scanner is outlined below. (For a detailed outline of this procedure, see "Connecting the Scanner to the scanner. (See "Connecting the Power... Cord" on p.19) ↓ 3. Turn the scanner on first, and then start up the PC. (See "Turning the Power On" on p.25) Installing the Scanner 17 Let the PC recognize the Scanner. (See "Recognizing the Scanner" on p.18) ↓ 2. Check the interface board in your computer. (...
... PC" at the end of this section.) 1. Turn the scanner off. (See "Turning the Power Off" on p.23) ↓ 5. Installation Procedure The procedure for installing the scanner is outlined below. (For a detailed outline of this procedure, see "Connecting the Scanner to the scanner. (See "Connecting the Power... Cord" on p.19) ↓ 3. Turn the scanner on first, and then start up the PC. (See "Turning the Power On" on p.25) Installing the Scanner 17 Let the PC recognize the Scanner. (See "Recognizing the Scanner" on p.18) ↓ 2. Check the interface board in your computer. (...

User Manual
Page 20
...DR-3080CII passed the Hi-Speed USB 2.0 certification test. These interface boards are as follows: Recommended USB 2.0 Interface boards Manufacturer: Adaptec Models: USB 2 connect 2000LP (AUA-2000) USB 2 connect 3100 (AUA-3100LP) USB 2 connect 5100 (AUA-5100) USB 2 connect for Notebooks (AUA-1420) IMPORTANT ● When installing... SCSI boards Manufacturer: Adaptec Models: AHA-2930U, AHA-2940AU, ASC-19160, ASC-29160, APA-1480 IMPORTANT When installing the SCSI board in your computer, please refer to the computer user's guide and follow the instructions provided. &#...
...DR-3080CII passed the Hi-Speed USB 2.0 certification test. These interface boards are as follows: Recommended USB 2.0 Interface boards Manufacturer: Adaptec Models: USB 2 connect 2000LP (AUA-2000) USB 2 connect 3100 (AUA-3100LP) USB 2 connect 5100 (AUA-5100) USB 2 connect for Notebooks (AUA-1420) IMPORTANT ● When installing... SCSI boards Manufacturer: Adaptec Models: AHA-2930U, AHA-2940AU, ASC-19160, ASC-29160, APA-1480 IMPORTANT When installing the SCSI board in your computer, please refer to the computer user's guide and follow the instructions provided. &#...

User Manual
Page 21
...9679; When the application is suitable for the environment in which you are two ways of connectors. DR-3080CII SCSI Device Computer SCSI Cable 50-Pin Half-Pitch (Pin Type) Installing the Scanner 19 Choose whichever format is running, do not turn the scanner off nor unplug the ...interface cable. ● Do not connect both a SCSI cable and a USB cable concurrently. ● Do not connect multiple DR-3080CIIs to one (1) computer. ●...
...9679; When the application is suitable for the environment in which you are two ways of connectors. DR-3080CII SCSI Device Computer SCSI Cable 50-Pin Half-Pitch (Pin Type) Installing the Scanner 19 Choose whichever format is running, do not turn the scanner off nor unplug the ...interface cable. ● Do not connect both a SCSI cable and a USB cable concurrently. ● Do not connect multiple DR-3080CIIs to one (1) computer. ●...
User Manual
Page 22
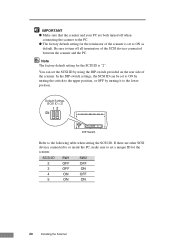
... inside the PC, make sure to set a unique ID for the scanner. SCSI ID 2 3 4 5 SW1 OFF OFF ON ON SW2 OFF ON OFF ON 20 Installing the Scanner Default Settings (SCSI ID = 2) 12 ON DIP Switch Refer to the lower position. You can be set to ON by turning the switch...
... inside the PC, make sure to set a unique ID for the scanner. SCSI ID 2 3 4 5 SW1 OFF OFF ON ON SW2 OFF ON OFF ON 20 Installing the Scanner Default Settings (SCSI ID = 2) 12 ON DIP Switch Refer to the lower position. You can be set to ON by turning the switch...

User Manual
Page 23
...when you use the scanner with a personal computer equipped with the scanner.(See "USB 2.0 Interface Board" on p.18) Computer USB Cable DR-3080CII Flat-Shaped Connector Smaller SquareShaped Connector IMPORTANT ● If the OS you are using is Windows NT, the connection via USB is not Hi... cable. • When using a USB extension board that supports Hi-Speed USB 2.0, be sure to choose one compatible with USB 2.0. Installing the Scanner 21 When using the DR-3080CII with Windows NT, be sure to connect the scanner via SCSI. ● When using a USB hub, be sure to use one verified...
...when you use the scanner with a personal computer equipped with the scanner.(See "USB 2.0 Interface Board" on p.18) Computer USB Cable DR-3080CII Flat-Shaped Connector Smaller SquareShaped Connector IMPORTANT ● If the OS you are using is Windows NT, the connection via USB is not Hi... cable. • When using a USB extension board that supports Hi-Speed USB 2.0, be sure to choose one compatible with USB 2.0. Installing the Scanner 21 When using the DR-3080CII with Windows NT, be sure to connect the scanner via SCSI. ● When using a USB hub, be sure to use one verified...

User Manual
Page 24
IMPORTANT ● Only use the power cord that is provided with this scanner to turn the power switch off before plugging in the power cord. 22 Installing the Scanner Connecting the Power Cord Connect the power cord that was provided with this scanner. ● Always be sure to the power cord connector located on the rear of the scanner, and then plug the cord into a power outlet.
IMPORTANT ● Only use the power cord that is provided with this scanner to turn the power switch off before plugging in the power cord. 22 Installing the Scanner Connecting the Power Cord Connect the power cord that was provided with this scanner. ● Always be sure to the power cord connector located on the rear of the scanner, and then plug the cord into a power outlet.

User Manual
Page 25
...)." Click the Next button. 6. Turn on the lower right front corner of the scanner. Contact your local authorized Canon dealer or service representative to your CD-ROM drive) and then click the Next button. 5. Installing the Scanner 23 Turn on . 2. Follow the instructions on the screen to proceed with the..., the scanner is on, immediately turn the scanner on or off and unplug the power cord. Recognizing the Scanner If you to install the scanner driver. Turning the Power On/Off Follow the procedures described below when turning the power on , press the power switch.
...)." Click the Next button. 6. Turn on the lower right front corner of the scanner. Contact your local authorized Canon dealer or service representative to your CD-ROM drive) and then click the Next button. 5. Installing the Scanner 23 Turn on . 2. Follow the instructions on the screen to proceed with the..., the scanner is on, immediately turn the scanner on or off and unplug the power cord. Recognizing the Scanner If you to install the scanner driver. Turning the Power On/Off Follow the procedures described below when turning the power on , press the power switch.

User Manual
Page 26
... click the Next button. 4. and then select "Specify a location". Click the Next button to proceed to the Found New Hardware Wizard" screen, select "Install from a list or specific location (Advanced)", and then click the Next button. 3. Select "Specify a location" and then click the Next button. 4. Load... the setup disc into the computer's CD-ROM drive. 3. Select "Include this location in the "Hardware Installation" dialog box. ● If you are using Windows XP, the "Found New Hardware Wizard" dialog box appears. 1. Select "Search for the best driver...
... click the Next button. 4. and then select "Specify a location". Click the Next button to proceed to the Found New Hardware Wizard" screen, select "Install from a list or specific location (Advanced)", and then click the Next button. 3. Select "Specify a location" and then click the Next button. 4. Load... the setup disc into the computer's CD-ROM drive. 3. Select "Include this location in the "Hardware Installation" dialog box. ● If you are using Windows XP, the "Found New Hardware Wizard" dialog box appears. 1. Select "Search for the best driver...

User Manual
Page 27
...CANON DR-3080CII SCSI" or "CANON DR-3080CII USB" in the "Imaging Device" directory. ● The displayed device name of time, unplug the power cord for safety's sake. 1. To turn the PC on. ● Wait at least 10 seconds before turning the scanner back on first, and then turn the scanner off the scanner. Installing... the Scanner 25 Note ● When connecting the DR-3080CII via USB. When the power indicator turns off, the scanner is off the PC. 2. Turn off . ...
...CANON DR-3080CII SCSI" or "CANON DR-3080CII USB" in the "Imaging Device" directory. ● The displayed device name of time, unplug the power cord for safety's sake. 1. To turn the PC on. ● Wait at least 10 seconds before turning the scanner back on first, and then turn the scanner off the scanner. Installing... the Scanner 25 Note ● When connecting the DR-3080CII via USB. When the power indicator turns off, the scanner is off the PC. 2. Turn off . ...

User Manual
Page 28
...which version of Windows you are using . The driver must back up the files listed below to be overwritten when you install this ISIS/TWAIN driver. Substitute the above folder names with the relevant folder names for Windows used with ISIS-compatible application software...Turn on as a user with the scanner contains the following software: ● ISIS/TWAIN driver This driver allows this application if necessary. Installing the ISIS/TWAIN Driver Follow the procedure described below . IMPORTANT If another ISIS-compatible driver is a TWAIN-compatible software application. Load the ...
...which version of Windows you are using . The driver must back up the files listed below to be overwritten when you install this ISIS/TWAIN driver. Substitute the above folder names with the relevant folder names for Windows used with ISIS-compatible application software...Turn on as a user with the scanner contains the following software: ● ISIS/TWAIN driver This driver allows this application if necessary. Installing the ISIS/TWAIN Driver Follow the procedure described below . IMPORTANT If another ISIS-compatible driver is a TWAIN-compatible software application. Load the ...

User Manual
Page 29
The Installer starts. 5. Note Installing the ISIS/TWAIN driver creates the following shortcuts in the Start menu: Installing the Software 27 The Run dialog box appears. 4. On the Start menu, click Run. Restart Windows when you have completed the installation. In the Open box, type "D:\Driver\Setup.exe" (where "D" is the letter assigned to your CD-ROM drive) and then click the OK button. Follow the instructions on the screen and complete the installation. 6. 3.
The Installer starts. 5. Note Installing the ISIS/TWAIN driver creates the following shortcuts in the Start menu: Installing the Software 27 The Run dialog box appears. 4. On the Start menu, click Run. Restart Windows when you have completed the installation. In the Open box, type "D:\Driver\Setup.exe" (where "D" is the letter assigned to your CD-ROM drive) and then click the OK button. Follow the instructions on the screen and complete the installation. 6. 3.

User Manual
Page 30
..." for the ISIS/TWAIN Driver for separating files without interrupting scanning. (See "Patch Code Sheets" on p.35) DR-3080CII Shading Tool Use this tool to launch the scanning application. Scan Panel 28 Installing the Software Canon DR-3080CII Help Online Help for the ISIS/TWAIN driver. (See "Using the ISIS/TWAIN Driver" on p.48) Scan Panel...
..." for the ISIS/TWAIN Driver for separating files without interrupting scanning. (See "Patch Code Sheets" on p.35) DR-3080CII Shading Tool Use this tool to launch the scanning application. Scan Panel 28 Installing the Software Canon DR-3080CII Help Online Help for the ISIS/TWAIN driver. (See "Using the ISIS/TWAIN Driver" on p.48) Scan Panel...
User Manual
Page 31
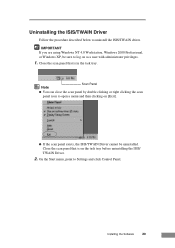
... XP, be sure to open a menu and then clicking on as a user with administrator privileges. 1. Close the scan panel that is in the task tray. Installing the Software 29 Uninstalling the ISIS/TWAIN Driver Follow the procedure described below to Settings and click Control Panel. Note Scan Panel ● You can...
... XP, be sure to open a menu and then clicking on as a user with administrator privileges. 1. Close the scan panel that is in the task tray. Installing the Software 29 Uninstalling the ISIS/TWAIN Driver Follow the procedure described below to Settings and click Control Panel. Note Scan Panel ● You can...
User Manual
Page 32
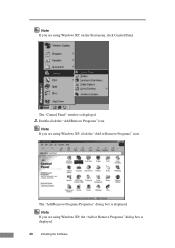
Note If you are using Windows XP, click the "Add or Remove Programs" icon. The "Add/Remove Programs Properties" dialog box is displayed. 3. Double-click the "Add/Remove Programs" icon. Note If you are using Windows XP, on the Start menu, click Control Panel. Note If you are using Windows XP, the "Add or Remove Programs" dialog box is displayed. 30 Installing the Software The "Control Panel" window is displayed.
Note If you are using Windows XP, click the "Add or Remove Programs" icon. The "Add/Remove Programs Properties" dialog box is displayed. 3. Double-click the "Add/Remove Programs" icon. Note If you are using Windows XP, on the Start menu, click Control Panel. Note If you are using Windows XP, the "Add or Remove Programs" dialog box is displayed. 30 Installing the Software The "Control Panel" window is displayed.
User Manual
Page 33
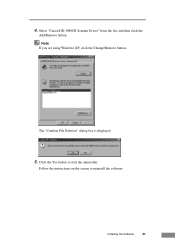
The "Confirm File Deletion" dialog box is displayed. 5. Follow the instructions on the screen to start the uninstaller. Note If you are using Windows XP, click the Change/Remove button. Installing the Software 31 Select "Canon DR-3080CII Scanner Driver" from the list, and then click the Add/Remove button. Click the Yes button to uninstall the software. 4.
The "Confirm File Deletion" dialog box is displayed. 5. Follow the instructions on the screen to start the uninstaller. Note If you are using Windows XP, click the Change/Remove button. Installing the Software 31 Select "Canon DR-3080CII Scanner Driver" from the list, and then click the Add/Remove button. Click the Yes button to uninstall the software. 4.


