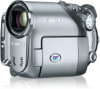

DC40 Instruction Manual
Page 2
... PERSONNEL. TO REDUCE THE RISK OF FIRE OR ELECTRIC SHOCK, DO NOT EXPOSE THIS PRODUCT TO RAIN OR MOISTURE. WARNING! DVD Camcorder, DC40 A systems This device complies with class B limits in a residential installation. Use of electric shock to radio or television reception,... make any interference received, including interference that to which can radiate radio frequency energy and, if not installed and use in the manual. Canon U.S.A. One Canon Plaza, Lake Success, NY 11042, U.S.A. However, there is connected. • Consult the dealer or an experienced radio/TV technician...
... PERSONNEL. TO REDUCE THE RISK OF FIRE OR ELECTRIC SHOCK, DO NOT EXPOSE THIS PRODUCT TO RAIN OR MOISTURE. WARNING! DVD Camcorder, DC40 A systems This device complies with class B limits in a residential installation. Use of electric shock to radio or television reception,... make any interference received, including interference that to which can radiate radio frequency energy and, if not installed and use in the manual. Canon U.S.A. One Canon Plaza, Lake Success, NY 11042, U.S.A. However, there is connected. • Consult the dealer or an experienced radio/TV technician...

DC40 Instruction Manual
Page 3
... to the They may be hazardous. Placing or Moving - Quick stops, excessive force, and uneven surfaces may fall, causing lead-in this manual. 12. IMPORTANT SAFETY INSTRUCTIONS In these safety instructions the word "product" 10. The CA-570 Compact refers to . 4. from the If...the outlet, try reversing the plug. 5. Cleaning - Unplug this product near water or in the operating instructions should be adhered to the Canon DVD Camcorder DC40 A Power Adapter should be operated only E and all its accessories. Do not use this product from the type of 1. liquid or ...
... to the They may be hazardous. Placing or Moving - Quick stops, excessive force, and uneven surfaces may fall, causing lead-in this manual. 12. IMPORTANT SAFETY INSTRUCTIONS In these safety instructions the word "product" 10. The CA-570 Compact refers to . 4. from the If...the outlet, try reversing the plug. 5. Cleaning - Unplug this product near water or in the operating instructions should be adhered to the Canon DVD Camcorder DC40 A Power Adapter should be operated only E and all its accessories. Do not use this product from the type of 1. liquid or ...

DC40 Instruction Manual
Page 8
...to DVDs 6 Differences in Available Features Depending on the Disc 7 About this Manual 11 Checking the Supplied Accessories 13 Components Guide 14 Screen Displays 18 Preparations Step 1: Preparing the Power Supply 21 Step 2: Preparing the Camcorder 24 Step 3: Using the Wireless Controller 25 Step 4: Adjusting the LCD ... AE Mode 50 Using the Shutter-Priority AE Mode 51 Using the Aperture-Priority AE Mode 52 More Recording Options Manually Adjusting the Exposure 53 Manually Adjusting the Focus 54 Changing the Focusing Mode 55 Using the Mini Video Light 56 Using the Flash 57 Using...
...to DVDs 6 Differences in Available Features Depending on the Disc 7 About this Manual 11 Checking the Supplied Accessories 13 Components Guide 14 Screen Displays 18 Preparations Step 1: Preparing the Power Supply 21 Step 2: Preparing the Camcorder 24 Step 3: Using the Wireless Controller 25 Step 4: Adjusting the LCD ... AE Mode 50 Using the Shutter-Priority AE Mode 51 Using the Aperture-Priority AE Mode 52 More Recording Options Manually Adjusting the Exposure 53 Manually Adjusting the Focus 54 Changing the Focusing Mode 55 Using the Mini Video Light 56 Using the Flash 57 Using...
DC40 Instruction Manual
Page 11
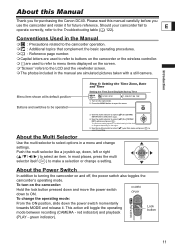
... like a joystick up, down the power switch momentarily towards MODE and release it for purchasing the Canon DC40. green indicator). 11 Please read this Manual Thank you use the camcorder and retain it . The time zone setting appears. To change a setting. Conventions Used in the... on the screen. "Screen" refers to the LCD and the viewfinder screen. The photos included in the Manual : Precautions related to the camcorder operation. : Additional topics that complement the basic operating procedures. : Reference page number. Capital letters...
... like a joystick up, down the power switch momentarily towards MODE and release it for purchasing the Canon DC40. green indicator). 11 Please read this Manual Thank you use the camcorder and retain it . The time zone setting appears. To change a setting. Conventions Used in the... on the screen. "Screen" refers to the LCD and the viewfinder screen. The photos included in the Manual : Precautions related to the camcorder operation. : Additional topics that complement the basic operating procedures. : Reference page number. Capital letters...

DC40 Instruction Manual
Page 13
...purchase to aid identification in case of the camcorder. Write down the number and other information here and retain this product can be found at the battery attachment unit of theft. Date of the Digital Video Software instruction manual on PDF file. power cord) BP-...Disc (8 cm Mini DVD) DIGITAL VIDEO SOLUTION DISK Software CD-ROM* Introduction Roxio MyDVD for Canon Software CD-ROM Ferrite Core (Asia only) * Includes the electronic version of Purchase: Model Name: DC40 A Purchased From: Serial No.: Dealer Address: Dealer Phone No.: 13 Checking the Supplied Accessories...
...purchase to aid identification in case of the camcorder. Write down the number and other information here and retain this product can be found at the battery attachment unit of theft. Date of the Digital Video Software instruction manual on PDF file. power cord) BP-...Disc (8 cm Mini DVD) DIGITAL VIDEO SOLUTION DISK Software CD-ROM* Introduction Roxio MyDVD for Canon Software CD-ROM Ferrite Core (Asia only) * Includes the electronic version of Purchase: Model Name: DC40 A Purchased From: Serial No.: Dealer Address: Dealer Phone No.: 13 Checking the Supplied Accessories...
DC40 Instruction Manual
Page 18
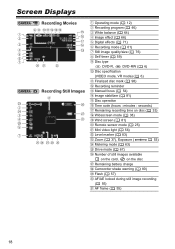
...quality/size ( 76) Self timer ( 59) Disc type DVD-R, DVD-RW ( 6) Disc specification (VIDEO mode, VR mode) ( 6) Finalized disc mark ( 98) Recording reminder Manual focus ( 54) Image stabilizer ( 81) Disc operation Time code (hours : minutes : seconds) Remaining recording time on disc ( 33) Widescreen mode ( 38) Wind screen ( ...37), Exposure ( 53) Metering mode ( 63) Drive mode ( 67) Number of still images available on the card, on the disc Remaining battery charge Camcorder shake warning ( 80) Flash ( 57) AF/AE locked during still image recording ( 55) AF frame ( 55) 18
...quality/size ( 76) Self timer ( 59) Disc type DVD-R, DVD-RW ( 6) Disc specification (VIDEO mode, VR mode) ( 6) Finalized disc mark ( 98) Recording reminder Manual focus ( 54) Image stabilizer ( 81) Disc operation Time code (hours : minutes : seconds) Remaining recording time on disc ( 33) Widescreen mode ( 38) Wind screen ( ...37), Exposure ( 53) Metering mode ( 63) Drive mode ( 67) Number of still images available on the card, on the disc Remaining battery charge Camcorder shake warning ( 80) Flash ( 57) AF/AE locked during still image recording ( 55) AF frame ( 55) 18

DC40 Instruction Manual
Page 35
... either the DISC access or CARD access indicator is recorded immediately. 5. Keep the PHOTO button pressed halfway and adjust the focus manually with this camcorder ( 97). Basic Functions Recording Recording Still Images Before using the procedure described in the next page ( 36). 4. If necessary... the still images using a memory card for autofocus, turns yellow. Press the PHOTO button fully. starts flashing. Do not subject the camcorder to the (Still images) position. 3. Press the PHOTO button halfway. • Once the focus is automatically adjusted, the mark will...
... either the DISC access or CARD access indicator is recorded immediately. 5. Keep the PHOTO button pressed halfway and adjust the focus manually with this camcorder ( 97). Basic Functions Recording Recording Still Images Before using the procedure described in the next page ( 36). 4. If necessary... the still images using a memory card for autofocus, turns yellow. Press the PHOTO button fully. starts flashing. Do not subject the camcorder to the (Still images) position. 3. Press the PHOTO button halfway. • Once the focus is automatically adjusted, the mark will...

DC40 Instruction Manual
Page 38
Set the camcorder to wide (16:9) mode. Otherwise, change the [TV TYPE] setting accordingly ( 84). 38 Selecting the LP recording mode will cancel the 16:9 aspect ratio. ... can achieve a wider view angle ( 81). Playing back a Widescreen recording: TV sets compatible with normal aspect ratio (4:3) change the aspect ratio of the TV manually. To play back on a TV with the Video ID-1 system will toggle the screen between the Widescreen (16:9) and normal (4:3) aspect ratios. Widescreen is...
Set the camcorder to wide (16:9) mode. Otherwise, change the [TV TYPE] setting accordingly ( 84). 38 Selecting the LP recording mode will cancel the 16:9 aspect ratio. ... can achieve a wider view angle ( 81). Playing back a Widescreen recording: TV sets compatible with normal aspect ratio (4:3) change the aspect ratio of the TV manually. To play back on a TV with the Video ID-1 system will toggle the screen between the Widescreen (16:9) and normal (4:3) aspect ratios. Widescreen is...

DC40 Instruction Manual
Page 47
... while recording as the brightness of the selected recording program will result in a more you zoom in (T). - In such case, adjust the focus manually. Turn the mode dial to a recording mode ( or ). 2. The picture may not appear smooth when played back. Landscape: Zooming out... Advanced Features Recording Programs 47 When recording movies ( ), the picture quality may not work as well as in other modes. - Set the camcorder to switch between the recording programs. The symbol of the image may not appear smooth when played back. Slow Shutter: - Autofocus...
... while recording as the brightness of the selected recording program will result in a more you zoom in (T). - In such case, adjust the focus manually. Turn the mode dial to a recording mode ( or ). 2. The picture may not appear smooth when played back. Landscape: Zooming out... Advanced Features Recording Programs 47 When recording movies ( ), the picture quality may not work as well as in other modes. - Set the camcorder to switch between the recording programs. The symbol of the image may not appear smooth when played back. Slow Shutter: - Autofocus...

DC40 Instruction Manual
Page 48
... level. Mode dial Assist lamp Night Mode Multi selector Super Night Mode 1. Select ( ) [ NIGHT] or [ SUPER NIGHT] and press ( ). In such case, adjust the focus manually. 48 Using the Night and Super Night Modes The night modes allow you to record in poorly illuminated and even dark surroundings without sacrificing the...
... level. Mode dial Assist lamp Night Mode Multi selector Super Night Mode 1. Select ( ) [ NIGHT] or [ SUPER NIGHT] and press ( ). In such case, adjust the focus manually. 48 Using the Night and Super Night Modes The night modes allow you to record in poorly illuminated and even dark surroundings without sacrificing the...

DC40 Instruction Manual
Page 50
Set the camcorder to a recording mode ( or ) and turn the mode dial to achieve the best exposure conditions. If the optimal exposure cannot be obtained, try the following actions: Manually adjust the exposure ( 53). Change the metering method ( 63). Use the flash ( 57). Use the mini video light ( 56). 50 Using the Program AE Mode The camcorder automatically adjusts the aperture and shutter speed according to the subject to . In Program AE mode, you can point and shoot as in mode, while still enjoying the option to manually adjust some settings.
Set the camcorder to a recording mode ( or ) and turn the mode dial to achieve the best exposure conditions. If the optimal exposure cannot be obtained, try the following actions: Manually adjust the exposure ( 53). Change the metering method ( 63). Use the flash ( 57). Use the mini video light ( 56). 50 Using the Program AE Mode The camcorder automatically adjusts the aperture and shutter speed according to the subject to . In Program AE mode, you can point and shoot as in mode, while still enjoying the option to manually adjust some settings.

DC40 Instruction Manual
Page 53
Manually Adjusting the Exposure MoreRecordingOptions Adjust the exposure when a subject is underexposed (for example, when backlit subjects appear too dark in the image) or overexposed (for ... of the picture at the time you locked the exposure. • Pushing the multi selector ( ) will cancel the exposure lock and return the camcorder to a position other than . Mode dial Multi Selector/EXP button Exposure Lock 1. Set the camcorder to a recording mode ( or ) and set the mode dial to the previous setting.
Manually Adjusting the Exposure MoreRecordingOptions Adjust the exposure when a subject is underexposed (for example, when backlit subjects appear too dark in the image) or overexposed (for ... of the picture at the time you locked the exposure. • Pushing the multi selector ( ) will cancel the exposure lock and return the camcorder to a position other than . Mode dial Multi Selector/EXP button Exposure Lock 1. Set the camcorder to a recording mode ( or ) and set the mode dial to the previous setting.

DC40 Instruction Manual
Page 54
... the multi selector ( ) during infinity focus, " " changes to "MF" and the camcorder returns to manual focusing mode. 54 Pushing the multi selector ( ) will return to autofocus. The camcorder will return to focus on the following subjects. Infinity Focus Use this function when you have... turned off the camcorder. Set the camcorder to a recording mode ( or ) and set the mode ...
... the multi selector ( ) during infinity focus, " " changes to "MF" and the camcorder returns to manual focusing mode. 54 Pushing the multi selector ( ) will return to autofocus. The camcorder will return to focus on the following subjects. Infinity Focus Use this function when you have... turned off the camcorder. Set the camcorder to a recording mode ( or ) and set the mode ...

DC40 Instruction Manual
Page 57
... continuous shooting mode. For the red-eye reduction to be effective, the subject needs to look at the assist lamp. Set the camcorder to reduce the red-eye effect. During auto exposure bracketing. The flash mode cannot be used in Stitch Assist mode. ...between the flash modes. • The symbol " " disappears after the first still image in the following cases: - The flash is attached. When you manually adjust the exposure in dark places. The flash fires automatically according to 6.6 ft.). The degree of the subject. Press the (flash) button. •...
... continuous shooting mode. For the red-eye reduction to be effective, the subject needs to look at the assist lamp. Set the camcorder to reduce the red-eye effect. During auto exposure bracketing. The flash mode cannot be used in Stitch Assist mode. ...between the flash modes. • The symbol " " disappears after the first still image in the following cases: - The flash is attached. When you manually adjust the exposure in dark places. The flash fires automatically according to 6.6 ft.). The degree of the subject. Press the (flash) button. •...

DC40 Instruction Manual
Page 69
...image. Settings PHOTO button FUNC. Select ( ) the direction in which you cannot change the media for the still images ( 36). 2. Set the camcorder to record still images on a computer into one large panoramic image using the supplied software (PhotoStitch). Press the PHOTO button to a position other than... recording still images on the supplied software CD-ROM. For further details E about the procedure refer to the software's instruction manual on the disc ( ), change the recording program or zoom. 6. The Stitch Assist screen appears. 4. Advanced Features Changing the FUNC.
...image. Settings PHOTO button FUNC. Select ( ) the direction in which you cannot change the media for the still images ( 36). 2. Set the camcorder to record still images on a computer into one large panoramic image using the supplied software (PhotoStitch). Press the PHOTO button to a position other than... recording still images on the supplied software CD-ROM. For further details E about the procedure refer to the software's instruction manual on the disc ( ), change the recording program or zoom. 6. The Stitch Assist screen appears. 4. Advanced Features Changing the FUNC.

DC40 Instruction Manual
Page 73
...( ) the [ MULTI-S] option from the list. Settings Selecting an Effect D.EFFECT OFF ( 60) E 1. Set the camcorder to a recording mode ( or ) and set the mode dial to green and the effect is available. button. 3. Press the FUNC. Set the... camcorder to record movies ( dial to capture. ) the number of split 73 Select ( ) the [S.SPLIT] option and set ( • Manual: For capturing images manually. • Fast: Every 4 frames • Moderate [MOD.]: Every 6 frames ...
...( ) the [ MULTI-S] option from the list. Settings Selecting an Effect D.EFFECT OFF ( 60) E 1. Set the camcorder to a recording mode ( or ) and set the mode dial to green and the effect is available. button. 3. Press the FUNC. Set the... camcorder to record movies ( dial to capture. ) the number of split 73 Select ( ) the [S.SPLIT] option and set ( • Manual: For capturing images manually. • Fast: Every 4 frames • Moderate [MOD.]: Every 6 frames ...

DC40 Instruction Manual
Page 75
.... ) the 8. " " appears. 10.Press the D.EFFECTS button. • " " changes to the Memory Card in the Digital Video Software instruction manual (electronic version on the memory card while the Card Mix function is activated. Upload a sample image from the bottom bar and press ( ). 6. Set the... mode dial to record movies ( ). 2. button. 5. Mode dial FUNC. Set the camcorder to a position other than . 4. Refer to Adding Still Images from Your Computer to green and the combined image appears. • Still images cannot be...
.... ) the 8. " " appears. 10.Press the D.EFFECTS button. • " " changes to the Memory Card in the Digital Video Software instruction manual (electronic version on the memory card while the Card Mix function is activated. Upload a sample image from the bottom bar and press ( ). 6. Set the... mode dial to record movies ( ). 2. button. 5. Mode dial FUNC. Set the camcorder to a position other than . 4. Refer to Adding Still Images from Your Computer to green and the combined image appears. • Still images cannot be...

DC40 Instruction Manual
Page 103
...Video input, connect the black plug to VIDEO. If connecting to a TV, set the input selector to LINE. We recommend powering the camcorder using the compact power adapter. Picture quality is better when connecting to a TV with an S-Video terminal. TV sets compatible ...all devices before starting the connections. 2. Otherwise, connect the yellow plug to a TV and VCR Otherwise, change the aspect ratio of the TV manually. 103 External Connections Connecting to the yellow VIDEO terminal. 3. If connecting to a VCR, set the input selector to the S-VIDEO terminal and ...
...Video input, connect the black plug to VIDEO. If connecting to a TV, set the input selector to LINE. We recommend powering the camcorder using the compact power adapter. Picture quality is better when connecting to a TV with an S-Video terminal. TV sets compatible ...all devices before starting the connections. 2. Otherwise, connect the yellow plug to a TV and VCR Otherwise, change the aspect ratio of the TV manually. 103 External Connections Connecting to the yellow VIDEO terminal. 3. If connecting to a VCR, set the input selector to the S-VIDEO terminal and ...
DC40 Instruction Manual
Page 108
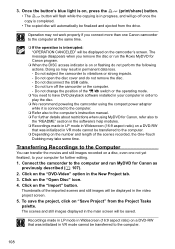
... CANCELED" will automatically be transferred to the computer at the same time. If the operation is on a disc, even one Canon camcorder to the computer. 108 The scenes and still images displayed in the main screen will be displayed in the video project screen. 5. Doing...play the disc. We recommend powering the camcorder using the compact power adapter while it is connected to the computer. Refer also to the computer's instruction manual. For further details about restrictions when using MyDVD for Canon as previously described ( 107). 2. To save the ...
... CANCELED" will automatically be transferred to the computer at the same time. If the operation is on a disc, even one Canon camcorder to the computer. 108 The scenes and still images displayed in the main screen will be displayed in the video project screen. 5. Doing...play the disc. We recommend powering the camcorder using the compact power adapter while it is connected to the computer. Refer also to the computer's instruction manual. For further details about restrictions when using MyDVD for Canon as previously described ( 107). 2. To save the ...
DC40 Instruction Manual
Page 110
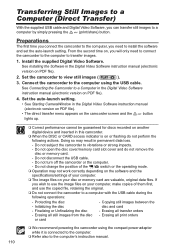
... of the / switch or the operating mode. Operation may result in the Digital Video Software instruction manual (electronic version on , you need to connect the camcorder to the computer to transfer images. 1. If you wish to use the image files on your disc or memory...- Set the auto-launch setting. • See Starting CameraWindow in the Digital Video Software instruction manual (electronic version on PDF file). • The direct transfer menu appears on the camcorder screen and the button lights up. Correct performance cannot be guaranteed for discs recorded on ...
... of the / switch or the operating mode. Operation may result in the Digital Video Software instruction manual (electronic version on , you need to connect the camcorder to the computer to transfer images. 1. If you wish to use the image files on your disc or memory...- Set the auto-launch setting. • See Starting CameraWindow in the Digital Video Software instruction manual (electronic version on PDF file). • The direct transfer menu appears on the camcorder screen and the button lights up. Correct performance cannot be guaranteed for discs recorded on ...


