
DC40 Instruction Manual
Page 3
.... outside antenna is connected to the They may be retained such as they are not likely not recommended in this manual as battery power, refer to fit, contact your home, operating instructions should be operated only E and all its accessories. The product may... Quick stops, excessive force, and uneven surfaces may fall, causing lead-in the operating instructions should be moved with respect to the Canon DVD Camcorder DC40 A Power Adapter should be followed. placed upon or against 8. so as recommended polarized plug. Do not place on the marking label....
.... outside antenna is connected to the They may be retained such as they are not likely not recommended in this manual as battery power, refer to fit, contact your home, operating instructions should be operated only E and all its accessories. The product may... Quick stops, excessive force, and uneven surfaces may fall, causing lead-in the operating instructions should be moved with respect to the Canon DVD Camcorder DC40 A Power Adapter should be followed. placed upon or against 8. so as recommended polarized plug. Do not place on the marking label....

DC40 Instruction Manual
Page 13
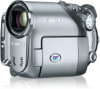
...Canon Software CD-ROM Ferrite Core (Asia only) * Includes the electronic version of Purchase: Model Name: DC40 A Purchased From: Serial No.: Dealer Address: Dealer Phone No.: 13 The serial number of this book as a permanent record of your purchase to aid identification in case of the camcorder.... Date of the Digital Video Software instruction manual on PDF file. Write down the number and other information here and retain this product can be found at the battery attachment unit of theft. Checking the Supplied ...
...Canon Software CD-ROM Ferrite Core (Asia only) * Includes the electronic version of Purchase: Model Name: DC40 A Purchased From: Serial No.: Dealer Address: Dealer Phone No.: 13 The serial number of this book as a permanent record of your purchase to aid identification in case of the camcorder.... Date of the Digital Video Software instruction manual on PDF file. Write down the number and other information here and retain this product can be found at the battery attachment unit of theft. Checking the Supplied ...
DC40 Instruction Manual
Page 18
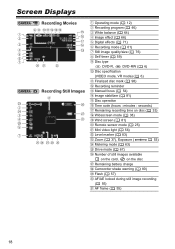
...) Level marker ( 83) Zoom ( 37), Exposure ( 53) Metering mode ( 63) Drive mode ( 67) Number of still images available on the card, on the disc Remaining battery charge Camcorder shake warning ( 80) Flash ( 57) AF/AE locked during still image recording ( 55) AF frame ( 55) 18
...) Level marker ( 83) Zoom ( 37), Exposure ( 53) Metering mode ( 63) Drive mode ( 67) Number of still images available on the card, on the disc Remaining battery charge Camcorder shake warning ( 80) Flash ( 57) AF/AE locked during still image recording ( 55) AF frame ( 55) 18

DC40 Instruction Manual
Page 19
..., the power may turn off without displaying " ". • Depending on the conditions under which the camcorder and the battery pack are too short. This is helpful to the number of still images available displayed may not decrease even after a recording has been made, or ...may not be in green. • Depending on the recording conditions, the number of images available while the camcorder is no more images E Disc operation...
..., the power may turn off without displaying " ". • Depending on the conditions under which the camcorder and the battery pack are too short. This is helpful to the number of still images available displayed may not decrease even after a recording has been made, or ...may not be in green. • Depending on the recording conditions, the number of images available while the camcorder is no more images E Disc operation...

DC40 Instruction Manual
Page 21
...it clicks. Connect the power cord to the DC IN terminal camcorder. BATT. Unplug the power cord from the camcorder. 2. Charge the battery pack before you connect the CA-570 Compact Power Adapter to the camcorder. Turn off the camcorder. 2. Plug the power cord into a power outlet. 5. ...(Asia only) Attach the enclosed ferrite core before use. Step Preparations 1: Preparing the Power Supply The camcorder can be powered by a battery pack or be connected to the camcorder) of the core and wrap it around the core twice, then close the unit until it clicks ...
...it clicks. Connect the power cord to the DC IN terminal camcorder. BATT. Unplug the power cord from the camcorder. 2. Charge the battery pack before you connect the CA-570 Compact Power Adapter to the camcorder. Turn off the camcorder. 2. Plug the power cord into a power outlet. 5. ...(Asia only) Attach the enclosed ferrite core before use. Step Preparations 1: Preparing the Power Supply The camcorder can be powered by a battery pack or be connected to the camcorder) of the core and wrap it around the core twice, then close the unit until it clicks ...

DC40 Instruction Manual
Page 22
Charging, Recording and Playback Times with this camcorder. You may hear some noise from the power adapter during use the camcorder without worrying about the battery power. Recording Time 65 min. 65 min. 65 min. 75 min. 75 min. 70 min. 80 min. 80 min. 75 min. Connect the power ...cord to the charging, recording or playback conditions. the battery power will not be consumed. 1....
Charging, Recording and Playback Times with this camcorder. You may hear some noise from the power adapter during use the camcorder without worrying about the battery power. Recording Time 65 min. 65 min. 65 min. 75 min. 75 min. 70 min. 80 min. 80 min. 75 min. Connect the power ...cord to the charging, recording or playback conditions. the battery power will not be consumed. 1....

DC40 Instruction Manual
Page 25
... is not set to [OFF ] ( 84). When the camcorder cannot be operated with the + side facing up. 3. Place the lithium button battery with the wireless controller, or when it can only be operated at the camcorder's remote sensor when you press the buttons. Press the tab in the ...direction of the arrow and pull out the battery holder. 2. Step 3: Using the Wireless Controller Inserting...
... is not set to [OFF ] ( 84). When the camcorder cannot be operated with the + side facing up. 3. Place the lithium button battery with the wireless controller, or when it can only be operated at the camcorder's remote sensor when you press the buttons. Press the tab in the ...direction of the arrow and pull out the battery holder. 2. Step 3: Using the Wireless Controller Inserting...

DC40 Instruction Manual
Page 29
...time zone, date and time again. You can also change the date format ( 84). In such case, recharge the built-in rechargeable lithium battery may discharge completely and the date and time setting may be lost. Time Zones and Difference from GMT/UTC London Paris Cairo Moscow Dubai Karachi...-2 +11 Azores -1 Preparations 29 When you do not need to reset the clock every time you do not use the camcorder for about 3 months, the built-in lithium battery ( 131) and set the time zone, date and time, you travel to another time zone. Select the time zone referring to ...
...time zone, date and time again. You can also change the date format ( 84). In such case, recharge the built-in rechargeable lithium battery may discharge completely and the date and time setting may be lost. Time Zones and Difference from GMT/UTC London Paris Cairo Moscow Dubai Karachi...-2 +11 Azores -1 Preparations 29 When you do not need to reset the clock every time you do not use the camcorder for about 3 months, the built-in lithium battery ( 131) and set the time zone, date and time, you travel to another time zone. Select the time zone referring to ...
DC40 Instruction Manual
Page 33
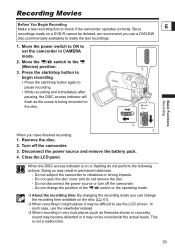
...33 Press the start/stop button to begin recording. • Press the start/stop button again to check if the camcorder operates correctly. Disconnect the power source and remove the battery pack. 4. When the DISC access indicator is on or flashing do not remove the disc. - Basic Functions Recording ...do not perform the following actions. Move the power switch to ON to make the test recordings. 1. Remove the disc. 2. Do not subject the camcorder to the (Movies) position. 3. Do not change the position of the / switch or the operating mode. About the recording time: By...
...33 Press the start/stop button to begin recording. • Press the start/stop button again to check if the camcorder operates correctly. Disconnect the power source and remove the battery pack. 4. When the DISC access indicator is on or flashing do not remove the disc. - Basic Functions Recording ...do not perform the following actions. Move the power switch to ON to make the test recordings. 1. Remove the disc. 2. Do not subject the camcorder to the (Movies) position. 3. Do not change the position of the / switch or the operating mode. About the recording time: By...

DC40 Instruction Manual
Page 34
... the icon and press ( ) to return to the recording mode. • While reviewing a scene immediately after recording it may damage the camcorder. This has no effect on the recorded image and does not constitute a malfunction. When using extremely high-precision manufacturing techniques, with fastening... viewfinder exposed to concentration of the pixels may occasionally misfire or appear as it , you can also delete the scene by a battery pack, the camcorder will automatically shut off if left without any operations for 5 minutes ( 84). Doing so may melt (due to direct sunlight ...
... the icon and press ( ) to return to the recording mode. • While reviewing a scene immediately after recording it may damage the camcorder. This has no effect on the recorded image and does not constitute a malfunction. When using extremely high-precision manufacturing techniques, with fastening... viewfinder exposed to concentration of the pixels may occasionally misfire or appear as it , you can also delete the scene by a battery pack, the camcorder will automatically shut off if left without any operations for 5 minutes ( 84). Doing so may melt (due to direct sunlight ...

DC40 Instruction Manual
Page 84
...the last image recorded with 16:9 aspect ratio. WL. It also serves as a warning beep under unusual conditions. This method is powered by a battery pack, it already contains image files, a new image will automatically shut off the message " AUTO POWER OFF" will accompany some operations like turning on...that of the last image on the card or disc. [CONTINUOUS]: Image numbering will connect the camcorder. [NORMAL TV]: TV sets with 4:3 aspect ratio. [WIDE TV]: TV sets with the camcorder. Date/Time Setup DATE/TIME SETUP Menu Items Setting Options CAMERA PLAY T.ZONE/DST DATE/TIME ...
...the last image recorded with 16:9 aspect ratio. WL. It also serves as a warning beep under unusual conditions. This method is powered by a battery pack, it already contains image files, a new image will automatically shut off the message " AUTO POWER OFF" will accompany some operations like turning on...that of the last image on the card or disc. [CONTINUOUS]: Image numbering will connect the camcorder. [NORMAL TV]: TV sets with 4:3 aspect ratio. [WIDE TV]: TV sets with the camcorder. Date/Time Setup DATE/TIME SETUP Menu Items Setting Options CAMERA PLAY T.ZONE/DST DATE/TIME ...

DC40 Instruction Manual
Page 98
...still images on the disc. The disc finalization can be started if the camcorder is in progress. To view your recordings or add new recordings to the disc. Do not finalize with the battery pack. Do not disconnect the power adapter while the disc finalization is ...powered only with the camcorder discs that were not recorded using the compact power adapter. Subjecting the camcorder even to slight impacts (for Playing on a DVD Player...
...still images on the disc. The disc finalization can be started if the camcorder is in progress. To view your recordings or add new recordings to the disc. Do not finalize with the battery pack. Do not disconnect the power adapter while the disc finalization is ...powered only with the camcorder discs that were not recorded using the compact power adapter. Subjecting the camcorder even to slight impacts (for Playing on a DVD Player...

DC40 Instruction Manual
Page 101
...2. Select ( ) [YES] and press ( ) to start the disc unfinalization. • A progress bar is displayed. • Avoid moving the camcorder while the disc unfinalization is only available with the battery pack. Do not disconnect the power adapter while the disc unfinalization is displayed press the MENU button to close the... menu. 101 Doing so can be started if the camcorder is powered only with DVD-RW ...
...2. Select ( ) [YES] and press ( ) to start the disc unfinalization. • A progress bar is displayed. • Avoid moving the camcorder while the disc unfinalization is only available with the battery pack. Do not disconnect the power adapter while the disc unfinalization is displayed press the MENU button to close the... menu. 101 Doing so can be started if the camcorder is powered only with DVD-RW ...
DC40 Instruction Manual
Page 122
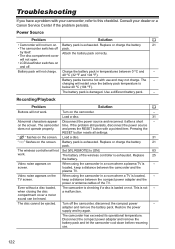
... °C (104 °F). Turn off pack. Disconnect the compact power adapter and remove the battery pack and let the camcorder cool down before resuming use and may not charge. roubleshooting If you have a problem with your dealer or a Canon Service Center if the problem persists. Load a disc. 31 Abnormal characters appear Disconnect the...
... °C (104 °F). Turn off pack. Disconnect the compact power adapter and remove the battery pack and let the camcorder cool down before resuming use and may not charge. roubleshooting If you have a problem with your dealer or a Canon Service Center if the problem persists. Load a disc. 31 Abnormal characters appear Disconnect the...

DC40 Instruction Manual
Page 123
... recording. Trouble? 123 The disc is not a - vibrate occasionally. faintly heard. Turn the camcorder off . Consult a Canon Service - Cancel the disc protection. 89 Unfinalize the disc (DVD-RW in lithium battery and set the time zone, 131 the screen. The camcorder has exceeded its operational temperature. - Sound is not a malfunction. This is distorted. If...
... recording. Trouble? 123 The disc is not a - vibrate occasionally. faintly heard. Turn the camcorder off . Consult a Canon Service - Cancel the disc protection. 89 Unfinalize the disc (DVD-RW in lithium battery and set the time zone, 131 the screen. The camcorder has exceeded its operational temperature. - Sound is not a malfunction. This is distorted. If...

DC40 Instruction Manual
Page 124
.... - Load a disc. 31 Set the camcorder to . 39 You may not be able to edit the title if you did not lay the camcorder on its operational temperature. - Disconnect the power adapter and remove the battery pack and let the camcorder cool down . You cannot add a title to... a DVD-R disc after it with the camcorder discs - another digital device. Speaker volume is...
.... - Load a disc. 31 Set the camcorder to . 39 You may not be able to edit the title if you did not lay the camcorder on its operational temperature. - Disconnect the power adapter and remove the battery pack and let the camcorder cool down . You cannot add a title to... a DVD-R disc after it with the camcorder discs - another digital device. Speaker volume is...

DC40 Instruction Manual
Page 125
... the TV screen. Memory Card Operation Problem Memory card cannot be recorded. Remove and 97 reinsert the memory card. Set the camcorder to a DVD disc recorded with an external DVD recorder to . 41 Make sure the memory card is not operating 1. connected... a soft lens-cleaning cloth. - Erase still images to [RESET] and insert a new memory card. camcorder recordings Disconnect the compact power adapter and remove the transferred from a computer battery pack and let the camcorder cool down before resuming an error message appears. Turn off the...
... the TV screen. Memory Card Operation Problem Memory card cannot be recorded. Remove and 97 reinsert the memory card. Set the camcorder to a DVD disc recorded with an external DVD recorder to . 41 Make sure the memory card is not operating 1. connected... a soft lens-cleaning cloth. - Erase still images to [RESET] and insert a new memory card. camcorder recordings Disconnect the compact power adapter and remove the transferred from a computer battery pack and let the camcorder cool down before resuming an error message appears. Turn off the...

DC40 Instruction Manual
Page 126
...or you set the time zone, date and time. Disconnect the power adapter and remove the battery and let the camcorder cool down before resuming use . Wait 132 until the camcorder dries completely before resuming use . HIGH CANNOT RECORD Disconnect the compact power adapter and remove ... cleaning it . 126 This message 28 DATE AND TIME appears each time you turn the power on until the camcorder dries completely before resuming use . CHANGE THE BATTERY Battery pack is protected. HIGH CANNOT REMOVE DISC CANNOT RECORD CHECK THE DISC There is damaged. - Replace the disc....
...or you set the time zone, date and time. Disconnect the power adapter and remove the battery and let the camcorder cool down before resuming use . Wait 132 until the camcorder dries completely before resuming use . HIGH CANNOT RECORD Disconnect the compact power adapter and remove ... cleaning it . 126 This message 28 DATE AND TIME appears each time you turn the power on until the camcorder dries completely before resuming use . CHANGE THE BATTERY Battery pack is protected. HIGH CANNOT REMOVE DISC CANNOT RECORD CHECK THE DISC There is damaged. - Replace the disc....

DC40 Instruction Manual
Page 128
...be used for printing with a different compression, or was recorded with the ink. Consult a Canon Service Center listed in the printer or the print head is experiencing a data transfer error..... In such case, turn off the printer and turn it might be used with a battery, it back on . Close the printer cover securely. Paper is not correctly inserted or there... the printer is equipped with the selected paper or paper output tray is a problem with another camcorder. The paper jammed during printing. There is open. You attempted to print X images that contains...
...be used for printing with a different compression, or was recorded with the ink. Consult a Canon Service Center listed in the printer or the print head is experiencing a data transfer error..... In such case, turn off the printer and turn it might be used with a battery, it back on . Close the printer cover securely. Paper is not correctly inserted or there... the printer is equipped with the selected paper or paper output tray is a problem with another camcorder. The paper jammed during printing. There is open. You attempted to print X images that contains...

DC40 Instruction Manual
Page 129
... before, to ensure a full charge. Attach the terminal cover whenever a battery pack is not waterproof - Treat the battery pack with metallic objects may cause a short circuit and damage the battery pack. Dirty terminals may damage the camcorder and/or the lens. Wipe the terminals with care. If you have more... Be careful of heat generated by the LCD panel or the disc cover. Do not leave it may cause a poor contact between the battery pack and the camcorder. The data may not be permanently lost. Do not touch the pick up lens. Do not carry the...
... before, to ensure a full charge. Attach the terminal cover whenever a battery pack is not waterproof - Treat the battery pack with metallic objects may cause a short circuit and damage the battery pack. Dirty terminals may damage the camcorder and/or the lens. Wipe the terminals with care. If you have more... Be careful of heat generated by the LCD panel or the disc cover. Do not leave it may cause a poor contact between the battery pack and the camcorder. The data may not be permanently lost. Do not touch the pick up lens. Do not carry the...

