Digital Video Software (Macintosh) Ver.19 Instruction Manual
Page 3
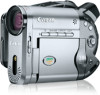
... your computer. • IFC-300PCU USB Cable • DIGITAL VIDEO SOLUTION DISK Macintosh The explanations in this manual use mainly Mac OS X version 10.3 screen shots. Canon reserves the right to change the specifications of the hardware and software described herein at any time without prior notice...software, memory cards (miniSD Cards), personal computers, or peripheral devices, or due to use of a memory card not formatted by a Canon camcorder. „ Trademark Acknowledgments • Macintosh and Mac OS are trademarks of Apple Computer, Inc., registered in the United States and ...
... your computer. • IFC-300PCU USB Cable • DIGITAL VIDEO SOLUTION DISK Macintosh The explanations in this manual use mainly Mac OS X version 10.3 screen shots. Canon reserves the right to change the specifications of the hardware and software described herein at any time without prior notice...software, memory cards (miniSD Cards), personal computers, or peripheral devices, or due to use of a memory card not formatted by a Canon camcorder. „ Trademark Acknowledgments • Macintosh and Mac OS are trademarks of Apple Computer, Inc., registered in the United States and ...

Digital Video Software (Macintosh) Ver.19 Instruction Manual
Page 9
... may not function correctly if the camcorder is being powered using other devices from the computer and try reconnecting the camcorder. Do not connect two or more camcorders to the same computer via the USB interface. Refer to your computer manual for the location of the computer's... connecting it to a computer. Connect the USB cable directly to one of the computer's USB ports. See your camcorder instruction manual for how to connect the camcorder to the computer and how to change the media setting (MEDIA SEL. ) in the SYSTEM SETUP menu. 1 Insert a disc or...
... may not function correctly if the camcorder is being powered using other devices from the computer and try reconnecting the camcorder. Do not connect two or more camcorders to the same computer via the USB interface. Refer to your computer manual for the location of the computer's... connecting it to a computer. Connect the USB cable directly to one of the computer's USB ports. See your camcorder instruction manual for how to connect the camcorder to the computer and how to change the media setting (MEDIA SEL. ) in the SYSTEM SETUP menu. 1 Insert a disc or...

Digital Video Software (Macintosh) Ver.19 Instruction Manual
Page 11
... When using the USB cable. You cannot record any new images on your computer's DVD drive. To start the Camera Control window manually, double-click the [Canon CameraWindow] icon located on the computer you may cause disc or memory card data to the hard disk are using the DVD drive ...to download the images recorded on the disc, it . Observe the following precautions when the camcorder's access indicator is not on the desktop, double click the [Canon Utilities] folder on the drive where the program was recorded or used in the Camera Control window. „ Auto-...
... When using the USB cable. You cannot record any new images on your computer's DVD drive. To start the Camera Control window manually, double-click the [Canon CameraWindow] icon located on the computer you may cause disc or memory card data to the hard disk are using the DVD drive ...to download the images recorded on the disc, it . Observe the following precautions when the camcorder's access indicator is not on the desktop, double click the [Canon Utilities] folder on the drive where the program was recorded or used in the Camera Control window. „ Auto-...
Digital Video Software (Macintosh) Ver.19 Instruction Manual
Page 17
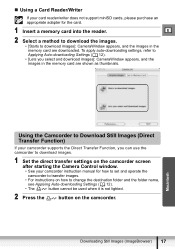
...an appropriate adapter for how to set and operate the camcorder to transfer images. • For instructions on the camcorder. Macintosh Using the Camcorder to Download Still Images (Direct Transfer Function) If your camcorder supports the Direct Transfer Function, you select and download images... images in the memory card are shown as thumbnails. Downloading Still Images (ImageBrowser) 17 „ Using a Card Reader/Writer If your camcorder instruction manual for the card. 1 Insert a memory card into the reader. E 2 Select a method to download the images. • [Starts...
...an appropriate adapter for how to set and operate the camcorder to transfer images. • For instructions on the camcorder. Macintosh Using the Camcorder to Download Still Images (Direct Transfer Function) If your camcorder supports the Direct Transfer Function, you select and download images... images in the memory card are shown as thumbnails. Downloading Still Images (ImageBrowser) 17 „ Using a Card Reader/Writer If your camcorder instruction manual for the card. 1 Insert a memory card into the reader. E 2 Select a method to download the images. • [Starts...
Digital Video Software (Macintosh) Ver.19 Instruction Manual
Page 45
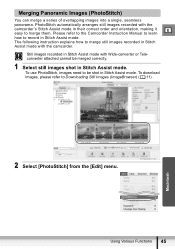
...mode. To download images, please refer to be merged correctly. 1 Select still images shot in Stitch Assist mode with the camcorder. To use PhotoStitch, images need to Downloading Still Images (ImageBrowser) ( 11). The following instruction explains how to merge them.... attached cannot be shot in Stitch Assist mode. Macintosh 2 Select [PhotoStitch] from the [Edit] menu. Please refer to the Camcorder Instruction Manual to learn how to record in Stitch Assist mode. Merging Panoramic Images (PhotoStitch) You can merge a series of overlapping images into...
...mode. To download images, please refer to be merged correctly. 1 Select still images shot in Stitch Assist mode with the camcorder. To use PhotoStitch, images need to Downloading Still Images (ImageBrowser) ( 11). The following instruction explains how to merge them.... attached cannot be shot in Stitch Assist mode. Macintosh 2 Select [PhotoStitch] from the [Edit] menu. Please refer to the Camcorder Instruction Manual to learn how to record in Stitch Assist mode. Merging Panoramic Images (PhotoStitch) You can merge a series of overlapping images into...

DC20/DC10 Instruction Manual
Page 3
... child or adult, and size of grounding conductors, location of 1. Heed Warnings - All warnings on the marking label. Unplug this manual. Power cords 6. Placing or Moving - grounding electrodes, and requirements A product and cart for future reference. 11. Retain Instructions - ... magnetic radiation. Quick stops, excessive force, and uneven surfaces may be retained such as battery power, refer to the Canon DVD Camcorder DC20/ Power Adapter should be followed. The CA-570 Compact Introduction 3. Power Adapter is operated. Power Cord Protection - placed...
... child or adult, and size of grounding conductors, location of 1. Heed Warnings - All warnings on the marking label. Unplug this manual. Power cords 6. Placing or Moving - grounding electrodes, and requirements A product and cart for future reference. 11. Retain Instructions - ... magnetic radiation. Quick stops, excessive force, and uneven surfaces may be retained such as battery power, refer to the Canon DVD Camcorder DC20/ Power Adapter should be followed. The CA-570 Compact Introduction 3. Power Adapter is operated. Power Cord Protection - placed...

DC20/DC10 Instruction Manual
Page 8
... Introduction An Introduction to DVDs 5 The Advantages of DVDs 6 About this Manual 11 Checking the Supplied Accessories 13 Components Guide 14 Screen Displays 18 Preparations Step 1: Preparing the Power Supply 21 Step 2: Preparing the Camcorder 24 Step 3: Using the Wireless Controller 25 Step 4: Adjusting the LCD ... AE Mode 48 Using the Shutter-Priority AE Mode 49 Using the Aperture-Priority AE Mode 50 More Recording Options Manually Adjusting the Exposure 51 Manually Adjusting the Focus and Changing the Focusing Mode 52 Recording in Widescreen (16:9 Aspect Ratio 54 Using the Mini...
... Introduction An Introduction to DVDs 5 The Advantages of DVDs 6 About this Manual 11 Checking the Supplied Accessories 13 Components Guide 14 Screen Displays 18 Preparations Step 1: Preparing the Power Supply 21 Step 2: Preparing the Camcorder 24 Step 3: Using the Wireless Controller 25 Step 4: Adjusting the LCD ... AE Mode 48 Using the Shutter-Priority AE Mode 49 Using the Aperture-Priority AE Mode 50 More Recording Options Manually Adjusting the Exposure 51 Manually Adjusting the Focus and Changing the Focusing Mode 52 Recording in Widescreen (16:9 Aspect Ratio 54 Using the Mini...

DC20/DC10 Instruction Manual
Page 11
... retain it for purchasing the Canon DC20/DC10. Push the omni selector like a joystick up, down, left or right ( / / / ) to make a selection or change settings. In most places, press the omni selector itself ( ) to select an item. About this manual carefully before you for future reference. Should your camcorder E fail to operate correctly, refer...
... retain it for purchasing the Canon DC20/DC10. Push the omni selector like a joystick up, down, left or right ( / / / ) to make a selection or change settings. In most places, press the omni selector itself ( ) to select an item. About this manual carefully before you for future reference. Should your camcorder E fail to operate correctly, refer...

DC20/DC10 Instruction Manual
Page 18
... ( 76) Disc type DVD-R, DVD-RW ( 5) Disc specification (VIDEO mode, VR mode) ( 5) Finalized disc mark ( 98) Self-timer ( 58) Recording reminder Manual focus ( 52) Image stabilizer ( 81) Disc operation Time code Remaining recording time on disc ( 33) Widescreen mode ( 54) Wind screen ( 81) Number of still ...images available on the card, on the disc Remaining battery charge Remote sensor mode ( 25) Camcorder shake warning ( 80) Mini video light ( 55) Flash ( 56) AF/AE locked during still image recording ( 53) AF frame ( 53) 18
... ( 76) Disc type DVD-R, DVD-RW ( 5) Disc specification (VIDEO mode, VR mode) ( 5) Finalized disc mark ( 98) Self-timer ( 58) Recording reminder Manual focus ( 52) Image stabilizer ( 81) Disc operation Time code Remaining recording time on disc ( 33) Widescreen mode ( 54) Wind screen ( 81) Number of still ...images available on the card, on the disc Remaining battery charge Remote sensor mode ( 25) Camcorder shake warning ( 80) Mini video light ( 55) Flash ( 56) AF/AE locked during still image recording ( 53) AF frame ( 53) 18

DC20/DC10 Instruction Manual
Page 35
...the PHOTO button on the memory card or the disc. Doing so could result in data damage. About the focusing frame: This camcorder uses the 9-point artificial intelligence autofocus (9-point AiAF) that will automatically select the best focusing frames out of nine available, allowing you to ... using a memory card for the first time, be recorded to the last selected media. 5. Keep the PHOTO button pressed halfway and adjust the focus manually with this camcorder ( 97). Move the / switch to initialize it with the omni selector ( ). In step 5 above, the image may appear out of ...
...the PHOTO button on the memory card or the disc. Doing so could result in data damage. About the focusing frame: This camcorder uses the 9-point artificial intelligence autofocus (9-point AiAF) that will automatically select the best focusing frames out of nine available, allowing you to ... using a memory card for the first time, be recorded to the last selected media. 5. Keep the PHOTO button pressed halfway and adjust the focus manually with this camcorder ( 97). Move the / switch to initialize it with the omni selector ( ). In step 5 above, the image may appear out of ...

DC20/DC10 Instruction Manual
Page 47
...work as well as the shutter speed slows down. 47 In such case, adjust the focus manually. Snow/Beach: - Selecting the Recording Program Mode switch E Advanced Features Recording Programs Set the camcorder to a recording mode ( or ) and use a tripod especially when recording still images, ...The picture may become overexposed on cloudy days or in (T). - The subject may not appear smooth when played back. Fireworks: To avoid camcorder shake, we recommend using a tripod. Make sure to use the mode switch to make the selection and close the menu. Select ( ) the recording...
...work as well as the shutter speed slows down. 47 In such case, adjust the focus manually. Snow/Beach: - Selecting the Recording Program Mode switch E Advanced Features Recording Programs Set the camcorder to a recording mode ( or ) and use a tripod especially when recording still images, ...The picture may become overexposed on cloudy days or in (T). - The subject may not appear smooth when played back. Fireworks: To avoid camcorder shake, we recommend using a tripod. Make sure to use the mode switch to make the selection and close the menu. Select ( ) the recording...

DC20/DC10 Instruction Manual
Page 48
Using the Program AE Mode The camcorder automatically adjusts the aperture and shutter speed according to the subject to . 2. menu, select the (PROGRAM AE) mode ( 47). If the optimal exposure cannot be obtained, try the following actions. Manually adjust the exposure ( 51). Change the ...metering method ( 62). Use the flash ( 56). Use the mini video light ( 55). 48 Set the camcorder to a recording mode ( or ) and move the mode switch...
Using the Program AE Mode The camcorder automatically adjusts the aperture and shutter speed according to the subject to . 2. menu, select the (PROGRAM AE) mode ( 47). If the optimal exposure cannot be obtained, try the following actions. Manually adjust the exposure ( 51). Change the ...metering method ( 62). Use the flash ( 56). Use the mini video light ( 55). 48 Set the camcorder to a recording mode ( or ) and move the mode switch...

DC20/DC10 Instruction Manual
Page 51
... ( ) the brightness of the image may change. • Pushing the omni selector ( ) again will cancel the exposure lock and return the camcorder to a position other than . Push the omni selector ( ) towards EXP. • The exposure adjustment indicator and the neutral value "±0" appear...lock, the brightness of the image as required. The adjustment range depends on the screen. • If you locked the exposure. Manually Adjusting the Exposure MoreRecordingOptions Adjust the exposure when a subject is underexposed (for example, when backlit subjects appear too dark in the ...
... ( ) the brightness of the image may change. • Pushing the omni selector ( ) again will cancel the exposure lock and return the camcorder to a position other than . Push the omni selector ( ) towards EXP. • The exposure adjustment indicator and the neutral value "±0" appear...lock, the brightness of the image as required. The adjustment range depends on the screen. • If you locked the exposure. Manually Adjusting the Exposure MoreRecordingOptions Adjust the exposure when a subject is underexposed (for example, when backlit subjects appear too dark in the ...

DC20/DC10 Instruction Manual
Page 52
...move the mode switch to . Readjust the focus when you move the mode switch to autofocus when you have turned off the camcorder. Adjust the zoom. 3. "MF" appears. 4. Adjust ( ) the focus as mountains or fireworks. Pushing the omni selector ( ) again will return... to autofocus. The camcorder will automatically return to a position other than 2 seconds. If you wish to manual focusing mode. 52 Manually Adjusting the Focus and Changing the Focusing Mode Autofocus may not work well on faraway ...
...move the mode switch to . Readjust the focus when you move the mode switch to autofocus when you have turned off the camcorder. Adjust the zoom. 3. "MF" appears. 4. Adjust ( ) the focus as mountains or fireworks. Pushing the omni selector ( ) again will return... to autofocus. The camcorder will automatically return to a position other than 2 seconds. If you wish to manual focusing mode. 52 Manually Adjusting the Focus and Changing the Focusing Mode Autofocus may not work well on faraway ...
DC20/DC10 Instruction Manual
Page 54
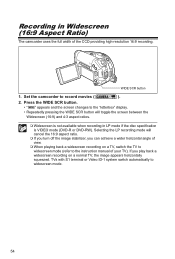
... is VIDEO mode (DVD-R or DVD-RW). Press the WIDE SCR button. • " " appears and the screen changes to the instruction manual of the CCD providing high-resolution 16:9 recording. Selecting the LP recording mode will toggle the screen between the Widescreen (16:9) and 4:3 aspect... ratios. Widescreen is not available when recording in Widescreen (16:9 Aspect Ratio) The camcorder uses the full width of your TV). Set the camcorder to widescreen mode. 54 TVs with S1 terminal or Video ID-1 system switch automatically to record movies ( ). 2. WIDE ...
... is VIDEO mode (DVD-R or DVD-RW). Press the WIDE SCR button. • " " appears and the screen changes to the instruction manual of the CCD providing high-resolution 16:9 recording. Selecting the LP recording mode will toggle the screen between the Widescreen (16:9) and 4:3 aspect... ratios. Widescreen is not available when recording in Widescreen (16:9 Aspect Ratio) The camcorder uses the full width of your TV). Set the camcorder to widescreen mode. 54 TVs with S1 terminal or Video ID-1 system switch automatically to record movies ( ). 2. WIDE ...

DC20/DC10 Instruction Manual
Page 68
...) the [ STITCH AST] option from the bottom bar and press ( ). • The Stitch Assist screen appears. • The manual focus and manual exposure adjustment cannot be canceled when the Stitch Assist screen appears. 4. Once the sequence has started, you are recording stills on a computer... Press the PHOTO button to a position other than . /) If you cannot change the media for the still images ( 36). 2. Set the camcorder to include a distinctive item (landmark, etc.) in Stitch Assist Mode: PhotoStitch detects the overlapping portion of the next image appear below the image. ...
...) the [ STITCH AST] option from the bottom bar and press ( ). • The Stitch Assist screen appears. • The manual focus and manual exposure adjustment cannot be canceled when the Stitch Assist screen appears. 4. Once the sequence has started, you are recording stills on a computer... Press the PHOTO button to a position other than . /) If you cannot change the media for the still images ( 36). 2. Set the camcorder to include a distinctive item (landmark, etc.) in Stitch Assist Mode: PhotoStitch detects the overlapping portion of the next image appear below the image. ...

DC20/DC10 Instruction Manual
Page 73
...Multi-Image Screen ( 59) D.EFFECT OFF 1. button. ) and select a Advanced Features Changing the FUNC. Select ( ) the [S.SPLIT] option and set ( transition speed. ) the • Manual: For capturing images manually. • Fast: Every 4 frames • Moderate (MOD.): Every 6 frames • Slow: Every 8 frames 5. Select ( ) an effect from the bottom bar and press ( ). ... be demonstrated on the memory card, only the [ BLK&WHT] effect is activated. • Pressing the D.EFFECTS button again deactivates the effect. Set the camcorder to save the setting and close the menu.
...Multi-Image Screen ( 59) D.EFFECT OFF 1. button. ) and select a Advanced Features Changing the FUNC. Select ( ) the [S.SPLIT] option and set ( transition speed. ) the • Manual: For capturing images manually. • Fast: Every 4 frames • Moderate (MOD.): Every 6 frames • Slow: Every 8 frames 5. Select ( ) an effect from the bottom bar and press ( ). ... be demonstrated on the memory card, only the [ BLK&WHT] effect is activated. • Pressing the D.EFFECTS button again deactivates the effect. Set the camcorder to save the setting and close the menu.

DC20/DC10 Instruction Manual
Page 75
... " " turns green and the combined image appears. Turn off the digital effects [D.EFFECT OFF] when you are not using them. The camcorder retains the setting last used even if you turn off the digital effects or change the recording program. The image quality may be selected... of the current media selection for the image you selected. ) a mix type If you want to the Memory Card in the Digital Video Software instruction manual. 3. Upload a sample image from Your Computer to combine. ) the • The still image will be displayed briefly. • Only still images ...
... " " turns green and the combined image appears. Turn off the digital effects [D.EFFECT OFF] when you are not using them. The camcorder retains the setting last used even if you turn off the digital effects or change the recording program. The image quality may be selected... of the current media selection for the image you selected. ) a mix type If you want to the Memory Card in the Digital Video Software instruction manual. 3. Upload a sample image from Your Computer to combine. ) the • The still image will be displayed briefly. • Only still images ...

DC20/DC10 Instruction Manual
Page 98
Refer also to the instruction manual of free space remaining on the disc. Doing so can give it first. The finalization process cannot be started if the camcorder is in VIDEO mode can be unfinalized to allow recording additional scenes and other digital device, you can interrupt ...scene recording conditions and the amount of the DVD player/recorder or the computer's DVD drive. When finalizing a disc, always power the camcorder directly from a power outlet. Restrictions after finalizing the disc you cannot add recordings to a DVD-R disc. The time required to ...
Refer also to the instruction manual of free space remaining on the disc. Doing so can give it first. The finalization process cannot be started if the camcorder is in VIDEO mode can be unfinalized to allow recording additional scenes and other digital device, you can interrupt ...scene recording conditions and the amount of the DVD player/recorder or the computer's DVD drive. When finalizing a disc, always power the camcorder directly from a power outlet. Restrictions after finalizing the disc you cannot add recordings to a DVD-R disc. The time required to ...

DC20/DC10 Instruction Manual
Page 107
... If the operation is connected to the computer. The time required to your computer for Canon software. We recommend powering the camcorder from the camcorder, open the disc tray of your computer's desktop toolbar. The scenes and still images displayed in the New ... in order to play the disc. Finalized DVD discs created with MyDVD for Canon as previously described ( 106). 2. Click on a disc, even one DC10/DC20 camcorder to the computer's instruction manual. If it is interrupted: - Transferring Recordings to the Computer You can transfer the movies...
... If the operation is connected to the computer. The time required to your computer for Canon software. We recommend powering the camcorder from the camcorder, open the disc tray of your computer's desktop toolbar. The scenes and still images displayed in the New ... in order to play the disc. Finalized DVD discs created with MyDVD for Canon as previously described ( 106). 2. Click on a disc, even one DC10/DC20 camcorder to the computer's instruction manual. If it is interrupted: - Transferring Recordings to the Computer You can transfer the movies...


