ScanGear Toolbox CS v2.2.0 User's Manual
Page 3
... Functions 1-3 27 Using ScanGear Toolbox CS without Displaying a Toolbar 29 ScanGear Toolbox CS Settings Categories/ Settings Chart 31 Appendix Setting the Start Button on the Scanner 33 Index ...35 Regarding screen shots In this manual, most screen shots are trademarks or registered trademarks of the respective companies. 3 When you use other...
... Functions 1-3 27 Using ScanGear Toolbox CS without Displaying a Toolbar 29 ScanGear Toolbox CS Settings Categories/ Settings Chart 31 Appendix Setting the Start Button on the Scanner 33 Index ...35 Regarding screen shots In this manual, most screen shots are trademarks or registered trademarks of the respective companies. 3 When you use other...

ScanGear Toolbox CS v2.2.0 User's Manual
Page 4
When you use a scanner to scan and send images to fax programs or copy them directly to P.21 regarding its settings and usage. 4 ScanGear Toolbox CS can also scan ... ScanGear Toolbox CS ScanGear Toolbox CS is a stand-alone utility program that program with the click of the scanner, the button launches ScanGear Toolbox CS on your computer, providing added convenience. When you use a scanner with the start a program and send the scanned image to that provides a simple way to use a Film...
When you use a scanner to scan and send images to fax programs or copy them directly to P.21 regarding its settings and usage. 4 ScanGear Toolbox CS can also scan ... ScanGear Toolbox CS ScanGear Toolbox CS is a stand-alone utility program that program with the click of the scanner, the button launches ScanGear Toolbox CS on your computer, providing added convenience. When you use a scanner with the start a program and send the scanned image to that provides a simple way to use a Film...
ScanGear Toolbox CS v2.2.0 User's Manual
Page 5
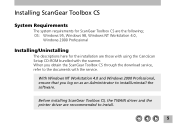
... requirements for the installation are those with using the CanoScan Setup CD-ROM bundled with the service. With Windows NT Workstation 4.0 and Windows 2000 Professional, ensure that you obtain the ScanGear Toolbox CS through the download service, refer to the documents with the scanner. OS: Windows 95, Windows 98, Windows NT Workstation...
... requirements for the installation are those with using the CanoScan Setup CD-ROM bundled with the service. With Windows NT Workstation 4.0 and Windows 2000 Professional, ensure that you obtain the ScanGear Toolbox CS through the download service, refer to the documents with the scanner. OS: Windows 95, Windows 98, Windows NT Workstation...
ScanGear Toolbox CS v2.2.0 User's Manual
Page 6
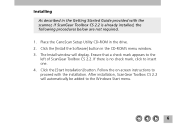
... Toolbox CS 2.2 will display. Click the [Start Installation] button. Follow the on-screen instructions to proceed with the scanner, if ScanGear Toolbox CS 2.2 is no check mark, click to insert one. 4. Place the CanoScan Setup Utility CD-ROM in the CD-ROM's menu window. 3. The Install window will automatically be added to...
... Toolbox CS 2.2 will display. Click the [Start Installation] button. Follow the on-screen instructions to proceed with the scanner, if ScanGear Toolbox CS 2.2 is no check mark, click to insert one. 4. Place the CanoScan Setup Utility CD-ROM in the CD-ROM's menu window. 3. The Install window will automatically be added to...
ScanGear Toolbox CS v2.2.0 User's Manual
Page 8
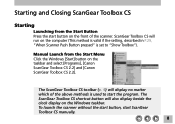
... Toolbox CS Starting Launching from the Start Menu Click the Windows [Start] button on the taskbar and select [Programs], [Canon ScanGear Toolbox CS 2.2] and [Canon ScanGear Toolbox CS 2.2]. ScanGear Toolbox CS will also display beside the clock display on the front of the above methods is... set to start the program. To launch the scanner without the start button, start ScanGear Toolbox CS manually. 8 The ScanGear Toolbox CS toolbar...
... Toolbox CS Starting Launching from the Start Menu Click the Windows [Start] button on the taskbar and select [Programs], [Canon ScanGear Toolbox CS 2.2] and [Canon ScanGear Toolbox CS 2.2]. ScanGear Toolbox CS will also display beside the clock display on the front of the above methods is... set to start the program. To launch the scanner without the start button, start ScanGear Toolbox CS manually. 8 The ScanGear Toolbox CS toolbar...

ScanGear Toolbox CS v2.2.0 User's Manual
Page 10
Right-Click on Shortcut Button Right-clicking the shortcut button presents the pop-up menu shown here. This function is valid with a scanner with the left mouse button shows the ScanGear Toolbox CS toolbar on any item to display ScanGear Toolbox CS version information. Click here...are Show Toolbox, Fax, Mail, Copy, Save and Custom 1 - 3. Click here to display the Prefs tab, which function is pressed. Left-Click on a CanoScan is activated when the start button. Double Left-Click on Shortcut Button Double-clicking the shortcut button with the start button on Shortcut Button Left...
Right-Click on Shortcut Button Right-clicking the shortcut button presents the pop-up menu shown here. This function is valid with a scanner with the left mouse button shows the ScanGear Toolbox CS toolbar on any item to display ScanGear Toolbox CS version information. Click here...are Show Toolbox, Fax, Mail, Copy, Save and Custom 1 - 3. Click here to display the Prefs tab, which function is pressed. Left-Click on a CanoScan is activated when the start button. Double Left-Click on Shortcut Button Double-clicking the shortcut button with the start button on Shortcut Button Left...
ScanGear Toolbox CS v2.2.0 User's Manual
Page 20
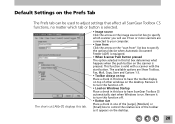
... The short-cut [Alt]+[T] displays this tab. • Image source Click the arrow on the image source list box to specify which scanner you will use if two or more scanners are Show Toolbox, Fax, Mail, Copy, Save and Custom 1-3. • Toolbar always on top Place a check in this box to ...have the toolbar display on top of other windows on the scanner is equipped. • When Scanner Push Button pressed The option selected in one of the [Large], [Medium] or [Small] box to turn this function off . • Button ...
... The short-cut [Alt]+[T] displays this tab. • Image source Click the arrow on the image source list box to specify which scanner you will use if two or more scanners are Show Toolbox, Fax, Mail, Copy, Save and Custom 1-3. • Toolbar always on top Place a check in this box to ...have the toolbar display on top of other windows on the scanner is equipped. • When Scanner Push Button pressed The option selected in one of the [Large], [Medium] or [Small] box to turn this function off . • Button ...
ScanGear Toolbox CS v2.2.0 User's Manual
Page 21
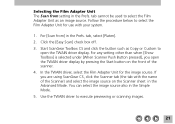
... the TWAIN driver to open the TWAIN driver display by pressing the Start button on the front of the Scanner) and select the image source on the Scanner sheet in the Simple Mode. 5. Start ScanGear Toolbox CS and click the button such as an image source. For any setting other than when... [Show Toolbox] is selected under [When Scanner Push Button pressed], you are using ScanGear CS, click the Scanner tab (the tab with your system. 1. Selecting the Film Adapter Unit The Scan from ] in the Prefs. You can select...
... the TWAIN driver to open the TWAIN driver display by pressing the Start button on the front of the Scanner) and select the image source on the Scanner sheet in the Simple Mode. 5. Start ScanGear Toolbox CS and click the button such as an image source. For any setting other than when... [Show Toolbox] is selected under [When Scanner Push Button pressed], you are using ScanGear CS, click the Scanner tab (the tab with your system. 1. Selecting the Film Adapter Unit The Scan from ] in the Prefs. You can select...

ScanGear Toolbox CS v2.2.0 User's Manual
Page 29
tab, specify which does not have the start button. In the item "When Scanner Push Button pressed" from the pop-up menu displayed by pressing the start button in the Prefs. Set here 29 The function described here is not valid with a scanner which function will launch by right-clicking the short-cut icon or in front of the ScanGear Toolbox CS, such as Copy or Fax immediately without displaying a toolbar, by pressing the start button on the scanner. Using ScanGear Toolbox CS without Displaying a Toolbar You can set the ScanGear Toolbox CS to launch a function of the scanner.
tab, specify which does not have the start button. In the item "When Scanner Push Button pressed" from the pop-up menu displayed by pressing the start button in the Prefs. Set here 29 The function described here is not valid with a scanner which function will launch by right-clicking the short-cut icon or in front of the ScanGear Toolbox CS, such as Copy or Fax immediately without displaying a toolbar, by pressing the start button on the scanner. Using ScanGear Toolbox CS without Displaying a Toolbar You can set the ScanGear Toolbox CS to launch a function of the scanner.
ScanGear Toolbox CS v2.2.0 User's Manual
Page 33
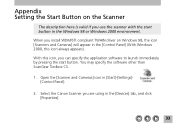
...Windows 98, the icon [Scanners and Cameras] will appear in the [Control Panel] (With Windows 2000, this icon, you use the scanner with the start button. Open the [Scanner and Cameras] icon in the [Devices] tab, and click [Properties]. 33 Select the Canon Scanner you install WDM/STI ...compliant TWAIN driver on the Scanner The description here is valid if you can specify ...
...Windows 98, the icon [Scanners and Cameras] will appear in the [Control Panel] (With Windows 2000, this icon, you use the scanner with the start button. Open the [Scanner and Cameras] icon in the [Devices] tab, and click [Properties]. 33 Select the Canon Scanner you install WDM/STI ...compliant TWAIN driver on the Scanner The description here is valid if you can specify ...

ScanGear Toolbox CS v2.2.0 User's Manual
Page 34
Confirm that [Canon Push Button] is installed, it appears in [Scanner events], then check the unique launching software with the start button from the [Send to this box. 5. Close the [Control Panel]. 34 3. Open the [Events] tab. 4. When ScanGear Toolbox CS is set in this application] list box. 0.
Confirm that [Canon Push Button] is installed, it appears in [Scanner events], then check the unique launching software with the start button from the [Send to this box. 5. Close the [Control Panel]. 34 3. Open the [Events] tab. 4. When ScanGear Toolbox CS is set in this application] list box. 0.

ScanGear Toolbox CS v2.2.0 User's Manual
Page 35
... the Start Menu ....... 8 MAPI 13 OCR program 19 Prefs Tab 20 Save Setting Tab 18 Saving 27 Scanners and Cameras icon 33 Sending Faxes 24 Sending Mail 24 Setting the Start Button on the Scanner . 33 Settings Categories/Chart 31 Shortcut Button 10 Starting 8 System Requirements 5 Toolbar 9 without Displaying a Toolbar 29 Default...
... the Start Menu ....... 8 MAPI 13 OCR program 19 Prefs Tab 20 Save Setting Tab 18 Saving 27 Scanners and Cameras icon 33 Sending Faxes 24 Sending Mail 24 Setting the Start Button on the Scanner . 33 Settings Categories/Chart 31 Shortcut Button 10 Starting 8 System Requirements 5 Toolbar 9 without Displaying a Toolbar 29 Default...
User Guide
Page 2
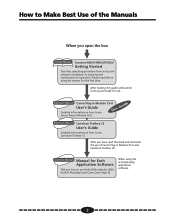
... use CS-U This Guide Canon Plug-in Module CS-U. Electronic Manuals Manual for Each Application Software Tells you open the box Printed Manual CanoScan N650U/N656U/N1220U Getting Started Describes operating procedure from set up and software installation to scanning and confirmation of operation. Please read this guide and scanner is set up and...
... use CS-U This Guide Canon Plug-in Module CS-U. Electronic Manuals Manual for Each Application Software Tells you open the box Printed Manual CanoScan N650U/N656U/N1220U Getting Started Describes operating procedure from set up and software installation to scanning and confirmation of operation. Please read this guide and scanner is set up and...
User Guide
Page 3
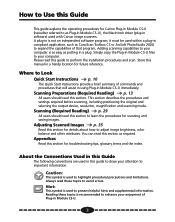
... summary of commands and procedures that program. Appendices Read this Guide This guide explains the operating procedures for Canon Plug-in Module CS-U (hereafter referred to as CanoScan Toolbox CS or ArcSoft PhotoStudio 2000, to expand the capabilities of Plug-in this section to learn the .... Simply copy the Plug-in software) used to your computer is as easy as required. Please read these topics is used with Canon image scanners. Scanning Preparations (Required Reading) p. 13 All users should read this section as putting in Module CS-U immediately. This section describes ...
... summary of commands and procedures that program. Appendices Read this Guide This guide explains the operating procedures for Canon Plug-in Module CS-U (hereafter referred to as CanoScan Toolbox CS or ArcSoft PhotoStudio 2000, to expand the capabilities of Plug-in this section to learn the .... Simply copy the Plug-in software) used to your computer is as easy as required. Please read these topics is used with Canon image scanners. Scanning Preparations (Required Reading) p. 13 All users should read this section as putting in Module CS-U immediately. This section describes ...
User Guide
Page 6
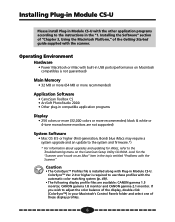
...: CANON gamma 1.5 monitor, CANON gamma 1.8 monitor and CANON gamma 2.1 monitor. Caution • The ColorSyncTM Profiles file is required to the instructions in Module CS-U. ColorSyncTM Ver. 2.0 or higher is installed along with the scanner. If you wish to the Troubleshooting menu on the CanoScan Setup....*) * For information about upgrades and updating for the "Scanner won't work on Macintosh compatibles is not guaranteed) Main Memory • 32 MB or more (64 MB or more recommended) Application Software • CanoScan Toolbox CS • ArcSoft PhotoStudio 2000 • Other...
...: CANON gamma 1.5 monitor, CANON gamma 1.8 monitor and CANON gamma 2.1 monitor. Caution • The ColorSyncTM Profiles file is required to the instructions in Module CS-U. ColorSyncTM Ver. 2.0 or higher is installed along with the scanner. If you wish to the Troubleshooting menu on the CanoScan Setup....*) * For information about upgrades and updating for the "Scanner won't work on Macintosh compatibles is not guaranteed) Main Memory • 32 MB or more (64 MB or more recommended) Application Software • CanoScan Toolbox CS • ArcSoft PhotoStudio 2000 • Other...

User Guide
Page 8
Refer to the scanner's Getting Started guide to attach it . Is Plug-in Module CS-U. Scanning Procedures Follow these settings. 8 Verify the Image before Scanning (Browser Window) § p. 23 ... • Preview p. 17 • Select the Output Device p. 18 • Set the Resolution and Magnification p. 19 • Set the Scan Mode p. 21 Refer to the scanner's Getting Started guide to adjust these procedures to use Plug-in Module CS-U installed? Is the...
Refer to the scanner's Getting Started guide to attach it . Is Plug-in Module CS-U. Scanning Procedures Follow these settings. 8 Verify the Image before Scanning (Browser Window) § p. 23 ... • Preview p. 17 • Select the Output Device p. 18 • Set the Resolution and Magnification p. 19 • Set the Scan Mode p. 21 Refer to the scanner's Getting Started guide to adjust these procedures to use Plug-in Module CS-U installed? Is the...

User Guide
Page 9
Plug-in Module CS-U Special Features • See the Results of Adjustments Immediately (Dynamic Preview) Once in preview mode, the results of your changes as scanners, color displays and color printers, for Easy Image Editing Plug-in Module CS-U can see the results of adjustments to be performed easily because you ...
Plug-in Module CS-U Special Features • See the Results of Adjustments Immediately (Dynamic Preview) Once in preview mode, the results of your changes as scanners, color displays and color printers, for Easy Image Editing Plug-in Module CS-U can see the results of adjustments to be performed easily because you ...

User Guide
Page 15
... STEP 1 Operating Procedures The following provides an example of the control panel can be started from a plug-in compatible application program, such as CanoScan Toolbox CS or ArcSoft PhotoStudio 2000. • The size of the Plug-in Module CS-U control panel will display. The Plug-in Module ... Module CS-U control panel will vary according to your computer and that the power is not a stand-alone application program. Verify that the scanner is attached to the resolution of the computer display. • The size of scanning from within ArcSoft PhotoStudio 2000. Open the [File] ...
... STEP 1 Operating Procedures The following provides an example of the control panel can be started from a plug-in compatible application program, such as CanoScan Toolbox CS or ArcSoft PhotoStudio 2000. • The size of the Plug-in Module CS-U control panel will display. The Plug-in Module ... Module CS-U control panel will vary according to your computer and that the power is not a stand-alone application program. Verify that the scanner is attached to the resolution of the computer display. • The size of scanning from within ArcSoft PhotoStudio 2000. Open the [File] ...
User Guide
Page 16
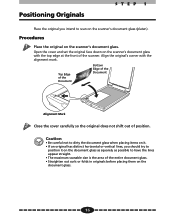
... Originals STEP 1 Place the original you should try to position it on the document glass as squarely as possible to scan on the scanner's document glass. Open the cover and set the original face down on the document glass. 16 Caution • Be careful not to dirty the document ... so the original does not shift out of the entire document glass. • Straighten out curls or folds in originals before placing them on the scanner's document glass with the alignment mark.
... Originals STEP 1 Place the original you should try to position it on the document glass as squarely as possible to scan on the scanner's document glass. Open the cover and set the original face down on the document glass. 16 Caution • Be careful not to dirty the document ... so the original does not shift out of the entire document glass. • Straighten out curls or folds in originals before placing them on the scanner's document glass with the alignment mark.

User Guide
Page 17
...8226; To change the size of the preview window, use the [Window Size] settings in the Preview Window Settings dialog (p. 26). Calibrating the scanner sets the correct white balance. 17 Operating Procedures Click on the [Preview] button. • The image will be immediately reflected in the preview ...• If the color balance of the preview image is a trial scan performed before the final scan that should be white, calibrate the scanner by selecting [Preferences] and [Calibration] (p. 27). Caution • The Dynamic Preview function enables changes to settings, such as the scan mode...
...8226; To change the size of the preview window, use the [Window Size] settings in the Preview Window Settings dialog (p. 26). Calibrating the scanner sets the correct white balance. 17 Operating Procedures Click on the [Preview] button. • The image will be immediately reflected in the preview ...• If the color balance of the preview image is a trial scan performed before the final scan that should be white, calibrate the scanner by selecting [Preferences] and [Calibration] (p. 27). Caution • The Dynamic Preview function enables changes to settings, such as the scan mode...


