
ScanGear Toolbox CS v2.2.0 User's Manual
Page 3
... or registered trademarks of the respective companies. 3 Other names and products listed in the United States and other Windows, different screens may appear from this manual, most screen shots are taken with Windows 98. When you use other countries. Selecting the Film Adapter Unit 21 Using ScanGear Toolbox CS 22 Sending Faxes...
... or registered trademarks of the respective companies. 3 Other names and products listed in the United States and other Windows, different screens may appear from this manual, most screen shots are taken with Windows 98. When you use other countries. Selecting the Film Adapter Unit 21 Using ScanGear Toolbox CS 22 Sending Faxes...
ScanGear Toolbox CS v2.2.0 User's Manual
Page 5
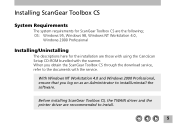
With Windows NT Workstation 4.0 and Windows 2000 Professional, ensure that you obtain the ScanGear Toolbox CS through the download service, refer to the documents with the scanner. Before installing ...to install/uninstall the software. Installing ScanGear Toolbox CS System Requirements The system requirements for the installation are those with using the CanoScan Setup CD-ROM bundled with the service. OS: Windows 95, Windows 98, Windows NT Workstation 4.0, Windows 2000 Professional Installing/Uninstalling The descriptions here for ScanGear Toolbox CS are reccommended to install. 5
With Windows NT Workstation 4.0 and Windows 2000 Professional, ensure that you obtain the ScanGear Toolbox CS through the download service, refer to the documents with the scanner. Before installing ...to install/uninstall the software. Installing ScanGear Toolbox CS System Requirements The system requirements for the installation are those with using the CanoScan Setup CD-ROM bundled with the service. OS: Windows 95, Windows 98, Windows NT Workstation 4.0, Windows 2000 Professional Installing/Uninstalling The descriptions here for ScanGear Toolbox CS are reccommended to install. 5
ScanGear Toolbox CS v2.2.0 User's Manual
Page 6
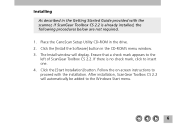
...insert one. 4. If there is already installed, the following procedures below are not required. 1. Place the CanoScan Setup Utility CD-ROM in the CD-ROM's menu window. 3. Follow the on-screen instructions to the left of ScanGear Toolbox CS 2.2. After installation, ScanGear Toolbox CS... 2.2 will display. Click the [Install the Software] button in the drive. 2. The Install window will automatically be added to the Windows Start menu. 6 Click the [Start Installation] button. Installing As described in the Getting Started Guide provided with the ...
...insert one. 4. If there is already installed, the following procedures below are not required. 1. Place the CanoScan Setup Utility CD-ROM in the CD-ROM's menu window. 3. Follow the on-screen instructions to the left of ScanGear Toolbox CS 2.2. After installation, ScanGear Toolbox CS... 2.2 will display. Click the [Install the Software] button in the drive. 2. The Install window will automatically be added to the Windows Start menu. 6 Click the [Start Installation] button. Installing As described in the Getting Started Guide provided with the ...
ScanGear Toolbox CS v2.2.0 User's Manual
Page 7
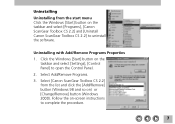
... and click the [Add/Remove] button (Windows 98 and so on) or [Change/Remove] button (Windows 2000). Uninstalling with Add/Remove Programs Properties 1. Select [Canon ScanGear Toolbox CS 2.2] from the start menu Click the Windows [Start] button on the taskbar and select [Programs], [Canon ScanGear Toolbox CS 2.2] and [Uninstall Canon ScanGear Toolbox CS 2.2] to uninstall the...
... and click the [Add/Remove] button (Windows 98 and so on) or [Change/Remove] button (Windows 2000). Uninstalling with Add/Remove Programs Properties 1. Select [Canon ScanGear Toolbox CS 2.2] from the start menu Click the Windows [Start] button on the taskbar and select [Programs], [Canon ScanGear Toolbox CS 2.2] and [Uninstall Canon ScanGear Toolbox CS 2.2] to uninstall the...
ScanGear Toolbox CS v2.2.0 User's Manual
Page 8
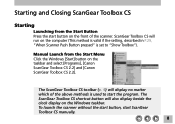
Starting and Closing ScanGear Toolbox CS Starting Launching from the Start Menu Click the Windows [Start] button on the taskbar and select [Programs], [Canon ScanGear Toolbox CS 2.2] and [Canon ScanGear Toolbox CS 2.2]. The ScanGear Toolbox CS toolbar (p. 9) will display no matter which of the scanner. The ScanGear Toolbox CS shortcut button will run...the front of the above methods is set to start the program. To launch the scanner without the start button, start button on the Windows taskbar. Manual Launch from the Start Button Press the start ScanGear Toolbox CS manually. 8
Starting and Closing ScanGear Toolbox CS Starting Launching from the Start Menu Click the Windows [Start] button on the taskbar and select [Programs], [Canon ScanGear Toolbox CS 2.2] and [Canon ScanGear Toolbox CS 2.2]. The ScanGear Toolbox CS toolbar (p. 9) will display no matter which of the scanner. The ScanGear Toolbox CS shortcut button will run...the front of the above methods is set to start the program. To launch the scanner without the start button, start button on the Windows taskbar. Manual Launch from the Start Button Press the start ScanGear Toolbox CS manually. 8

ScanGear Toolbox CS v2.2.0 User's Manual
Page 11
ScanGear Toolbox CS continues to close it was displayed. 11 ScanGear Toolbox CS will close at the upper right of the toolbar to run even after the toolbar is closed by the above method. The toolbar will close. Closing ScanGear Toolbox CS Right-click the shortcut icon on the Windows taskbar and select [Exit ScanGear Toolbox] from the pop-up menu. Closing Closing the Toolbar Click the close box at the same time if it . Only the toolbar will also close .
ScanGear Toolbox CS continues to close it was displayed. 11 ScanGear Toolbox CS will close at the upper right of the toolbar to run even after the toolbar is closed by the above method. The toolbar will close. Closing ScanGear Toolbox CS Right-click the shortcut icon on the Windows taskbar and select [Exit ScanGear Toolbox] from the pop-up menu. Closing Closing the Toolbar Click the close box at the same time if it . Only the toolbar will also close .
ScanGear Toolbox CS v2.2.0 User's Manual
Page 14
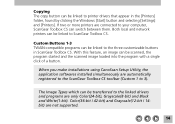
... button. Custom Buttons 1-3 TWAIN-compatible programs can be linked to the three customizable buttons in the [Printers] folder, found by clicking the Windows [Start] button and selecting [Settings] and [Printers]. With this feature, an image can be linked to ScanGear Toolbox CS. When you make ...installations using CanoScan Setup Utility, the application softwares installed simultaneously are only Color(24-bit), Grayscale(8-bit) and Black and White(1-bit). The Image ...
... button. Custom Buttons 1-3 TWAIN-compatible programs can be linked to the three customizable buttons in the [Printers] folder, found by clicking the Windows [Start] button and selecting [Settings] and [Printers]. With this feature, an image can be linked to ScanGear Toolbox CS. When you make ...installations using CanoScan Setup Utility, the application softwares installed simultaneously are only Color(24-bit), Grayscale(8-bit) and Black and White(1-bit). The Image ...

ScanGear Toolbox CS v2.2.0 User's Manual
Page 15
... Chart (p. 31) for a list of the [Link to which features a tab for these settings. 15 Tab Settings Clicking the [Settings] button opens the Canon ScanGear Toolbox CS Settings window, which it to adjust settings for scanned images. These tabs are used when Easy Acquire is present in this function on from the...
... Chart (p. 31) for a list of the [Link to which features a tab for these settings. 15 Tab Settings Clicking the [Settings] button opens the Canon ScanGear Toolbox CS Settings window, which it to adjust settings for scanned images. These tabs are used when Easy Acquire is present in this function on from the...
ScanGear Toolbox CS v2.2.0 User's Manual
Page 20
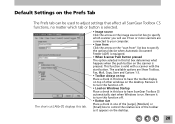
... The option selected in this list box determines what happens when the push button on the scanner is valid with a scanner with the start when Windows is selected. The short-cut [Alt]+[T] displays this tab. • Image source Click the arrow on the image source list box to specify which tab... turn this function off . • Button size Place a check in one of the [Large], [Medium] or [Small] box to control the relative size of other windows on the desktop. Default Settings on the Prefs Tab The Prefs tab can be used to adjust settings that affect all ScanGear Toolbox CS functions...
... The option selected in this list box determines what happens when the push button on the scanner is valid with a scanner with the start when Windows is selected. The short-cut [Alt]+[T] displays this tab. • Image source Click the arrow on the image source list box to specify which tab... turn this function off . • Button size Place a check in one of the [Large], [Medium] or [Small] box to control the relative size of other windows on the desktop. Default Settings on the Prefs Tab The Prefs tab can be used to adjust settings that affect all ScanGear Toolbox CS functions...

ScanGear Toolbox CS v2.2.0 User's Manual
Page 25
... When Easy Acquire is ready to send after you specify the address and subject. Click the [Scan] button. When the scan is complete, a new message window is opened in the mail program and the scanned image is ready to print and click [OK]. Click the [Preview] button, check the preview image... the [Mail] button. When [Multiple Copies] is On 1. The message is included as required. 3. Click the [Copy] button. When the scan is complete, a new message window is opened in the mail program and the scanned image is included as an attachment.
... When Easy Acquire is ready to send after you specify the address and subject. Click the [Scan] button. When the scan is complete, a new message window is opened in the mail program and the scanned image is ready to print and click [OK]. Click the [Preview] button, check the preview image... the [Mail] button. When [Multiple Copies] is On 1. The message is included as required. 3. Click the [Copy] button. When the scan is complete, a new message window is opened in the mail program and the scanned image is included as an attachment.

ScanGear Toolbox CS v2.2.0 User's Manual
Page 31
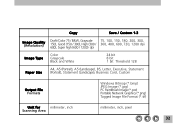
..., Letter Output File Formats 24 bit 8 bit 1 bit Threshold 128 A4, A5 (Portrait), A5 (Landscape), B5, Letter, Executive, Statement (Portrait), Statement (Landscape), Business Card, Custom Windows Bitmap (*.bmp) JPEG Image (*.jpg) PC PaintBrush Image (*.pcx) Portable Network Graphics (*.png) Tagged Image File Format (*.tif) Unit for millimeter, inch Scanning Area millimeter...
..., Letter Output File Formats 24 bit 8 bit 1 bit Threshold 128 A4, A5 (Portrait), A5 (Landscape), B5, Letter, Executive, Statement (Portrait), Statement (Landscape), Business Card, Custom Windows Bitmap (*.bmp) JPEG Image (*.jpg) PC PaintBrush Image (*.pcx) Portable Network Graphics (*.png) Tagged Image File Format (*.tif) Unit for millimeter, inch Scanning Area millimeter...
ScanGear Toolbox CS v2.2.0 User's Manual
Page 32
... bit 8 bit 1 bit Threshold 128 Paper Size A4, A5 (Portrait), A5 (Landscape), B5, Letter, Executive, Statement (Portrait), Statement (Landscape), Business Card, Custom Output File Formats Windows Bitmap (*.bmp) JPEG Image (*.jpg) PC PaintBrush Image (*.pcx) Portable Network Graphics (*.png) Tagged Image File Format (*.tif) Unit for millimeter, inch Scanning Area millimeter...
... bit 8 bit 1 bit Threshold 128 Paper Size A4, A5 (Portrait), A5 (Landscape), B5, Letter, Executive, Statement (Portrait), Statement (Landscape), Business Card, Custom Output File Formats Windows Bitmap (*.bmp) JPEG Image (*.jpg) PC PaintBrush Image (*.pcx) Portable Network Graphics (*.png) Tagged Image File Format (*.tif) Unit for millimeter, inch Scanning Area millimeter...
ScanGear Toolbox CS v2.2.0 User's Manual
Page 33
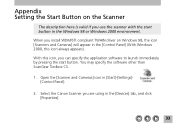
... and Cameras] icon in the [Control Panel] (With Windows 2000, this icon, you are using in the Windows 98 or Windows 2000 environment. Appendix Setting the Start Button on Windows 98, the icon [Scanners and Cameras] will appear in [Start]-[Settings][Control Panel]. 2. Select the Canon Scanner you can specify the application software to launch...
... and Cameras] icon in the [Control Panel] (With Windows 2000, this icon, you are using in the Windows 98 or Windows 2000 environment. Appendix Setting the Start Button on Windows 98, the icon [Scanners and Cameras] will appear in [Start]-[Settings][Control Panel]. 2. Select the Canon Scanner you can specify the application software to launch...

